Are you planning to build a wastewater drainage system on a suburban area by installing a pit? Agree that a dacha or a permanent home with all the amenities will become much more comfortable. But you don’t know how to construct a brick drainage pit and what consumables are required for this?
We will help you cope with the task - the article discusses popular types of brick cesspools. As well as a step-by-step process for constructing such a sewer system, starting with choosing a location for the pit and calculating its dimensions.
The material is supplied with visual photographs. There are also videos with useful tips on how to independently build a brick drainage tank. The advantages and features of its operation and periodic maintenance are considered.
The principle of operation of the drain pit
A drain or cesspool is one of the oldest options for sewer collection points and primary wastewater treatment on earth. It can be built even without any construction experience.
Moreover, such a device is often created on the site at the very beginning of construction work in order to provide builders with a minimum set of amenities.
You can build a drainage pit yourself or invite a team of workers - there is a large amount of excavation work to be done
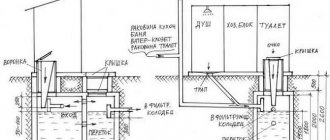
Technically, a drainage pit is the simplest septic tank or human waste storage tank. A sewer pipe leading from the house is connected to this tank, located underground.
The pipes of a separate toilet, bathhouse and other premises located on the site are also connected to it.
One common cesspool on the site is not the only option for organizing such a system. If desired, you can make a separate small container for each room.
This solution may be convenient, for example, if the bathhouse is located at a considerable distance from other buildings.
Waste is gradually accumulated and partially disposed of, depending on the type of structure. As the pit fills with wastewater, it must be cleaned to prevent the structure from overflowing.
Modern means make it possible to dispose of waste with a fairly high degree of efficiency. We recommend that you familiarize yourself with the best methods for cleaning cesspools.
General recommendations
Maintenance of a brick cesspool involves regularly emptying and cleaning the structure. To enhance the processing of sewage, it is recommended to use special bacteria. They are quite easy to use. Moreover, drugs are always sold along with detailed instructions. Special products are simply poured or poured into a storage tank or first mixed with a certain volume of water and then added to the sewer.
Thanks to the use of drugs, sewage is processed faster, decomposing into safe elements. However, some products are negatively affected by certain types of household chemicals. Therefore, before using this method of increasing the efficiency of wastewater disposal, it is recommended to check the composition of all substances used. It is necessary to ensure that detergents and cleaning products do not harm bacteria.
Experts also advise that after cleaning the sewage pit, inspect the structure. It is necessary to check whether the seal of the container is broken. If any defects are found, then repair work must be carried out. This could be replacing damaged bricks, restoring the waterproofing layer, and so on.
Types of cesspools
You can build any type of cesspool from brick:
- hermetic;
- with permeable walls;
- without bottom;
- divided into several sections.
Each building has certain characteristics. For example, a sealed pit is used in areas with high groundwater levels. This design prevents the possibility of environmental pollution by wastewater.
Permeable drainage pits , designed for processing and disposal of gray waste, are installed with a meter-long sand and gravel filter in the bottom area.
If the throughput capacity of the underlying rocks is insufficient, they are equipped with small holes in the walls through which the liquid part of the waste is disposed of.
If you divide the capacity of the drainage pit with brick partitions and insert overflow tubes into them, you will get an almost homemade septic tank
In so-called pits without a bottom, the lower part is not concreted. The walls of such structures are erected on a concrete base with a gap, into which a sand and gravel filter is laid directly on the ground.
Liquid effluent will slowly percolate through this natural filter and then enter the underlying soil strata where it undergoes final treatment. The use of brick allows you to create both a sealed drainage pit and a permeable version. Most often, such structures are made with a rectangular base; this is the simplest design.
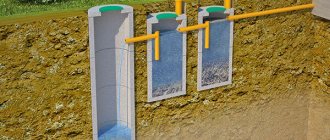
Divided into several sections . A large pit can be divided by partitions into two or three sections, which are connected by overflows.
Such a device, similar to a sewer septic tank, allows you to repeatedly separate the bulk of solid and liquid waste and increase the degree of their processing with the help of bacteria.
Image gallery
Photo from
Drain pit with filter walls
Multi-section drive option
Brick septic tank with three chambers
Features of arrangement of multi-chamber objects
Drainage
The drainage hole is made at some distance from the first one, or on the same base and is separated by a partition. It will allow you to call a sewer truck much less often. The essence of the drainage pit is that water from the main one is poured into it without thick components that cause silting.
Drainage ditch diagram
The effect is achieved due to the “T”-shaped device of the overflow pipe - the liquid is taken from the middle layers of the pit. It should be located lower than the pipe from the house.
For this pit, it is allowed to lay bricks with gaps, and the device without a concrete base - and the water is simply absorbed into the soil.
So, a brick pit for sewerage is an excellent solution. You can save on a lot of things when constructing it, and no one will see the masonry, which means this is an excellent opportunity for a novice mason to practice.
Sooner or later, the sewage system in a country house becomes clogged. How to clean a sewer in a private house? Cleaning methods - hydromechanical, chemical, as well as traditional methods of dealing with blockages. You will learn about the use of plastic pipes for sewerage in this article. Pros and cons, as well as installation features.
Features of a brick structure
Using brick to build the walls of a cesspool has a number of advantages. This material perfectly holds impurities and is durable. Using brickwork you can create a structure of any size and configuration.
When using concrete rings, you have to adapt to their standard dimensions. Pouring monolithic concrete is no less labor-intensive than laying bricks.
It is not necessary to use high-quality material for the cesspool; bricks that have already been used before will also work.
The brick is suitable for creating drainage pits and other structures of any configuration. In addition, such devices can be installed in an area with a high groundwater level.
Masonry work requires certain skills; it is a real art of construction. It is best to master such operations during the construction of sewerage structures, since all the flaws will be hidden underground in the future.
And yet you shouldn’t do the laying completely carelessly. An uneven brick wall may collapse over time.
A brick storage tank has one useful property - it is stable at almost any groundwater level and has good resistance to swelling of the soil when it freezes in winter.
Such a drainage pit can be constructed both on light sandy soils and on heavy clay soils.
Useful recommendations for building a brick pit are given in the following photo selection.
Image gallery
Photo from
Construction of a large drainage pit
Small sewage point
Rectangular version of the cesspool
Use of old brick
Pros of use
Scheme of a cesspool with a drainage layer
The principle of constructing and using a cesspool is very simple - all the waste from the house flows into it, after filling it is cleaned with vacuum cleaners and the process begins again. The advantages of brick construction include:
- a simple device that a novice master can perform;
- you can make any convenient shape;
- The drainage pad device cleans drains and increases the time of use.
This design is not without its drawbacks: it may cause an unpleasant odor, a short service life and a frequent need to call the vacuum cleaners. This makes it not the best option.
Subtleties of building a brick pit
Before starting work, you need to decide on the size of the future cesspool, as well as find a suitable place for the construction.
Stage #1 - preliminary calculations
The simplest calculation option is based on the average standard. The number of people permanently living in the house is multiplied by the norm of 0.5 cubic meters. meters.
After this, you need to calculate the parameters of the cesspool depending on its configuration. The container is usually made in the form of a cube or cylinder. The first option is preferable, since it is easier to line a container with straight walls with bricks.
The depth of the pit should be no more than three meters, but practice shows that it is possible to service a sewer with a depth of less than two meters or less. The volume of the pit now needs to be divided by the selected height. The resulting figure will be the area of the base.
The choice of location should be taken extremely carefully - the minimum acceptable standards for the distance of a pit from residential premises depend on its volume
It remains to choose the length and width for a container with a rectangular base. If you decide to dig a cylindrical hole, you will have to use the formula for the area of a circle:
S=πr2
Where:
- S is the area of the structure;
- π is the number “pi” equal to 3.14;
- r is the radius of the structure.
The resulting area should be divided by 3.14, i.e. to the number "pi". From the result, which is the square of the radius of the circle, you need to extract the root, obtaining the actual radius of the base of this cylinder.
Before marking, all parameters must be increased by the size of the brickwork and concrete base. This role is usually performed by a concrete slab 30-40 cm thick.
The concrete screed should have approximately the same dimensions. The thickness of the brickwork for sewer structures should be 25 cm on the outer contour, and 12-13 cm is sufficient for internal walls.
When choosing the parameters of the container, you should remember that filling it more than two-thirds is undesirable, so the depth of the pit for the cesspool should be increased to the required size. When choosing a location for a structure, a number of sanitary standards should be taken into account.
For example, the distance from a sewage storage tank to a residential building must be at least five meters, to a fence - at least two meters, to a source of drinking water - at least 25 meters, etc.
In addition, in areas with uneven terrain, sewerage devices should be located lower than the water source. Finally, it is necessary to provide access for sewage disposal equipment.
The machine does not have to be in close proximity to the cesspool, but the distance between them should not exceed a limit of four meters.
Stage #2 - excavation work
Once the markings have been completed, you can begin digging a pit. The easiest way is to order the services of an excavator, but if you need a small capacity and want to save money, you can do it manually.
The technology of work is very simple: the ground is dug with a bayonet shovel, and as the pit deepens, it is removed using a bucket on a rope. A ladder will be useful to get out of the hole, as well as a regular building level to control the quality of the work.
If there is a desire or need, a pit for a drainage pit can be made manually using a shovel and a bucket on a rope
The walls of the pit are usually made vertical, but the bottom is given a slight slope so that the contents of the container accumulate in the corner, above which the maintenance hatch will be located.
In the future, this point will make it easier to pump waste out of the container. On light soils, the walls may need to be protected from crumbling, for example, with the help of temporary wooden structures.
Stage #3 - installation of a concrete base
If the bottom of the pit is supposed to be made airtight, then either a concrete slab must be placed down or concreting work must be done. In the first case, everything is simple: choose a reinforced concrete structure of suitable dimensions and install it below.
If the decision is made to concrete the bottom, then first a sand cushion about 15 cm thick is laid down. The sand must be leveled and compacted, observing the previously made slope.
Then a reinforcing mesh is placed on the bottom and a cement-sand screed is poured. After this, you need to wait until the concrete base hardens.
When pouring the base with a concrete mixture, it is important to wait until the screed has completely dried, and then you can continue further construction of the cesspool
It takes about four weeks for it to dry completely, but when constructing a cesspool, work usually continues seven days after the base has been poured.
If you plan to build a cesspool without a bottom, you should fill only the space above which the walls will be built with a concrete screed.
Open ground is left in the center, on which a sand and gravel filter is subsequently laid. To properly fill the concrete base in this case, you will need to build wooden formwork.
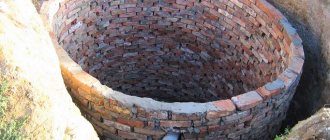
Stage #4 - making brickwork
For a cesspool, it is recommended to use durable red ceramic bricks, but white silicate bricks are also considered quite suitable.
To prepare masonry mortar you will need the following ingredients:
- cement grade M400 – 1 part;
- construction sand – 3 parts;
- water – 0.8 parts;
- slaked lime or clay - 0.5 parts.
Sand and cement need to be sifted so that there are no solid inclusions, this will make the solution homogeneous and bring it to the consistency of liquid sour cream.
First, a clay castle is made on the base, and the first row of bricks is placed on it. The masonry is immediately leveled using a level. The thickness of the clay castle will be uneven, since the bottom is made with a slope.
When constructing a drainage pit with permeable walls, bricks are placed with clearance in places where there should be vertical seams
First, beacon bricks are placed in the corners and their position is carefully leveled. Next, the laying is carried out using rope beacons, which are pulled for each row.
Experienced craftsmen can lay three rows at once or use a special ordering strip. Beginners are advised to first check literally every brick they lay with a level.
A plumb line is used to control the quality of the masonry vertically so that the wall is level.
The laying of each row of bricks should be carefully checked using a level. A special thread stretched along the row will facilitate masonry work
Depending on the thickness of the wall, a brick laying scheme is chosen. If you need to make a wall 25 cm thick, then lay it “in one brick”, and if it is 12 cm - “in half a brick”. The length of the brick corresponds to the width of the wall.
Of course, this is not how a permeable cesspool is made. Usually it is laid “in half a brick,” with gaps made between individual bricks so that liquid drains can escape through these holes.
The brick laying pattern is chosen depending on the width of the wall. For cesspools, masonry of half a brick (12 cm) or one brick (25 cm) is most often used.
In any case, you should adhere to the rule: vertical seams between bricks in adjacent rows should not coincide. The laying is done as follows: a small amount of mortar is applied to the surface of the base using a trowel.
A brick is placed on top and pressed, gently tapping it with a trowel so that it takes the correct position.
If you need to make a cylindrical drainage pit out of brick, then the bricks will have to be laid in an arc. It is important that the seams in adjacent rows do not match, this can weaken the structure
Then the excess solution is picked up with a trowel. There is another technology: the solution is applied to a separate brick, then it is installed in place.
Here are some useful tips for masonry work:
- The dimensions of the mortar-filled joint between the bricks should be about 6-8 mm.
- The seam should be the same size everywhere, this will improve the quality of the work.
- Bricks should be placed along the walls in small portions to reduce work time (you won’t have to bring every brick from a common pile).
- Before laying, the bricks are watered, this improves the adhesion of the surface to the mortar.
- Every fifth row is recommended to be laid using a special reinforcement mesh.
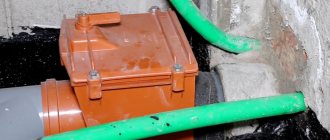
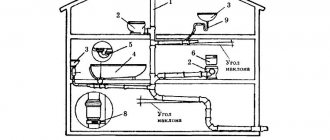
Of course, a sewer pipe needs to be connected to the cesspool. The entrance site should be thoroughly treated with the solution to avoid leaks.
The pipe must be properly insulated and laid below the freezing level of the soil, maintaining the required slope. We recommend looking at this article for detailed information about the material for insulating sewer pipes.
After the masonry work is completed, the walls need to be plastered.
The sewer pipe should enter the sewer installation at a slight angle to ensure optimal speed of movement of sewage and waste
Stage #5 - waterproofing and top flooring
A layer of waterproofing material, for example bitumen mastic, is placed on the plaster. These measures will help extend the life of the sewer system.
When applying waterproofing materials, you must strictly follow the instructions. For example, mastic requires a dry base.
Now you can install the top floor. To do this, it is best to purchase a ready-made concrete slab with a hole and a cover - a manhole.
Alternatively, you can consider a self-made concrete structure or a timber floor. The latter option is no different in strength; such an overlap will have to be replaced every few years.
If you decide to make a concrete floor yourself, you should start making it simultaneously with the base and using a similar technology. Pouring is done into wooden formwork.
The parameters of the upper ceiling must exceed the dimensions of the hole that it will cover by at least 30 cm.
The opening for servicing the drainage pit must be large enough for a person to crawl into it to inspect the structure
First, a layer of mortar of several centimeters is poured, then the reinforcement is installed and the main layer is poured. This element must dry within four weeks. It is necessary to make another hole in the upper ceiling - a ventilation hole.
The sewer system needs proper ventilation, because over time, wastewater begins to release methane, which is a dangerous gas.
To organize natural ventilation, use a plastic pipe with a diameter of about 100 mm. The top of the pipe is covered with a protective device; it also wouldn’t hurt to equip its lower part with a grill.
After installing the ceiling, a layer of waterproofing should be applied over the structure; roofing material or even thick polyethylene film will do.
A soil and plant layer is usually laid on top to improve the area and protect the cesspool from freezing in winter.
Choosing a location and size
Before installing the sewer system, it is necessary to select a location for the future cesspool. This must be done based on the established SNiP:
- The distance from the house to the well must be at least 5 m.
- The distance from a spring with drinking water with normal soil is from 30 m, with sandy soil - from 50 m.
- The depression should not exceed 3 m. If the hole is deeper, the vacuum cleaner will not be able to completely clean the tank. This happens due to a weak pump.
- The distance to the neighboring plot is at least 1 m.
- For ease of access of the sewer truck, the distance from the road is no more than 3 m.
Let's determine the size of the required brick pit. To do this, you need to multiply the number of residents by 150 liters - this is the average value of sewage released by 1 person. With this calculation, the minimum daily sewage allocation will be obtained.
If the house has a washing machine or other equipment that consumes water, then take into account 200 liters of water for each inhabitant of the premises.
The resulting amount must be multiplied by the number of days after which it is planned to pump out sewage. For example, if sewer trucks come 2 times a month, then multiply by 15. When using a cesspool for 3 people, the output is 9000 liters, that is, 9 m3.
If the well is equipped without a sealed bottom, then some part of the sludge will go into the ground, which means the volume will decrease. In this case, the payment can be taken not 15, but 7 days.
When the necessary parameters are known, you can start digging a hole. At the same time, it is important not to forget about SNiPs. There are restrictions that the depth cannot be more than 2.5 m, and the width of one side should not exceed 2 m. This is assuming that a rectangular pit is used.
Photo
Laying out the walls
Construction from broken bricks
Jumpers for ceiling installation
Part of the cesspool is made of masonry cells
Waterproofing
With significant daily water consumption, a large volume of wastewater is generated. To receive them, a design is required that prevents contaminated liquid from entering the soil. To ensure the environmental safety of the cesspool, a structure with a concrete bottom and protection from a layer of waterproofing is used. Bitumen mastic is the most common material used to waterproof a cesspool. The work is carried out on finished masonry that has dried after plastering. For the first primer layer, bitumen is heated and mixed with kerosene. The liquid solution is applied to the brick wall. After drying, the procedure is repeated; you can apply the bitumen with a roller or brush. Without waiting for complete drying, fiberglass is applied to the still sticky surface. Bitumen waterproofing is again applied on top.
There is a more modern material - bitumen emulsion, which does not require preheating; for priming, it is enough to dilute part of the composition with water.
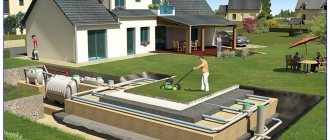
Installation of ready-made blocks
The easiest to install system for accumulating and processing wastewater is considered to be a ready-made complex, offered for sale in disassembled form. Individual elements of factory-made septic tanks for a drainage pit in a private house are manufactured exactly to size, which allows them to be assembled as quickly as possible. The only weak point of these systems is the fact that they have a fixed volume specified by the manufacturer. As a rule, container parameters are designed for average consumption. To select the optimal system option, it is recommended to make approximate calculations of the load on the septic tank in advance.
The installation of cesspools of this type usually does not cause any difficulties:
- Dig a pit. The work is carried out according to the standard scheme for all pits. The bottom is equipped with a cushion made of a mixture of concrete and crushed stone.
- After pouring the solution, pause work until the concrete has completely hardened. From time to time it is sprayed with water.
- In the meantime, in a specialized store you can choose a waste accumulation and treatment unit of suitable volume. As a rule, its kit includes septic tanks, lids and rings.
- The assembly of individual elements must be carried out in strict accordance with the instructions. It contains an installation diagram and recommendations for arranging individual components. Thus, to increase the tightness of the joint sections of the underwater pipe and the main tank, it is recommended to use an acid-resistant sealant.
- Before filling the finished structure with soil, it is recommended to test it. To do this, process water is allowed into the system. As the procedure progresses, it is necessary to check the correct angle of laying the sewer pipe and the tightness of the connections. If no leaks are found, the complex can be backfilled.
Step-by-step instruction
The construction of a septic tank at the dacha with your own hands, used without pumping, must be carried out in compliance with all building codes and sanitary requirements. When a suitable location is chosen for organizing such a system, the service life becomes much longer and, moreover, such a design will not arouse the interest of supervisory authorities. Judging by the appearance of the system, it does not seem that it is reliable and safe, but for this, during construction it is necessary not only to use the right technology, but also to choose the right place and the system will meet your expectations.
Selecting a location
When choosing a location for installation, you need to consider a number of factors.
- Suitable depth. The depth of installation of a septic tank system is completely dependent on the depth of groundwater and the freezing of the soil.
- It is optimal if you design a septic tank system at your dacha with your own hands that works without pumping on sandy or gravel soil. Such soil facilitates the installation of a filtration system. If your site is located on clay soil, the task of choosing a location becomes more complicated.
- Relief of the site. The intake of clean water depends on the topography; when your site is on clay soil, the distance from it to the water should be at least 15 meters.
- It is not recommended to manufacture the system near residential buildings with a foundation. When the septic tank undergoes filtration and the liquid leaves it, it can wash away the base of the building. For this reason, the septic tank must be installed at a distance of at least 6 meters from the house and at least 4 meters from the pool.
- It is recommended to install the system closer to the road. This is necessary when the system operates only as a storage tank and needs to be pumped out periodically; in other situations this is not necessary.
Taking into account such requirements, choosing a location will allow you to organize the system efficiently and carry out land work comfortably.
If you liked the article, please share it
Previously on the topic:
Share
What tools are needed?
Using a bayonet shovel, you can dig the hole itself.
- A shovel is the main tool for constructing a cesspool. You will need two of them: a bayonet one - for digging a pit;
- shovel - to throw out soil.
The simplest inexpensive ways
In the old days, as a typical rural sewer system, a drain hole was built in a private house with your own hands. To increase its strength, its walls were coated with clay or reinforced with boards. A little later, they began to practice burying old barrels, tanks and tanks in the ground. As practice has shown, a system of a series of containers in which wastewater is collected and partially filtered is able to cope with waste volumes of about 1 m3 per day.
Using a simple cesspool with your own hands without pumping, you can fill the needs for drainage of wastewater in country houses with non-permanent residence. However, from the point of view of current sanitary standards, such structures are on the list of undesirable and even prohibited options. Fines and other types of administrative penalties are provided for violators.
There are several recommendations on how to properly make a cesspool:
- It is necessary to dig 1 m higher than the level rises in spring and autumn. At this time, this indicator has maximum values.
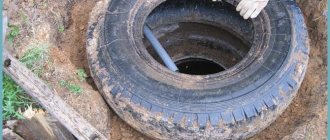
- A good budget option for a durable drain shaft involves using old car tires for this. They are simply placed inside the finished barrel and fastened together using screw bridges.
- In cases where the cesspool for a permanent residence is located at some distance from the home or toilet stall, the top cover is equipped with a side cutout for connecting the sewer pipeline.
- The required amount of earth is poured into the gaps between the tires and the shaft (it is advisable to compact it). For safety, a concrete slab is usually laid over the pit. A hole is made in it for the ventilation pipe and a hatch for pumping out wastewater.