An aerator is a plumbing device that is installed on the spouts of water taps and mixers to saturate the water with small air bubbles and mechanically clean it from foreign particles.
The principle of operation of the aerator is to pass water through several meshes with different cell sizes. Thanks to this, the water is saturated with air, feels soft and splashes less when washing dishes. While maintaining washing efficiency, the aerator saves up to 70% of water
.
Types of mixer aerators
The range of aerator attachments for installation on faucet spouts is presented in the following types:
- simple mesh, which is usually installed by manufacturers on all spouts of faucets and mixers;
- with adjustable water jet shape;
- with a change in the angle of the water jet;
- with adjustment of the shape and angle of the water stream;
- with random LED multi-colored illumination of the water jet;
- with LED illumination of the water jet in different colors depending on its temperature.
The photo on the left shows an aerator with the ability to adjust the shape and angle of the water jet, on the right is an aerator with LED lighting, and in the center there are two simple standard aerators.
Simple mesh
A widespread type of aerator, which is usually installed on all faucet and bathtub spouts, in washbasins and in kitchen sinks.
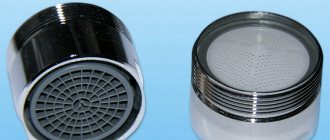
A simple aerator consists of a housing containing a series of plastic and metal meshes. The photo shows a simple disassembled aerator.
With the ability to adjust the shape and angle of the water jet
Manufacturers, as a rule, do not install aerators with the ability to adjust the shape and angle of water flow on faucet spouts, since their efficiency is not much different from standard aerators, and they cost twice as much.
Typically, the shape of faucet spouts provides the optimal direction of the water stream, and the ability to change its angle is rarely in demand. But the ability to change the shape of the jet can be useful.
If water flows out in the form of a stream from many jets, as in the photo on the left, then the water pressure in each of the jets increases and this mode is good when washing heavily soiled dishes. In another position of the flow regulator, water flows out like from a standard aerator.
With LED illuminated water jet
More recently, thanks to the efforts of Chinese manufacturers, faucet aerators with LED lighting that illuminate the water have appeared on the market. Children really like the water illuminated in different colors and they are happy to run to wash themselves or even wash the dishes. And adults also enjoy looking at colored water.
There are two types of aerators with LED lighting:
- with random color changes;
- with backlight color changing depending on water temperature
Structurally, aerators are made the same, and the choice is determined only by personal preferences. If you like constantly changing colors, like in a strobe, then you need to choose the first type, and if you like water simply illuminated in one color, then the second type.
An aerator with temperature-dependent water illumination illuminates the stream as follows:
- green at temperatures below 30°C;.
- blue at temperatures ranging from 30°C to 38°C;
- red at temperatures above 39°C.
Aerator device with LED lighting
Aerators with LED lighting, both with iridescent colors and those illuminating the water with a color depending on its temperature, are designed in the same way and are designed to operate at a temperature of water passing through them of no more than 60°C.
The photo shows the aerator from the side where the water stream is flowing out. As you can see, instead of a mesh there is a transparent lid with holes, like in a shower head.
On the opposite side of the aerator there is a mesh filter for coarse water purification and an annular rubber gasket. The mesh filter in quality aerators is usually made of stainless steel or brass.
The mesh is simply inserted into the aerator body and can be easily removed. Behind it you can see a part in the form of a cup, on the sides of which there are three rectangular holes made at an angle, which serve to direct the flow of water onto the blades of the generator turbine.
The cup is made of plastic and is not fixed, so it can also be easily removed without the use of tools.
Water, falling under pressure on the generator turbine blades, causes them to rotate. The turbine is mounted on a shaft, and when rotating, it transmits torque through it to a generator, which generates electric current. LEDs are connected to the generator winding. Therefore, when the generator is running, they glow, illuminating the water.
As you can see, there are no batteries in the aerator with LED lighting. If the LEDs stop shining, it means the generator or LEDs have failed. Such an aerator cannot be repaired, unless you can clean the mesh filter and turbine from dirt.
Manufacturers call the nozzle with LED lighting, designed for installation on the faucet, an aerator, which is not true. This device does not have a system that fills water jets with air bubbles and therefore it is more correct to call it a water divider with LED backlight.
It should be noted that an aerator with LED lighting works well even with very low water pressure, but at the same time it produces a rather loud acoustic noise, which is emitted by a working electric generator. The sound emitted by the aerator is similar to the noise of a running electric motor in children's toys, complemented by flowing water from a shower head.
When purchasing an illuminated aerator, you should take into account that its length is several centimeters and after installing it on the faucet spout, the working area will decrease, which can create inconvenience for a shallow sink.
The practice of using an aerator with LED lighting has shown that its service life rarely exceeds six months.
Installing an aerator with LED lighting on a faucet
Before installing an aerator with LED lighting on the faucet spout, you must unscrew the already installed aerator from it.
The body of the aerator with LED lighting is usually made of plastic and does not have edges for tightening it with an open-end wrench. Therefore, it is simply wrapped in the tap spout by hand.
Advantages of pond aeration
The devices are indispensable for maintaining oxygen balance in artificial reservoirs. The constant aeration of water they carry out prevents it from stagnating. This prevents the occurrence of rotting processes in it and inhibits the development of microflora that is dangerous to the life of fish. With the help of aerators, constant circulation of water is organized.
Warm surface layers heated in the sun mix with cold lower layers, normalizing the temperature of the reservoir. In oxygen-enriched water, fish develop faster.
What material to choose a faucet aerator from?
Aerator housings
for the mixer are made of plastic or brass. They are covered with a decorative shiny coating on top and are practically no different in appearance. Aerators with a brass body are more expensive, but they also last for many years.
The body of the aerator, made of plastic, becomes brittle over time due to changes in water temperature, and when you try to unscrew it with a key from the faucet spout for cleaning, it cracks. This fact is confirmed by personal experience. Therefore, if you plan to clean the aerator meshes with your own hands in the future, it is better to purchase an aerator with a brass body
.
The coarse water filter in the aerator (blue in the photo above), which simultaneously performs the task of cutting the water flow into many thin jets, is usually made of plastic. I have not seen metal filters. There is no choice here.
Fine meshes in the aerator, directly involved in the formation of bubbles in the water, are made of plastic, extruded aluminum, brass, plain or stainless steel. The choice should be made of meshes made of brass, or better yet, stainless steel. They will serve forever.
Thus, the best choice would be an aerator, the body of which is made of chrome-plated brass, and the fine mesh is made of stainless steel.
.
Popular manufacturers
Many companies producing sanitary equipment are engaged in the manufacture of aerators for faucets. Water-saving devices must be of high quality, reliable and durable. The products of the following companies are in wide demand among consumers:
- The German manufacturer Grohe produces high-quality economizers that are tested at all production stages. The declared service life of faucet attachments is from 5, subject to proper installation and maintenance. The cost of products varies from 350 to 1000 rubles.
- Finnish aerators produced by Oras are in greatest demand among buyers due to their high quality and reasonable price (250-500 rubles). The manufacturer also produces ready-made kits, which include sink faucets equipped with aerators. Finnish products have a good filter system.
- Aerators for faucets of the Timo brand (Finland) have gained wide popularity. The manufacturer claims a 5-year warranty period for the products. The models of the Finnish brand are interesting in terms of design; high-quality materials are used for their production; the product line includes water-saving devices of different colors. The average price is up to 500 rubles.
Good aerators are produced by the French company Jacob Delafon. According to consumer reviews, domestically produced aerators are much cheaper than imported models, but do not have a long service life. In general, water limiters show high savings and are easy to install and dismantle. The use of faucet attachments does not interfere with the comfortable use of water.
Grohe
Jacob Delafon
Oras
Timo
How to clean aerator screens from dirt and rust
Over time, due to the content of small particles of iron oxides in tap water, they are deposited on all surfaces with which the water comes into contact. The water aerator will not escape this fate either.
The coarse and fine screens become clogged, bubbles disappear from the water flowing from the tap, and it stops making the characteristic hissing sound. And all the advantages that the aerator created disappear. Of course, you can replace it with a new one. But it’s easy to clean the mesh from dirt and rust with your own hands.
How to remove and disassemble the aerator
To unscrew the aerator, there are two edges on its body for gripping with a key, located diametrically opposite.
There are special plastic wrenches on sale that are designed to unscrew aerators. The design of one of these keys is shown in the photograph. But I think there is no point in purchasing a special wrench that can be replaced with a standard open-end wrench.
To unscrew the aerator with an open-end wrench, you need to grab the aerator by the edges with its jaws and rotate it clockwise (if you look at the faucet from above). To prevent scratches on the surface of the case from the impact of the key, thin leather or other material can be placed between its jaws.
View of the removed aerator assembly. The design is a collection of meshes with very small cells, folded one after the other sequentially into a cylindrical glass. The first two plastic meshes guide the stream of water and at the same time act as a coarse filter, the rest mix water and air.
To remove the mesh from the aerator body, press with your finger on the mesh, which is located on the side where the water flows out. All meshes will be removed along with the cylinder in which they are placed.
Next, all the meshes are removed from the cylinder. To do this, you need to insert the blade of a screwdriver into the side slot of the cylinder and first remove the double coarse mesh.
The photo shows a coarse mesh and a cylinder with fine meshes remaining in it.
By prying the edge of the spherical mesh with the blade of a knife, you disconnect the block of coarse mesh.
The photo shows the coarse water purification mesh disassembled. All that remains is to remove the fine water purification mesh from the cylinder and you can begin cleaning the mesh from dirt and rust.
Cleaning the aerator mesh from rust
First, you need to wash each aerator mesh under running water using any detergent with a hard brush or an old toothbrush.
Mechanically, fine grains of sand and dirt are easily removed from the mesh. But a coating of rust, covering half or more of the mesh cells, will remain.
To remove the remaining rust deposits, you need to use a chemical cleaning method. For these purposes, any detergent for washing plumbing products that removes rust, for example Sanox, is suitable.
All parts of the aerator must be placed in a suitable container and filled with detergent. After 15-20 minutes, the rust from the surface of the part should disappear, otherwise you need to wait longer. When traces of rust disappear, the parts should be washed in running water.
As you can see in the photo, the aerator parts after treatment in the Sanox detergent began to look like new.
The aerator nets must be installed in the sequence shown in the photograph. It has been noticed in practice that in order for the aerator to operate with very low water pressure in the water supply system, the fine mesh during assembly must be oriented in such a way that the wires forming the cells of one mesh are oriented relative to the wires of the adjacent mesh at an angle of 45°.
After cleaning the mesh, assembling and installing the aerator on the mixer, a stream of water from the tap ran filled with bubbles, making a characteristic hissing sound. Thanks to cleaning the mesh with my own hands, the aerator began to work like new.
Nozzle installation sequence
There are no particular difficulties in attaching the nozzle to the tap. The device is screwed in manually without the use of tools. Installation of the aerator begins with the installation of the sealing gasket, which comes with the device.
If a threaded adapter is used during installation, ensure that gaskets are present at both connection points
To tighten the threaded connection, use pliers. The main thing when working with a tool is not to damage the outer surface of the plumbing equipment.
The easiest way to prevent this is to first insulate the tool with construction tape, or simply wrap the surface with a piece of fabric.
When tightening the threads, it is important not to overdo it so as not to damage the body of the aerator or water tap.
Installation of the device on the shower is carried out in a similar way and in the same sequence.
Noise control measures
Faucets with water aerators still have a drawback, which manifests itself when the faucet is installed in stainless steel sinks. Water with bubbles falling to the bottom of the sink causes its thin walls to vibrate and creates more acoustic noise than without an aerator. There is a simple way to reduce noise levels. It is enough to glue a plate of microporous rubber or other porous material to the outside of the bottom of the sink, which will dampen vibration, and with it noise.
To select the most suitable sound-absorbing material, simply open the tap and apply the material to the bottom of the sink. Then glue the most suitable one. It is quite possible that applying a thin layer of macroflex or other foam material will also be effective. But I haven't tried it myself.
What the experts say
On sale you can find a large number of different versions of aerators, the cost of some is within several tens of rubles. Some are effective, others are not, despite using the same production technology. You should choose the offer of well-known manufacturers, since in this case you can be satisfied with the result obtained.
Marina.
When looking for a way to significantly reduce water consumption, you should pay attention to aerators. I note that 1 liter of water remains 1 liter of water, but the consumption is reduced when washing dishes or taking a shower. The effect has been proven by numerous studies.
Nikolai.
I bought an illuminated aerator, installed it, and immediately couldn’t get enough of the results. However, as it turned out, in practice backlighting is not needed, since it is poorly visible in the light, and there is no point in using the faucet in the dark.
Catherine.
