Replacing a sewer system in an apartment with your own hands is a complex, responsible, difficult, troublesome and dangerous task. Where there is still old cast iron, replacing it with plastic, as they say, simply screams. But plumbing work is expensive, and for good reason. Therefore, it is recommended to undertake sewer repairs in an apartment yourself only if there is an acute shortage of funds. And first you should clearly understand the sewerage system, otherwise a small inaccuracy can turn your apartment into a gas chamber. In this regard, the work of a plumber can be compared to the work of a sapper.
Sewage device
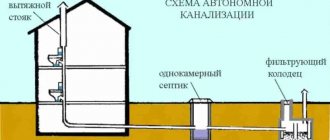
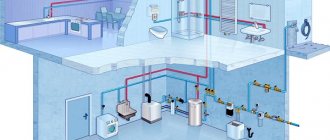
A typical sewage system in an apartment is shown in the figure. The main principles of its design are that, under any external conditions, the pressure in the riser is slightly higher than atmospheric pressure and accurately maintained slopes.
If the first rule is violated to a lesser extent (low pressure), atmospheric air will squeeze sewer gases into the apartment and can form an explosive mixture with them. If there is excess pressure, harmful gases will eject water from the siphons and break into the home themselves.
Common mistakes
When installing a riser and wiring communications in an apartment, the slope is often made much less than necessary. In addition, the O-rings are not always positioned correctly: they get twisted, which contributes to the formation of leaks.
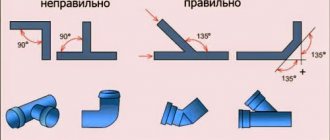
When installing pipes, a large number of bends are provided (more than 2 in the room), because of this, the outflow of contaminated water is difficult and blockages form.
Often in hard-to-reach areas, little attention is paid to the tightness of joints. It must be taken into account that in such places the highest safety of pipeline operation must be ensured precisely because of the complexity of maintenance.
About pipe slopes
Installation of sewer pipes is carried out at a slope within strictly defined limits. If the slope is small, the liquid simply will not flow down them, and if the slope is too large, the water will drain quickly, but the contamination will remain in the pipe. Paradoxically, excessive “leaking” of the sewer pipe leads to chronic blockages. SNiP give the following values for MINIMUM slopes of sewer pipes:
- With a diameter of 50 mm – 30 mm/m.
- 110 mm – 20 mm/m.
- 160 mm – 8 mm/m.
- 200 mm – 7 mm/m.
The MAXIMUM slope should not exceed 150 mm/m, with the exception of bends for plumbing fixtures up to 1.5 m long. Connecting sewer pipes at right angles is allowed only in a vertical plane.
It is difficult to maintain slopes in a residential area, but this is a very responsible task. Therefore, when completely replacing the sewer system or designing it for a new house, it is recommended to use the capital guidance of A.A. Lukins. and Lukinykh N.A. “Tables for hydraulic calculation of sewer pipelines and siphons according to the formula of A.A. Pavlovsky." This is a fundamental work, in which, in addition to ready-made values for most life circumstances, there are also formulas by which you can independently carry out calculations for exceptional cases.
About neighbors
Replacing the sewer system yourself in an apartment building is impossible without good neighborly relations: after all, during your work, the neighbors “on the risers” (above and below) will have to sit without water and endure it or go to a bucket instead of a toilet. And any secret ill-wisher, by opening the taps of the cold and hot water risers in the basement, will give them a sign that the work is supposedly finished. They will start using it “from the heart”, and everything from above will come to you. Non-trivial options are possible here. The author of these lines knows of a case where an evil and irresponsible alcoholic was successfully neutralized during work by getting him drunk to death.
Protective Equipment and Precautions
When repairing a sewer system, the riser outlets, even if they are not changed, will have to be released for some time. Let’s say everything is settled with the neighbors and the water is turned off. But where is the guarantee that one of them will not be “grabbed” to the point that he forgets, does his job in the toilet and flushes out of the bucket? And all this will be yours. And on you. Therefore, before starting work:
- Remove the toilet and clean the toilet completely.
- Cover the walls and floor of the toilet with plastic film and tape.
- Stock up on a plastic raincoat, rubber boots, gloves and a helmet with protective glass. A separate glass on the hoop will not work: you will have to work with heavy, brittle cast iron hanging above your head.
The main stages of work to replace the sewerage system in an apartment building
Despite the existing algorithm, the order of installation work may change, depending on the state of communications and the specific layout of your home.
But, as a rule, masters adhere to established rules:
- Exhaust installation: the pipe passing through the wall and connecting the internal and external systems must be located in a sleeve - a safety casing. In the transition, the pipe must be solid, without joints.
- Installation of a riser: if the pipe passing through all floors of the house does not exceed 10 meters, then install 1 riser. When this distance is more than 10 meters, a second one is installed.
- Pipe routing: bends of the largest diameter 10-11 centimeters are installed near the toilet. The remaining pipes leading to the sanitary facilities are 5 cm each.
All devices are connected after complete installation of the sewer system and preliminary testing of the system.
Securing the riser at the top
A prerequisite for do-it-yourself sewer repair is a securely fastened top of the riser. You should not rely on standard fastenings (if they still exist) on the floors: over time, they weaken, rust, and during repairs, all the upper sections may end up in your apartment. Replacement, of course, at the expense of the culprit.
In addition, an old cast-iron riser can burst from vibration when working with a power tool or impacts, even in an area quite distant from it. A properly executed fastening unit is also a damper that absorbs vibration. And in any case, a securely fastened riser will reduce the likelihood of a sewerage accident.
To secure the riser at the top, right under the ceiling, but always above the very top joint of the pipes, on both sides of the riser, two strong crutches with a diameter of at least 12 mm are mounted on cement mortar. Threaded rod pieces or ready-made studs with a metal mounting collet work well; in this case, you can do without cement. The embedment depth is at least 120 mm. The stud must protrude at least 40 mm beyond the middle of the riser pipe.
The riser is secured with two semicircular brackets (half-clamps) 2-3x40-60 mm in front and behind. Strips of thin, dense rubber, for example, from a car inner tube, are placed under the staples. In the “ears” of the half-clamps you need to drill holes for the studs. The staples are attached to the studs between two nuts, tightening them alternately to prevent lateral forces from appearing on the riser. It is also unacceptable to secure the riser with one clamp or bracket, pressing it against the wall. If the riser is already adjacent to the wall, you need to carefully knock out a groove under it for the rear bracket. And don’t forget – cast iron is very fragile!
At whose expense
Another question that needs to be examined in detail so that you don’t have to pay money in vain. Everything is quite simple here:
- If part of the structure is changed due to an emergency, damage or constant leaks, all costs are borne by the service organization.
- When a planned reconstruction of a building is carried out with a complete replacement of the riser, residents are also not required to pay the costs. Funds are taken from contributions for major repairs, which are paid monthly.
- If the design is changed by the owner of the property on his own initiative, all costs must be paid by him. Especially if there are no reliability claims.
Important!
You shouldn’t try to break the design in order to present everything as an accident. If the examination reveals such a fact, you will have to pay not only the cost of materials and work, but also a fine.
Pipe material
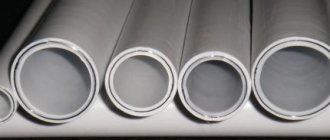
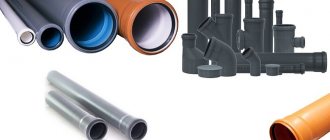
It is known that plastic pipes are certainly better than cast iron pipes. But plastic comes in different varieties, and the reliability of the sewer system largely depends on the material of the pipes. The quality and comparative cost of pipes made from various types of plastic are as follows:
- Polyethylene is cheap, but it is definitely rejected: it is subject to deformation, is not heat-resistant, and does not seal reliably. Polyethylene pipes come on sale from “alternative” manufacturers; Repairing the sewer system “temporarily” is nonsense.
- PVC is cheaper than propylene and has the lowest hydraulic resistance; it is glued with dichloroethane glue. But heat resistance is limited to 80 degrees, and its strength and chemical resistance are not very high: you can clean PVC sewers only with a plunger or an ultrasonic emitter.
- Polyisopropylene (propylene) is quite expensive and not as smooth as PVC. But it holds up to 130 degrees, and due to its strength and durability it allows mechanical cleaning with a cable or spiral and chemical cleaning with active agents, except for concentrated acids and alkalis.
What is required for repair
The set of tools and consumables depends on the type of problem and the material from which the sewer pipeline is made. I recommend having everything you need because you never know what kind of emergency will happen.
Tools:
- hammer;
- chisel;
- Bulgarian;
- Screwdriver Set;
- pipe cutter;
- drill;
- cable with a brush.
Consumables:
- clamps;
- couplings;
- sealant;
- cement;
- rubber compressor;
- chemical solvents.
If you need to replace part of the pipeline or riser during repairs, you will additionally need a pipe made of cast iron or PVC.
Pipe diameters
The diameter of the sewer pipes of 32 mm is acceptable in two cases: if the sewer system with separate risers and the drainage from plumbing fixtures goes directly into the riser or the length of the wiring from the farthest point to the riser does not exceed 7 m. In other cases, you need to use 40 mm or 50 - mm pipes.
The minimum diameter of the riser pipe is 110 mm. Sometimes there are risers of 160 mm and even 200 mm. Accordingly, you need to select the elements of the new riser, see the section on replacing it.
For PVC sewerage, if the drainage from the kitchen is only from the sink, a 32 mm pipe can be laid from the kitchen to the bathtub. But the drain from the bathtub and further to the riser must be at least 40 mm in any case.
Work order
Replacing the apartment sewer system is carried out in the following order:
- We determine the installation locations for plumbing fixtures if it is planned to reconstruct the system or install additional equipment.
- We draw a diagram of the sewerage wiring in the apartment. We indicate on the diagram the location of the pipes, the distances between them, their sizes and the slopes of the sections.
- We perform a revision (inspection) of the old wiring and choose a method for dismantling it.
- We calculate the amount of materials and components needed for repairs. We purchase pipes, fittings, sealant, transition couplings from plastic to cast iron in accordance with the wiring diagram.
- We try on pipes with fittings in place.
- We install the system in sections in free space (on the floor).
- We dismantle old equipment.
- We install new pipelines and customize them in place.
- We carry out final installation of the system with sealing of joints.
- We install and connect plumbing fixtures.
- We connect the system to a ventilated riser.
- Once the sealant has hardened, check for leaks.
Now let's give some explanations of the individual stages of work.
Devices
We select places for devices based on the following:
The maximum length of the rigid connection to the siphon is 1.5 m; corrugated - 0.8 m. The minimum permissible angle in the horizontal plane is 120 degrees. It is highly desirable that there are no horizontal corners at all. You may have to re-determine the types of devices, so you should not purchase them in advance.
Scheme
If you just need to replace the old sewer system with a new one, and the old one is generally serviceable, we draw the diagram according to the “as it was” principle. If there were problems with the previous sewer system, or a new one is being installed, we accurately maintain the slopes and diameters; in doubtful cases we make calculations. We give the finished diagram to specialists for verification: it’s much cheaper than drawing up a project with a call to the site, and it’s no good at all for yourself.
The diagram should indicate:
- The premises of the apartment in which the work will be carried out. If the pipe simply passes through the closet, then it is still considered that there will be work there.
- For each room - the location of the system elements, indicating the dimensions and distances from the walls. The elements are not devices, it’s all the wiring. For a pipe passing through a closet, its parameters in the closet must be indicated, even if they are the same in the kitchen. If a solid pipe passes through a wall, then its total length should be indicated, as well as the length of each section.
- All fittings and service elements: cleaning and inspection bends, etc.
- Location of the central sewer riser.
An example of a sewer system in a private house:
Inspection and dismantling methods
The purpose of the audit is to determine how to dismantle the old wiring. Depending on its condition, disassembly is carried out in the following ways:
- In rare cases, when changing from plastic to plastic, sections of pipes are simply removed with a rocking motion.
- In the rarest cases, when cast iron pipes are free on all sides, the old pipeline is disassembled in the same way, but the sealing of the connections is first selected with a chisel or chisel.
- In other cases, the pipes are sawed in sections, as far as will fit, with a grinder with a diamond wheel, then a wedge or a powerful flat-head screwdriver is inserted into the cut, and hammered with a 1-2 kg hammer or sledgehammer until the pipe bursts along the bridge of the cut.
In any case, the pipeline to be dismantled is first disconnected from the riser, and disassembly begins from the far end.
Notes:
- Breaking cast iron pipes with a heavy sledgehammer is only permissible on the first floor of a private house with a slab reinforced concrete floor.
- With a corundum wheel for metal, work is difficult, the wheel wears out quickly, and in terms of cost, disassembling with a diamond wheel turns out to be only slightly more expensive. The diamond wheel will serve for a long time.
Materials
We calculate materials so that as few pipes as possible have to be cut. It is advisable to first find out from your seller what standard sizes he offers; The length of the sections is of particular importance. The ideal case is when only one pipe is cut. It is possible that the sewerage scheme will have to be modified to optimize costs for materials.
Trying on site
This operation has three goals:
- Find out whether there will be some kind of coupling on the wall, whether there will be “tails” of pipes behind the walls sufficient to fit into the couplings and mark the places of the couplings on the wall.
- Mark out the installation locations for supporting crutches or clips and determine their number.
- Identify places that are especially inconvenient for work, think through and verify the sequence of operations in them.
Rough editing
Preliminary installation of pipeline sections is carried out without sealing: we simply insert the ends of the pipes into the pipes with gaskets. We cut ONLY the free ends of the pipes to size with a margin of 10-15 mm; The mounting pipes must not be touched under any circumstances. We do the cutting with a hand hacksaw for metal in a miter box strictly at 90 degrees, cut off the burrs with a mounting knife and remove the chamfers. The “hairy” end of the pipe will become a source of constant blockages. We immediately turn the rotary tees/splitters to the desired position.
Dismantling old pipes
Dismantling methods have already been described. In general, dismantling is carried out as follows:
- The sealing of pipes in the walls is knocked out or removed in another accessible way. The pipes must be “wall free” before dismantling.
- We remove appliances from the kitchen to the bathroom, emptying the bathroom and kitchen.
- We outline the installation locations of new devices (or old ones in a new place) with a pencil on the wall.
- We warn the neighbors and shut off the water to the floors.
- We remove the toilet with a flush tank and prepare the toilet for use, as described above.
- To disconnect the distribution pipeline from the riser, we make TWO cuts 120-150 mm apart, and first drive the wedge into the cut FAR from the riser, and only after disconnecting the entire pipe do we break out the piece.
- We drill along the contour or hammer with a chisel and a hammer no heavier than 200 g the seal of the pipe into the outlet of the riser, we take out (more precisely, we pick out, using our working ingenuity to the fullest extent) the rest of the pipe. Once again, don’t forget, cast iron is very fragile!
- We clean the inside of the outlet pipe and toilet and plug it tightly with rags.
- We supply water and inform the neighbors that they can use it for now.
- Next, we dismantle the pipeline, starting from the far end.
Note: a long cast iron pipe makes a good resonator. If you violate the shutdown order, the neighbors will lose all goodwill towards you due to the roar and ringing, and the riser may burst, and not necessarily on you.
Video: example of dismantling cast iron pipes
Finish installation
Finish installation is carried out FROM THE Riser. The authors of the recommendations to conduct it from end to beginning only used plumbing. The main rule: the PREVIOUS pipe is adjusted to the size. If you break it, the entire wiring will go away... let's not get distracted by the professional jargon of plumbers. The operating procedure is as follows:
- In the outlet of the riser, according to the instructions, we install a plastic-cast iron transition collar.
- We insert the first section of pipe into the cuff and check whether its mounting pipe is in place.
- We cut it exactly to size, clean the cut, and chamfer it.
- We finally mount it using sealant.
- In the same way, we assemble the entire pipeline section by section to the end.
- If the riser is not expected to be replaced, we adjust the toilet pipe to the exact size, put it on the sealant and install the toilet back.
- Once the sealant has hardened, we check for leaks and soundproof the pipes.
Notes:
- Adapter cuffs come in different designs, so a description of the installation of specific samples is not given: detailed instructions are attached to each model. To select, you need to know the connecting dimensions, and check the quality of rubber and plastic parts when purchasing.
- All of these operations, if the riser outlets have been securely plugged, can be performed without turning off the water supply.
- Plastic pipes are thin-walled and very slowly develop plaque from the inside. This is good, but the plastic sewer is very loud. Therefore, its sound insulation is necessary, but its description is the subject of a separate article.
Dismantling Guide
Due to the fact that the sulfur used to connect sections of communications tends to harden, demolition will be difficult. So how can you understand what composition was used for fastening? To find out, you need to bring a blowtorch to the connection. An unpleasant odor and melting indicate the presence of sulfur.
Dismantling joints with a torch or blowtorch
To destroy a pipeline where there is a connection using sulfur, you will need a hammer, chisel, blowtorch or torch. Sulfur is a chemical element, so when heated it will begin to release harmful substances into the air. They are poisonous to humans and harm everything around them. Moreover, the heating process can last several hours. Therefore, you will need a gas mask and other protective equipment to prevent the fire of nearby equipment or furniture. You can use a protective screen made of a metal base or asbestos.
Detailed instructions on dismantling communications
Dismantling the system begins with the elimination of pipes located at a distance from the riser. For operational work, use a hammer and chisel. After all, cast iron itself is a rather fragile material, and accordingly, it is easily susceptible to mechanical destruction.
Important! To disassemble pipes, it is not recommended to use a hammer with a metal attachment. If you do not calculate the force of the impact, the hammer will fall inside the pipe, which can cause a large-scale blockage of the sewer system or the lumen of the pipeline will close.
A hammer with a polymer attachment is suitable for the job.
The pipe removal process includes several stages:
1. Work with a hammer is carried out until the cross in the riser becomes visible.
2. It is necessary to loosen the crosspiece. This procedure is easier to do when there is a small section of pipe remaining. However, some wizards do not leave extra in order to fully open the connection.
3
Wear all protective equipment and take precautions using protective screens. If two professionals are involved in dismantling, the work will take less effort and time
One specialist heats the sulfur, the second, at the same time, loosens the pipe, breaks off and removes the viscous sulfur.
4. The crosspiece can be easily removed from the riser when most of the sulfur has been removed.
Important! Care should be taken when removing pipe attached to a tee. Part of the pipe is cut off with a grinder. In this case, a fragment no longer than 10 cm should remain.
Then this segment must be loosened and removed.
In this case, a fragment no longer than 10 cm should remain. Then this segment must be loosened and removed.
Sealing connections
Sealing of joints is carried out as follows:
- The sealant used is neutral (non-acidic), silicone or polyurethane. For propylene, any is suitable; for PVC, only silicone.
- Each plastic gasket is treated with a thin layer of sealant. Rubber gaskets are installed dry in the couplings.
- The sealant is applied to the inner surface of the mounting pipe in a minimally thin layer and to the outer surface of the mating pipe with a layer of normal thickness, according to the instructions for the sealant.
- We insert the pipe into the coupling. The squeezed-out bead of sealant should have a diameter of approximately half the flange of the mounting pipe and be uniform in thickness. If there is something missing somewhere, we add a little.
- We wrap the joint with thin plastic film and use a spatula, brush or fabric swab to smooth the sealant through the film with slight pressure. A fillet should form at least 2/3 of the flange and the same amount along the pipe.
- Leave the film on the joint until the sealant hardens.
Replacing the riser
Replacing a sewer riser in an apartment is one of the operations that amateurs are strongly advised not to undertake. Changing the riser yourself is only permissible in a private house, where no one except you will get hurt. And you definitely need at least one helper. Experienced plumbers allow an assistant, who is already jokingly changing the wiring, to replace the riser for the first time only under strict personal supervision, especially since it is impossible to replace the riser alone.
If you do decide to do this, remember: all possible consequences are your full responsibility.
To replace the riser you will need the following:
- Rubber transition cuffs plastic/cast iron and cast iron/plastic.
- Plastic cross with diameters of 110 mm/110 mm/110 mm/50 mm, having a 50 mm bend in the desired direction (right or left).
- Two pipes with a diameter of 110 mm of the required length.
- Compensator 110 mm for plastic pipes. Without it, it will not be possible to assemble the riser, since the riser does not have a free end.
- Metal clamps with studs or crutches for attaching the riser to the wall.
- 2 plastic 45 degree swivel elbows for leveling or moving the riser to the side.
- Plastic insert with a cleaning hatch for a riser made of propylene pipes. PVC pipes for the riser are applicable on the top floor or in a private house.
The procedure for replacing the riser is as follows:
- We strengthen the old riser from above, as described above.
- We turn off the water and warn the neighbors.
- In the middle of the old riser we make two cuts, as when disconnecting the wiring from it.
- Insert TWO wedges or screwdrivers into the BOTTOM cut at 45 degrees on both sides from the middle.
- By beating one by one, we achieve chipping along the lower bridge. This operation requires a lot of experience and skill: if it is performed incorrectly, the entire column of pipes can collapse either towards you or downwards from you.
- We rearrange the wedges into the upper cut and break off the cut piece.
- An assistant (preferably two) hold the upper part of the pipe, and you use a chisel or chisel to remove as much of the seal as possible from the upper joint.
- Carefully, but shaking with force, loosen the upper joint and remove the pipe. This operation is no less important than cutting out the middle.
- We select the seal of the lower joint (after the cross-splitter) and just as carefully and forcefully rock and remove the lower pipe with the same cross. This stage is even more responsible.
- We assemble the new riser roughly according to the diagram, from top to bottom: pipe - adjusting bend - compensator - cleaning - adjusting bend - pipe - cross. We mate the top and bottom of the new riser to the cast iron with appropriate cuffs.
- During the rough assembly process, we adjust the lower pipe exactly to size.
- We do the final assembly using sealant, connect the wiring, and install the toilet.
- We supply water and notify neighbors.
- We secure the riser with clamps on studs or crutches at at least four points: a third of the length of the pipe from the upper and lower ends and at each adjusting bend.
Notes:
- Under no circumstances should you hammer on old pipes or pull them to loosen them. When loosening, you need to monitor the end of the pipe in the coupling and adjust your movements to the state of the seal. Just rocking it back and forth won't keep it loose forever.
- Particular care and attention must be exercised with intelligence when loosening the down tube. If it turns out of the crosspiece, then it is extremely difficult to loosen and remove the latter without already having a long lever, and completely impossible for a beginner. You will have to call on a specialist for help and prepare to patiently listen to everything that he deems necessary to say to you. And pay as much as he orders: not every plumber will undertake such work.
- Dismantling even a relatively new cast iron riser is a job with a high degree of injury risk. Heavy cast iron tends to twist out and collapse, and in a cramped toilet it’s difficult for even two people to grab a hold of, and there’s nowhere to jump off. Therefore, remember: all responsibility for yourself and for your assistants lies with you.
Conclusion
Whether to decide to replace the sewer system in your apartment with your own hands is your choice and your business. However, we hope that after reading you will be filled with respect for the hard, dirty, often dangerous, but vitally necessary and by no means simple work of plumbers for all of us.
When to change
Cast iron risers, due to their gentle operating mode, in which their contact with liquid waste occurs only briefly and the falling flow does not completely wash the walls, work in sewer systems for quite a long time. In multi-storey buildings on the upper floors, a cast iron riser will last much longer and will become less clogged, unlike the first floors, where the riser drain is in contact with the liquid for a longer time. The need to replace the riser may be caused by the following reasons:
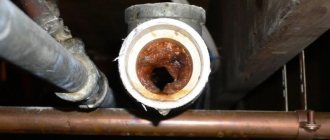
- Physical deterioration . During operation, the walls of cast iron risers become thinner due to low corrosion resistance, cracks and fistulas form in them, pipes leak, and there is an unpleasant odor in the bathroom.
- Frequent blockages . With prolonged use, the inner shell of pipe risers becomes covered with plaque; over time, its thickness increases - this leads to the fact that the throughput of the pipeline decreases and in emergency situations the passage channel becomes clogged.
Rice. 2 Damaged drain pipe
- Mechanical damage. Cast iron is a brittle material; when struck by sharp, heavy objects, it splits and cannot be repaired. When carrying out major repairs, situations sometimes arise when the old internal sewer pipeline of an apartment in the inlet pipe of the riser is broken, and the shaped element (tee, cross) may crack. The adapter from the internal sewerage system to the riser cannot be restored - it must be replaced, and the riser pipe will also have to be removed, and if it is very worn out and clogged with plaque, it must be replaced.
- Repair. When carrying out renovations in an apartment, it may be necessary to replace the tee in the sewer riser that supplies wastewater to a vertical pipe to change its configuration, using modern PVC products. In this case, it is easier and more reliable to install a plastic product instead of an old worn-out cast iron pipe, which is not intended for joining with shaped polymer parts.
- Noise insulation. If an inexpensive PVC pipe riser is installed in the house, when using the sewerage system, noise often occurs in it, reducing the comfort of living and using the toilet. One of the radical options for combating sewer noise is to replace the vertical riser pipe with a low-noise, specially designed one that has a higher mass and, accordingly, cost.
Rice. 3 Low noise sewer pipes


