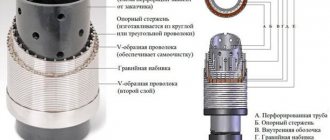
Not everyone in their dacha has a central water supply, but everyone needs water. For this reason, the problem of finding water, digging wells and drilling wells is very acute. Is it possible to find water on the site yourself? How to check its quality? We answer the most important questions.
Even if you were lucky and quickly found an aquifer, this does not mean that your difficulties are over. After all, not every liquid that is located underground is suitable for drinking: it may contain elements harmful to humans. For this reason, the found water must be tested before use.
How to find water on the site
Finding water is not an easy task. We want to introduce you to the most common methods of finding water. Let's start with the folk ones.
Traditional methods of finding water
Our ancestors were very observant. They could, by observing the behavior of animals or examining vegetation, determine where the groundwater was located.
Indicator plants
As you know, some plants prefer dry soils and cannot grow in places with high groundwater levels. Others, on the contrary, are found only in damp places. With this information, you can determine whether there is water in your area by analyzing the vegetation that predominates there.
- Woodlice, river gravel, wormwood, reeds, nettles, sorrel, ivy are indicator plants that indicate the presence of an underground reservoir on your site. If there is a birch tree growing on your property, carefully inspect the tree. If it is short and the branches are directed towards the ground, this is also a sign of the presence of water.
- A pine tree that feels great on the site indicates a lack of water in this place. Healthy apple, cherry or plum trees will indicate the same. In the presence of underground water, these trees begin to get sick and grow poorly.
Animal watching
Animals can also “tell” you where you can find water in your area - you just need to watch them carefully.
- In hot weather, dogs dig holes and lie down in them to make it easier to endure the heat. They place these holes in cool places where there is water underground.
- When a horse is thirsty, it kicks its hoof in the place where there is water.
- Midges swarm in the evenings over damp places.
- The mouse, on the contrary, searches only for dry areas. If she built a hole in the ground, there is no water there. But in areas located above groundwater, mouse nests are on branches or in grass, but not in the soil.
- Red ants also do not like high humidity. They build their anthills only in dry places - there is no point in looking for water there.
Use of water-absorbing (hygroscopic) materials
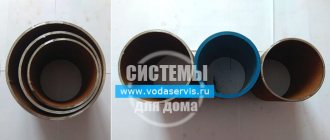
There are materials, such as salt or red (ceramic) brick, that strongly absorb moisture. The following method of determining the location of groundwater on a site is based on this property.
Take several completely dry clay pots, not covered with glaze. Prepare the material you will use as a water absorbent. Dry the salt in the oven. Grind the brick into powder and dry it as well. You can also take silica gel, which also has hygroscopic properties. Fill several pots with any of the above materials and tie them with linen, thick burlap or other natural fabric. After this, number the pots and weigh them on a very accurate scale (it is best to use apothecary scales).
Dig holes in different places on the site and bury the pots to a depth of about 50 cm. After a day, dig up all the containers and send them to the scales again. The pot whose weight has increased the most will indicate the location of the underground water.
Finding water using dowsing
Dowsing was known back in the 15th century. Then, with its help, they looked for minerals, treasures, geopathogenic zones, etc. Our ancestors used it to find water. Nowadays, dowsing is considered a pseudoscientific practice, but it continues to be used and sometimes quite successfully.
How to find water using a vine
Our ancestors, who did not have any modern devices for finding water, used dowsing for this purpose. The essence of this method is as follows. Find a slingshot-shaped branch on a willow, willow or hazel where the distance between the shoots is approximately 150 degrees. Dry it thoroughly before starting work.
Search for water by moving first from north to south, and then from east to west. Press your elbows to your body, and grab the slingshot with your hands by both ends so that its sharp end “looks” up. Move slowly around the area. In the place where underground water is located, the vine will go down. Place a peg here. So go through the entire area. Using the pegs you can then determine the location of the aquifer.
How to find water using a frame
A similar principle underlies the search for water using a metal frame. Prepare two aluminum rods about 40 cm long and at least 3 mm in diameter. Measuring about 10 cm from the edge in each of them, bend them at an angle of 90 degrees. For convenience and greater precision of work, prepare two hollow tubes made from elderberry, viburnum or hazel (remove the core from the branches). Insert the short ends of aluminum rods into them.
Move around the area in the same way as when searching with a vine. Take branches with frames in your hands. Press your elbows to your body, position the aluminum frames parallel to each other. Start checking the area. In the place where the water is, the frames will begin to move and intersect. Place a peg here. Using them, as in the previous method, you can then determine the location of the aquifer.
Scientific ways to find water
Everything in life changes. The methods of searching for water on the site have also changed. Nowadays, more reliable tools are used for this purpose than a frame and a vine, and the inexhaustible possibilities of modern technology.
Manual drilling
One of the common methods of searching for water in an area is exploratory drilling. Using a hand drill with a diameter of about 30 cm, you can make holes up to 10 m deep. The drill is removed along with the soil every 20 cm. The soil is inspected to determine how much wetter it is compared to the previous one. Professional drillers can use this method to quite accurately determine the proximity of the aquifer. However, it is impossible to determine the volume of an underground source by drilling - this is a significant disadvantage of this method.
Spectral seismic exploration
This scientific method is one of the most accurate in determining the location of groundwater. Its essence is as follows. The entire territory of the site is tapped, and the “responses” - the force of vibrational waves of the soil - are captured and recorded by a special device. The data is entered into a computer, where a special program is used to calculate the probability of finding water and the depth of the aquifer. The method has one significant drawback - its high price.
Pottery for determining the aquifer
In ancient times, a dried clay pot was placed at the supposed place of groundwater flow, positioned upside down. The accumulation of moisture inside it indicated the presence of an underground channel.
Modern techniques involve the use of silica gel granules, a material with good absorbent properties. 1-2 liters of the substance are placed in the oven to dry and then placed in a pot. The container tied with linen is weighed and buried for a day at a depth of 1.5-2 m, after which it is checked again on an accurate scale. The greater the weight of the composition, the greater the likelihood of nearby water increases and the opportunity to construct a well appears.
As an alternative to silica gel, pre-weighed finely crushed ceramic bricks can be used.
Is water alive or dead?
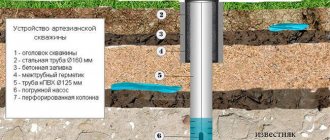
Remember the fairy tale about living and dead water? Tap bleach is bad. Whether it’s a well or a borehole, the water from which undergoes multi-stage natural filtration in the layers of the earth, therefore, it is an order of magnitude better, cleaner and healthier. However, this is not quite true. And the first thing you need to understand is the difference in the chemical composition of waters lying at different depths.
- Surface , replenished by precipitation. This water is suitable for irrigation, but it cannot be called drinking water. It is usually very turbid, because, coming from the soil surface and passing through the clay and sandy layers, it retains a lot of suspended solid particles.
- Groundwater , also replenished by rain and melt water. An additional risk factor is pollution from industrial and livestock waste. It is these waters, together with surface waters, that fall into wells up to 20 m deep.
- Interstratal , surrounded by waterproof soil layers. They are the ones who most often go to the owners of their own well in the country. Water from a depth of 20-30 m, as a rule, contains a lot of chlorides, nitrogenous compounds and sulfates. At a depth of 30-70 m, the temperature is lower and the pressure is higher. As a result, carbonate and bicarbonate ions of calcium and magnesium are formed here, which increases water hardness. Another problem with waters at this depth is an excess of ferrous compounds.
- Artesian ones lie at a depth of more than 100 m and are the most environmentally friendly. However, they may also contain impurities that are hazardous to health. Typically, artesian water suffers from increased mineralization and a high percentage of manganese. Also, at great depths, optimal conditions are created for the development and activity of hydrogen sulfide bacteria.
Thus, “living” water extracted directly from the ground is much more dangerous than purified (even chemically) “dead” tap water. But this does not mean that wells have become obsolete. Not at all. It’s just important to evaluate the quality of the water before you start using them.
Places where underground moisture accumulates
Penetrating into the soil, precipitation undergoes natural filtration. They accumulate in soil layers, forming aquifers. These inland bodies of water not only lie horizontally, but also bend. This is how unique lenses consisting of an aqueous solution are formed. Their volume can vary from 3-5 to several tens of cubic meters.
Deep deposits are of greatest value to humans in terms of use and consumption. The liquid medium in them is filtered in the best possible way. This high-quality liquid is found at a depth of 8-10 meters. If we consider not simple water, but enriched with mineral and salt components that are beneficial to human health, then it can be found no closer than 30-50 m from the surface.
How often should you test your water?
The first check is carried out 3-4 weeks after drilling the well. During this period, sand and particles of hard rock raised during excavation have time to settle. The optimal time for laboratory research is the off-season, because... It is in autumn and spring that surface waters are most polluted.
In the future, water quality analysis is recommended to be carried out once a year. The following cases are exceptions:
- the water source is located in an industrial zone: testing is carried out once a quarter or at least every six months;
- water is used for drinking: testing is carried out 2-3 times a year.
An unscheduled inspection is carried out after repair work in a well/well or after installation of filtration and purification equipment.
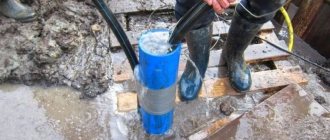
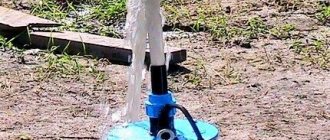
Homemade depth gauge
This is the easiest way to determine the depth of a well or shallow well. It is implemented using a construction tape measure, a cord and a steel weight. Clear, dry weather is best for taking measurements in this way. Optimal dates are late summer, early autumn. The fact is that during this period groundwater is at its lowest level.
Tools for self-measuring well depth
Operating procedure:
- Determine the diameter of the well. A ruler is used for this. This will make it possible to select a suitable load.
- Lower the string with a weight at the end inside the shaft until the cord reduces its tension. This indicates contact with the bottom of the well.
- Pull the string out and lay it out in a straight line on the ground. By measuring the dry part, determine the distance to the water surface. To simplify the task, before starting the procedure, the cord is equipped with colored ribbons at the same distance.
- The size of the wet section of the string will indicate the volume of the source well.
Measuring the depth of the well using string and sinker
The main disadvantage of this simple method is the significant limitations on the measured depth (no more than 10 m).
In addition, the dimensions of the wet area indicate only the static level of the well, while when installing a pump it is necessary to know the dynamic level. To determine it, a suction hose with a filter at the end is threaded inside the casing: it must reach the bottom. By turning on the pump, time the time until the water supply is completely emptied. You need to turn off the pump only after specific squelching sounds appear. After this, the depth measurement procedure is repeated again: the height of the remaining water is the dynamic level.
Taking water for testing
So, we have a well or well. And the first task is to assess the current water quality. To do this, you need to take samples, adhering to the following rules.
- Use sterile glass or plastic containers with a volume of 1.5 liters. Bottles of soda water or other sugary drinks require careful disinfection, because... Particles of dyes and food additives may remain on their walls, which will distort the results of the examination.
- Be sure to drain any stagnant water. When drawing water from a well using a pump or from a well, allow the water to drain for 15-30 minutes. A liquid that has not been updated for a long time is always much worse in quality than the one that will replace it. If you are drawing from a well using a bucket, lower it lower than usual, but do not try to reach the bottom. The water closer to the surface may be stagnant, and at the very bottom there will be a significant admixture of silt.
- Draw water not from a tap, but from a pipe connected directly to the source. The pressure should be low so that excess air does not enter the container. Saturation of the environment with oxygen can provoke various chemical reactions, which will affect the accuracy of the results.
- Fill the container to the brim so that there is no air pocket in it, and close with an airtight lid or stopper.
- Collect water immediately before taking it for examination. The maximum storage period should not exceed two days. At the same time, store the container in a cool place. To prevent flowering and other reactions resulting from exposure to sunlight, wrap the container in a thick, opaque bag.
A note must be attached to the water container for examination indicating where the sample was taken, the type of source, and the exact date and time of collection.
Ultrasonic level gauge
A professional device, the operating principle of which is similar to the IUGS device discussed above.
Ultrasonic level gauge
In this case, instead of conventional sound waves, ultrasound is used for measurement. Its pulses are sent towards the obstacle, and by determining the difference between the time the signal is sent and returned, the final result is produced. Ultrasonic level meters allow you to determine the level of the medium without coming into direct contact with it. They are used to work in hard-to-reach places, which include a well.
Laboratory research
The most accurate way to determine water quality is to send a sample for examination. In each federal district there are organizations that have the authority to conduct relevant research:
- sanitary and epidemiological stations,
- laboratories at the research institute,
- geological laboratories,
- accredited laboratories of Rospotrebnadzor,
- laboratories in regional water utility departments,
- laboratories in organizations whose activities are related to geological exploration.
The cost of services depends on whether you contact a private or public organization, as well as on the type of research. For example, you can conduct not a full, but a partial test aimed at identifying a separate group of substances.
The comprehensive analysis consists of two parts. The scan parameters are listed in the table.
| Chemical testing of water (analysis for compliance with SanPiN 2.1.4.1074-01) | Microbiological examination of water (determination of bacteriological and parasitological indicators) |
|
|
Upon inspection, you will receive a document with detailed characteristics of the water. This will allow us to conclude whether the existing well can be used for specific purposes. Also, a report from the laboratory will help you choose the optimal cleaning system that will solve existing problems.
Water analysis by eye
Sometimes even a visual inspection of the liquid, analysis of its smell, taste, color and transparency is enough to understand whether it is suitable for use. We list the most common causes of contamination and methods for eliminating the problem.
- Low efficiency of the mesh filter (or lack thereof). The main sign: the water is cloudy. During operation, the filter becomes clogged with sand and clay deposits and, as a result, fails. All you need to do is clean the equipment or install a new one instead.
- Groundwater pollution . The main sign: the water is cloudy. Groundwater sometimes penetrates through the rings of concrete tanks or a hole in the caisson. The problem will be solved by pumping out accidentally infiltrated groundwater, cleaning the surface of the concrete structure and the caisson from a layer of contaminants, as well as sealing the holes that led to the leak.
- Excess iron . The main symptom: the water has a metallic taste. Cleaning from ferrous compounds is possible through the use of reagent or reagent-free filters. Reverse osmosis installations, as well as the aeration method, are popular.
- Excess of hydrogen sulfide . The main symptom: the water has a pronounced rotten smell. A carbon filter or water disinfection with potassium permanganate will help reduce the amount of hydrogen sulfide.
Comprehensive well cleaning
Comprehensive well treatment includes cleaning the shaft and disinfecting the water. Such measures are relevant for all wells without exception and should be carried out at least once (or preferably twice) a year in early spring or after a spring flood.
The whole process goes as follows.
- Pumping out water . If there is not too much water in the well, it is enough to use a surface pump. Otherwise, you cannot do without more powerful submersible equipment. Before starting work, be sure to remove all floating debris using a fine mesh net.
- Inspection and treatment of the bottom and walls of the well . When the water has been pumped out, go down into the shaft and inspect the bottom and walls for cracks and leaks. Fix all defects with a waterproofing solution. Using brushes and a spatula, clean all surfaces of silt, algae and debris. From the bottom, remove sediment and old bottom filling, which is replaced with a new one (gravel, sand, fine crushed stone). Expanded clay cannot be used for backfilling, because... its specific gravity is too small, in addition, the material is toxic. If there is plaque on the concrete rings, remove it with special compounds (for example, a weak solution of hydrochloric acid or vinegar for salt deposits; copper sulfate for mold; corrosion stains are removed with a grinder or jackhammer, and then treated with a waterproof anti-corrosion compound).
- Water disinfection . Disinfectants must kill pathogenic microflora and suppress their development, but at the same time be safe for humans, not harm the walls of the well and can be easily washed off. After the water is disinfected, it is pumped out of the well.
To pump out water that has undergone the disinfection procedure, use an inexpensive pump so that after completing the work you won’t be sorry to say goodbye to it.
Method No. 5 – exploratory drilling.
The most accurate search method. To implement it, you do not need any special equipment or hired people; you can easily carry out exploratory drilling yourself. And for this you will only need a simple garden auger with an auger of 30 cm or more.
By the way, in order not to turn your site into a sieve, we first recommend using the methods listed above (one or more) to still outline the proposed locations for the wells. If none of them appeals to you, well, you can drill “holes” throughout the area at random.
Exploratory drilling is carried out to a depth of 6-10 meters, and after every 10-15 centimeters, in order not to break the tool, soil is excavated.
Note:
- the location for the well must be sufficiently far away (at least 25-30 meters) from all possible sources of pollution - garbage, compost pits, drainage trenches, etc.;
- during exploration work, you should not rush, since the aquifers are not too large (only 5-10 cm thick), therefore, by drilling extra meters in a hurry, you can easily skip them;
- if there is a choice, then the well should be placed on an elevated area, since melt and rainwater will constantly flow and drain into the lowland, displacing clean water to the level of the aquifer.
Popular means for disinfecting water in a well
Despite the emergence of modern methods of physical disinfection (ultrasonic and ultraviolet cleaning), more conventional chemical methods of disinfection using available means do not lose their relevance.
Potassium permangantsovka
The use of potassium permanganate is considered a gentle disinfection method. Everything is done according to the following scheme:
STEP 1 . Add 1 tbsp to a bucket of warm water. potassium permanganate, mix, pour the solution into the well.
STEP 2 . After 30-60 minutes, pump out the water.
STEP 3 . Rinse the dry walls of the well shaft with a manganese solution.
STEP 4 . Place a mesh (sieve) with 3-5 g of manganese or silicon chips on the bottom. The mesh will be in the well constantly, providing an antibacterial and disinfecting effect.
1% chlorine powder (bleach)
Bleach provides a fairly strong disinfection. To calculate the required amount of bleach, follow the instructions.
- Take 10 g of powder and dilute in 1 liter of clean water.
- Fill 3 200 ml containers with well water.
- Add 2 drops of chloride solution to the first container, 4 to the second, and 6 to the third. Mix the liquid in each container.
- After half an hour, evaluate each container for the chlorine smell: it should be barely noticeable.
- Calculate the required amount of solution using the following data: 1 ml of bleach solution contains 25 drops, i.e. for disinfection 1 cubic meter. 400 ml of solution is needed in the well.
The disinfection process itself occurs as follows.
STEP 1 . Pour the solution into the well and stir the water with a long pole for 10 minutes. If the volume of water is large, use a bucket on a rope: scoop up the liquid with it, and then pour it back.
STEP 2 . Cover the well with plastic film or cloth for 12-24 hours in the cold season or 6-10 hours in the summer. The material must be dense to prevent sunlight from entering the mine, which destroys chlorine molecules.
STEP 3 . If after the specified time the smell of chlorine is completely absent, repeat disinfection.
STEP 4 . Rinse the walls of the well first with chlorinated water, and then with clean water.
STEP 5 . Pump out the water until the smell of chlorine disappears.
"White"
The amount of “Whiteness” required for water disinfection is calculated as follows: 1 liter of product per reinforced concrete ring of the well. The sequence of actions is similar to using bleach.
Results
The need to accurately determine the depth of a drinking well usually arises in two cases. The first is when you need to check the work of the drilling company, because... The calculation for the work is carried out according to the depth of the depth. Such information will also be needed when constructing a well yourself: it will help you decide on a pump. When choosing a measurement method, take into account the required level of accuracy and your financial capabilities.
How to find out the depth of a well: 10 ways and means to determine the depth of water
water dacha well garden well Plot