Beton-House.com
Website about concrete: construction, characteristics, design. We combine the experience of professionals and private craftsmen in one place
Concrete caisson
When constructing drinking water wells, it is necessary to resolve the issue of access to the well head and well equipment for their maintenance and repair. And also provide them with protection from freezing and flooding by groundwater.
To do this, caissons are installed above the head - special sealed cavities with access from the outside. They can be made of different materials, including modern ones. But for now, one of the most popular options remains a caisson made of concrete rings for a well.
This article will tell you about its advantages and pain points, as well as the features of constructing caissons from reinforced concrete rings.
- Design elements
Device
This is a sealed container made from different materials. At the bottom there is a pipe coming out of the well with water and a casing. The terminal should be located below the freezing level of the soil in your area. The height can be from 1 m to 2 m. The diameter of the structure must allow for normal installation and maintenance of the installed equipment.
Advice: in case of flooding of the caisson, it is recommended to make drainage.
Design features
A caisson is a metal or plastic container that looks like a box or a two-meter barrel. Often, steel is used to make caissons, which must be insulated (partially or completely) and painted using special solutions. If necessary, a ladder is installed inside the caisson structure; this is necessary for large container sizes.
Based on the water supply system, or, more precisely, which parts of it will be installed in the structure, the dimensions of the structure with a caisson are selected. There is a hole at the bottom of the structure through which water is supplied. They also install a cover over the pipe hole to make it easier to get to the well for cleaning it.
Return to contents
Arrangement of the CDS
Equipped with the following equipment:
- Pump: submersible or surface pump.
- Filtration system.
- Hydraulic accumulator.
- Automation block.
- Shut-off valves.
- Pipeline.
- Check valve.
- Measuring instruments (pressure gauge, etc.).
Installation must be carried out in accordance with certain requirements:
- Depth not less than 2000 mm.
- The casing pipe should be in the center of the pit.
- When constructing a container made of concrete, a base of crushed stone and sand is built.
- The walls of a concrete or brick KDS must be waterproofed.
- The pit should have dimensions 300 mm larger on all sides around the perimeter.
- When purchasing a PVC structure, waterproofing work is not required.
- From the inside, the structure must be insulated with heat-insulating material.
- Subject to the presence of groundwater, the chamber is mounted ready-made. All actions to prevent moisture penetration occur on the surface.
Preparatory work
First you need to decide on the choice of the main material for the caisson. In this case, the defining points are:
- cost of materials and finished structure;
- personal skills in working with materials and tools;
- the lowest temperature level in the cold season.
To arrange the caisson you will need:
- bayonet and shovel;
- welding machine;
- hacksaw for metal;
- plumb and level;
- construction mixer;
- containers for solution;
- trowels;
- spatulas.
The dimensions of the internal space of the caisson are determined by the specific use case. If it is planned to place a pumping station and other equipment inside the caisson, an area of 150 by 150 cm or a diameter of 150 cm is required . If the installation of special devices is not planned, a free space of 100 by 100 cm or a diameter of 100 cm will be sufficient.
It is necessary to dig a pit around the well. Along the perimeter, its size should exceed the outer edge of the wall of the future caisson by 15 - 20 cm. The depth of the pit is determined by the level of maximum freezing of the soil. The bottom should be placed 50-60 cm lower.
Types and their sizes
The main requirement for choosing a material is tightness. There are several options to ensure this:
- Steel. Can be square, rectangular and cylindrical. The structure must be insulated and protected from corrosion.
- Homemade concrete. There are two options: installing rings or pouring a reinforced concrete structure over formwork. Concrete also needs insulation and waterproofing.
- Made of brick. The low thermal conductivity of the material requires mandatory insulation, especially if the masonry is made of one brick. Waterproofing measures are also required.
- Plastic. These are ready-made containers produced in a factory. They are light in weight. At the same time, they are distinguished by high rigidity. They are completely sealed. If good insulation is done, plastic containers do not need to be buried in the ground.
Advantages
The durability of concrete is the main advantage of this design over other types. By choosing this option, you will forget about the issues of equipment replacement and repair for the next 30 years. Even a brick caisson cannot compare in strength to cement. Plastic shelters will definitely not withstand such a load for a long time. Corrosion is not terrible for concrete, which cannot be said about metal caissons.
In addition, there are three more advantages:
- Short installation times. You can mount and install the rings on top of each other in just a few hours. With the help of a crane, it is quite possible to cope with this task in half a day. The duration of the overall process is limited only by the rate of concrete hardening.
- Easy to repair. In an emergency, you don’t have to dismantle the entire structure. Undamaged elements can be easily removed and reinstalled. Other types of caissons usually require complete disassembly.
- Saving money. Based on the estimate of materials, the shelter will be cheaper than similar types. Easy installation does not require significant investment in equipment and workers.
pros
This will help determine which caisson is best to build.
| Advantages | ||
| Varieties | pros | |
| Plastic |
| |
| Reinforced concrete |
| |
| Concrete rings |
| |
| Brick |
| |
| Metal |
| |
Safety Basics
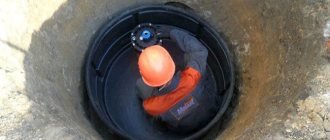
Inexperienced homeowners often neglect basic rules and endanger not only themselves, but also their partners. To avoid ridiculous injuries, you need to follow at least some basic rules.
- A person in a mine must protect his head with a helmet. Anything can happen; a bucket falling down or a tool falling down is not uncommon.
- Ropes, ropes, ropes, rings - everything related to lifting is carefully checked before starting work.
- A person dripping in a shaft must be secured with a rope, and if the depth of the well is over 6 m, then with two: a working rope and a safety rope.
The construction of a well must be carried out by several people
- There are so-called gas pockets in the soil, and since the air exchange in the mine is not fast, as you descend, they periodically light a candle. Its flame should burn evenly, which indicates a sufficient amount of oxygen; if the fire goes out, the pit needs to be checked.
Advice! There are several ways to ventilate a mine. The easiest way to do this is with a thick blanket, which is lowered to the bottom several times and raised back on ropes. A fan lowered to the bottom of the shaft will also help speed up gas exchange.
Tools
The set of construction tools largely depends on the type of container, or rather, what material it is made of. However, in any case, a shovel and buckets are needed.
Advice! You can speed up the digging process by renting special equipment. But sometimes this is impossible due to its size and the difficulty of accessing the source.
The following tool is needed:
- Concrete mixer.
- Shovels.
- Master OK.
- Tamping.
- Hammer.
- Trowel.
- Level.
- Buckets and the like.
The work may require:
- Sand.
- Cement.
- Crushed stone.
- Pure water.
- Fittings.
- Additives (giving concrete improved properties) and so on.
Types of water intake, which one to choose?
The water intake of a conventional mine well is of three types:
- An incomplete water intake is the most common option and means that the shaft does not reach the lower impermeable layer, and water seeps through the bottom and wall.
- The full water intake reaches the waterproof layer and water seeps only through specially prepared walls of the shaft.
- A full water receiver with an expander is a structure that not only reaches the lower water-resistant layer, but also goes deep into it, forming a niche for accumulating water reserves. Its lower part is often made expanded.
Scheme: types of wells by type of water intake
Important! To think that the more water in the well, the better, is completely wrong. It is important to correctly calculate the balance between daily consumption and volume, otherwise stagnation with all the ensuing consequences is inevitable.
How to do it yourself?
It is necessary to take into account a large number of nuances and carry out a number of preparatory work.
- Choosing a location. The well for the well is made in the same place where it was drilled. Therefore, there is not much choice here. It is important to take into account the pipe outlet. It doesn't have to be in the center. If the KDS is rectangular, then the exit may be on the side.
- Depth. The caisson made for the well must be placed taking into account negative temperatures. Otherwise, its effectiveness will be reduced to zero. This level differs in different regions of Russia.
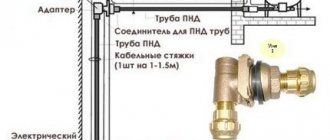
- Trench for electrical cable and water supply. A ditch must be dug along which engineering systems are laid. The cable can be laid in the same trench as the water supply. But it should be placed in a protective casing. The depth of this trench should also be sufficient in cold weather.
- A pit is dug in the hole itself. It will be located around the casing.
- An important step is the process of insulating the walls. Waterproofing the structure from the outside is considered the most effective. Liquid bitumen is preferably used since a seamless coating can be achieved.
- As for insulation, it can be done from the inside if circumstances permit. It can also be done outside. In the latter case, the insulation must be protected from soil pressure. For example, when using rock wool, the soil will put pressure on the rock wool, reducing its effectiveness.
Why are caissons installed?
To supply water to residential premises, it is not enough to drill a well and install pumping units; you also need to take care of protecting the structural elements from external influences. To achieve this goal, a special device is installed - a caisson. It will not allow equipment to fail and water to freeze in pipes at subzero temperatures.
In addition, installation of a caisson is necessary:
- to prevent melt and groundwater from entering the volume;
- for ease of maintenance of units that deliver water, as well as purify it due to its location in one place;
- to prevent animals, people, insects from entering the closed area;
- to ensure an acceptable distance between the wellhead and the pump.
The caisson is installed for ease of maintenance of units delivering water.
Step-by-step production
Each case has its own points that are important to pay attention to.
Reinforced concrete KDS
Pouring concrete walls:
- First, a pit is dug.
- A concrete base is poured as the bottom.
- An embankment is made of sand and crushed stone, which is carefully compacted and then filled with concrete screed.
- When the base has dried, the wall formwork is assembled.
- A reinforcing mesh must be made, which will give the structure the necessary rigidity.
- When all this work has been completed, concrete is poured.
- During the pouring process, the concrete should be penetrated to completely eliminate the formation of voids. Filling must be done in one visit.
- When everything has frozen, all that remains is to make the lid. You should put together a frame from wooden panels, also lay a metal mesh, and then fill it with concrete in one go.
- It is also necessary to dismantle the formwork and carry out hydro- and thermal insulation work.
- The lid must have an entrance to the basement and ventilation holes.
- The structure is complemented by a stationary or removable staircase.
Made from concrete rings
It installs faster. The work has the following order:
- A pit is dug with a diameter larger than the rings by 300 mm.
- The bottom must be dug strictly to the level.
- A cushion of sand and crushed stone is poured into the bottom and everything is compacted.
- If there is a bottom element, then it should be placed on the bottom using a crane. If not, then the bottom is filled with concrete. Don't forget about the hole in the bottom plate for the well pipe to exit.
- When the bottom is ready, the rings are installed. They are connected to each other with cement mortar.
- After installing the required number of rings on the outside, they are treated with waterproofing mastic. Be especially careful with joints.
- To lay communications, holes are made in the rings. After laying the pipeline and electrical cable, the holes should be treated with sealing material.
- A cover and hatch are installed on top of the structure.
- The ring caisson is ready for use.
Brick KDS
A brick building requires the longest time to build. The work proceeds in the following sequence:
- A pit is being dug, larger in size than according to the project.
- A cement-sand cushion is poured into the bottom and everything is filled with concrete.
- When the screed has dried, you can begin laying bricks.
- Be sure to use a level to check the horizontal and vertical.
- Decide in advance whether the masonry will consist of one brick or two.
- A height of 2 m can be laid out of brick at a time. The speed of laying directly depends on qualifications; if they are low, the process may take several days.
- After laying out the walls, you need to wait until the solution dries completely.
- After this, formwork is made to pour concrete into the roof of the structure. A frame made of reinforcement must be placed in it.
- Finally, the walls of the structure are waterproofed, insulated and buried from the outside.
- Hatch and ladder installed.
Installation of concrete structures
A footing is applied to a flat layer of earth, the thickness of the layer is in the range of 80-120 mm. For 25 kg of the finished mixture you will need approximately 100 liters of crushed stone, 70 liters of sand and 20 liters of water. It is not necessary to adhere to high accuracy in measurements; this is not critical for this cement.
Bottom of the pit
At a distance of 20 cm from the rings, formwork from boards is laid out. The top edge should touch the fill height level. The finished concrete mixture is poured into the area between the boards and leveled to a smooth surface. After a week of waiting, the footing will harden and acquire the desired condition.
Maintenance and repair
Installing a caisson is one thing, maintaining it in good condition to increase its service life is another matter entirely. There are several tips and recommendations:
- From time to time check the structure for leaks. Especially if the camera is made of metal. The seams and the material itself may be subject to corrosion. If this is the case, then the problem areas are eliminated.
- Check the quality of the top concrete cover. Due to the influence of high temperatures, it is susceptible to destruction.
- Check the outlets of the pipeline and power supply for leaks.
- Check the outlet of the casing pipe.
How to choose a place for a well and when to start digging
There is a whole arsenal of folk methods for finding water and determining the location for a well, most of them are not questioned, and dowsing is still popular to this day. Experts recommend, at a minimum, asking neighbors or independently measuring the depth of nearby structures. But only exploratory drilling can guarantee an accurate result. The well must be located on the site in a place where it is not at risk of contamination by domestic wastewater (for example, far from the country toilet).
Detection of aquifers using the folk method - dowsing
In addition, it should fit perfectly into the landscape design. It is not recommended to start construction work in the spring, since due to fluctuations in groundwater content, you can make a mistake with the depth. The optimal time is considered to be the end of winter, but not later than March. Work can also begin at the end of summer.
What does a well consist of?
Basically, above-ground and underground elements are distinguished. The depth of the well should allow filtration to be installed.
Main parts of the well:
- Header. Represents the upper ground part. The element performs a protective function to prevent runoff and precipitation from entering the source. The head structure includes a roofing part, a blind area, a canopy and a lifting structure. To decorate the head, you can use wood, stone, or plaster. A mechanism is provided outside for draining rainwater.
- Shafts of hydraulic structures. This is the space between the head and the bottom. The design has a casing. The main purpose of the element is to protect concrete rings from destruction.
- Water intake part. Used to store water. There the liquid is filtered and settled.
The well consists of above-ground and underground elements.
The water intake part includes a casing and a filter. In this case, the design can be incomplete, complete or with a sump. In the incomplete version, the column does not reach the water layer and approaches from below.
The incomplete design is simple to implement and has a large volume of water.
The full version is more complex in design, where the casing rests on a layer of waterproof rocks. The part with the sump has a water reserve depth of 1.5 meters. Suitable for large quantities of liquid.