Plumbing in a dacha is a luxury that not everyone can afford. Difficulties in supplying water to the site can have different sources: the distance of the main water supply from the dacha, the impossibility of laying pipes, the high cost of equipment/plumbing, and much more. But in a summer cottage there is a constant need for water - to rinse your hands, to wash your face, or to wash the dishes. And the salvation in this case is a small country washbasin, which, by the way, is quite easy to make with your own hands.
DIY country washbasin
Features of country washbasins
A washbasin that can be used for a summer residence is generally a small structure that does not have a connection to water supply or sewer pipes, but performs simple functions that enable the user to maintain the proper level of hygiene of the body and home. So, usually the structure of a washbasin consists of only a water tank and a small sink (and in some cases there is none). The latter can be hung on the wall or installed on a cabinet. The water container can have different volumes - this will determine how often you will have to fill the tank in order to use the washbasin. However, such designs are not particularly large in size.
Design of a self-assembled country washbasin
Washbasin for a summer residence with a drainage channel
Typically, the washbasin tank is filled with water as needed. To use it, you need to open the tap or press a special lever, and the water will flow. Once the tank is empty, you can refill it with water and use the sink.
Original heated country washbasin
On a note! Typically, country washbasins are installed on the street near the house or bathhouse. But some design options can also be installed indoors, provided that proper drainage of used water is organized.
A dacha is a great place to relax, but don’t forget about gardening work.
You can use a dacha washbasin in the following cases:
- the need to rinse your hands after dacha work;
- washing hands and face to maintain hygiene;
- washing dishes;
- rinsing small items.
Heated washbasin for a summer residence
Due to its small dimensions and small volumes of water, it will not be possible to use a washbasin for larger purposes (for example, taking a shower).
Washbasin for a summer residence - decor
Advantages of a country washbasin:
- ease of installation anywhere;
- ease of making with your own hands;
- small dimensions;
- simplicity and ease of use;
- mobility - the washbasin can be easily moved to another place if necessary;
- the water in it quickly heats up under the rays of the sun - you can use warm water. However, there are country washbasins with the ability to heat water.
Simple plastic washbasin (washstand)
Disadvantages of this design:
- the need to frequently collect water;
- in cold weather, the water in the sink will remain cold;
- for the winter it must be emptied and removed from the street, otherwise it may be damaged;
- impossibility of full connection to the water supply and sewerage system.
The cheapest and easiest way to make a country washbasin
Simple washbasin with cabinet and sink
Types of designs
Despite the fact that when most people mention the phrase “country washbasin,” they imagine a small tank installed on the wall of the house, there are a lot of varieties of this type of design. And they differ not only in the color and material from which they are made, but also in size, appearance and even a number of design features.
On a note! Among country washbasins, there are the most primitive options and, at the same time, complex designs that have the function of heating water or unusual decorative design.
Outdoor washbasin
Table. Summary table of types of washbasins.
| Type | Short description | Subspecies |
| Street | Such washbasins, as you might guess, are installed outdoors. Usually these are suspended structures, fixed to a wall or some kind of support, and may not have a sink (in this case, the water simply flows to the ground). They are small in size and easy to use. There is no water heating function (warm water can only be used on sunny days, when the liquid is heated by the thermal energy of the sun). | They have one standard option - the one that hangs on the wall. The only differences here can be in the materials, shape, dimensions of the product and the method of water supply. |
| Home type | These washbasins are installed indoors - in a bathhouse, at home, on a veranda, etc. They usually have a more complex design, since here it is necessary to think through a water drainage system (it can be discharged either into a container, which is then emptied, or into a pipe, connected to a cesspool or taken outside the house to the site). Also, this version of washbasins suggests, in some cases, the possibility of supplying water to the container to be filled and the possibility of heating the liquid. | Such washbasins can be divided into 4 categories: on a counter, with a cabinet, with a filling system, and with a water heating function. |
Washbasin with heated water for a summer residence
As for the materials used to make washbasins, plastic, stainless steel and sometimes wood are usually used. The latter is used less and less, since two other materials surpass it in performance characteristics. For example, a steel washbasin can last for many years without damage, plastic is absolutely not afraid of water, etc. When choosing a material, you should focus only on your own preferences and wishes in general. Below we will take a closer look at some types of washbasins.
The washbasin can be placed next to the beds
DIY washbasin from scrap materials
Self-leveling washbasin
This option can also be called hanging. This is the simplest model, consisting of a small water tank, fasteners and a tap for the ability to turn on or off the water. This type of washbasin works like this: the tank is filled with water manually, then you just need to open the tap or use the pressing mechanism, and the liquid is ready for use. Caring for the tank is extremely simple - you just need to regularly clean it from the inside to remove sediment and remove it from the street for the winter.
Plastic wall-hung washbasin
On a note! The capacity of such a washbasin usually does not exceed 3-5 liters of water. You can mount it on a house, on a tree – in general, on any vertical surface.
This option is excellent for ensuring a primitive level of hygiene - rinsing hands and washing. It is usually mounted outdoors in an accessible place for use. Installing it couldn’t be easier, and such a tank costs mere pennies. By the way, you can ensure the presence of such a washbasin in your dacha even without going to the store - it’s very easy to make it yourself.
Scheme of a washbasin made from a plastic bottle
A simple pour-over washbasin can be made from a plastic bottle
The drain can be organized in any way you like: install a sink, and under it an old bucket, run a pipe, or simply allow the water to flow to the ground. By the way, it is recommended to pour gravel into the place where water will seep underground.
There are pour-over washbasins and much larger volumes - up to 18 liters. There is enough water in them, including for washing dishes. They can have different shapes, are usually made of plastic or metal, and always have a valve to prevent sudden leakage of water. You can install such a tank in the house or on the street, the main thing is to securely fasten it on a vertical surface.
A canister washbasin is a great option for the garage
Washbasin with cabinet
The head of the washbasin and the commander of the washcloths... That’s right, this type of washbasin, equipped with a cabinet, is popularly called “Moidodyr”, which Korney Chukovsky once wrote about. Such a washbasin looks massive and stable, and it can be installed both indoors and outdoors (you can see it more often in the house). The design is a wooden cabinet equipped with a sink and a water tank. There is also a small cabinet where you can store personal hygiene items.
Country washbasin with cabinet
The water tank of such a washbasin usually has a good large volume. You can fill it either manually or supply water through pipes. You can install a bucket inside the cabinet to collect used water. It's important to remember to take it out. The main advantage of this “Moidodyr” is the ability to conveniently wash dishes, and not just wash or rinse your hands.
Attention! If “Moidodyr” is located outside, then it is important to put it indoors for the winter so that the wood from which the cabinet is made does not become unusable. Also, you should not place such a structure in direct sunlight - the material may dry out and become deformed.
In a summer cottage, even with water supply, a washstand is a vital thing
Washbasin on counter
This is a greatly simplified version of “Moidodyr”, it is a structure of a support, a tank and sometimes a sink. The tank and sink are simply fixed on a stand, usually metal. The legs of the support are dug into the ground. The advantage is that you can install such a structure anywhere in the garden.
Washbasin on a counter from an old washing machine
Country washbasin idea
This version of the washbasin is used outdoors. It is stable and easy to use. The volume of the water tank is up to 15 liters. Usually the tank itself is equipped with a valve, so washing your hands using such a washbasin is very convenient.
Do-it-yourself washbasin for your dacha. Making a simple and convenient drain
Washbasin with heating
This option is the best from a landscaping point of view. After all, you can use not cold water, but heated and even hot water. Such washbasins are equipped with special heating elements that heat water and operate on the principle of a boiler - the tank must be filled with liquid and the equipment must be plugged into the network. After a while the water will warm up and it can be used
The heater can be immersed in water or located in a separate pipe in the tank. Cheaper is option number 1, and therefore it is used more often. But in this case, the tank will have to be descaled, and you need to use the washbasin carefully - the structure may cause an electric shock if it is damaged.
Country washbasin with cabinet and water heating
Briefly about the main thing
There are many ways to make a washbasin with your own hands, spending a minimum of time and money. In general, it can be done for free if you use items available in any country house as materials for production: buckets, canisters, plastic bottles, basins. Even out-of-use ones will do. Examples of such washbasins are described in the article. And to make using them pleasant, you need to think about equipping the washbasin with a sink and drain. The most convenient designs are those equipped with a tap that allows you to regulate the pressure. It is available in any hardware store and is inexpensive.
Ratings 0
Product selection
Everything is simple here - you need to choose products depending on the specific needs of a person for clean water. For installation in a greenhouse, the simplest washbasin is sufficient, which you can even make yourself. But in the house, if funds allow, it makes sense to install a washbasin with the ability to heat water - washing and washing dishes will be much more pleasant.
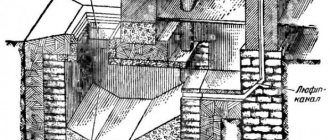
Wastewater disposal
As for the volume of water consumed, you need to take into account the number of people who will use the washbasin, as well as the frequency of use. So, for one summer resident a small washbasin with a capacity of 5 liters is quite enough, but if several people live in the house or work on the site at once, then it is recommended to install a structure with a volume of at least 10 liters.
Choosing the best washbasin for your cottage
As for the material, you should focus on your preferences. The metal is stronger, more durable, does not fade, but will rust over time. Plastic is not subject to corrosion, but is more fragile and can fade under the sun. But it is quite inexpensive. Wood is used if a cabinet is needed under the washbasin. It is not recommended to make a tank out of it.
The photo shows another version of the cabinet, in the manufacture of which wooden boards were used
The most convenient types of washbasins for the dacha are portable models
To the question “Make or buy?” everyone must answer for themselves too. So, the simplest washbasin can either be bought for little money in a store or made from some container in an hour. But complex designs with a cabinet are easier to buy. Although, if you wish, you can do them yourself. Below we will look at several options for creating simple washbasins for your dacha.
Decorating a country washbasin
On the counter
A more complex option is a country washbasin on a counter. They are containers mounted on a “leg”. This option is convenient to move and install around the site.
Some designs have a baffle on the vanity support, making installation easier by pressing down on it with your foot. Those parts of the installation that are immersed in the ground must be insulated from moisture.
Making a washbasin from a plastic bottle
Step 1. First, you should take everything you need to create such a simple washbasin. This is a large 5 liter plastic bottle, marker, scissors, water-resistant glue, plasticine, hose connector.
Tools and materials needed to make a washbasin
Step 2. Next you need to modify the hose connector. Its valve needs to be weighted. In order to do this, you need to take the marker, disassemble it and leave the marker body. Meanwhile, you need to remove the valve itself from the connector and remove the rubber seal from it.
Disassembled marker and valve from connector
Step 3. The marker tube needs to be filled with plasticine and compacted well. This is necessary so that the valve itself in the future washbasin shuts off the water well. You then need to insert the valve itself inside the marker body, gluing it with waterproof glue.
A valve is inserted inside the marker
Step 4. Next you need to take a bottle - the future water container - and screw off the lid. The connector will need to be built into the cover by cutting a hole in it with the same diameter as the connector thread. The thread must be coated with sealant or glue and screwed into the lid. The thread must be inside.
The thread is lubricated with sealant
Step 5. The hose connector nut must be screwed on from the inside of the cover and the glue must be thoroughly dried. Next, you can insert the valve into the connector and install the rubber seal in place.
Now you can insert the valve
Step 6. You need to cut a hole in the bottom of the bottle-container to fill the water. The easiest way to organize this place is to take a plastic bottle of a smaller volume and cut off the top of it, which will serve as a funnel and lid for the washbasin.
The top of the smaller bottle is cut off
Step 7. This washbasin was mounted on wood. It can be tied to the support using twine, which can be secured with tape on the tank itself. You can also wrap the bottle with twine and use it to hang the washbasin on a nail on the wall.
The twine is fixed with tape
You can also wrap the bottle with twine
Step 8. The bottle cap with the valve must be screwed to the tank, secure the latter to the support, and the washbasin is ready for use.
Screw on the lid with valve
Detailed manufacturing instructions
The location and purpose of the washbasin largely determines its appearance. It is also important to have the skills to assemble various useful homemade products for the home, the availability of free time, available materials, tools, and available means to implement your idea.
Let's look at the simplest ways to make a washbasin yourself, which require virtually no investment.
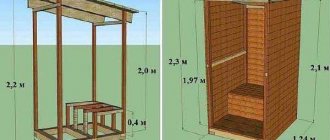
Washbasin frame: step-by-step instructions and photos
The container with the tap can be hung on any stationary vertical support that already exists on the plot, or you can make it yourself. This means metal racks. The convenience of their use is that the washbasin will become mobile and can be moved and installed anywhere at your discretion. The design is equipped with a crossbar on legs, which serves as a kind of “pedal”. With its help, the procedure for rearranging the washbasin is simplified - just press on it with your foot. It is also important to create some protection for this structure from moisture, since the legs are pressed into the ground.
You can buy a water tank ready-made or build it yourself using the example of the previously discussed models. The extent to which the support is deepened into the ground will depend on the volume of the attached container. This must be taken into account.
The container can be purchased ready-made
To manufacture such a design, the following components will be required:
- a piece of metal pipe with a diameter of 6–7 mm;
- water tap;
- two rubber seals;
- two nuts and washers each.
There should be at least two legs, located at a distance of 20–25 cm, for better stability of the structure. They stop at a length of no more than 1.5 meters, so that over time the racks do not deform under the weight of the water tank.
Sequence of work:
- Cut the iron rods to the required length in the amount of 2 pieces. On one edge, the cut should be at an angle so that the legs can be easily pressed into the ground.
- Prepare the jumpers in the same way - upper and lower. It is also necessary to make parts for support from below.
- Connect all the workpieces together by welding.
Canister washbasin
To make such a washstand, you will need to find an empty metal canister and a tap. The material used to make the faucet can be plastic. A plastic locking device is of lower quality and durable, but it costs much less, which is a plus. It is not necessary to use a barrel as a tank. Any available container (for example, a bucket) will do. A wooden or plastic barrel may also be suitable for a washbasin.
Important! Under no circumstances should you use a canister under the washbasin in which toxic chemicals or any other harmful compounds were previously stored. The use of such a canister can cause irreparable harm to your health.
The procedure for assembling a sink for a summer house from a metal barrel consists of several stages. The first thing you need to do is prepare all the necessary tools and materials. Next, you need to drill a hole in the canister. This is necessary in order to install the faucet. A fitting is mounted in the hole. The fastening of this element must be tightened tightly.
Once the fitting is installed, you can begin installing the valve. There's nothing complicated about it. The connection pipe of the shut-off device easily fits into the fitting coupling. In order to prevent liquid leakage during operation of the tap, it is necessary to seal the threaded connection. For this purpose, linen thread is used.
If there is no flax thread, you can seal the joint with a sealing compound.
At the end, all that remains is to fasten the structure. To do this, hang it from a wall, tree, or place it on a special stand. The appropriate installation method depends on your specific situation.
DIY washbasin with cabinet
If it is not possible to buy a ready-made model, we make a washbasin for the dacha with our own hands. It is better to make it on a cabinet and add accessories for convenient drying of dishes.
We purchase materials for production:
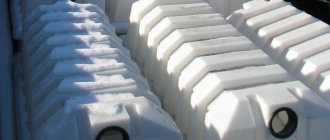
- a tank from a store will look much more aesthetically pleasing. When choosing a tank, take into account that water will flow out weakly from a wide and low container. If the tank is high, the pressure from it will be stronger. The ideal option is a tank with a concave bottom;
- You won’t be able to make a sink yourself, but many still have sinks that were previously used in apartments, but have gone out of fashion. If there is no sink, a metal or plastic basin will replace it;
- It is better to purchase materials for making cabinets that are moisture resistant. If there is a frame from a sewing machine, an unnecessary chest of drawers or a table left, they can be used as a cabinet;
- You will need plumbing equipment: faucet, faucet, gaskets, nuts, winding, water supply and drainage systems.
When all the components are prepared, we make an outdoor washbasin for the dacha.
Sequence of work:
- We make a hole in the tank for the tap, thread a squeegee into it, put gaskets on both sides, and secure with nuts.
- We fasten the tap, having previously wrapped the spool with winding material.
- We make a drawing of the frame on paper; the stability of the entire structure depends on a correctly executed base. We coat metal parts with an anti-corrosion compound. We make the frame for the cabinet according to the size of the sink, make it from metal and cover it with varnished wooden slats.
- We strengthen the bottom of the cabinet with slats, fastening them at a distance of 10-15 mm from each other. The gaps between the slats will prevent moisture from accumulating.
- We make a frame from timber for the door, nail plywood to it, and attach the handle to the screws.
- Wooden elements need to be painted and varnished, otherwise they will quickly become unusable due to exposure to moisture.
- We attach the water container to the vertical support and secure the washbasin in the cabinet. The optimal height of the washbasin is from 850 to 900 mm.
- We arrange a drain using a bucket installed under the sink, or connect a pipe and drain the drain into a hole dug at some distance from the homemade washbasin.
The washbasin is equipped with additional elements. If you have skills in carpentry, we set up a table next to the sink for cutting vegetables, and install an electric stove for preserving in the fresh air.
Making a simple model of an outdoor washbasin
Improving your water drain is possible with a little effort and time. It is proposed to consider an option that uses the following components:
- connector with valve for hoses (purchased at a gardening store);
- marker or felt-tip pen;
- plasticine;
- waterproof glue;
- five liter bottle.
Step-by-step instruction:
- First, disassemble the marker, since to work you will need its body without the insides, which you will remove. Now remove the rubber gasket located under the valve in the connector.
Prepare the necessary materials and tools
- Using the obtained parts, proceed to modifying the valve, i.e., making it heavier. This is necessary so that the valve properly holds water in the washbasin. Extend it using a marker, after filling the tube with plasticine balls. Now lubricate the pin with glue and insert it into the hole in the felt-tip pen body. To make the valve fit into the tube easier, you can adjust it using wire cutters. Wait for the parts to set.
It is recommended to remove the protrusions with pliers
- Next, cut a hole in the bottle cap with the same diameter as the connector. Coat the thread of the connecting piece with glue and insert it into the lid.
Lubricate the threads and insert into the cap
- Tighten the nut from the connector from the outside. Let the structure dry and install the modified valve in its original place in the connector. Also install the rubber seal in its original position.
Insert valve
- Cut a circle in the bottom of the bottle where the water will be poured. To make it easier to fill the container, a funnel made from a plastic bottle of a smaller capacity is inserted on top. At the same time, it will serve as a lid.
Making a water container from a plastic bottle
- To hang the washbasin from a tree or other stationary support, prepare 1.5 meters of twine. First tie it around the neck of the tank, then around the body itself. Secure the fastener with tape.
Secure the rope fastening with tape
All that remains is to screw on the lid with the built-in valve and make sure that the system is working.
For ease of use, a connector for garden hoses with a release valve is mounted in the lid
Wooden washbasin
If you don’t mind spending time and effort, you can start making a more solid design for a country washbasin with your own hands, called “Moidodyr”. It includes a cabinet and a separate area for placing a water tank. Building materials can be purchased or used those that are freely available on the site. The complementary elements are the sink and tank.
Thrifty summer residents usually use a washbasin that was dismantled during repairs and make the cistern themselves. The model is universal, as it is suitable for installation outdoors and indoors.
A washbasin with a cabinet is a frame covered with sheet or panel material. It could be:
- plywood;
- Fiberboard;
- chipboard;
- Sheet steel;
- plastic;
- polycarbonate;
- polymer panels.
It is quite possible to sheathe the frame with boards. Specifically, for the frame you will need wooden blocks with a section of 50 by 80 mm, or a steel corner measuring 25x25 mm.
The frame consists of bars that are sheathed with sheet material
Sequence of further actions:
- Take accurate measurements of the sink and, based on them, calculate the dimensions of the cabinet base.
- Cut the blanks for the frame to the required dimensions: 8 pieces of the same length (to create the upper and lower square horizontally) and 4 vertical bars.
- Assemble the structure by knocking or welding, depending on the type of material.
- Cover the frame with cladding material on all sides, except for the front.
- Attach the doors to the front.
- On top, as a continuation of the rear wall, build a panel for attaching the tank.
At this point the construction work can be considered completed. All that remains is to install a bowl for washing and a storage container for water.
Washbasin made from a bottle and syringe
An even simpler option is to create a homemade washbasin from an ordinary plastic bottle.
Step 1. First of all, you need to unscrew the cap from the bottle and cut a hole in it with the same diameter as the syringe you took. A 2.5 cc syringe is ideal.
You need to cut a hole in the cap for the syringe.
Step 2. Next, you need to cut off the spout of the syringe on which the needle is placed. Moreover, not only the spout itself needs to be removed, but also the entire upper part.
The syringe tip needs to be cut off
Step 3. Then the syringe must be inserted into the hole in the bottle cap. It is important that the syringe barely fits into the hole, otherwise it will have to be sealed with sealant to prevent water leaks.
Syringe inserted into hole
Step 4. The stopper with the syringe can be screwed back onto the bottle. The bottom of the container must be cut to allow it to be filled with water.
The cap screws onto the bottle
Step 5. Now the washbasin can be installed and used. To shut off the water, the syringe plunger must be pulled out.
The syringe plunger is pulled out
And in this position of the piston the washbasin can be used
Attention! Large bottles are not recommended in this case. Otherwise the design will be unreliable. A volume of 2-3 liters is quite sufficient.
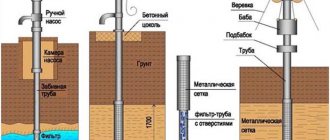
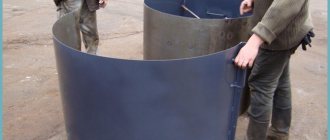
Pouring concrete
Concrete is first poured into the most inaccessible places. It must be constantly vibrated so that the mixture is distributed evenly. After completely filling the formwork, you need to level the surface and cover the sink with film.
After 3 days, the concrete will completely harden. You can remove the film. After the same period of time, the formwork is removed. But the installation of taps and siphons is postponed for a month. This is necessary so that the product dries completely and becomes strong.
Washbasin made from an oil canister
Another simple washbasin option that motorists can make without throwing away the oil canister and purchasing a water bottle with a shut-off valve plug.
Step 1. The first step is to take a metal canister and rinse it well.
The canister must be rinsed thoroughly
Step 2. You will also need to take the neck of a plastic bottle. It needs to be attached to the canister in the place where the water outlet will be organized, that is, the tap, and circled with a marker.
The neck of the bottle is outlined with a marker
Step 3. Using the resulting contour, you need to cut a hole in the tank. You can use a drill and drill a few holes to make the cut.
Holes are drilled with a drill
Cutting a hole in the canister
Step 4. The sharp edges of the hole need to be sanded with a file.
The edges of the hole are sanded
Step 5. Using cold welding, you need to attach the plastic neck of the bottle, which was previously used to apply markings, to the tank by inserting it into the hole.
Plastic bottle neck
The neck is inserted into the hole
Step 6. Now you need to screw the bottle cap, equipped with a valve, onto the neck - this will be the tap.
The future faucet of a country washbasin
Step 7. Having filled the tank with water, you can use the washbasin by opening and closing the water using the valve.
Ready-made country washbasin from a canister
Classical
As a classic washbasin, a metal container is used, in which a sufficient hole is made on top to pour water inside.
A hole is also made from the bottom for the valve; by pressing on it, water will flow out through the hole. The simplest design is hung on hooks on the wall, it is very easy to make yourself in just 15 minutes.