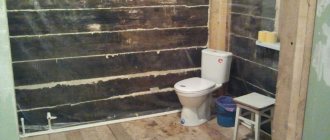
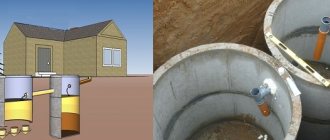
It is impossible to organize the correct operation of the local sewer system of a country cottage without installing a drain tank. One of the cheapest ways to drain sewage is a cesspool - you can build a sewer structure yourself, using inexpensive materials.
We suggest familiarizing yourself with the most popular and budget options for waste tanks. The article describes in detail the technologies for their construction, and also outlines the features of the operation of cesspools.
Basic information
If a cesspool was built without taking into account all sanitary and technical standards (according to SNiP), sewage can seep into the soil, and then into groundwater, which can lead to severe poisoning of the body. If you are making a drainage hole with your own hands, do not forget to take into account all the requirements for the work.
This type of sewage system can most often be found in dachas, as well as in private houses where two or three people live temporarily. Such a number of residents use water evenly, so systematic cleaning of the cesspool is not necessary.
Regulatory documents governing the installation of sewerage in a private house
There is a “Code of Rules: Internal Plumbing and Sewage of Buildings,” which brings together the entire regulatory framework for the planning, installation and operation of private sewerage. With all the latest changes and additions, the code was put into effect on January 1, 2013. This standard was developed by the scientific and scientific institute OJSC SantekhNIIproekt.
The “Code of Rules” is built on the following documents relating to sewer systems:
- SNiP 2.01.09-85 “Sewerage. External networks and structures."
- SNiP 2.04.01-85 “Internal water supply and sewerage of buildings: updated edition.”
- SNiP 3.05.01-85 “Internal sanitary systems of buildings.”
- SNiP 2.01.09-91 “Buildings and structures in undermined areas and subsidence soils.”
- GOST 17.01.2.03-90 “Nature conservation. Hydrosphere. Criteria and indicators of water quality for irrigation.”
- SanPiN 2.1.2645-01 “Sanitary and epidemiological requirements for living conditions in residential buildings and premises.”
Based on the above regulatory materials, each owner of a private house has the right to design and build a device for drainage according to an individual project.
It is worth clarifying that when applying the Code: Internal Plumbing and Sewerage of Buildings, all the rules established in it are mandatory. Selective adherence to the requirements given in the document is not permitted.
Types of structures
The safest, but most expensive, are sealed ones . This design has no bottom and is only suitable for certain conditions. The choice of this structure directly depends on the type of soil foundation.
Concrete or brick are considered more complex structures . In turn, such a construction eliminates the possibility of wastewater entering the ground. The volume of the sump will depend solely on the needs of the user.
Note : They can be calculated based on daily water use and treatment options.
Simple tank design
Operation of sealed tanks is possible with the use of specialized biological activators. They will help eliminate unpleasant odors and make the cleaning process much easier. In areas where sandy soil predominates, you can get by with the simplest option.
When constructing a structure without a bottom, a completely different technology is used. Instead of a concrete or brick bottom, ordinary crushed stone is used.
Note : In this way, you can get a natural filter for all liquid coming from the house.
This design provides for nuances related to the amount of incoming water.
Homemade septic tanks
A septic tank, or sump tank, is a container consisting of a single sealed body (usually plastic), divided into several sections (for example, as in the figure - A, B, C), an intersection separator, a wastewater supply pipe and a pipe for purified discharge.
Such septic tanks are complex cesspools, but they can not only serve as a vessel for collecting wastewater, but also process dirty liquid into fertilizer for the garden. Homemade septic tanks are a design of 2 or 3 tanks. In the first, only rough purification of wastewater from large debris occurs, but in the second or third, bacteria will work - they process contaminated water into fertilizer.
You can build such a complex structure with your own hands, but this will require considerable financial investments. The essence of the work on arranging a septic tank cesspool:
- You need to buy two or three containers made of special plastic - they must be sealed with outlet holes to the outside.
- You will need to install overflow pipes between these containers - they must also be available. Moreover, they will need to be installed at an angle.
- The first container of the septic tank will contain a small filter - they are sold in stores and have a special marking “for a country septic tank.” This filter will be located at the outlet of the pipe leading to the second container.
- In the second compartment of a complex cesspool, bacteria will live that process waste and turn dirty water into practically clean water - at least, it can be used for watering the garden and washing the car.
- The third compartment is installed at will - it is needed to collect already purified water, but even without it the septic tank will be fully functional. The only clarification: in this case, you will need to install a drain valve in the second container - you will need to extract purified water somehow!
Experts say that the most practical thing is to invite professionals to install a cesspool. But it is quite possible to do it yourself, which will save significant financial resources. If you don’t have a construction/engineering education, and you have minimal or no experience in carrying out any construction work, then it’s better not to risk installing a septic tank yourself - specialists will do it with a quality guarantee.
How and where to place it correctly?
The ease of use and safety for the health of others depends on where the sump is located.
When choosing the location of the pit, it is worth considering several important aspects:
- this is initially the distance from the well to the cesspool and from the residential building;
- its distance from the nearest water intake point;
- opportunity to freely drive up for cleaning.
Taking into account sanitary standards, the wastewater tank is located at a distance of approximately seven meters from the house. However, these calculations should also include the type of drive that will be used.
Thus, a sealed pit in a private house should be located at a distance of 5-7 meters, while a sump without a bottom should be made as far as possible. This will minimize the appearance of any unpleasant odors indoors and not violate sanitary standards.
If the site is equipped with a well or well, the sump should be placed 25-50 meters from them. By adhering to such standards, it will be possible to avoid harmful microorganisms getting into the water.
Advice . Due to the constant operation of the drive, frequent maintenance will be required. Therefore, it is worth taking care in advance about convenient access for the vacuum truck.
Cover decoration elements
You can decorate septic tank covers with your own hands. Decorative elements can be:
- fake diamond;
- mobile flower bed;
- compositions of garden figurines and other additional elements.
Fake diamond
A boulder or artificial stone is a structure that is hollow inside and looks like a real stone from above. The advantages of this decor are:
- low cost;
- ease of installation. The stone is simply placed on top of the septic tank lid;
Masking the septic tank lid with artificial stone
- light weight, which allows you to remove the decorative element in the shortest possible time and without outside help for periodic maintenance of the treatment plant;
- non-susceptibility of the material to temperature changes and precipitation. The product service life is more than 25 years;
- a variety of shapes and colors, which allows you to choose the best option for the landscape of your garden plot.
You can make a stone for decorating the septic tank lid yourself. To do this you will need to prepare:
- cement mortar;
- special shape (you can use any shape, for example, a car tire);
- stone chips.
The manufacturing process is as follows:
- the bottom of the shape of the future boulder is covered with small stones or crumbs;
- the crumb is poured with concrete;
- After the cement mortar has completely dried, the boulder is removed from the mold and placed in the place prepared for it.
Decorative stone production scheme
How to make a boulder from polyurethane foam and a metal frame, watch the video.
Mobile flower bed
A decorative portable flowerbed can be made from various materials in accordance with the wishes of the owner of the site. The most commonly used:
- car tires;
- wooden boxes;
- baskets;
- umbrellas;
- barrels and so on.
Annual flowers with a small root system are planted in the prepared flowerbed frame. The finished structure is installed on the lid of the septic tank.
Mobile flower bed for decorating the lid of a septic tank
Decorating with compositions
Another decorative element can be various garden figurines, which can be purchased in stores or made from scrap materials with your own hands.
Figurines for decoration
Finished figurines are usually made of polymers and differ in:
- resistance to temperature changes;
- resistance to sunlight;
- resistance to precipitation.
From ready-made figurines you can build various compositions using decorative stone and/or a portable flower bed.
Artificial stone lid with garden figurine and plant
So, it is mandatory to install a cover at a wastewater treatment plant. To prevent the lid from spoiling the appearance of the area, it can be decorated with various elements in accordance with the overall design concept. Using various decorative elements, you can also “hide” filtration fields, sewer pipes, inspection and inspection wells, and so on.
Sanitary standards
To avoid problems later, it is necessary to comply with sanitary standards:
- The drainage pit must be located at least 35 meters from the well.
- You cannot use a storage system without a bottom if there is excess waste (more than 1 cubic meter).
- The lid should cover the pit tightly, especially in winter, to avoid freezing of the tank. And it’s best if the lid has additional insulation.
Decor selection criteria
Ready-made decorative hatch cover
The choice of the final camouflage option depends on several important factors:
- General style of landscape design at a summer cottage. The decorative element should fit into it and look organic.
- Manhole cover material. For polymer products, it is better to choose lighter camouflage options, although plastic mixed with a composite can withstand high loads. Excessively heavy elements can damage the surface of the sewer cover.
- The complexity of the process. If the master likes to tinker and show his imagination, you can opt for non-standard, intricate options. If you want to do everything in no time, it is recommended to simply purchase a ready-made solution.
- Durability and attractiveness of the final (final) design. The decor is not made for one or two years, so it is worth considering the material’s resistance to temperature changes, sun, and precipitation.
- Weight of the finished structure. If you need to get under the hatch cover, you will have to lift the decor. It is advisable to do without outside help. After all, at the right time it may not be there.
You should rely on your financial capabilities. For some, it is acceptable to close a sewer hatch within 50,000 rubles, while others are able to manage only a few hundred or thousand.
Basic standards
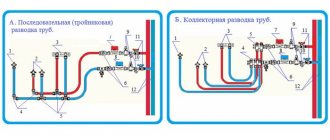
The device provides, first of all, the optimal location. It should be borne in mind that when installing a sewer system, the pipes should not pass near the house, but a long distance will not work either.
List of basic requirements in a private house:
| Distance | The distance from neighbors should be at least 5 m, the distance to groundwater and the fence should be no less than 1 m each |
| According to the rules, there should not be a drinking water well near the septic tank | If the soil is clayey, a distance between them should be at least 20 m. For loam and sandy loam, other minimum values are provided - 30 and 50 m, respectively |
| Calculation of volume, depending on the number of people living | For each person, you must allocate at least 0.5 m 3 of the total volume of the pit. If this rule is followed, it is possible to significantly extend the life of the sump. For example, when using clay soil, the filtration rate is the lowest, because for one year the purification ability remains at a sufficient level, and then is gradually impaired |
| Pipe slope | When laying pipes, they should be placed at a slope of 2-3%. That is, the angle should be 2-3 cm per linear meter of pipe |
Advice . Calling a sewage disposal truck is paid regardless of the filling level of the tank, therefore, when creating a drainage pit at your dacha, it makes sense to provide a reserve volume. For example, if three people live in a house, the optimal volume of the sump is 6 cubic meters.
For work you will need tools:
- gloves or tops;
- buckets and shovels;
- cable or rope;
- wheelbarrow;
- level and tape measure;
- ladder; Follow safety precautions and, if possible, do not work alone.
Arrangement technology in 13 steps
Step 1 . We apply markings to the floor. This is done with ordinary chalk - choose a place exactly in the middle of the room.
Step 2 . Break up the concrete and cut off all the reinforcement around the perimeter.
Step 3. Remove soil from the opening. You can use shovels for this.
Step 4 . Level the bottom of the formed pit with shovels, and similarly with the walls.
Step 5. Arrange ventilation - you can do without it, but with it the air in the inspection pit and in the garage as a whole will be noticeably cleaner and more pleasant. Read about garage ventilation in general here.
This is done using a plastic pipe with a diameter of at least 10 cm. To do this, you need to dig a horizontal trench and lead it through the wall. Already in the trench, place the pipe so that its lower end is at the very bottom.
Step 6. Pour sand into the hole for a layer up to 20 cm thick. While pouring water, compact it to the desired shape, and then lay a 10-centimeter layer of crushed stone on top. It is better to use crushed stone with small and medium fractions.
Step 7. Select the desired waterproofing material and fix it on the walls and floor of the inspection pit. Roll-type material is ideal: roofing felt is the cheapest, but if your budget is more generous, you can use a waterproofing membrane or film.
Please note: the waterproofing strips are laid with an overlap of up to 10 cm, and then the joints are secured with bitumen-based mastic or special tapes. You should also take the waterproofing material out and press the ends with some kind of weight during installation to avoid displacement.
Step 8. Fill the bottom with screed. The approximate layer thickness is 5-7 cm.
Step 9 . The walls are made of blocks or bricks.
If you decide to work with blocks/bricks, then lay them with a half offset. Excellent for fixing masonry mortar made of cement and sand.
There is a second option - creating a monolithic structure made of concrete. To do this, it is necessary to prepare formwork from boards or plywood (see materials). It can be one or two layers. Typically, a two-layer design is made in cases where you have to deal with fragile sandy soil.
The structure will be strengthened by a reinforcing frame placed exactly in the middle. Parts of the frame can be fastened together with a reinforcing rod.
Step 10. Pour concrete. Use its entire array; it is best to fill it during the day every 4 hours.
Step 11. After a week, remove the formwork, but you cannot use the pit yet - it will completely harden only after about 30 days.
Step 12: Do the finishing touches. Can:
- paint;
- veneer with ceramic tiles;
- plaster.
Step 13. The final touch is to create a boundary structure around the perimeter. To do this, you can use a steel corner. However, this stage is often skipped by many garage owners. But if you want to do everything aesthetically and beautifully, then go for it!
Features of recesses for which there is no bottom
Stages of work:
- First, they dig a pit. 1.5 m 3 of soil is used for thermal insulation above the ceiling; the top layer and the rest of the soil are distributed throughout the site.
- Then they make a cushion at the bottom (crushed stone, sand), through which the sewage will escape.
- At the same time, pipes are laid at an angle, which avoids stagnation of liquid, and walls are erected, which can be either concrete rings or brick.
- After laying the second ring, a pipe leading to the well is installed in its upper part.
- When the pipeline is laid, rings and covers are installed, proceed to the installation of hatches.
- If the masonry is brick, make a trench, and the dimensions of the cesspool must be observed (the width is 30 cm, the height corresponds to the level of the walls).
- Don't forget to treat for moisture.
In this case, the concrete slab will lie not only on the walls of the well, but also on the soil layer, access to the hatch is left open.
Construction of a brick cesspool
A significant advantage of a brick cesspool is durability. The structure can last more than half a century. In addition, such a tank is repairable.
Step #1. Calculation of the volume of materials
To properly build a brick cesspool, you need to make a construction plan and carry out preliminary calculations. It is necessary to calculate the number of pieces of material and determine the number of rows. To do this, the estimated height of the walls is divided by the height of the brick row, not forgetting to add 6 mm to the seams.
Knowing approximately the number of bricks in each row, it will not be difficult to find out the required volume. To determine the number of bricks for staggered laying, you need to multiply the number of bricks in one row by 0.6.
To build a pit, you can even use used red solid bricks that have chips and small cracks
When constructing a brick wall, the masonry is done using a cement-sand mortar prepared in a ratio of 1:4.
Step #2. Excavation and wall laying
You can dig a pit yourself, armed with a bayonet shovel, or using small-scale mechanization tools. The shape of the pit can be any: round, square, rectangular. At the same stage, a trench 55 cm deep is dug for laying sewer pipes.
To construct an absorbent structure, the bottom of the pit is covered with a drainage layer at least 100 cm thick; when constructing a sealed storage tank, it is filled with a cement screed.
The walls are laid in a checkerboard pattern so that the vertical seams between the rows do not form a single line; the thickness of the solid section can be one brick or half a brick
Brick walls must be plastered with cement mortar. To achieve complete tightness, the surface is covered with bitumen mastic, and to extend the service life of the plaster, ironing is carried out.
Reinforced concrete screed is best suited as a floor. The sides of the pit should overlap by 25-30 cm.
To create the ceiling, formwork is assembled from wooden boards. Concrete is poured inside it in two layers. To do this, first pour out a solution 7-8 cm thick.
A reinforcement grid is laid on top of the first layer, maintaining a spacing of 10 cm between the rods, and the lined sheathing is filled with a second layer of mortar.
An inspection hole with a diameter of 700 mm is made in the ceiling cavity.
After the concrete has set, the floor is covered with roofing felt, plastic film or any other waterproofing material. The finished structure is sprinkled with soft clay and soil.
After completing the organization of the sewerage system with a cesspool, all you have to do is monitor the filling of the tank and, as necessary, use sewerage equipment for pumping.
DIY installation methods
There are several methods for the device, much depends on the size and level of complexity.
How to make an absorbing model?
The absorption drain pit is suitable for owners of small country houses. Simple device, easy maintenance and choice of location.
Wall coverings can be made from several materials, but the simplest option is from tires or concrete products:
- A hole is dug with a diameter of 800 mm: please note, it must be larger than the size of the ring.
- A concrete screed is made around the perimeter of the pit, which will be a reliable base for the rings.
- In the lowest ring, holes are made every 100 mm to allow water to escape.
- The diameter of the filter holes is 50 mm.
Advice . The depth of the sedimentation tank should not exceed 300 cm so that it is not difficult to remove the sediment.
- The constructed pit must be filled with broken bricks, gravel or crushed stone to a depth of 100 cm. The pit is filled with exactly the same material from the outside.
- Before backfilling, it is necessary to carry out all waterproofing work that can block the external aggressive environment.
At the final stage of the work, a plate with several holes is installed (for the ventilation pipe and hatch).
How to build a sealed model?
In general, it is no different from the previous method, but there are still minor differences:
- The bottom needs to be concreted.
- No infiltration holes required.
Construction works
To begin with, marking is done using a tape measure and beacons. We dig a hole. By the way, do not rush to throw away all the soil at this stage of excavation. Leave a small amount to cover the walls after pouring. The floor of the dug pit must be level. After that, a layer of crushed stone with sand is poured onto the bottom and compacted thoroughly.
It is necessary to understand how to make sure that when the soil heaves in winter and the garage settles into place in the spring, the pit does not break through the floor or large gaps do not form between its walls and the garage floor. This is where the backfill of gravel and sand plays its role, since it is a non-heaving base and a kind of shock absorber during subsidence.
The whole work consists of layering one material on top of another:
- a layer of crushed stone (15 cm) is covered with a layer of sand (5-7 cm), roofing material is laid on the sand. Its edges should also cover the lower sections of the walls (approximately 10-15 cm).
- concrete solution pours a layer of roofing material.
- A metal mesh is placed on the poured and slightly dried floor and filled with cement solution (this will make the structure strong). The layer should be quite thick (6-7 cm). Only when the floors in the pit have firmly grasped can you tackle the walls. A small layer of clay is applied to them, followed by a layer of roofing material.
Formwork assembly and backfilling
The next step will be the assembly of formwork from boards for the construction of walls. When you assemble it, be sure to consider the location of the tool shelves that are included in the project. When the formwork is assembled, it is poured with thick layers of cement (35-40 cm). Do not forget to compact the material during the pouring process. Add a strip of metal mesh to each layer.
The embedded frame is installed on top of the walls when they are all completely poured. To secure the anchors, you can use steel rods half a meter long. Install the frame so that there are low curbs along the edges of the pit. They will serve as insurance so that the wheel does not accidentally jump off the edges of the pit.
When the concrete has finally set, you can begin backfilling the walls. The soil needs to be compacted as best as possible, crushed stone should be poured on top and the surface should be leveled with the floor using concrete. The inspection hole in the garage is ready with your own hands.
We install lighting You can also install lighting into the structure, this will be very helpful when repairing a car. The wires should be placed in a corrugated pipe, and the socket should be in a sealed housing. The ladder for the pit does not need to be secured - it can be taken out as needed.
Notes
- ↑ (Retrieved February 29, 2016)
- ↑ (Retrieved February 29, 2016)
- ↑ Yam // Explanatory dictionary of the living Great Russian language: in 4 volumes / author's compilation. V. I. Dal. — 2nd ed. - St. Petersburg. : Printing house of M. O. Wolf, 1880-1882. - T. 4. - P. 698. (Retrieved February 29, 2016)
- ↑ Yam, a village on the postal route // Encyclopedic Dictionary of Brockhaus and Efron: in 86 volumes (82 volumes and 4 additional). - St. Petersburg, 1890-1907.
- (Retrieved February 29, 2016)
- (Accessed April 1, 2010)
- Yam // Explanatory dictionary of the living Great Russian language: in 4 volumes / author's compilation. V. I. Dal. — 2nd ed. - St. Petersburg. : Printing house of M. O. Wolf, 1880-1882.
- Vasilenko N.P.
Orders // Encyclopedic Dictionary of Brockhaus and Efron: in 86 volumes (82 volumes and 4 additional). - St. Petersburg, 1890-1907. - (Retrieved February 29, 2016)
Materials for making the lid
To make the lid, you can use a wide variety of building materials, which are most suitable in each specific case:
- Tree.
- Metal.
- Plastic.
- Plywood.
- Chipboard.
The most common option in the recent past is a wooden lid. This material is environmentally friendly, affordable and easy to process. Also, the wooden structure above the well looks very colorful and original, especially if the homeowner uses imagination when decorating the log house. You can also cut a hinged lid from sheet metal, polymer sheets - hardboard, textolite, installed on a wooden or steel frame.
If the well shaft is made of concrete casing rings, then you don’t have to worry too much and cover it with a standard concrete cover with a hatch. Of course, such a structure will not look very aesthetically pleasing. But, if the well is located deep in the garden plot and is not noticeable to guests and household members, this option is quite acceptable. The main advantage in this case is the simplicity of the device and durability of operation.