A bathhouse, first of all, is water, without which you cannot wash and which after washing must be somehow disposed of, drained, without flooding the entire surrounding area. This means that we need an effective drainage system, a drain for the bathhouse, which on a “bath day” will allow it to function for at least half a day and provide washing for even a large family.
View this publication on Instagram
Publication from Wooden houses and baths from KELO (@artkelo)
What type of sewage system to choose for a bathhouse
In private buildings and country cottages, central drainage in the form of a centralized sewer network is not often found. Perhaps in cottage villages, with development according to some kind of pre-approved (general) plan. Basically, all types of drainage of water used in the household are limited to a septic tank (factory-made or home-made), a more open version of it - a drain well or even a pit where the water goes thanks to loose soil - the latter option assumes a very low groundwater level and soft, almost frost-free water. , winter.
Criteria for choosing a sewer system
When choosing the optimal sewage system for a bathhouse for a particular area, we are guided by the following points:
- the absorbency of the soil in the area where the bathhouse is being built, the tendency for this soil to swell, the characteristics of its flowability;
- how far is the natural water intake located and how deep does the groundwater lie;
- intensity of use of the bathhouse and the associated possible volume of drainage;
- the difference in the height difference between the location of the bathhouse and the point of discharge into the well;
- budget.
Arrangement of a drain well or reservoir
To properly arrange a drain well, its location and operating principle must be figured out already at the bathhouse design stage. The main task in such a design is to correlate the location of the steam room and washing compartment with the well itself and with the slope of the drainage pipe through which the used water will drain.
For families who use the bathhouse only on weekends and in which the number of family members is 3-4 people, and the volume of the drainage pit may be small. So that the drain water had to be pumped out every 4-6 months. And taking into account the fact that during the washing process, detergents that are aggressive to the environment are used (no matter how they are positioned in advertising regarding safety), drainage wells for bathhouses must be as airtight as possible in the sense of the penetration of used water into the soil surrounding the well.
To do this, the walls of such tanks are concreted or waterproofed from the ground in some other way.
Drain well
Drain wells are considered to be reservoirs (pits) completely isolated from the environment. That is, the used water does not go anywhere, settles with solid fractions settling to the bottom, and only after some time is removed (pumped) out of the well.
They are made by digging a hole with earth-moving equipment; waterproofing is ensured by lowering concrete ends into the hole with a sealed bottom on the bottom and sealing the joints between the rings.
Drainage well
A drain option, but without a sealed bottom. Instead, a sand cushion is made at the lowest level, on top of which fine gravel is poured. It is installed in soils that do not have loamy and clay layers, which allows wastewater to undergo deep filtration. If there are such layers, then the drainage well on them serves as a storage well.
Such wells are constructed after assessing the absorption properties of the soil and its throughput per unit of time. the assessment is made after test drilling on the site selected for construction.
Pit under the steam room
If the bathhouse will be used exclusively in the summer (or during the period when the air temperature is in the range of +4⁰С and above), a simple pit located directly under the floor of the steam room can serve as a storage and disposal tank for drain water under the steam room.
Absorption pit
It is a hole dug in the ground in advance, even before the construction of the bathhouse, filled with at least 60% filter material (sand, crushed stone, ceramic or brick chips). Used only for columnar foundations. In winter, in the middle zone and to the north, operation is impossible - the pit freezes and will not absorb and filter drain water. Frequent use of a bathhouse with a steam room, in which such a pit serves as a container for draining water, is also not allowed, since it will not have time to absorb water.
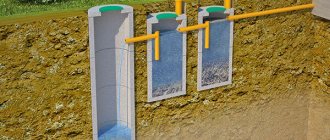
Autonomous sewerage system with settling well
If it is impossible to connect the bathhouse to a centralized sewer system, the best and environmentally friendly option would be to create settling wells - single- or double-circuit.
In the first case, the inlet pipe-tee is located above the same drain (outlet) pipe-tee. In a double-circuit settling well, which ensures even greater purity of settled water, a bypass hole is made between the second and first chambers. Water purification occurs under the influence of gravity, due to which suspension and solid particles of dirty water gradually sink to the bottom and form sludge. And already in it, under the influence of anaerobic bacteria, the decomposition of harmful components into simple non-toxic compounds occurs, which are cleaned from the bottom of such wells at a certain frequency.
Video description
Video description
Installation of a drainage system for a bath:
Indoor design
A floor with a drain in a bathhouse is designed internally according to the same principle by which a sewer system is created in a house. The requirements for both drainage systems are no different. The presence of a ventilation riser or shut-off valve depends on the specific room. A riser is necessary if drainage is organized from several rooms at once.
The concrete floor drainage system consists of:
- internal wall cladding;
- vapor barrier of walls;
- foundation waterproofing;
- load-bearing base;
- crushed stone cushion;
- concrete layer with thermal insulation;
- screeds for covering;
- finishing coating;
- sewer drain pipes;
- wooden gratings;
- drain hole or grate;
- water seal partitions;
- drain pipe or gutter.
Installation of a drain floor on a concrete base in a bathhouse Source slipguard.ru
Wastewater disposal method
Let's look at specific cases of wastewater disposal methods depending on the type of soil under the bathhouse, how high the groundwater level is, and how the water used for cleaning is removed.
Pit under the bathhouse
The simplest and most cost-effective option for draining the water used in the bathhouse during washing. It does not involve the creation of complex engineering structures and expensive materials. It is a rectangular or circular hole dug in advance, even before the construction of the bathhouse, directly under the washing compartment and/or steam room. At the bottom of which chalk filter material (sand) is poured, and the layer above is made of larger bulk fractions (crushed stone).
It is permissible to install a pit under the bathhouse if the foundation of the bathhouse is columnar, which presupposes the presence of effective and constant natural ventilation under the floor, and the depth of groundwater is sufficient for the soil filter in such a pit to cope with purifying water from detergents dissolved in it
Drain well
It is located somewhat away from the bathhouse being built, water is drained by a pipe laid from the drainage point in the floor and inclined towards the drain well at an angle of at least 2⁰. This is desired in order to:
- the water flowed by gravity into the settling well;
- the water did not freeze in the pipe at subzero temperatures, thereby blocking the self-flow.
These two conditions require a very low sump location. That is, the deeper the hole into which such a well with a sealed bottom is installed, and the lower the receiving hole is located in it, where the water drain pipe from the bathhouse is inserted, the more efficient and reliable the drain will be.
Emptying a well can be done in two ways:
- pumping out excess water using a sewage disposal machine, with the subsequent removal of such water to treatment sites by public or private enterprises;
- adding biological reagents to the drained water, which completely neutralize harmful substances dissolved in the water. In this case, such water can be brought through a low-lying special pipe into the soil at a depth and distance, where the natural purification cycle will be completed in such water.
Note:
| The denser the surrounding buildings and the higher the groundwater level, the stricter the requirements for water discharged into the ground after biological treatment - up to a complete ban on such discharge. |
Filtration well
A well that does not have a sealed bottom and is filled in its lower levels with filtering natural materials. Drain water in filtration wells is filtered and purified naturally through loose soils with different fraction sizes, after which it naturally goes into the soil, dissolving in the environment. Or, in the case of dense soil “pillows” in the form of clay, it settles on such a natural dense bottom and, processed by beneficial bacteria (originally present in such wells or introduced artificially in the form of biological products), is extracted from there and used for household needs.
Ground filtration
You can count on filtering drain water from a bathhouse with soil only if:
- the bathhouse is not used in winter or if the freezing point is below the groundwater level;
- The drain water has time to pass through all layers of soil filtration before it reaches the groundwater level.
The particle size of filter fractions increases from bottom to top. That is, at the very bottom of the filtration well there should be the smallest particles of filtration substances. Usually it is clean, without clay impurities, fine river sand.
Briefly about the main thing
The wastewater drainage system for the bathhouse is organized before the start of the main construction.
There are 3 ways to make floors in a bathhouse with a drain: pouring, leaking and continuous. The last 2 coatings are most often used.
They choose a drainage system for a specific area, guided by the wishes for the operation of the steam room.
There are 4 main ways to organize a water drainage system in a bathhouse: pit, drainage and drainage wells, ground filtration. All methods are suitable for different requirements for the operation of the bath.
Preparing for drainage installation
Draining used water from the bathhouse, if it is not associated with the use of a pit, is carried out in two stages: first along the internal part of the drainage system, passing directly under the bathhouse, then along the outer section of the pipe. To do this, the method of laying the pipe must be planned at the stage of creating the bathhouse project - with reconnaissance of the properties of the soil around the proposed construction of the facility, calculation of the cross-section of the pipes, their type and the depth of the wells.
Design of the internal part of the drainage system
The design of the internal part of the drainage system is directly related to the type of water collection device. Which, in turn, depends on the design of the floor, which can be:
- torrential - with a lag structure. The installation of such a floor is possible only in a region with a warm climate and with soil consisting of light loose particles (light pebbles, sand of all types, shell rock, etc.). In the plank flooring of such a floor there are small gaps through which water rolls directly into soil for a bathhouse installed on columnar supports or a pile foundation. In regions with winters, when the temperature drops below zero degrees Celsius, the construction of such a bathhouse is impractical.
- Leaking. The floor is made of boards resting on logs, and the logs, in turn, rest on the lower rims of a wooden frame or on the supports of a load-bearing foundation. The floor is slightly inclined to one side or funnel-shaped, with the lowest point usually in the center of the room, where the drain is installed. This design is optimal for baths on a columnar or slab foundation.
- Not leaking. It is built on a strip foundation. It is a concrete poured structure with a slope towards one of the walls or in the form of a flat funnel towards the center of the floor. In the first case, to drain water out along the wall, a drain gutter is made, through which the water flows into the drain; in the second, such a drain is mounted directly into the thickness of the concrete screed.
In addition, preliminary calculations of water consumption for each person are immediately made and, in accordance with this, the diameter of the drain pipes, on which the throughput of the drain system depends.
In any case, the pipe connecting the internal part of the drainage system with the external one must have a slight slope, at least 2 degrees, so that water flows by gravity and it is impossible for it to stagnate in any area where it flows outward.
Design of external drainage area
The external section of the drainage system is a direct continuation of the internal one, and is arranged according to the same physical principles: an inclination to the drainage point of at least 2 degrees, pipes of the same cross-section as inside (or at least not smaller). The cross-section of the pipes, associated with their throughput, is selected according to the following criteria:
If the number of people visiting the bathhouse at a time for about 12 hours does not exceed 5 people, then a pipe with a cross-section of 7 cm is sufficient. If there are more than five or among these five there are especially “zealous” lovers of steaming, then it is better to choose a drain pipe with a diameter of 11 cm .
| You can control the angle of inclination of drain pipes without measuring the degrees of inclination, but by taking into account the difference in levels of each subsequent section of laid pipes. For optimal flow, a difference in levels of 2 cm per meter is sufficient, with a lowering of that part of the pipeline that is closer to the well/septic tank/sewer. |
Video on the topic of planning sewerage in a bathhouse
What do experts recommend?
Speaking about how to properly drain a bathhouse, experts offer several tips:
The well should be deepened to the level of soil freezing. A layer of drainage expanded clay is poured inside the finished pit, slightly above the freezing point. The rest of the space is covered with earth and compacted;
Digging a drain well
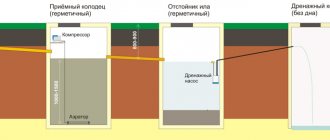
If water is absorbed by the soil with difficulty, it is advisable to dig a pit ─ an additional small hole from which the accumulated water is discharged outside the site through a drain outlet. The pipe is dug above the bottom of the pit.
Using a pit
Step-by-step guide to creating a bathhouse drain with your own hands
About 90% of Russia's territory is located in a climate zone where in winter the temperature is guaranteed to drop below minus five degrees. Therefore, the drainage system for drainage water will most likely be connected to a sump well, less often to a drainage well with the ability to filter drainage water through a ground bed, as well as to septic tanks or, if there is a developed municipal infrastructure, to connect the drainage system to a stationary sewerage system.
Therefore, there is no point in considering pits under the washing compartment or steam room in this case: such a bathhouse cannot be used in winter due to freezing of the soil and the inability to absorb water into its lower layers, which are below the freezing point or groundwater level.
So, a sump well, a septic tank or a sewer. What steps should be taken step by step to ensure that the bathhouse drains correctly?
Installation of the internal part of the drainage system
- Trenches are dug with a depth of 40 to 60 cm for laying drain pipes, with a slope of 2 cm for each linear meter. The bottom of the trenches is covered with sand, the sand is compacted while maintaining the required degree of slope.
- A drain system is installed with all the necessary adapters in the form of corners, tees, etc., with sealing of joints, if this is included in the technological minimum according to the instructions.
- A sewer riser is installed, secured to the wall with special clamps, if the bathhouse has a toilet. In addition, the riser is either equipped with a ventilation well with an outlet above the roof, or it is cut off above the level of the toilet cistern and a check valve is installed on the cut-off part.
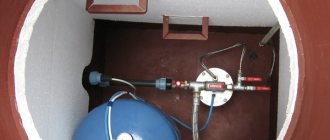
Installation of a closed septic tank
A septic tank for collecting wastewater can be either homemade, made from scrap materials (even car tires placed flat on top of each other), or produced at a specialized enterprise. With a ventilation “trunk”, a hole for connecting a drain pipe, a shaft for the corrugation of a sewage disposal machine. Moreover, if the wastewater drained into it does not exceed a volume of 300 liters at a time, and 700 liters per week, then it is quite possible to settle on a septic tank made from tires.
The height and base area of the septic tank depend on the type of soil on which it is placed. Sandy ones have the greatest absorption capacity - 100 l / m2 / day. On mixed soils, this capacity usually does not exceed 50 l/m2/day, on loamy soils - no more than 20 l/m2/day.
The procedure for installing a septic tank is as follows:
- A trench is dug from the exit point of the bathhouse drain pipe to the selected location for the septic tank, maintaining the required slope along the entire length of the route.
- After excavating the soil, in an area of 3 x 3 m, they dig a 2 x 2 shaft with a depth of 2.5 - 3 meters, into which tires from heavy trucks (6-8 pieces) are lowered flat sequentially. A hole is cut in one of the top ones for the entrance of the drain pipe.
- The finished septic tank is closed with a plastic or metal lid with a ventilation pipe inserted into it.
- They check the ability of the soil under the septic tank to absorb water, for which up to 100 liters of water are poured inside through a pipe and the time of its absorption into the soil is determined, after which the lid of the septic tank and the surrounding area are covered with the excavated soil.
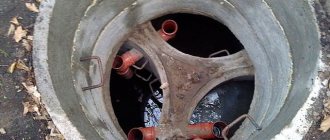
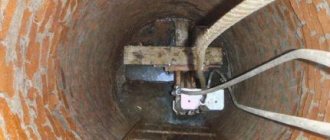
Installation of a drain well
The most convenient material for a drain well is reinforced concrete rings. They are produced in different diameters and fit perfectly together, for which purpose grooves and protrusions are provided at the ends, ideally matching one another. In addition, they can be equipped with matching bottoms and covers with standard plumbing hatches.
For natural water flow, it is better to place the well under the septic tank in a low area - this way you will have to remove less soil. In addition, there must be a place for the access of a special vehicle that will pump out the accumulated excess drain water. To construct a well, a 2 x 2 m shaft is dug, with a calculated depth.
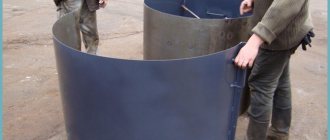
Precast concrete rings are an expensive thing, so many limit themselves to homemade devices. For example, they use used and even broken bricks to line the walls of a well. In such cases, a sand cushion is poured onto the bottom, compacted, and then a concrete mixture based on cement-500 is poured in, and after the concrete has hardened, finishing of the walls with bricks begins. It is better to use a mixture of clay and sand as a binding solution. After such walls have dried, they are treated with bitumen mastic. As a cover, they either take ready-made reinforced concrete for a well shaft, or cast it from concrete with the formwork placed so that the cover overlaps by 30 cm in length, width or diameter. The filling is made in two layers, with reinforcing rods between them. Such a self-cast slab is also treated with bitumen mastic, and before backfilling with soil it is also covered with polyethylene 200 microns thick.
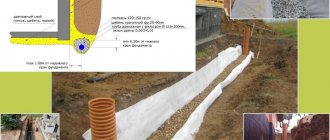
Installation of a ground filtration system
If there is no low-lying area near the bathhouse that will ensure self-flow of water, then you have to dig a deeper hole for the septic tank. But in any case, it is better to place it as close as possible to the place where the drain pipe exits the bathhouse - this provides a greater guarantee of non-clogging.
A trench 80-110 cm deep is dug at the place where the septic tank is dug. The specific depth of laying the pipe is selected taking into account the level of freezing of the ground.
Drainage pipes are being laid. To make them, holes are drilled in pipes using 8, 10 and 12 mm drills. In this case, the pipeline to the septic tank is divided into three conditionally equal parts, and as you move away from the bathhouse, the diameter of the holes in each of these parts is reduced.
The pipes are laid on geotextiles, which, in turn, are laid on a crushed stone bed. At the end of the pipe, a branch is strengthened with an angle of 90⁰ to the pipe, onto the end of which a protective valve with holes is put on. The pipe is also wrapped in geotextile, and after checking its functionality, it is first filled with 10 cm of crushed stone, and then with ordinary soil.
Tips for use
Drainage pipes require regular cleaning using plumbing fixtures or cleaning products.
The waste container is regularly checked to ensure it is full and emptied in a timely manner. Particular attention to filling is needed in the fall and spring, during periods when the soil is saturated with water and it does not leave the septic tank so intensively. And every 12-15 years it is necessary to completely replace the sand and gravel cushion in the trenches simultaneously with the lower layer of earth underneath them. Polyethylene pipes, whose service life reaches 50 years, do not need to be replaced.
Tips for using water drainage from a bathhouse
If the conditions of slope and evenness of laid drainage pipes are met, there are no problems with their operation. Or they can be solved in the following ways:
- Dirt in the drain. Usually this is hair or remains from some kind of bath procedures (washcloths, broom leaves, etc.) and is simply cleaned: a floor board designed in advance for this purpose is raised, under which the drain passes, the drain is removed and cleaned. Pipes are cleaned mechanically - with a brush on a thick wire (reinforcing rod).
- Pipe freezing in winter. Such a nuisance occurs when the pipe is not tilted enough or when a “wave” forms on the pipe, as well as when it becomes clogged. In these cases, you need to start defrosting the system as soon as it is detected - otherwise ice, which has an expansion coefficient greater than water, will rupture the pipe. This can be done by running boiling water from Esmarch’s mug into the pipe with the drain removed, calculating that for every 5 cm of ice plug you need at least 5 liters of boiling water. However, steam generators cope even more effectively with ice plugs in drains. You just need to make sure that the superheated steam does not overly soften the polyethylene or polyvinyl chloride pipes.
Drainage system in the washing room
If the floor is not torrential (and in 99% of bathhouses in Russia with its cold winters it is just like that), but leaking, then the main internal part of the drainage system is a drain with a drain pipe. In a leaky floor with special slots for drains, prefabricated gutters are made between the joists from bent galvanized iron 0.5-0.8 mm thick. And in a monolithic, hermetically sealed one, with an inclination towards one of the walls, gutters are installed, which drain water to a ladder, from which there is already an exit to the external sewer pipe. The second option for a non-leaking floor is in the form of a funnel with a gentle slope towards the center of the room. In this case, the drain ladder is mounted directly in the concrete screed, in a place previously provided for this.
When deciding whether a drain is needed in a steam room, they proceed from the capacity of the bathhouse. If it is heated more than once a week and a total of 5 people wash in it, then it is better to install a drain similar to the drain in the washing room and in the steam room.
Options for arranging a water seal
The spread of a foul odor where there is a sewer is not a rare occurrence. Installing a water seal helps get rid of it. The design is an improvised water plug, which is always located in the cavity of the pipe, even during periods when the bathhouse is temporarily not in use.
The main purpose of the device is to separate two adjacent gas environments, cutting off unpleasant odors coming from the septic tank.
The simplest option for a water seal is to connect a U-shaped siphon to the pipeline, which is constructed from three shaped elements in the form of bends
The simple design has one drawback - if the system is rarely used, the liquid evaporates over time.
For such rarely used systems, it is better to install a “dry” water seal.
A “dry” water seal is a complex structure equipped with an elastic membrane and a spring mechanism that blocks the outlet from the pipe
This design is convenient in that when liquid enters the system under the influence of the created pressure, the valve lowers, opening the path for the flow, and after it passes, it returns to its original position.
In the absence of the opportunity to purchase a finished product, you can build a similar structure on your own.
The basis for the manufacture of a homemade “dry” water seal was a plastic pipe D50 mm, which was equipped with a 50/110 mm adapter
To make a water seal, the wide edge of the adapter is cut at an angle of 30°. A circle D 110 mm is cut out of dense rubber and fixed to the cut site. The finished structure is placed at the outlet of the pipe from the septic tank.
Pit against sewer
When deciding what is best to install on the site - a cesspool for a bathhouse or a stationary septic tank (which is a variant of an autonomous sewerage system) take into account the following
Advantages and disadvantages
these devices:
- service life - for septic tanks it is many times longer;
- environmental Safety;
- practicality, ease of use;
- volume of devices (septic tanks have a whole “model range” that best suits the different needs of consumers).
Septic tanks have only one drawback - high price. But the cesspool has many more disadvantages. This includes silting, the need for regular cleaning, and the inevitable release of harmful substances into the soil, which are not all “fertilizers.”
Design from the outside
The calculations use the size of the steam room, frequency of use in the future, and type of soil. Each of the water intake designs has its own installation nuances. A drainage well is used most often because of its basic design for personal use in summer cottages. The tank for wastewater treatment is enough for a group of up to 6 people to visit the bathhouse.
A professional design team will help determine the optimal size of the well in the conditions of a particular site. You won’t have to overpay for extra material and square meters of work by the installers.
Constructions that use a septic tank are sold ready-made. The volume of the tank varies depending on the number of possible visitors to the bathhouse. For a large family of 6-7 people, the average capacity of the tank should be at least 1.5 m3 per day.
Gutter composition
| Gutter bracket | Drain funnel | Drain elements for drains | Gutter | Gutter Angle | Drainpipe |
When building gutters with your own hands, you need to have an idea of the composition of the drainage system. Its main elements are:
- Gutters – run along the perimeter of the building. When water flows from the roof, it first falls into the gutter;
- Drainpipes are installed in the corners of the house. They perform the function of draining water entering the gutters;
- Funnels - are placed at the junction of the gutter with the drainpipe, preventing water from following a different path;
- Plugs – elements for gutters that perform a restrictive function;
- Adapters, couplings – connecting parts, used to connect drainage elements;
- Elbows, tees, angles - used to distribute water masses, protect walls and foundations from contact with water;
- Brackets, holders – used for fastening gutters;
- Clamps, pins - fasteners for drainpipes.
Tips for choosing material
Polypropylene pipes for sewerage installations
To install the drainage system in the bathhouse, modern high-strength plastic pipes of the required diameter are used. The average service life of the product, subject to installation technology, is 50 years.
Depending on the requirement, pipes made of materials such as:
- PVC - polyvinyl chloride;
- PVC - chlorinated polyvinyl chloride;
- PP - polypropylene;
- HDPE - low-density polyethylene.
Pipes made of PVC, PP and HDPE are not afraid of moisture and are not subject to corrosion. Thanks to the intuitive mounting, they are easy to install. Most manufacturers of plastic pipes have a wide range of products, which allows you to select products of the desired length, diameter and shape.
PVC pipes for laying communications in the ground
The use of cast iron pipes is impractical - they are expensive, difficult to deliver to the work site and difficult to install, although the products are highly durable and reliable.
Asbestos-cement pipes are also not the best choice for drainage in a bathhouse. In addition to low strength, they have a rough inner surface, which does not have the best effect on the natural flow of water. This is especially noticeable for highways longer than 10 m.
The cross-section of the drain pipe is selected taking into account the water intake points in the bathhouse. For a typical bath with a steam room and a washing room, a pipe with a diameter of 11 cm is sufficient. For small baths with a single flush, a pipe with a diameter of no more than 7 cm is allowed.
Basic principles of construction
Depending on the height of the pillars immersion into the ground, the foundation can be:
- shallow;
- recessed;
- not buried.
In most cases, the first two types of bases are suitable for a bath.
Shallow base
In this case, all platform components are formed into a single strong structure, sensitive to any soil distortion. The structure evenly directs the load over the entire surface of the base. The supports are connected by a solid grillage made of reinforced concrete or metal brackets.
A shallow foundation may have a slight rise in the base, while deformation in level is not allowed above the permissible calculations that are used in the construction business, and on which the structure of the building directly depends.
All calculations for a shallow foundation are carried out in the same way as in the case of other types of foundation.
Recessed base
This type of sole differs in the depth of the pillars and directly depends on the amount of soil freezing. Basically this depth exceeds 0.4 meters. The stages themselves are the same as for the foundation of a small foundation.
You can dig holes with a mechanical or gasoline drill, or with a specialized machine. In the latter case, you will have to turn to construction companies for help.
Despite the small volume of the structure and relatively low weight, on heaving soils it is better to install supports below the freezing point of the ground. Otherwise, when the temperature changes, the foundation may “walk”.
How can you arrange a kitchen sink drain at your dacha?
To organize a drain at your dacha with your own hands, you need to connect a corrugation to the kitchen sink and create a water valve by bending the corrugation in an N-shape so that water always remains in it.
Then connect the corrugation to a plastic pipe with a diameter of 50 mm and bring it outside the house. By the way, the kitchen sink should be equipped with a grate to prevent large food waste from falling into the drain pipe. When installing a drain on the main line between the kitchen in the country and the drainage container, it is necessary to install an intermediate siphon so that all foreign particles that are heavier than water settle at the bottom and do not fall into the container. The siphon should be equipped with an inspection window so that you can unscrew the lid and drain the water with solid particles into a bucket. This will reduce the entry of organic matter and sand into the drainage container. In this case, the volume of the barrel will be enough for a longer time, the barrel will last longer, and otherwise the rotting processes will lead to its silting. When mixing for concreting, you need to add a spoonful of any washing powder to a bucket of water into the solution. This additive will facilitate the mixing process, improve the quality of the solution - increase its moisture resistance, strength, frost resistance, and protect it from cracking.
Then you need to take a metal barrel; if it is closed at both ends, then on one side you need to cut out the bottom using a chisel and hammer. Place the barrel with the open end down in the hole on a pre-filled bed of gravel and small crushed stone. The prepared pit for draining water at the dacha must be larger than the height of the barrel. At the other end of the barrel, you have to make one hole for the pipe, connect the barrel and the pipe taken out of the kitchen with a tee with flanges. All joints: pipes with the barrel, as well as with the outlet pipe from the sink, must be sealed.
Possible options for draining a sink in the countryside, organized by yourself, are shown in these photos:
For better resorption of waste water, you can additionally dig drainage trenches on the sides of the barrel as wide as it is, approximately 1.5-2 m long. The trenches must be filled with crushed stone and large boulders. Cover the top of the trench and barrel with a layer of earth 30 to 100 cm thick, flush with the surface of the site, and cover it with turf. On top you can plant flowers, grass and a couple of birch trees - they love water. As practice shows, if you drain a sink in your dacha in this way, the structure will last about 7-10 years.
Construction stages
The first and most labor-intensive stage of construction is the preparation of the trench, that is, excavation work. Where to put the excavated soil? As a rule, if it is high-quality soil, then it can be simply distributed over the site. If it is clay, stones or sand, then it is better to remove the soil from the site.
If you decide to equip the pit with brickwork, then it is better to choose ceramic bricks. This material is the most durable, as it is not afraid of moisture.
For reasons of saving building materials, the laying of the drainage pit is carried out in half a brick
It is important not to forget to leave gaps between the ends, which will serve as drainage holes.
After completing the masonry, you need to begin forming a permeable bottom. For backfilling, as already mentioned, crushed stone and sand are used, but you can also use construction waste - broken bricks or concrete.
Strengthening the walls of the pit using brickwork or other methods is completed at a distance of about 40 cm of earth. The pit is covered from above with an iron sheet or covered with a concrete slab.
If the soil on the site is clayey and does not allow water to pass through well, then it is worth leaving a hole in the floor slab through which wastewater can be pumped out.
The remaining free space to ground level is filled with soil removed from the pit. This arrangement of the drainage pit is quite reliable; you can walk and drive on top of it without fear. And to disguise this unsightly piece of the site, you can place a flower bed on top.
Review of popular schemes
Despite the material of manufacture, sewerage structures can have different designs. The difference concerns, to a greater extent, the number of cameras - from one to three. Let's consider the schemes that are most suitable for providing private houses with autonomous sewerage.
Separate storage tank
Scavenging from one sealed chamber is the simplest option. It does not pollute the environment, therefore, it is safe and environmentally friendly. Such a pit takes up minimal space, and since it is underground, it does not interfere with growing flowers or setting up beds nearby.
Restrictions apply to planting trees, which with their roots can depressurize the sewer structure.
Diagram of the simplest single-chamber cesspool. It is necessary to ensure that wastewater does not rise above the level of the sewer pipe insertion, and call the sewer service in time
A single-chamber storage tank is relevant for those who rarely use the sewer system, that is, rarely visit their dacha. There is another option - if a single person lives in the house, and the sewer system consists of a minimum of active points of use (toilet, shower, sink).
When constructing a tank, it is necessary to remember that it is not filled to the very top, but to the level of the pipe inlet, therefore it is only used to 2/3 of the volume. A simple storage tank requires regular pumping, and for this you should prepare a convenient access road for sewer trucks and it is better to conclude a contract for constant maintenance.
Drain pit without bottom
A variant of a single storage tank is a pit with a filter bottom. The main purpose of the filter is to pass part of the wastewater directly into the ground in order to reduce the load on the structure and reduce the number of calls to specialists for pumping out waste.
The design of the bottom of the tank differs from the solid bottom of a sealed chamber. This could be a structure made of concrete blanks, a brick well or a plastic container.
Scheme of a cesspool with perforated walls and a filter bottom. A thick sand and gravel bed acts as a filter, which needs to be updated over time.
In soils with low permeability, for example, in plastic sandy loams, it is advisable to arrange additional perforation of the walls. To do this, small holes are formed approximately 10–15 cm apart.
They are placed along the entire height of the soil filter in a checkerboard pattern. These methods increase the filtration area and, as a result, speed up the recycling process.
Two important conditions for a filtration device:
- sandy or sandy loam soil - loose, with a high degree of water permeability;
- low level of water horizons.
Dense clay soils, hard sandy loams, loams of any consistency simply will not absorb water, so the perforation device is useless.
This scheme is more suitable for the construction of filter wells, which are the second or third compartment and are installed after the storage tank. The quality of post-treatment of partially clarified water in the ground is much higher than that of unsettled sewage from the first storage pit.
Pumping out waste from a pit without a bottom is carried out a little less frequently than from a regular pit. If the filter becomes clogged, the pumping mode is the same.
Two-chamber septic tank made of concrete rings
A more complicated version of the drainage pit is a double tank.
It can have different designs:
- concrete container divided into 2 parts by a partition;
- 2 wells connected by an overflow pipe.
Despite some differences in design, the goals of constructing two-chamber models are the same - to separate waste according to the degree of contamination. In the first section, which is a full-fledged storage facility, waste processing by anaerobes begins, resulting in the formation of solid sediment and turbid liquid.
In the second, the wastewater is even more clarified, and there is much less sediment.
Option for installing a two-chamber septic tank. The second tank is a filter well that receives wastewater from the first chamber and sends it to the ground for further treatment (+)
If the second container is equipped with a compressor, then the cleaning will be more effective, since the processing will also be carried out by aerobic microorganisms. Two-chamber models, in fact, are no longer just storage tanks, but septic tanks capable of partially purifying sewage.
The following photo selection briefly presents the process of building a two-chamber septic tank from concrete rings: