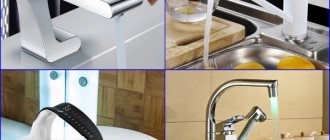
Probably each of us should know how to fix a water tap. Moreover, in most cases, the malfunction can be eliminated quite quickly and without extra costs, but you need to wait for more than one hour to call a specialist, and he will charge a lot of money for the work.
In our article we will talk about the most common breakdowns of water taps, after which we will provide repair algorithms for most models.
If you have experience and skills, you can quickly fix any malfunction
Basic faults
Before repairing a water faucet, you should take the time to analyze the situation. This way we can understand exactly what actions should be taken, thereby saving a lot of time.
Leakage is the most common problem
The list of breakdowns includes the following items:
| Breaking | Description |
| When the valve is closed, drops of water flow out of the tap | The locking mechanism becomes unusable. To fix the problem, it is necessary to either replace the element responsible for blocking the pipe clearance, or install new sealing gaskets. |
| Water drips at the connection point of the spout, hose or valve | The tightness of the connection is broken. It can be restored either by replacing the gasket or by installing a plumbing tap on the thread. |
| The flywheel turns | The flywheel housing has come off the rod or the rod has failed. In the first case, it is enough to install the part in place, in the second, you will have to replace the locking element. |
| The faucet makes a humming sound when operating | The gasket has worn out and its edges begin to vibrate under water pressure. Usually, to eliminate extraneous sounds, it is enough to replace the gasket. |
| Leak on body or spout | The integrity of the product has been compromised. It can be temporarily sealed using “cold welding”, but it is worth replacing the faucet as soon as possible. |
| Splashes fly from the aerator, water flow is obstructed. | The aerator grille is clogged and requires cleaning. |
In principle, this table describes the main faults. Other situations that may arise during the operation of the crane are derivatives of those already analyzed, and therefore they need to be repaired using a similar algorithm.
But such cracks cannot be repaired
Also, before starting work, you should carefully familiarize yourself with the design features of the model you have installed. As a rule, the assembly drawing of the water tap comes complete with the product itself, so when installing a new mixer, this document should be kept.
Note! If you can’t find a diagram, then you should enter the query “assembly drawing method for indicating a water tap” into a search engine and select your model. Most manufacturers post technical documentation online, so the chance of finding what you need is very high.
Now we will try to figure out what to do in each specific case. And let's start with the most common situation, namely, eliminating the causes of leakage of the shut-off element.
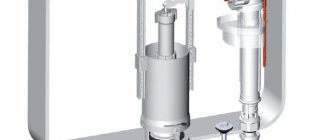
Drawing of a water tap body and a schematic representation of shut-off elements
What to do if the new faucet is dripping?
Sometimes even a faucet that was purchased and installed relatively recently begins to leak. In such situations, the reason, as a rule, is simple to the point of banality - the device has a manufacturing defect, which is difficult to identify during external inspection.
Important information! Cracks and chips inside the structure can hardly be eliminated on your own - even an experienced plumber will not be able to do this. That is why the only correct solution is to return the faucet to the store and ask the seller to replace the defective model.
New faucet
Finally, we note that the faucet in the kitchen or bathroom can start dripping at any moment. To solve this kind of problem, you can go one of two possible ways - to involve a qualified specialist in the work or to try to do everything yourself. However, if you know the exact cause of the leak and how to properly eliminate it, then no difficulties should arise.
Note! To prevent a leak from appearing at the most inopportune moment, regularly carry out preventive measures - change gaskets in a timely manner, check the condition of locking mechanisms. All this will significantly extend the life of the crane!
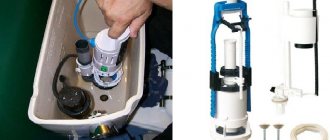
Axlebox models
Replacing axlebox
Cranes that use an axle box as a shut-off valve are the easiest to repair.
The algorithm of actions here is as follows:
- Before disassembling the water tap, be sure to turn off the water on the riser.
- Remove the cover from the flywheel , under which the fixing screw is located.
- We unscrew the screw using a screwdriver, and then remove the flywheel from the guides.
- We dismantle the decorative cones covering the place where the axle box is attached.
- Using an adjustable wrench, unscrew the axlebox that has become unusable from its socket . We clean the cavity from sediment and blot it with a rag, removing any remaining water.
Photo of the removed axle box
- We install the new axle box in place , screwing it along the threads. In this case, there is no need to exert excessive force so as not to damage the structure.
- Next we need to check the faucet for leaks . We turn on the water on the riser and inspect the installation site of the axle box.
- Grabbing the rod with pliers, turn it several times . The water flow should turn on and off quickly and clearly.
- We perform the assembly in reverse order , installing decorative cones and securing the flywheel to the tap.
Axlebox repair
In some cases, crane axle boxes can be repaired. It all depends on their design.
Remove the gasket from the end of the axle box
Products with a rubber gasket are more repairable:
- Using a screwdriver, unscrew the screw that secures the gasket at the end.
- We dismantle the sealing element and install a new one of the appropriate size in its place.
- We secure the gasket with a screw, clamping it firmly enough, but without deformation.
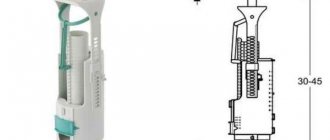
With ceramic axle boxes it will be a little more complicated:
- Remove the rubber sealing gasket from the end, and then remove the end plug.
- We dismantle the ceramic plates, if necessary, unscrewing the element that fixes them.
- We clean the internal cavity of the axlebox, removing contaminants that can lead to leaks.
Completely disassembled ceramic axle box
- We return the plates to their place, observing the correct position: when turning the rod, they should completely block the hole, interrupting the flow of water.
- We complete the assembly by replacing the dismantled elements.
Note! Often the cause of leakage is wear and tear on the ceramic plates themselves, so they may need to be completely replaced. But finding these parts is quite difficult, and the price of the repair kit will not be much less than the cost of a new axlebox.
How to fix a leaking faucet
Let’s say right away that in most cases there are no difficulties in replacing a leaking faucet, but beginners still often encounter some problems. However, preliminary preparation and strict adherence to step-by-step instructions will help cope with leaks and significantly increase the service life of the mixer.
In principle, repairing a faucet yourself is not such a difficult task.
Ball and cartridge models
Dismantling the crane
The design of the water tap and mixer, which is controlled by one lever, differs from the axle-box design.
Accordingly, the dismantling of such a product for repair must be performed according to a different scheme:
Unscrew the screw
- First, lift up the red and blue trim on the front panel.
- Under the cover there is usually a screw for a Phillips screwdriver or hexagon - unscrew it.
- Next, remove the handle, carefully disconnecting it from the rod of the ball or cartridge locking mechanism.
- The next stage is to provide access to the fittings themselves. To do this, you need to unscrew one or two nuts.
Note! Very often, manufacturers make an internal locking nut with grooves for a special tool. You can either purchase a similar wrench, or try to unscrew the part yourself, using improvised tools.
Unscrewing the nut with a special tool
By removing the nut, we gain access to either the cartridge or the ball valve. They are dismantled quite simply, and replacement will not cause difficulties.
Replacing locking and sealing elements
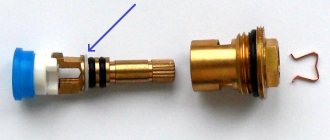
Repair kit for ball mixer
To restore the functionality of a single-lever mixer, most often you need to completely change the functional element.
The instructions recommend doing this:
- We remove the cartridge from the socket by pulling it vertically up along the guides. If a part is skewed, you can correct its position with a slight side impact.
- We clean the cavity under the cartridge from rust and debris, which may cause seal failure.
- We install a new cartridge, secure it with one nut and check how well it shuts off the water. If there are no leaks and the adjustment works properly, we assemble the mixer.
Cartridge removed from slot
Ball valves have their own characteristics. Their main advantage is that the ball itself breaks extremely rarely, so repairs usually involve replacing the gaskets. We proceed like this:
- Holding the rod, remove the ball from the socket.
- Using tweezers or small pliers, remove the spring-loaded gaskets that press the ball to the body.
Removing the sealing elements
- We replace the gaskets, and then install the ball in place.
- We place a new sealing ring on top and clamp the valve with a union nut for the mixer.
- As in previous cases, it is better to check the tightness of the structure before complete assembly.
Valve mixers
In this case, the mixer device is very simple and it will be easier to repair it. Therefore, you can deal with this yourself.
The valve mixer device includes such elements.
- Frame.
- Spout.
- Valves.
- Crane axle boxes.
The valves are designed for manual control of the mixer, and the faucet axleboxes perform the function of supplying water. Older models are equipped with rubber gaskets to prevent faucet leakage, while more modern models are equipped with ceramic plates.
Other renovations
Troubleshooting minor problems
In addition to actually repairing the locking mechanism, to restore the functionality of the faucet, it is sometimes necessary to carry out other measures.
For example, in case of problems with the aerator, we proceed as follows:
Dismantling the aerator
- Using an adjustable wrench with plastic pads, carefully grab the aerator and unscrew it from the spout.
- We take out the installed mesh and rinse it thoroughly, removing all dirt.
- At the same time, we clean the mixer spout with a flexible brush, trying to remove as much deposits as possible from the inner walls.
- We screw the aerator onto the spout, making sure that the thread is not skewed.
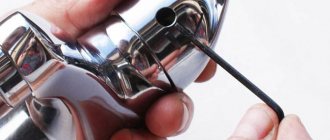
If a leak occurs in the place where the swivel spout is fixed, proceed as follows:
- Carefully tighten the union nut using an adjustable wrench. We remove the “gander”.
- Remove the rubber gasket from the socket.
- We install a new one in its place. The diameter and thickness of both elements must match.
- We return the spout to its place, securing it with a union nut.
It is this gasket that needs replacing
Coating restoration
Some problems do not affect the operation of the mixer, but significantly worsen its appearance. As a rule, these include scratches, chipped coating, abrasions, etc. And although complete restoration of chrome or nickel plating by galvanic means is quite expensive, it is not at all necessary to throw away the faucet and buy a new one.
You can restore the attractive appearance of the product by painting:
- We dismantle the mixer by completely disassembling it and removing all non-metallic parts.
- We grind metal surfaces, removing scratches, and then thoroughly degrease them.
Silver metallic in aerosol - Apply metallic paint to the grease-free mixer. For application, you can use either an aerosol can (cheap, but not very high quality) or an airbrush (quite expensive and complicated, but the coating is more even).
- When the paint has dried, we treat the surfaces with a special protective polish for metallics. You can buy it at any automotive chemical store.
Note! If the scratches are minor, then this polishing can be used without painting: it well restores the factory chrome/nickel plating.
- After polishing is completed, we assemble the tap and install it in place.
Recommendations for preventing breakdowns
A recommendation in order to extend the service life is the need to select good designs made of stainless steel, brass or copper alloys. To prevent the appearance of limescale, additional filters are installed.
Clean surfaces with gel-type products suitable for metal surfaces. Do not use hard brushes or substances containing alkali. To maintain shine, washing gels are thoroughly rinsed.
Do not tighten the valve all the way, so as not to loosen the unit - smooth movements are required.
Watch the video on the correct selection:
When to change the cartridge
A disk cartridge can fail as a result of worn-out plastic moving parts. Plates made from ceramic last longer. They don't wear out as often as rubber ones. But it is useless to look for the exact cause of the breakdown. The cartridge cannot be repaired, it can only be replaced with a new one. Therefore, whatever the cause of the malfunction, a new part will be needed in any case.
The cartridge cannot be repaired, it can only be replaced
You can determine that the cartridge has become unusable by the following signs.
- The water does not mix at the proper level. The leak can only be either cold or hot.
- There were problems with the water supply. If you turn the lever to any extreme position, water does not flow.
- If the lever is in a fixed position, constant changes in water temperature occur.
- When you turn on the water, you cannot turn it on at full pressure.
- Problems with completely shutting off the water. This cannot be done.
- There is water leaking under the handle.
- It takes some effort to turn the lever.
Water directly affects the quality of operation of the mixer. Harmful impurities that it may be rich in lead to the formation of limescale and rust. This spoils the product, clogs it and does not allow it to work well and for a long time. To reduce the likelihood of such a problem occurring or delay its occurrence as much as possible, it is worth using filters that make the water softer and purify it mechanically.
Water directly affects the quality of operation of the mixer
Types of switches
The faucet switches to the shower using mechanisms that can be:
1.cork,
2. push-button,
3. cartridge,
4. spool valves.
The cartridge type of switch is considered the simplest and most widely used. Basically, the device breaks due to wear of the rubber seal in the form of a ring, which is located between the mixer lever and its body. The seal is affected by moisture and mechanical stress, so it wears out. Bad gaskets should be replaced with new ones by disassembling the device.
Device
The design of a simple water-pressure mixer is most often the same for all models. The basic composition of the functional elements and its principle of operation remain the same, despite possible external differences.
This crane includes:
- Mounting screw;
- Spindle;
- Valve handle;
- Stuffing box;
- Lid;
- Pad;
- Gland packing;
- Nuts on the valve body;
- Spout and saddle.
The handwheel handle or valve is connected to the vertical spindle so that its lower part, 20 mm long, is able to move inside the nut. In turn, the lower part of the nut is screwed into the body. The spool is located at the end of the spindle, consisting of a disk with a gasket, which is installed using a nut or button. That is, when we turn the faucet handle, the spindle is screwed in, and this leads to shutting off the water. The gasket is pressed tightly against the metal seat of the valve and creates an impassable obstacle to the passage of coolant.
To prevent water from penetrating upward, the design of each mixer includes a special part - an oil seal bushing, which is located in the upper part of the spindle. Thanks to the stuffing box, the water is isolated. Due to the properties of the waterproof material, which prevents the penetration of water, water does not flow from the tap.
Lever mixers
The design of such faucets includes a body, a spout (gander), a ceramic or ball cartridge, a control handle, and a nut that secures the cartridge in the body.
The ceramic cartridge performs the function of mixing water, and the control handle makes it possible to regulate the water pressure and its temperature. If there is a breakdown in the cartridge, you will have to replace it; it is not intended to be disassembled.
Our range:
6102 Shower mixer WasserKRAFT 6919 RUR
6301 Bath mixer with short spout WasserKRAFT 4789 RUR
7801 Bath mixer with short spout WasserKRAFT RUB 13,123
AGATHA External shower mixer, with hand shower, bronze RUB 5,023