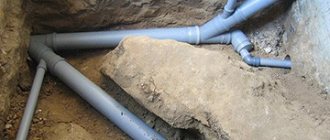
A wide variety of communications and highways are laid in the home of a modern person. One of the most important is sewerage, which performs the functions of collecting and discharging wastewater. During its operation, sewer gases are generated. They are a very specific cocktail of ammonia, methane and other similar substances. These substances are dangerous to human health, so they should not be allowed to enter living rooms.
To eliminate this problem, a special design is used, the main part of which is the fan pipe. The product serves to maintain the proper level of pressure in the sewer and to remove gases formed in the sewer.
Return to content
Who should clean the ventilation in an apartment building?
Checking the ventilation in an apartment building is done like this: attach a sheet of paper or a paper napkin to the exhaust grille.
If the sheet or napkin does not stay on the grill, then there is a problem with ventilation. Possible reasons for lack of traction:
- The mine simply doesn't work.
If the house is old and the shaft is made of concrete blocks, then cracks may appear at their joints. - There is a blockage in the mine.
Dust, small debris, and insects get into the air ducts. Grease deposits may form on your kitchen hood. - No influx.
If fresh air does not enter the apartment, there is nothing to displace the exhaust air. In this case, the productivity of the supply and exhaust should be approximately equal: the air passing through a small window slit will not be enough for full ventilation.
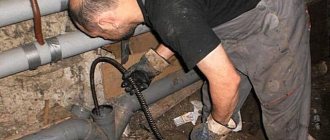
You can only clean the grille on your exhaust vent yourself; The cleaning of ventilation shafts is carried out by specialists. If the ventilation does not work, diagnostics are carried out: a video camera is lowered into the shaft, which detects the cause of the blockage. All dirt is then removed using a pneumatic brushing machine.
Ventilation must undergo not only cleaning, but also disinfection. A sprayer with a flexible pipe is carried out to the middle of the shaft and cleans its walls with an antibacterial solution. For better treatment, you can contact the sanitary and epidemiological service: specialists will analyze the bacterial environment in the ventilation and select an individual disinfectant.
Rules for installing an air valve for sewerage
There are a number of rules that must be followed during installation:
- If the sewer ventilation valve is mounted in the attic (on a riser), the temperature in the room must always be positive.
- If the ventilation valve is installed in a room with a floor grating, it must be at least 35 cm above the floor level.
- The valve must remain accessible for inspection and possible repairs. This is especially important if it is installed not in addition to, but instead of a fan pipe.
- The valve installed on the riser must be located at least 30 cm higher than the topmost pipe inlet from the plumbing fixture (i.e., there should be no other inlets from the valve for the next 30 cm down).
- There should be at least 20 cm from the valve to the nearest siphon.
Stages of work
If the installation of a sewer valve is carried out in an apartment building, it is necessary to inform the neighbors. After this, the riser is disconnected from the water supply, and you can proceed directly to installing the aerator:
- The section of pipe on which the product will be installed is dismantled.
- The valve, using a sealing ring, is inserted into a tee or outlet. In this case, the arrow on the body of the product must point in the direction of the flow of water through the pipe.
- Tee or elbow - mounted on a pipe.
As an option, you can install the aeration valve directly into the pipe, without using a tee or outlet.
What is an anemostat and how to install it correctly?
About the advantages of Domvent ventilation valves
Related Posts
Simple and clear water seal
Hydraulic seal
A hydraulic seal, which is required in any wastewater receiver, also serves as a barrier to unpleasant odors. Physically, it can be an elbow-shaped siphon, usually made of the same material as the entire sewer pipeline (metal, plastic). This unit constantly contains a certain amount of water, which prevents the stench from entering the room.
Important! There is no point in hoping that a water seal will provide 100% protection against sewer odor. If the pressure in the system suddenly drops, for example, during a volley discharge of water, then nothing will prevent the “aromas” of the waste from flowing into the room
Also, we would like to place special emphasis on the fact that during operation, after a certain period of time, fats and various contaminants (hair, threads, soap scum, etc.) will be deposited on the walls of the siphon. So they will become a source of foul odor. To avoid this, it is necessary to periodically carry out preventive cleaning of the knee - 2-3 times every six months.
Materials for organizing ventilation
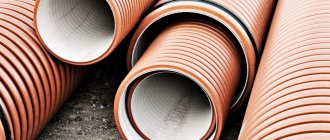
In the modern world there are a lot of materials that can be used as sewer pipes and for ventilation.
For years, fairly massive and heavy cast iron pipes served as the main material. In multi-storey buildings that were built during the Soviet Union, the use of cast iron or steel systems is quite common. Most often, this structure is repeatedly damaged, or rather damaged by corrosion. It is recommended to replace such pipes immediately. As a last resort, carry out local repairs using modern materials that can combine pipes of different diameters. There are a lot of disadvantages when using cast iron:
- Difficult to install.
- Additional loads on the floor.
- Requires regular maintenance.
- Subject to corrosion.
- High price.
All this together caused quite a lot of inconvenience, which was eliminated when plastic pipes were released for sale.
- The first thing I would like to note is that this material is absolutely not susceptible to corrosion, which increases the service life tens of times.
- Each pipe, as well as each corner, is equipped with rubber cuffs that prevent water and unpleasant odors from escaping.
- Any design is easy to assemble, which greatly reduces installation time.
- Use minimal effort for maintenance. If the structure is not disassembled, then when assembled it can last more than 10 years. Important. For long-term use, cleaning is necessary. To do this, it is enough to use one of the chemicals, of which there are quite a lot on the shelves of household chemical stores. Since the procedure is performed quite rarely, it is not worth saving on it. It is better to purchase a high-quality product that can properly remove plaque.
- The cost of plastic is much lower than the cost of metal, making it even cheaper to design everything from scratch.
The ventilation system uses the same pipe as the main riser. That is, the diameter of the pipes must be completely consistent. In addition, the connection will be much easier.
When to use a vacuum valve
The second option for arranging ventilation lies in installing vacuum valves. However, this method is recommended only when it is impossible to install vent pipes due to technical inconsistencies, or their installation is financially unprofitable.
The principle of operation of the device is to connect the sash and a spring with a low resistance value. When the device is closed, the airtight seal completely seals off the penetration of air masses. When a vacuum appears in the sewer (in the case of draining water), the valve automatically opens and air from the room enters the system, regulating the correct proportions. Once balance is restored, the sash closes again and creates an airtight seal.
It is impossible for unpleasant aromas to penetrate into the room through a sealed vacuum valve. An obstacle to sewer odors when the valve is open is the air flow, which moves in the opposite direction.
When installing ventilation with the installation of a vacuum valve, it is important to understand and be guided by some aspects of the functioning of this device:
- If the water seal dries out, the installed valve is unable to prevent the odor from spreading throughout the rooms in the house.
- The main location for installing valves is considered to be the riser. If installation is difficult in the specified area, then they can be installed on any horizontal section of the pipeline.
When selecting a ventilation equipment method, it is worth understanding that installing a water seal in any case will make the system’s operating efficiency much higher.
Schemes for creating effective ventilation
Installation of a vacuum aerator in a sewerage system
Before installation, the vacuum aerator is checked for leaks. The internal space is filled with water from the side where air does not enter the device. Leaks in the housing are detected. The valve is always installed vertically, because horizontal placement does not guarantee normal operation. The device does not require constant maintenance, but must be accessible for cleaning.
To reduce the ingress of debris, the valve is connected to the circuit 300 mm higher from the place where the pipe is installed in the riser. The device is placed in the attic, on the top floor, so that there is free flow of air to it. The valve can withstand temperatures from -50 to +90°C. The aerator does not require insulation, because There is an air space inside between the box and the lid, which serves as insulation from the cold.
A rubber cuff is used to connect the fan shaft to the drainage collector. The length of the riser increases by the height of the attic, if there is one, and the head is raised above the roof.
In a public sewer system, where there are several risers, it is allowed to combine the heads into one pull-out system, and the forced principle must be used. It is not recommended to connect the outlet pipeline from the sewer to the stove chimney.
Main features of sewerage systems in the CIS countries
Features common to all sewerage systems designed in the CIS countries include:
- the movement of human waste occurs naturally;
- a similar effect is achieved due to a slight tilt, which is calculated during the design of special pumps;
- the pipes through which household waste flows are separated from the stormwater pipes, which are responsible for removing excess water from city streets;
- both public and storm drains are maintained by city services.
Otherwise, the differences depend on the specific country of residence and the characteristics of a particular region.
We remove the sewer hood through the roof
Very few people are aware of how the sewerage system works. And the need for ventilation in it seems completely fictional. However, unvented drains can cause unpleasant odors in the bathroom, kitchen and home.
This problem mainly occurs in high-rise buildings and large buildings where there is a large load on the plumbing line. Small private houses, by law, may not be equipped with sewer system ventilation, although some helpful cottage owners still install a special pipe with access to the roof.
Operating principle and ventilation device options
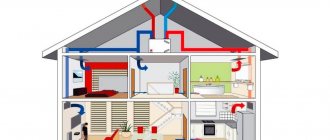
The influx of outdoor air into the premises passes through loosely fitting window shutters or channels and valves provided for this purpose in double-glazed windows made of metal-plastic.
The hood is produced through vertical shafts (usually located in bathrooms and kitchens) running from the apartment to the roof or attic. Due to the difference in temperature indoors and outdoors, a draft arises in the shaft, ensuring air movement.
The flow of fresh air moves through the rooms, gradually mixing with exhaust air masses, after which it is removed from the room through exhaust ducts.
If the air flow is blocked, normal air circulation in the apartment becomes impossible.
The following actions lead to disruption of this process:
- Installation of blind window frames.
- Installation of doorways without a gap between the floor and the door leaf.
- Constantly closed interior doors.
- Installation of periodically turning on fans at the entrances to ventilation shafts.
Of course, this should in no case be a reason to refuse interior doors or convenient plastic windows. For normal air exchange, it is enough to install transfer grilles in the door leaves, install special valves in the windows, and when installing fans, make sure that they do not completely block the exhaust duct.
Incorrect operation of the ventilation system is indicated by the formation of condensation on the walls, fogged windows, and the formation of mold.
For apartment buildings, several ventilation options are allowed:
- From each room in each apartment there is a separate shaft leading to the roof. The method is convenient because under no circumstances will odors from neighbors penetrate into the apartment. The pull here is also stronger and more stable. Developers use this method infrequently, since its implementation requires a large number of pipes and additional labor costs. In addition, in multi-story buildings such a ventilation system will require too much space.
- Exhaust ducts from individual rooms connect to a common collection duct in the attic, from where they are discharged to the street. If the diameter of the ventilation duct is insufficient, exhaust air masses can penetrate into rooms located on the upper floors. Because of this, the upper floors are often connected to the shaft directly, bypassing the box collector.
- The ventilation ducts lead directly to the attic, which acts as a kind of intermediate ventilation chamber. From there, the exhaust air goes outside through a collection channel. Not a very convenient method, since not only all sorts of odors will accumulate in the attic, but also an abundance of moist air. This will lead to the formation of condensation, mold and accelerated destruction of building materials. To reduce condensation, the channels must have good thermal insulation.
- Tree-like structure of the ventilation system. Small channels from individual rooms connect to the common vertical trunk. The method is economical, and therefore the most common. The main problem with this solution is that if the draft is disrupted, odors from one apartment will penetrate into neighboring ones.
Common mistakes that are best avoided
In order not to ruin the entire system, remember important details during its installation.
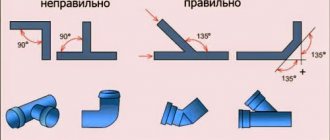
For example, when ensuring a pipeline slope, you need to remember the ratios, because its insufficient or excessively large value can cause frequent blockages.
Correctly determine the angle of inclination of the fan pipe
You will ensure the long service life of your sewer system if you use the pipes for their intended purpose, namely, install external pipes on the street, and internal pipes in the house.
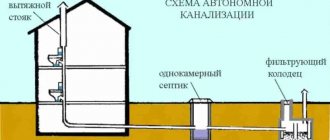
And lastly, if there is no riser, then ventilation is provided by taking clean air from the pipes of the septic tank, and removing dirty air through a ventilation duct leading to the roof.
Chimney-based ventilation
Fan pipe indoors with outlet through the ceilings
The vent pipe is used to connect the pipeline to the exhaust pipe (ventilation duct). Fan pipes are divided according to shape and material. The choice of one product or another depends on the configuration of sewer lines and the location of their exit from the building.
Principle of operation
If the drainage system is not equipped with a ventilation duct, then the wastewater entering the sewer riser creates a “rarefaction” of air. The air deficit is partially replaced by water located in the siphons of sinks, bathtubs and other equipment.
During simultaneous drainage, especially in multi-apartment and multi-storey private buildings, a vacuum is created in the sewer pipe, which “breaks” the water seal. Therefore, unpleasant odors and harmful gases freely penetrate into the room.
In sewer lines where a drain pipe was installed, the process occurs differently. The air entering through the ventilation duct during “vacuum” in the riser protects the integrity of the water seal and normalizes the pressure inside the pipeline.
Installation Tips
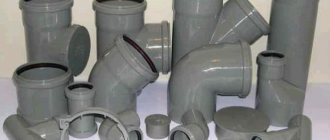
Components for assembling a ventilation pipe
When installing exhaust pipes and sewers, it is recommended to use products made from similar materials. This will allow for reliable sealing of the joints due to identical fasteners and fittings. It is not recommended to use pipes made of different materials (plastic, cast iron), since the connection will not have sufficient strength.
Ideally, if design work has been previously carried out and space has been provided for the installation of an exhaust pipe. Before starting work, it is advisable to prepare all the necessary materials and tools.
If installation work is carried out in old houses where there is already a sewer system based on cast iron pipes, then you will need to purchase a sewer pipeline made of a similar material. When using plastic products, the existing system is completely dismantled and new communications are laid.
Exhaust pipe outlet through interfloor ceilings and roof
When installing ventilation using fan pipes yourself, you should adhere to certain rules:
- According to the project, the end of the exhaust fan pipe is led to the roof of the house through the interfloor and attic floors. The height above the roof level is at least 50 cm. When passing through the attic, the height from the ceiling to the end of the vent pipe is at least 300 cm.
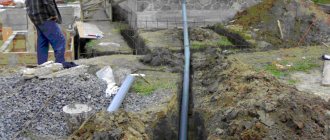
- When the exhaust pipe is routed through the ceiling, the junction is insulated with sound-absorbing material. If necessary, a steel box is installed, the space inside of which is filled with heat-insulating material.
- When constructing ventilation for sewerage at an already operating facility, the drainage pipe is discharged through a load-bearing wall. It is not advisable to lay through floors, as this can lead to a decrease in their strength.
- The cross-section of the exhaust pipe must be equal to the cross-section of the riser pipe. As a rule, in multi-storey private houses a pipe with a cross-section of 110 mm is selected.
- If there are several risers, they can be connected to one exhaust pipe at the top. The connection of sewer ventilation with the stove chimney and hood is not allowed.
- The length of the pipe from the plumbing equipment to the exhaust pipe should not exceed 6 m. The connection is made by connecting the siphon of the equipment with a socket adapter.
- For laying and exiting the pipe, special couplings and bends with the required rotation angle are used. The connection of the various elements of the exhaust pipe is carried out using metal crimp clamps, seals and silicone-based sealant.
If, during the process of exiting through the roof, the drain pipe hits the floor beams, then an elbow with the required rotation angle (30–45) is installed for displacement. In multi-storey private houses, it is recommended to install an element with a plug on each floor (revision). If blockages occur, this will allow you to quickly resolve the problem without dismantling the ventilation duct.
Purpose of sewer ventilation
Sewer ventilation is installed at the construction stage
At the moment the drains are drained, the pressure in the riser elbow changes, while water is sucked out of the water seal and odors penetrate into the apartment. Gases harm human health, cause allergic reactions, poisoning, and cause explosive situations. A water trap or siphon is a curved pipe under the toilet, bathtub, sink and other plumbing fixtures. There is always water present in the knee, which serves as a plug that prevents the penetration of odors.
A riser with forced supply and exhaust has the following effect on the system:
- does not allow evaporation into the bathroom;
- prevents methane or hydrogen sulfide from entering the house, which appears in sewer wells or cesspools;
- balances the pressure inside the pipeline.
Building codes allow the installation of sewerage without installing a ventilation riser for private houses up to two floors high. In such buildings, one-time discharges of a small volume of wastewater are provided, which do not cover the diameter of the drain collector (50, 70 or 110 mm).
The situation changes if sewerage is planned in an apartment building. Residents simultaneously use the drain, the escaping mass blocks the channel, and the safety plugs are pulled out of the siphons under pressure. The need for ventilation becomes obvious as the number of storeys increases.
Odors penetrate into the room if sewage wells in a multi-storey sector are filled to capacity. There is no possibility for fresh flow to penetrate into the drainage main. When draining even from one apartment, a pressure difference results and on the first floors it sucks water from the knees under the sink, bathtub or toilet.
Installation work
Plastic products are resistant to temperature changes. You can work with them at any time of the year, even in severe frost.
The hood from the pipes of a private house is assembled in the following sequence:
- Drawing up project documentation. All details should be taken into account and possible nuances should be taken into account. The diagram must indicate the route with precise reference to each room, attic and roof. Based on the drawn up drawings, calculations of building materials are carried out.
- Marking. The places where the channels pass and the points of their attachment to load-bearing surfaces are marked on the walls, ceiling and floor.
- Drilling holes for attaching clamps. Insert dowels into them and fix the clips with screws.
- Conducting channel assembly. First, a riser is made into which tees and plugs are cut. The links are joined into sockets. The gaskets are pre-coated with silicone grease.
- Installation of electrical appliances. After inserting the fan, the pipe is connected to the common pipeline. Do the same with the heater on the input group.
- Checking for leaks. This is done by applying soap foam to the joints. If a leak is detected, it is sealed with silicone sealant.
- Installation of grilles and ventilation mushrooms.
If there is such a possibility, then it is advisable to install the exhaust system at the stage of building a house or during renovation before applying the final finish.
How is the ventilation system discharged through the roof?
The work plan is very simple: first, a ventilation riser is installed on the upper floor. Then an end pipe is installed on the roof. And the last step is to connect the upper section of the ventilation pipe to the lower part of the end cap. This is usually done using corrugation, but some people prefer to use other materials, since corrugation is easily deformed - just an accidental finger press is enough. The material can also easily become perforated.
The roof end pipe is also easy to install. A special hole is cut in the roof, and two pipes in it are connected using a special cuff - an elastic adapter. All edges are treated with sealant. And finally everything is held together with screws.
Roof ventilation is a reliable, forever system that is low cost and easy to install.
Principle of operation
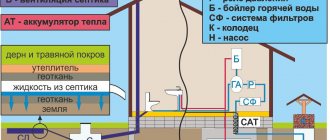
The operation of a septic tank practically occurs differently in each case. The water clarified during the passage of the septic tank must leave constantly, because the septic tank is also constantly replenished. In reality, a slightly different process often occurs - the septic tank operates as long as water fills the container. This often happens due to a lack of understanding of the fact that a septic tank alone is not enough for successful sewerage operation. The removal of clarified waste must be ensured, and the ventilation of the septic tank must work. It is assumed that when using an expensive imported septic tank with aeration, it is possible to discharge wastewater into the nearest reservoirs.
The principle of operation of a septic tank.
If the water consumption in the house is less than 1 m³, the septic tank will be filled in just a couple of days. The clarified water should flow by gravity through the outlet pipe. Usually the water goes into a drainage pipe, then into a ditch or into filtration fields. Entering in small portions, wastewater in a properly designed septic tank should be kept at the same level. This level must be such that the outlet pipe can operate optimally.
It is known that for any sewer pipe the optimal filling is 1/3 of the diameter. This is why pipes with a diameter of less than 100 mm are unsuitable for external sewerage. This also applies to the outlet pipes from the septic tank. We can assume that the choice of the diameter of the local sewerage pipe has already been made; 100 mm is the required minimum. Theoretically, it never hurts to increase the diameter of the outlet pipe.
The problem will be to find a drainage pipe for the resorption field of large diameter on sale. If you wish, you can make it yourself by making the appropriate cuts in a regular sewer pipe. On the Internet you can find any recommendations for such owners who want to make drainage pipes more efficient. Usually, the outlet pipe from the septic tank quickly silts up, but making it larger is also not always possible, since ready-made septic tanks have outlet pipes of certain sizes.
Non-standard methods
One of the options for installing ventilation ducts
If your building has already been built, but you don’t want to make holes in the ceiling, you can resort to alternative methods that do not contradict standard requirements and safety rules.
- Installation of pipe on an external wall. This scheme is quite simple and similar to the classical system. You need to install a pipe along the outer wall of the house. Its diameter should be 110 mm. It cuts into the sewer, is secured with clamps to the wall and is brought out to the roof of the building. It is important not to install the pipe near windows and balconies. Externally, such a system is very similar to a drain pipe, so it will not spoil the overall appearance of the house. But in this case it will need to be insulated, otherwise freezing is guaranteed.
- Installation of the system to the septic tank. This method can be considered the best option out of these 3 methods. According to the rules, storage tanks and purification devices should be located 5–20 m from the home. Therefore, by providing ventilation to the septic tank, you can prevent odors from entering the house. Moreover, removing the pipe from the septic tank is easy to do both before and after building a house.
- Installation of the system along the fence. The installation principle is the same, the only difference is the distance of the ventilation outlet from the house.
By using such a system, you could harm your neighbors. So, if your fence is located in close proximity to neighboring houses, the sewer smell will reach them.
Fan pipes, or How to avoid sewer odors from entering your home?
The drainage pipe is an important element of the sewerage system in a country house. Simply put, this is an exhaust duct connected to the riser and brought to the roof, through which unpleasant odors are removed outside the building
What is the purpose of the fan pipe? Its main task is to remove odors from the sewer riser into the atmosphere. Usually, to prevent polluted air from entering the room, a water seal, which is a curved pipe filled with water, is installed in the wastewater receiver from the plumbing fixture. When draining, some of the water remains in the bend of the pipe, preventing air from the sewer from entering the room. It would seem that the problem is solved. But not for seasonal homes: if the plumbing fixture is not used for some time, the barrier to unpleasant odors will literally gradually evaporate. This is where the drain pipe comes to the rescue: air pollution will not occur, even if the water seal is dry. In addition, it will prevent the valve from breaking, which can happen at the moment of maximum water removal.
Multilayer polypropylene (PP) pipes with noise-absorbing additives provide an increased level of sound insulation. They have walls of increased mass, as well as an improved design of corner bends.
Another function of the drain pipe is to prevent rarefaction of gases in the riser (it is because of this that water flows out of the sinks with a characteristic squelching sound).
One riser - one pipe
In most cases, fan pipes with a diameter of 100 mm are used, but sometimes 50 mm are sufficient. Their diameter, as well as their number, is determined by engineering calculations based primarily on the number of plumbing fixtures connected to one riser. As a rule, a riser with two or three bathrooms (equipped with a washbasin, shower and toilet) requires one drain pipe. If the bathrooms are located in different parts of the building, as is often the case in large houses, and are connected to separate risers, then each of them will need its own drain pipe. Moreover, it should be taken into account that all exhaust ducts lead to the roof, which means that a corresponding number of pipes will “grow” on it.
Installation
Layout of pipes in the house Fan pipes are installed simultaneously with the sewerage system. The exhaust pipeline can have both vertical and horizontal sections (the optimal rotation angle is 45°). The pipes are connected into a socket using a rubber seal to seal the channel. They are fixed to the walls every 70 cm with clamps with vibration-isolating pads.
To lay pipes through reinforced concrete floors, sleeves made of rigid non-flammable material are used (most often these are pieces of steel pipes that are inserted into pre-made holes). The sleeve is needed to protect the pipe from temperature deformation and from mechanical damage during sedimentary movements of the building.
Please note: a 100 mm pipe has a socket with a diameter of 110 mm, therefore the internal diameter of the sleeve for it should be 120 mm. The resulting gap is filled with waterproof material (silicone sealant, polyurethane foam, oiled or bitumen-impregnated rope), which should not rigidly fix the pipe in the sleeve, allowing for minor movements along the longitudinal axis
Pipe outlet through the roof
Usually, special passages are used for this purpose (some of them are suitable only for a certain roofing covering, but there are also universal models). Often, exhaust pipes are led to the roof through a chimney.
When exiting to the roof, the drain pipe must be at least 50 cm away from the attic window, otherwise odors from the sewer will be “pumped” into the room during ventilation.
In any case, it is important to remember one thing: for obvious reasons, the exhaust pipe should not be located in the same channel as the supply ventilation pipe, nor should it go onto the roof next to the attic window, near open terraces and balconies
Valve as an alternative
What if for some reason it is impossible to install a drain pipe? An air valve 15–20 cm high, located at the end of the sewer riser, will help solve the problem. This inexpensive and simple design device works as follows: when a vacuum occurs in the riser, the valve membrane rises and allows air into the sewer system. And when the pressure equalizes, the membrane lowers, creating a barrier against unpleasant odors.
Of course, the valve is not an adequate replacement for a drain pipe (in particular, it quickly becomes dirty and fails, and if the water seal is dry, there is no point in using it at all), however, in a number of situations it becomes the only possible alternative.
Installation of a new structure
Installation of a new product should start from the lowest sewer line or from the foundation if we are talking about a country house. It is necessary to drill holes in the wall to secure the clamps. You need to buy high-quality metal parts. Such elements give strength to the entire product. The line is installed and secured using clamps. Fan ventilation outlets are connected to the plumbing fixture and firmly fixed.
To achieve maximum tight and reliable contact of the riser with the fan device, it is necessary to use seals. Craftsmen recommend installing these elements using soap or silicone. In this case, the contact will be really reliable, but it will be difficult to remove it.
Fan pipe exit through the roof
It is also necessary to carry out soundproofing to protect residents from loud sounds from the sewer. The simplest, cheapest and at the same time reliable option is to apply polyurethane foam. The sewer pipe just needs to be filled with foam and allowed to dry. This building material perfectly absorbs all sounds. The only drawback of this method is the problematic maintenance of the sewer system.
A more acceptable option, which, by the way, is the only one when installing complex branches, is to use slabs and mineral wool for sound insulation. You can also purchase and install a box for sound insulation. This product is equipped with a window for checking the line.
Return to content
Requirements for a ventilated valve (aerator)
The installation of ventilated valves to allow air into the system (Figure 5), which guarantees normal operation of the sewer system, is carried out on the basis of appropriate calculations. The throughput of the aerator must correspond to the specified design parameters for the throughput of the riser. In turn, the fluid flow through the riser depends on its diameter, type (ventilated/non-ventilated) and height. The calculations also take into account the diameter of the dictating floor drain (with the highest waste flow), the angle of liquid entry through it, the height of the water seals and other initial data.
Figure 5. Operating principle of an aerator - air valve for sewerage: 1. In the operating position, the valve is closed - air from the sewer does not enter the room.2. When a vacuum occurs in the sewer riser, the aerator valve opens, the missing amount of air comes from the room, preventing the water seal from breaking.
In a simplified form, you can coordinate the flow parameters of the aerator and ventilated riser using tabular selections. Initially, you should refer to Appendix “B” of SP 40-107-2003 for the installation of internal sewerage from polypropylene pipes. It is to this that SP 30.13330.2012 refers to determine the characteristics of the aerator.
Table 1. Capacity of a riser made of polypropylene pipes ∅110 mm, equipped with a ventilation valve with a clear cross-sectional area of the air flow of 3170 mm2 and 1650 mm2.
| Diameter of floor outlet, mm | Angle of liquid entry into the riser, ° | Riser capacity, l/s | |
| 1650 mm2 | 3170 mm2 | ||
| 50 | 45.0 60.0 87.5 | 5.85 5.10 3.75 | 7.7 6.8 4.54 |
| 110 | 45.0 60.0 87.5 | 4.14 3.64 2.53 | 5.44 4.8 3.2 |
Next, you should find out the flow parameters of the sewerage system with similar initial data. For ventilated risers, they can be gleaned from tables 6-9 (SP 30.13330.2012).
Table 2. Capacity of ventilated risers made of polyvinyl chloride (PVC) pipes (SP 30.13330.2012 (Table 7)).
| Outer diameter of floor bends, mm | Angle of connection of floor branches to the riser, ° | Throughput, l/s, risers with pipe diameter, mm | |
| 50 | 110 | ||
| 50 | 45 60 87.5 | 1,10 1.03 0.69 | 8.22 7.24 4.83 |
| 110 | 45 60 87.5 | 1,10 1.03 0.69 | 5,85 5.37 3.58 |
This also takes into account the diameter of the floor outlet and the angle of its connection. From the tables it becomes clear that, for example, for some of the most popular PVC pipes today, Ø 110 mm with an outlet Ø 110mm/45 (outlet for connecting a toilet), the second throughput of the riser will be 5.85 l/s. This figure turns out to be slightly higher than with similar geometric parameters of a sewer system with an air valve (5.44 l/s (Table 1)).
Check valve
To ensure that fluid flows in one direction, there is a device called a check valve. The most popular channels for sewer circuits have a cross-section of 110 and 50 mm. Therefore, the part in question has the same dimensions.
The component is placed at the junction of the channels or an insertion is made with a threaded joint. There are models where a “plate” is used as an element that blocks the flow of liquid. This component is located inside the device.
Pressure is applied to it from the desired side, and it opens. If impurities begin to move in the opposite direction, the component in question blocks them.
Ball models are more popular.
They work on a similar principle. But instead of a “plate” they are equipped with a ball element. These products are characterized by greater reliability.
There are flange and coupling type parts. Each of them has its own characteristics. Parts of the first type are created for highways installed both horizontally and vertically. Devices of the second type are installed only on vertical channels.
To equip toilets, valves with a cross-sectional area of 110 mm are used. Products with a cross-sectional size of 50 mm are mounted on the internal pipeline.
Check valves are made from:
- cast iron;
- plastic;
- become.
You need to choose a device based on the pipe materials. If they are polymer, then the device must be made of plastic.
The installation of the parts in question is carried out in different ways. Models with significant throughput are installed on public highways. They can be used to equip small private houses. They are not recommended for installation in apartments in multi-storey buildings.
Installing the device at all drain points reduces the possibility of accidents. This is important for those homeowners who live on the first two floors of multi-story buildings. After all, they are the ones with the greatest risk of an accident. To become more familiar with the design of the check valve and the method of its installation, read this article.
Rules for installing sewer ventilation
To properly install a sewer hood in your private home, you need to adhere to a number of rules:
It is desirable that the drain pipe be made of the same material as the sewer pipe. This will ensure ease of installation and facilitate sealing of joints. The main line, branches and waste pipe are mounted into a single sewer and ventilation system. It is best to install sewer ventilation during the construction of a house.
This will not only make the process easier, but will also allow you to hide all communications. When constructing a building from scratch, you need to make sure that you have a detailed plan for the sewer system, which includes everything from the drain pipe and its cap to the sewer manholes and septic tank. When installing air ducts, it is important to consider the distance from the ventilation outlet to the roof to the windows, vents and doors of your home. It must be at least 4 meters to eliminate the possibility of foul odors entering the house with wind currents.
You also need to take into account the height of the end pipe, which leads through the roof to the roof. Usually it ranges from 0.2 to 3 meters. But this is too large a range, and therefore the numbers need to be a little more specific.
For a flat roof, it is enough that the height of the pipe rising above the roof is no more than 30 centimeters. But with a pitched roof it’s a little more complicated.
The fact is that the greater the angle of the slope, the higher the hood needs to be installed. Therefore, the optimal height for a standard gable roof will be at least 50 centimeters.
On the roof next to the exhaust pipe there should not be any outlets of other utilities, for example, a chimney or a house's supply and exhaust ventilation deflector.
If there is no other way out, and the pipe needs to be placed next to others, then it needs to be installed several meters higher than the others. This way you can protect yourself from the stench getting into other systems.
To increase draft in ventilation, you can use a simple device - a deflector. But you need to be careful, since in the winter months condensation may freeze on it, forming just in the coldest place of the system.
If the pipe opening is completely covered with ice, there will be no benefit from such ventilation.
Installing ventilation in a private house with your own hands is not so easy. This is a very complex system based on the laws of physics and construction technologies.
To do everything correctly and efficiently, you first need to study the typical schemes of sewer and ventilation systems.
Typical installation mistakes
If an inexperienced person undertakes the installation of this structure, he may make a number of mistakes, including: Bringing the riser inside the room in the attic. This decision is most often made by those who do not want to deal with removing the pipe through the roof. As a result, gases will accumulate and sooner or later penetrate into the living space.
By following this link https://vse-postroim-sami.ru/engineering-systems/drainage-systems/8652_ustrojstvo-livnevoj-kanalizacii-princip-raboty-konstrukciya-snip/, you will learn about the rules for arranging storm drainage. You may also be interested in an article on how to properly build a septic tank. Read about how to choose the right dry closet for your dacha here.
Installation of various exhaust devices, for example, a deflector, on the structure. Inexperienced builders believe that this way they can achieve better traction. The presence of such a device leads to the accumulation of condensate on the inner surface of the riser, which subsequently freezes and impairs the removal of sewer gases.
Installation of a vent pipe on the external wall of the building. This design is also susceptible to freezing due to condensation inside, so it cannot function normally. Output of the riser under the roof overhang. In this case, there is a possibility that the structure will be damaged by snow masses.
The installation procedure for a fan pipe is quite simple and does not require high qualifications, and it does not matter whether you need to install a new product or replace an old one. The main thing is to carefully study the installation instructions and strictly follow the requirements of construction documentation.
Return to content
Ventilation outlets of sewer risers
There is only one way to make the toilet’s bathroom safer and more comfortable, remove unnecessary odors and normalize the operation of the water seal. This can only be achieved by equipping the sewer with a ventilation outlet to remove gases accumulating inside the system. Similar devices are found in almost any sewer drain system equipped with a water seal. If the ventilation system of the riser becomes clogged, freezes, or does not work efficiently enough, the entire entrance to the house will know about it.
DIY deflector construction
You can make your own fan deflector. You will need a sheet of galvanized steel, fasteners in the form of nuts, bolts, metal scissors and a ruler with a pencil. The bottom of the deflector is marked on the sheet as a cone. The diameter of the lower part should be equal to the cross-section of the ventilation riser, and the diameter of the upper part should be approximately fifteen percent larger than the lower value. The cone is fixed with screws and rivets. In the middle of the project, install a “skirt” to block the air flow. The umbrella is attached to the top of the posts.
Note: The deflector requires minimal tools to make and the unit works almost as efficiently as a factory deflector.
Model selection
To do this, it is better to choose the simplest model that ensures effective extraction from the sewer system in a private home.
Development of drawings
At the first stage, it is necessary to draw an assembly drawing of the product and calculate the dimensions and connection parameters for each part separately. Then all the details must be redrawn in real size and scale. The drawing must be transferred to cardboard.
Preparing tools
When designing a deflector, you need to think about the technology for its installation and the tools that will be required to manufacture the product. But in any case, this is necessary:
- The simplest tools for drawing up technical documentation are a ruler, 30- and 45-degree squares, a protractor and a compass.
- Metal shears for cutting sheet metal.
- File – for removing burrs.
- A marker used to mark parts.
- Drill a hole for the fasteners.
- Metal drills.
- Locksmith's hammer.
- The vice of a locksmith.
- Shiloh.
- Cardboard scissors.
Materials for making the deflector
The main material is sheet metal. The selection criterion is its availability and financial capabilities. An outlet for ventilation of a sewer riser in a private house can be done with your own hands. For this you will need:
- The stainless steel sheet has a thickness of 0.25-0.5 mm. This is the best choice in terms of durability.
- The aluminum sheet has a thickness of 0.4-0.8 millimeters. In terms of durability, it is in no way inferior to stainless steel.
- Sheets of other metals - copper, titanium, zinc, etc.
- Galvanized steel sheets 0.4-0.6 mm thick. The most popular material in terms of price/quality ratio and availability.
- Cardboard 1.0-1.5 mm thick for making models and unfolding parts.
- The rivets are standard aluminum or drawn rivets.
Other supporting materials may be needed as you work.
Making a fixture
The first step is to cut out the prototype parts of the device from cardboard. These are then used to assemble the deflector model, the parts can be secured using a stapler.
After checking all the dimensions on the cardboard pieces, an awl is used to make holes where the rivets will be located. The circuit is disassembled, and the metal parts are cut out in accordance with the development. Holes for fastening are drilled in accordance with the marks of the tenon holes.
Then it is assembled.
Significant deficiencies in sewer system ventilation
Insufficient ventilation of the sewer riser in a private house very quickly manifests itself in the form of unpleasant odors. And the reasons for this are usually the following:
- insufficient size of sewer risers, which leads to siphons falling out;
- increased downtime of water fittings, causing them to dry out;
- cracks in sewer pipes due to improper installation. A sewer hood in a private house is necessary to create comfortable living conditions.
Possible elements of an autonomous system
There are several types of tanks for collecting liquid waste: absorbent, i.e. with an earthen bottom, sealed pits and septic tanks.
Absorbing
The most common ones are those that have as simple a design as possible - earthen pits, or actually bottomless pits. These tanks are cheaper, but they are the worst possible option. A mini-pit is dug into the ground, which is then gradually filled with wastewater. This allows dangerous liquid components to easily penetrate the soil, contaminating it, and this “fire radius” can be quite wide. Solid particles gradually sink to the bottom, where they are compacted into a heavy mass. Once the quarry is filled with wastewater, it is filled back in and new natural reservoirs are prepared.
Sealed
This option is much better for the environment. After excavating the soil, a concrete or metal (“light version” - made of plastic) container is placed in it, which completely prevents the possible leakage of harmful substances directly into the ground. There are no objections to these designs: they are reliable and hygienic. However, many are not satisfied with the fact that specialized equipment is needed to install such an ecological septic tank. Another “minus” is the regular cleaning of holes using a slurry machine.
Septic tanks
They are perfect. This is a plastic, completely sealed container. Its advantage over a septic tank is partial disinfection and wastewater treatment. Bacteria are added to the liquid substance, which accelerates the decomposition of solid substances. As a result, the water is purified by 50-60%. Filters are used to further purify the liquid. These structures, consisting of 2-3 containers, are often made themselves: for example, from concrete discs or bricks.
Any type of septic tank requires a ventilation system. Industrial septic tanks can be equipped with it. When constructing a ventilation system, the materials of the tanks, the characteristics of the structure, its location on the site and its depth are taken into account.