The internal structure of the cisterns of many modern toilets, at first glance, is completely different from what was used 30-40 years ago. Therefore, when many questions arise related to the maintenance of sanitary fittings, for example, how to adjust the float in the toilet or adjust the outlet valve, apartment owners sometimes have uncertainty - should they solve the problem themselves or invite a third-party specialist? However, the functionality of current devices is based on the same principles as before. Their understanding, as well as knowledge of plumbing maintenance algorithms, makes it possible to maintain it in working condition on your own.
Picture 1
Does not hold the float in the toilet and other damage
The most common causes of toilet tank failure and solutions.
To avoid having to replace the flush tank due to possible damage to the toilet lid during repairs, you should pay attention to how its lid is secured before starting work. The drain tank may be filled above the required level for several reasons: float misalignment and crack formation in it, damage to the float membrane
It could also be a problem with the shut-off valve, which no longer protects the float from water entering it.
The drain tank may be filled above the required level for several reasons: float misalignment and crack formation in it, damage to the float membrane. It could also be a problem with the shut-off valve, which ceases to protect the float from water entering it.
Let's first talk about how to put the float itself in order. Materials such as brass and plastic can be used to create a toilet float. With the first option, you only need to bend it a little. With a plastic float the situation is somewhat different. To adjust it, you will have to use a mounting screw or a plastic ratchet.
Before starting work on replacing the shut-off valve, make sure that there is no water left in the tank. After this, you can disconnect the valve from the drainpipe and remove the lever. To remove the valve, you will need to unscrew the nuts, which can also be used when installing a new valve. To complete the work, fill the tank with water and install the float.
If a crack appears in the float, it becomes unusable. This can be understood when it begins to submerge in the water in the tank. It should be changed or you can try to repair it.
If you prefer to install a new float, then before removing the old one you need to turn off the water supply to the tank and use an adjustable wrench to unscrew the pipe through which water flows. Once the new float is installed, you can open the valve to allow the tank to fill with water. Once the tank is filled with water to the desired level, you will need to fix the float in the desired position.
How to repair a toilet float, you need to remove it from the tank and wait until it dries. Then you should seal the crack with heated plastic, or you can use a plastic bag, which you will have to put on the float.
If you need to replace a damaged membrane, you first need to get rid of the presence of water in the tank by tying the float lever to the crossbar. To remove the pipe through which water from the toilet goes into the sewer pipes, you will have to unscrew the nut. Then, having slightly unscrewed the fastening nut, remove the siphon and install a new membrane in the place where the old part was previously located.
The most common tank breakdowns: repair, replacement, removal of elements
A common problem is the constant filling of the tank with water or unregulated flushing, in which it is important to adjust the float in the toilet. There are reasons for this, including:
- Worn membrane on the float.
- Float misalignment.
- Allowing water to enter the toilet cistern valve using a flapper valve.
- Hole in the float.
Methods for regulating a toilet float: why it doesn’t work
It is enough to bend the brass lever, which was installed on old-style toilets, after first determining by testing the place at which the device shuts off the water supply.
The plastic lever that is equipped with new tanks has a clear design. Inside the tank, the toilet float valve is secured with a mounting screw. This part changes the bend of the lever if necessary. The part is also held in the desired position using a plastic ratchet.
How to Replace a Stop Valve
Even inexperienced owners can do this kind of work. It is recommended to perform the following steps step by step:
- First, all the water is released from the tank and the valve is disconnected from the pipe.
- Then remove the lever and nuts intended to secure the reinforcement.
- The old float valve is removed and the new one is installed, secured with the old nuts.
- After this, the tank is filled with water, and the float valve is fixed in the desired position.
Problems with the float: does not shut off the water
Set of parts for installation in the tank
A damaged float in the toilet tank is difficult to rise and fall due to the fact that water enters inside. There are two ways to fix a breakdown: by replacing the part or by repairing it.
To replace the float in the toilet, close the valve through which the tank is filled and drain the water inside.
Then, using an adjustable wrench, unscrew the water supply pipe and remove the damaged part. After installing the new part, the water supply is restored by adjusting the required water level.
If the float in the toilet tank needs to be repaired, the water is removed from the float and the hole inside is sealed with hot plastic or the float is placed in a plastic bag.
Adjusting the toilet float involves securing the float lever to the crossbar, draining the water and unscrewing the nut holding the flush pipe. After this, after loosening the fastening nut, unscrew the siphon and install a new valve for supplying water to the toilet exactly in the old place.
Lets water through: no gasket or anything
If water makes a loud noise as it gets inside the tank, this can be eliminated in 2 ways:
- insert a thin tube into the outlet from which water flows, which significantly reduces the noise when drawing water;
- reduce the diameter of the hole through which water enters the tank.
The tank is leaking onto the floor
The problem is rotten mounting bolts. To make sure, you should do this:
- First, turn off the water and scoop out the liquid remaining inside.
- Disconnect the flexible hose.
- Loosen the bolts and nuts connecting the toilet shelf and the tank.
- Remove the tank.
- Remove rotted bolts and clean contact points from lime and rust.
- Install new fasteners.
To increase reliability, it is recommended to replace the rubber cuff. After this, all elements must be put in place, adjusted and tested.
Markings for toilet installation
What to do if water does not flow into the drain tank: how the system with a button works
First, determine the cause of the breakdown.
If the hole in the drain valve is clogged, clean it with a screwdriver. If the problem is in the shut-off valve, then it cannot be repaired; the part must only be replaced.
If the flexible hose is clogged, the part is disconnected by shutting off the water. The hose is placed over the container and the hose is opened. If the liquid does not pour out, then it is time to change the hose due to clogging. If water flows, the problem is not in the hose and you need to further look for the roots of the problem.
Sometimes it is easier to change all the shutoff valves at once. In order not to make a mistake when buying a new set, you can take the old one with you to the store and show it to the seller. To do this you will need pliers and an adjustable wrench.
The replacement steps are clear. First, turn off the water, then unscrew the button and then remove the lid. Then remove the dial circuit and unscrew the fitting. After this, dismantle the lever with the drain valve and put it away. Installation of new components is carried out in the reverse order.
If the float in the toilet does not shut off the water, it urgently needs to be repaired.
Internal organization
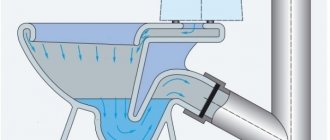
The toilet cistern consists of two simple systems: collecting water and draining it. To troubleshoot possible problems, you need to understand how everything works and works. First, let's look at what parts the old-style toilet cistern consists of. Their system is more understandable and visual, and the operation of more modern devices will be clear by analogy.
The internal fittings of this type of tank are very simple. The water supply system is an inlet valve with a float mechanism. The drain system is a lever and a bulb with a drain valve inside. There is also an overflow tube - it drains excess water from the tank, bypassing the drain hole.
Old design cistern design
The main thing in this design is the correct operation of the water supply system. A more detailed diagram of its device is shown in the figure below. The inlet valve is connected to the float using a curved lever. This lever presses on the piston, which opens/closes the water supply.
When filling the tank, the float is in the lower position. Its lever does not press on the piston and it is pressed out by water pressure, opening the outlet to the pipe. The water is gradually filling up. As the water level rises, the float rises. Gradually it presses the piston, cutting off the water supply.
The device of the float mechanism in the toilet tank
The system is simple and effective; the filling level of the tank can be changed by bending the lever slightly. The disadvantage of this system is the noticeable noise when filling.
Now let's look at how draining water in a tank works. In the version shown in the figure above, the drain hole is blocked by the drain valve bulb. There is a chain attached to the bulb, which is connected to the drain lever. We press the lever, lift the bulb, the water drains into the hole. When the level drops, the float moves down, opening the water supply. This is how this type of cistern works.
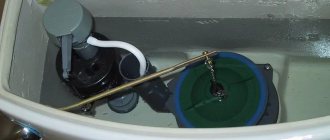
Modern models with lever flush
There is less noise when filling toilet tanks with bottom water supply. This is a more modern version of the device described above. Here the tap/inlet valve is hidden inside the tank - in a tube (in the photo there is a gray tube to which the float is connected).
Drain tank device with water supply from below
The operating mechanism is the same - the float is lowered - the valve is open, water flows. The tank filled, the float rose, and the valve shut off the water. The drainage system remained almost unchanged in this version. The same valve that rises when you press the lever. The water overflow system has hardly changed either. This is also a tube, but it goes into the same drain.
You can clearly see the operation of the drain tank of such a system in the video.
With button
Models of toilet tanks with a button have similar water inlet fittings (some with side water supply, some from the bottom). Their drain fittings are of a different type.
Tank device with push-button drain
The system shown in the photo is most often found in domestically produced toilets. It is inexpensive and reliable. The design of imported units is different. They basically have a bottom water supply and another drain and overflow device (pictured below).
Imported fittings for the cistern
There are different such systems:
- with one button the water is drained while the button is pressed;
- draining starts when pressed, stops when pressed again;
The working mechanism here is slightly different, although the principle remains the same. In this fitting, when you press the button, the glass rises, blocking the drain. The stand remains motionless. In short, this is all the difference. The drain is adjusted using a rotary nut or a special lever.
What does it represent?
This part is one of the main elements of the water supply system to the cistern. Its main purpose is to regulate the required amount of water supply and prevent its overflow.
Related article: The toilet doesn't drain well
This element can be called decisive in the system of normal water supply to the toilet. After all, most often, if a situation arises that water for some reason stops flowing into the drain tank, the problem lies precisely in the condition of the valve.
Previously, toilets were equipped with a spherical float. But time has shown that this design is imperfect; the device quickly filled with water and failed.
To fulfill its purpose, the float is inextricably linked with the following mechanisms:
- lever or plastic wheel;
- piston;
- membrane valve;
How to adjust a toilet video
That's all, only useful tips on our construction blog.
- Vyacheslav July 27, 2015 17:23
Question: What if the adjusting bolt is “tightly” connected to the guide bar? He just won't spin. And your instructions are very competent. Tell. Thank you.
Sergey February 29, 2021 16:31
Good evening! When you press the drain button of the fittings, the water drains only when you press and hold the button. How and how is the full drain mode adjusted/set/by pressing the button and without forcing it? Those. Water is drained only when the button is pressed and held. The button does not sink and is not fixed at the bottom.
Leave a comment or two
How to buy a float for a toilet tank
What guides me when choosing a float valve for a toilet?
To avoid having to change the float valve again and again, you must immediately select the appropriate part, based on the pressure in the water supply.
The float in the toilet is available for low, medium and high water pressure. There is also a stabilizing valve that allows you to stabilize the pressure in the water supply.
Based on the type of design, there are membrane and piston float valves, as well as Croydon valves. Piston float valves are more reliable than Croydon valves and are therefore the most commonly used. Diaphragm valves contain a disc-shaped rubber membrane instead of a gasket.
This mechanism is very reliable and has a long service life. But the presence of coarse particles and impurities in water can quickly damage the membrane, which will lead to water leakage. To protect the membrane, you will need to install a filter that will clean the water.
It is necessary to constantly monitor the condition of the mechanisms at least two or three times a year. If you do not find damage in the mechanisms in a timely manner, you will have to repair them in the future. Regular inspection can protect not only you, but also your neighbors from loss of financial resources and from carrying out repair work.
Toilet corrugation sizes
Sewage pump toilet grinder
Installing a toilet with an oblique outlet with your own hands
The cistern is filling with water making a loud noise.
If it has been noticed that a container is filled with water with a strong noise, and then the liquid overflows into the toilet, first of all this indicates high pressure in the central water supply, due to which the float valve cannot hold the flow of water. In such a situation, it is necessary to upgrade the valve with an additional part.
- The tank cover is removed.
- The diameter of the opening of the inlet tube for the flow of water into the container from the water supply system is measured.
- A plastic pipe 200-400 mm long is selected in accordance with the height of the tank and suitable for the diameter of the nipple.
- The pipe is put on the nipple and cut so that its end does not lightly touch the bottom of the tank.
Thanks to this additional device, will be drained , which will to some extent reduce the pressure of the liquid coming from the water supply.
Blitz tips
- If you plan to install a new toilet, you should choose models with a glass-type bottom float. Such models operate almost silently, and technical malfunctions associated with the float mechanism are extremely rare.
- When installing a new float, you must select a model that is designed to handle the pressure in your plumbing system. Floats differ in load capacity and the stronger the pressure, the higher this figure should be. If you neglect this rule, then even a working float system will let some of the water from the tank into the toilet bowl.
- Adjustment in the vertical plane allows you to change the amount of water that is used when draining liquid from the drain tank. If the element moves to the upper part and is fixed in this position, then the amount of water that pours out of the drain tank will be maximum; if in the lower part, then pouring in will be minimal in volume. In most cases, it is enough to adjust the position of the float in the middle of the scale so that there is no overflow of liquid during draining, and the device copes with its task.
Main types of drainage equipment designs
First of all, they depend on the type of filling and drainage mechanisms. The water drainage functions are performed by lever, push-button and automatic products.
The float (1) controls the inlet valve (3) through the lever (2). The water level depends on the adjustment of the float lever on the valve lever (4). The water pressure during filling is adjusted at the valve using a set screw.
Lever models were the main models installed on toilets of the last century. They are still used in some places today. Lever devices are distinguished by their simplicity. The first products drained only at the moment of pressing, while the shut-off valve was manually held (by the “pull” - a chain or fishing line). Then came systems that use the siphon effect, which themselves control the flow after activation. But both the first and subsequent models are characterized by increased unregulated water consumption. In addition, such plumbing does not meet current aesthetic requirements.
The toilet flush mechanism, made in a push-button version, is installed on most modern plumbing products. The predominant location of the button is at the top, on the covers of compact systems, and can also be on the wall for products installed in building structures. Their advantages, in addition to good aesthetics, lie in the ability to adjust the drain and overflow parameters. Push-button mechanisms also, once activated, hold the shut-off valve open without human intervention. And models with paired buttons allow full or partial discharge of liquid into the toilet.
Automatic
Today, there are rare and expensive products for draining water, which justify themselves when installed in luxury products or used in public places. Their work is controlled by infrared sensors.
Shut-off valves for the toilet, represented by filling mechanisms, work, as many years ago, using the principle of a refill valve, opened and closed by a float. In the classic version, the float transmits force to the valve of a faucet with a side connection through a horizontal rocker arm.
Floats that shut off the water supply through a system of levers.
However, now more often floats are installed that move along a vertical guide, cutting off the water supply through a system of levers for both the side supply and the bottom.
Important! Modern filling valves, due to their design features, allow you to draw water much faster than systems with a rocker arm
Recommendations
So, if problems arise with the water supply to the cistern, you need to remember the following:
- Most often, the cause of this is a malfunction of the float, the membrane of the permeability valve or its holes.
- Having figured out the reason, you can try to repair the failed part. In some cases, repair is not possible and replacement is necessary.
- When purchasing a new float design, you need to have an idea about the type of flush system in your toilet. This determines what type of part is needed.
- Anyone can install a new float. The main thing is not to forget to temporarily block the water supply system, correctly dismantle the broken part and install a new one at the required level.
- If you are not confident that you will be able to successfully carry out the required plumbing manipulations, the best solution would be to contact a specialized specialist.
Installation instructions
Like any plumbing fixture, the tank drain system fails over time. Often the cause is a float. Many people call a professional, which is reasonable, but you can do the replacement yourself. The operating algorithm directly depends on the type of device.
For models with traction
Changing the float valve for a toilet is not difficult; you don’t even have to dismantle the tank, but you need to start by deciding what exactly needs to be replaced. Plastic floats, floats with a rod, or a complete set of parts (float, rod and valve) are sold separately. Most often, the entire mechanism is replaced. It is inexpensive, repairs are not difficult, but the result is an almost new drainage system.
The operating algorithm is simple:
- turn off the water in the riser;
- empty the tank;
- disconnect the water supply;
- dismantle the old valve with float;
- clean the seat and install a replacement.
The supply hose is connected last. The work of installing the float is almost finished, but before starting operation it is necessary to turn on the water and carefully inspect the connection points and attachment points of the tank. If water does not flow out, all that remains is to adjust the valve and the repair is complete.
https://youtube.com/watch?v=DpLdsj1-tX8
For glass-type floats
Installing floats of this type is a more labor-intensive process. The main difficulty is that it is easier to install the float before installing the tank itself
To avoid mistakes before starting work, it is important to read the manufacturer’s instructions and follow their instructions
Often during repairs, not only the float mechanism and fill valve are changed, but also the drainage system. This is a smart approach because you won't have to re-disassemble and reassemble the tank if you need to replace the drain valve.
In general, the work is performed according to the algorithm:
- Installation of a drain mechanism with large dimensions. Be sure to use the supplied seals and gaskets during installation. The mechanism is aligned along the axis of the tank and clamped from below with a nut.
- A filling valve with a float is being installed. It should be positioned vertically and not come into contact with the parts of the drain mechanism.
- Assembling the tank and installing it on the toilet.
Level adjustment
The required water level in the drain tank is regulated by setting the float valve.
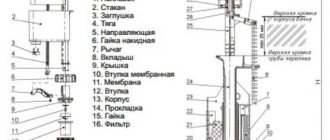
First you need to understand what a float valve is. This is a device that automatically maintains water in the tank at a given level. Consists of 3 main parts:
- the valve itself that supplies water to the flush tank;
- a float that controls the state of the valve;
- a system of levers/rods/pushers/guides with which the float is connected to the valve and controls its condition.
Valve adjustment diagram (if necessary). Table for setting the valve height for water release.
The valve is rigidly fixed to the tank. The float relative to the valve can move freely up and down. They are connected to each other in such a way that in the highest position of the float the valve is locked. In all other float positions the valve is open. To shut off the water supply to the flush tank, you need to raise the float to the upper limit of its free movement. For this purpose, the buoyant force of water is used.
Tank operating cycle:
- The tank is empty, the float is down, the valve is open, water flows freely into the tank.
- Filling. The water rises, the float rises, but the valve is still open.
- The float is raised by water to the upper limit of its stroke, the valve is closed. The water supply to the tank has been stopped. The float, supported by the Archimedes force, cannot go down and keeps the valve closed. The cistern will remain full until someone uses the flush button.
- Drain. Water flows out, the float goes down, the valve opens. After this, the cycle begins again.
In order for the water supply to stop when it reaches the required level, it is necessary to fix the upper limit of the free movement of the float at the same level. This can be done by changing the geometric parameters (dimensions and angles) of the float-valve connection system.
Everything said was of a general nature and applied to all types of float valves. Specific adjustment methods will depend on the design features of the fittings.
Features of adjustment of various types of float valves
With all the variety of existing PCs, two main types of connection between a float and a valve can be distinguished:
- float on the lever;
- float on vertical guides.
Float on lever
Relative to the valve, the float moves on the lever in an arc. At the top of the stroke, the lever should take an almost horizontal position for clear operation of the valve. The designs of such levers may also differ from each other.
Float on the lever (photo 1)
In its simplest form, such a PC looks like this (photo 1):
Adjusting the water level involves roughly bending a wire lever. To increase the water level in the tank, the lever must be bent up, to decrease - down.
Advantages: simplicity, reliability, low price.
Disadvantages: inconvenience and inaccuracy of adjustment, large dimensions.
Adjustable lever (photo 2)
Adjusting the water level: the required bend of the lever is fixed with a screw.
Advantages: simplified adjustment, low price.
Disadvantage: the fragility of plastic (compared to wire) when aging, still large dimensions.
A control device with the ability to move the float along the length of the lever. This allows you to more conveniently position the float among other fittings. The water level is adjusted by changing the tilt of the entire lever.
Float on vertical guides
Adjustable lever (photo 2)
In such devices, the float moves vertically along guides and is usually located directly above/below the valve.
This design increases compactness, but complicates the product, which, of course, affects its cost. The disadvantages include possible jamming when the float slides along the guides. The accuracy of the work greatly depends on the quality of the product.
If the tank is equipped with a similar PC, then adjusting the water level is reduced to changing the length of the rod/pusher connecting the float to the valve locking mechanism. The adjustment can be threaded (the most convenient and accurate), with a latch, ratchet, etc.
Well, that’s probably all that could be said about regulating the water level in the toilet cistern. without affecting rare types of fittings and unlikely cases of failure. Don’t be intimidated by the volume of information presented - if you understand the essence of the process and there are no breakdowns, adjusting the water level will not be difficult, and it will not take more than 5 minutes.
How to adjust a toilet float: troubleshooting
It may happen that the functionality of the toilet flush barrel malfunctions and its operation is disrupted. The float ball valve is responsible for filling the tank with water and adjusting the amount of water in the tank. The reason for the constant leakage from the tank into the toilet or its complete absence may lie in the failure of the float valve. To adjust the toilet float and repair the cistern yourself, you need to know about its structure and principle of operation.
Types of cistern
Toilet cisterns are divided into several types. The types differ in the type of release device, the material used and the method of installation.
According to the location of the release lever of the tank:
According to the material from which the tank is made:
- wall installation;
- installation on a toilet shelf;
- installation on the wall.
For more details on how to install and secure the tank, read a separate article.
Internal structure of the cistern
Each type of flush tank has an internal device that carries out the work of filling the tank with water, adjusting the amount of water in it and flushing.
The design of the ceramic cistern consists of:
The fill valve is a part of the tank that is responsible for the flow of water from the water pipes, beyond its strictly defined limit. The float acts as an indicator of the water level. The action of the float ball valve is aimed at supplying water to the tank, its dosage and rate. The principle of operation of the float valve is that when there is sufficient water in the tank, the float floats up, using a lever to move a special plug that blocks access to the water supply to the tank.
The overflow is responsible for directing excess water into the toilet. It is needed to ensure that the tank does not overfill and water does not flow over its edge. This mechanism is made in the form of a small plastic tube and is located in the center of the tank. To regulate the water level, the tube either goes down or goes up.
The drain fittings are designed to drain water from the tank. The drain button on the tank is connected to a lever, which starts this mechanism.
How to adjust the float
A broken float valve can cause water to constantly flow from the tank into the toilet. There may be several reasons for the float to break and not work properly. The float may become warped, a hole may form in it, or the membrane may become unusable. It may also happen that the shut-off valve begins to let water into it.
All work related to repairing the float and adjusting it can be done independently, without involving plumbers. Depending on the cause of unstable operation or in the event of a breakdown, the following actions are taken:
- adjusting the lever, bringing it to the desired position;
- replacing the shut-off valve;
- float repair;
- complete replacement.
To adjust the float lever and bring it to the desired position, it is necessary to take into account the material from which it is made. The brass lever bends. The required position is determined by raising and lowering the lever.
The plastic lever is adjusted with a fastening screw or a plastic ratchet. The fastening type changes the bend of the lever, and the ratchet locks the lever in the desired position.
In order to replace the shut-off valve, you must first drain all the water from the drain tank and disconnect the faulty valve from the water pipe. After removing the lever, you need to unscrew the fastening nuts and remove the valve. After this, a new valve is installed, the drain tank is filled with water, and the float is brought to the desired position.
When repairing a float, you can seal the damaged area with heated plastic. Wrapping the float in a plastic bag can also solve this problem.
If a float needs to be replaced, the water supply to the tank is first cut off and it is completely emptied. After unscrewing the water supply pipe, the old float is removed and a new one is installed in its place. The required position of the new float is fixed.
When replacing the membrane, it is necessary to tie the float to the crossbar, drain all the water from the tank, and unscrew the fastening nut of the flush pipe.
Knowing the structure of the drain tank and the operating principle of the mechanisms that ensure its proper functioning, you can independently eliminate minor malfunctions. Adjusting the float will help solve the problem of constant water flow from the flush tank into the toilet, normalizing its amount in the tank, as well as the lack of flushing. By doing all the work on adjusting the float yourself, you can eliminate the cost of calling plumbers. You can contact specialists in cases where all measures have been taken, but the drain tank malfunction remains.
Correcting the situation yourself
normalize water flow and eliminate leaks by adjusting the position of the float in the drain tank:
To reduce water consumption , the float should be placed lower. Contact with the liquid in the tank will begin to occur earlier, the float will float up, blocking the valve and the supply of “excess” water.
If water continuously flows , then the bulb (sealing gasket) is probably not tightly blocking the drain. If after pressing the membrane the leakage stops, then our assumption is correct and you just need to increase the weight (you can hang any weight).
You can also raise the float a little. More liquid will flow and its volume will be enough to reliably seal the drain hole with a gasket.
Changing the position of the float
1 . rod ( spoke ) is a small metal rod that holds the float.
To lower the water level bend the rod slightly , lowering the float down, and to increase the volume of liquid, lift it up.
With this approach, it is necessary to ensure that the water level in the tank does not reach 3-4 cm up to its side holes. If there are no holes, then you need to focus on the drain mechanism - it should be slightly hidden by water.
2 . The rod can be made of plastic . In this case, there is no need to bend anything. It is enough to move the float along a special guide ratchet:
3 . Nowadays, manufacturers increasingly place the float vertically . This does not change the essence and the principle remains the same. If your float is positioned like this, it can easily be moved up and down along the rod and ratchet:
Cleaning the shut-off valve
If after all the manipulations the water continues to flow, then it is necessary to disassemble the shut-off valve and clean it.
Despite the tricks of manufacturers, the service life of valves in our water is on average 3-5 years.
The membrane and water supply holes may become clogged with dirt . To eliminate this problem, remove the protective cap and remove the membrane. Then the internal ducts are washed well, and the membrane is put in place, closed with a cap.
Related article: How to clear a clogged toilet yourself
The main thing in the process is not to break or lose anything . If this does happen, then read the next paragraph.
Changing the valve
Here the main problem is not the replacement itself , but the availability of the necessary mechanism. We turn off the water, dismantle the faulty or broken valve, take it with us and happily show it to the salesperson at the plumbing store.
After independently fixing the breakdown, each owner receives a new skill that will definitely come in handy in the future.
Additional information is in our article - tables of toilet sizes and its structure.