The first priority after installing the toilet in place and connecting it to the sewerage system is to install the cistern fittings. The smooth operation of the entire system will depend on the correct installation and quality regulation of this plumbing equipment. The fittings of the drain tank are a device that ensures that it is filled with water after emptying during draining, automatically regulating the amount of drained water and controlling its overflow. How to install the tank fittings correctly, read our article.
The tank fittings are not complicated in design and can easily be installed with your own hands
Purpose and principle of operation of fittings
Fittings for cistern
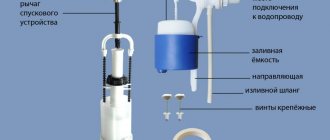
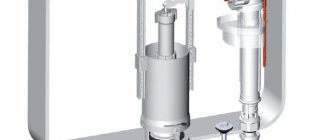
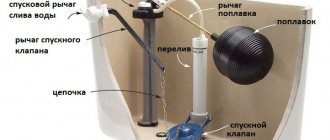
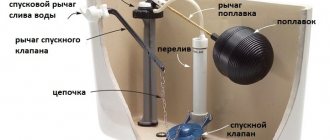
The fittings are the whole complex of mechanisms that ensure draining of water and refilling the tank. Such elements perform the following functions:
- Drain. Draining water from the tank into the toilet bowl and then closing the drain hole to fill with a new portion of water.
- Constipated. Blocking the access of water into the container after it is filled.
- Overfill protection. Prevents incoming water from overflowing the edge of the tank.
Accordingly, the entire set of toilet fittings is divided into three mechanisms - drain, shut-off and protective. Each of them is relatively autonomous, but the failure of one leads to a malfunction of the entire system.
There are two types of drain fittings for the toilet cistern:
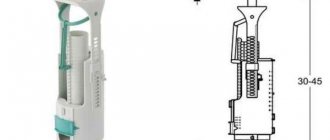
- Exhaust (rod). To start flushing, you need to pull the handle located on the tank lid. The handle is connected to a rod that locks the drain hole. This mechanism is considered obsolete, but is still quite common.
- Push-button. To start flushing, press the button on the tank lid. The button is connected by levers to a release valve, which, when opened slightly, allows water to escape.
The second option is more common; there are several varieties of it:
- single-mode flush - when you press the button, the entire volume of liquid is poured into the toilet;
- dual-mode drainage – two-button release key, the smaller button allows you to drain half the volume of water, the larger button allows you to drain the entire volume;
- flush with stop function - when you press the button a second time, the drain hole is closed, water no longer flows into the toilet.
After the tank is completely or partially emptied, the drain hole closes automatically under the influence of gravity.
The shut-off valve for the toilet consists of a float device and a shut-off valve. There are two types of floats:
- Spherical. It is a hollow rubber or plastic ball or cylinder. It has a simple design and is considered an outdated model.
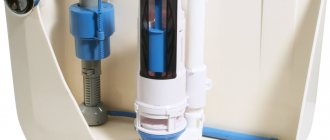
- Modern float. The shape resembles an inverted glass mounted on a vertical rod. More precise in adjusting the level of water entering the tank.
The operating principle of both devices is similar. A float attached to a plastic lever (pull) reacts to increases and decreases in the water level in the tank. The liquid gradually fills the container and raises the light float to the maximum set level. The attached lever presses harder and harder on the shut-off valve until the water flow stops completely. When the tank is empty, the float drops to the bottom, the lever releases pressure on the shut-off valve, and water again flows freely into the tank.
The overfill protection system is a hollow tube connected to a drain hole. If, due to a malfunction, the liquid level in the tank rises above this tube, water flows through it into the toilet bowl.
Water does not enter the tank
The most common cause of this problem lies in clogging of the narrowest section of the valve. To solve the problem, empty the tank and unscrew the valve along with the lever and float. You will notice a narrow hole through which water enters the tank. It can be cleaned with a needle or thin wire.
You should unscrew the inlet pipe valve a little and flush out the remaining blockage. If water flows freely, you need to tighten the valve and install the valve with the lever and float in place.
Reinforcement selection criteria
Functional mechanisms of fittings
The choice of fittings for the tank depends on the way it is located relative to the toilet:
- Monoblock. The bowl and tank are cast as a single solid structure. Does not require a special device that transfers water from the tank to the toilet.
- Separate location. Previously, high placement was common, when the tank and toilet were connected by a long pipe. Nowadays, such an outdated model can occasionally be found in retro-style toilets.
- Compact The most common type of connection is when the tank is placed on the toilet shelf and fixed with special fasteners.
- Built-in (hidden). The tank and all the unattractive sewer systems are hidden in the wall, and only the wall-hung toilet and flush button are exposed outside.
When choosing fittings for a toilet, it is also necessary to take into account the method of supplying water to the tank. There are the following types of eyeliner:
- Lateral. The liquid enters through a side opening at the top of the tank.
- Bottom. The liquid enters through a hole located in the bottom wall of the tank.
Fittings with side connections are easy to install, but this option is not very attractive in appearance, since the water supply hose leading to the tank is visible, and filling occurs with a characteristic noise.
The second option is more aesthetically pleasing, but more difficult to install. When choosing fittings for a tank with water supply from below, it is necessary to ensure the quality and tightness of the fastenings of the rubber gaskets in order to prevent leakage during further use.
The main criterion when choosing fittings is the quality of the plastic from which it is made. In this case, the usual idea that imported products are better than domestic ones is erroneous.
Foreign fittings are not designed for the low quality of our tap water and wear out faster.
Before installing a new set of fittings, you must carefully inspect the parts. They should not have any irregularities or areas of poor-quality casting. All rubber seals must be even and smooth. If the quality of the gaskets is in doubt, it is worth purchasing an additional set to install the fittings.
Constant flow of water
There are two reasons for this phenomenon. One of them lies in the skew of the float. In order to repair the device, you should:
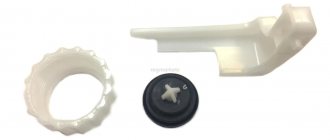
- Unscrew the fixing ring at the start button and remove the cover.
- Carefully inspect the float. If a part is under water, it must be lifted. Typically, it clings to the valve lever to drain.
- Check if the mechanism works correctly. For this purpose, you should drain the water and check how much the float rises. When the required level is reached, the valve shuts off the water flow.
Over time, the O-ring membrane loses its elasticity. Therefore, it is recommended to replace it. Choose the same model.
Popular design models
OLI design
There are quite a few manufacturers of replacement plumbing equipment. Both domestic and foreign models are presented on the market. Imported systems are more expensive than domestic ones. But you can separately purchase replacement elements for them. The most popular equipment is from companies such as Alca plast (Poland), OLI (Portugal), Geberit (Switzerland), Grohe (Germany).
The Portuguese company OLI regularly presents innovative developments in the field of plumbing systems. It was she who created the double flush valve 20 years ago, reorienting the industry towards the economical use of water.
Among OLI's latest developments is the Azor Silent range of fittings, equipped with a silent filling valve. It allows you to reduce the noise level when filling the tank to 6 decibels (for comparison: the rustling of leaves produces a noise of 15-20 decibels).
Another interesting solution is the OLIpure system with a built-in detergent reservoir. Each time you drain, add a few drops of liquid detergent or cleaning agent to the water (they can be used at the same time). The cleaning agent is in an isolated container, so the internal mechanisms and rubber seals are not exposed to aggressive chemicals.
Trusted Russian manufacturers supply fittings of decent quality, and the cost of the sets is significantly lower than their foreign counterparts. You can choose from such manufacturers as Virken-Rus LLC (Moscow), Uklad JSC (Pskov), Arkon LLC (Tula), PKF Protex LLC (Tula). Domestic enterprises also produce replacement elements suitable for imported fittings.
The Virken company regularly introduces its new developments to the market. Among the latter is a flush column with patented QUICK FIT technology, which allows you to connect the flush mechanism directly to the existing fixture base without disconnecting the tank from the toilet. The mechanism is considered one of the most universal on the market also because instead of the central pillar there is a flexible cable installed, which does not require adjustment to the height of the tank.
The fittings sets of this company are also popular on the market due to their seals made of silicone. It does not react with impurities contained in water, retains its integrity and elasticity during temperature changes, and does not deform over time, unlike rubber.
Installation and connection methods
Installation of toilet fittings
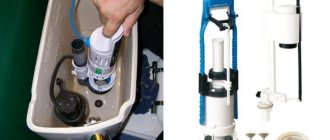
The sequence of installing a new set of fittings into the toilet tank for old and new models is similar and consists of the following:
- Preparatory stage. Turn off the water supply valve on the riser. Drain all liquid from the container. Disconnect the water supply hose (it can be located below or on the side).
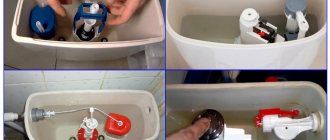
- Dismantling the old system. Disconnect the tank by unscrewing the nuts located under the toilet shelf. Place the tank on a horizontal surface. In its lower part, which connects to the toilet, there is a plastic nut screwed on, holding the flush mechanism inside the tank. It must be unscrewed, after which the old fittings can be freely removed. Wash the tank, remove fine sediment and rust, and wipe dry. Inspect it for cracks or chips in the holes.
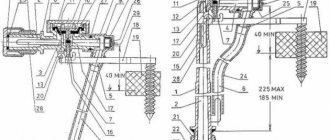
- Installation of a new system. Assemble the new fittings in the reverse order. First install the drain stand. To do this, a plastic nut is unscrewed from it, then a rubber gasket is put on the pipe. Place the entire device inside the tank, insert it into the drain hole and secure it with a plastic nut. You need to screw it all the way by hand, then tighten it a little with a wrench. At this stage, you must be careful: do not overtighten the nut, otherwise the plastic may burst.
- Connecting the tank to the toilet. There is an o-ring left on the toilet bowl from the old fittings. You can throw it away. Clean the connection area from dirty stains and rust, wipe dry. Secure the new sealing O-ring. Install mounting bolts, backed with rubber gaskets, inside the tank. Mount the tank on the toilet shelf and level it. Screw washers and nuts onto the bolts, then use a wrench to tighten the fastening. This must be done gradually and alternately, making several revolutions on each side.
- Adjustment. The height of the drain tanks varies, so the design of the fittings provides for the possibility of independently setting the required height. It is also necessary to adjust the float of the filler fittings so that the level of the collected water in the tank is approximately 2 cm below the top of the overflow tube. If the installed fittings are two-button and the drainage is carried out in two modes, it is necessary to set the economical drainage switch to the desired level (usually this volume is 3 liters).
- Water connection. Install a metal or plastic water supply pipe into the filler hole of the tank and secure it with special nuts. The inner nut is doubled with a rubber gasket. Connect a flexible hose to the external inlet of the pipe, which is connected to the water supply. Let the water flow by turning the valve on the water pipe and make sure that the drain and shut-off mechanisms of the fittings are in good working order. Check whether the connection between the flexible hose and the inlet pipe is tight, as well as the connection between the tank and the toilet bowl. Install the lid and button (or handle) on the tank.
The procedure for replacing fittings is relatively simple. If you have the appropriate tools and minimal skills in using them, you can change the fittings yourself. In this case, you need to follow the instructions included with the kit.
Adjusting the drain mechanism
After installation, all that remains is to check how the fittings in the tank work. It is important to correctly adjust the water level inside the tank. To do this, the glass is fixed in a position in which the water will stop at the same level. The overflow height is also adjusted in parallel. Each locking mechanism usually comes with instructions from the manufacturer. If you study it, you will learn how to configure the toilet fittings correctly in your case.
Adjusting toilet fittings
In the attached video you will see how to properly install the toilet flush fittings. If you have experience in this work, then leave your comments at the end of this article.
Customer Reviews
Tatyana, Moscow : “Water began to leak a little bit into the toilet from the tank. Seems like a small problem. But the utility bill for water has risen significantly in a month. I had to figure out how to change the insides of the tank myself. I bought a set of fittings with side connections. The plastic is good, high quality. The elastic bands are all dense, but at the same time flexible. In general, I did it. The most difficult thing was to place the tank on the toilet so that nothing would leak in this connection either. I hope it will serve."
Valery, Moscow : “I didn’t want to install a cheap toilet flush. So I chose Czech fittings. I also liked the quality of workmanship, the plastic is so strong. The buttons have not worn off over time. And the tank fills almost silently and very quickly. I hope it lasts for a long time."
Preparation for repair
Before starting work, you need to prepare tools and purchase new parts that require replacement.
The next stage of preparation is removing the tank cap. There are two popular design options:
- with one button;
- with two buttons.
The dismantling process is different in each option. To open the lid, equipped with one button, you need to turn the ring counterclockwise. It is better to use a screwdriver for this. After removing the ring, you need to move the cover to the side and remove the clothespin. As a result, you can completely remove the cover and begin repairs.
Opening a design with two buttons occurs differently. First you need to press one button and find the hole located on the side of the second button. Use a screwdriver to carefully remove the second button. After this, begin to unscrew the slotted screw. The process then continues as in the first case.
