No matter how high-quality the toilet and fittings are, problems arise from time to time: either water does not fill, or, on the contrary, it constantly flows from the drain. All these problems are associated with fittings (drain and inlet valves), which are placed in the drain tank. Next, we’ll talk about how to install, change, adjust and repair it yourself, with your own hands.
No matter what the toilet looks like, the filling in the cistern will be similar
How does a toilet flush work?
With a huge variety of drainage systems, the principle is identical. And if you know how one model of a toilet flushing system works, then, after thinking, you will understand any other.
The drainage system consists of two parts.
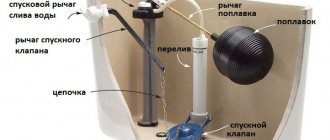
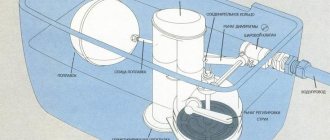
The tank mechanism consists of a drain valve and a supply tap with a float valve
Drain valve
It is controlled by an external lever or button. The purpose of the drain valve is to open the way for water when flushing and to keep it securely in the tank the rest of the time.
In older models with a high cast-iron tank, the drain hole was plugged with a heavy iron plug. They lifted it by pulling the chain connected to the lever. The lever, in turn, lifted the plug, opening the way for water.
If the chain was dropped, the plug would fall again, blocking the pipe. And to get the required volume of water, you had to stand next to the toilet and hold the lever.
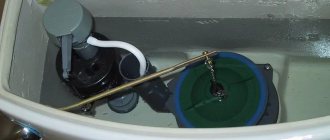
The inconvenience was eliminated by replacing the heavy plug with a hollow pear-shaped valve. Opening the way for water, the plug floated, and the drain remained open until the water left. The valve goes down with the water and plugs the outlet again.
Toilet flush system with hollow pear-shaped valve
The hollow “pear” still serves today, but more complex systems consisting of an overflow tube, a rubber valve and a plastic float, operating on the same principle, are more often used.
Water supply unit with float valve
The base and here is a float connected through a lever to the membrane of the water tap. When the water is released by the drain valve, the float is at the bottom, releasing the membrane. Water pours into the tank.
The water rises, and the float rises with it. At a certain level, through a lever and a rod, it presses on the faucet membrane, which shuts off the water supply. The tank is full of water and ready for a new flush (Fig. 1).
Water supply unit to the toilet cistern with a float valve
By adjusting the height of the float relatively, we set the amount of water that will fill the tank. Usually from 6 to 10 liters.
I recommend: Advantages of the design of wall-hung toilets
Shut-off valve arrangement
The drainage mechanism is simple in most cases. Typically, it includes three elements:
- drain device. consisting of a closing siphon and a waterproof gasket that isolates the tank from the pipe;
- adjustment lever. attached to the pipe by means of a ball valve;
- float on the spoke. controlling the degree of filling.
Installation of the drain and filling mechanisms of the tank depends on its type, type of fastening and even material, be it cast iron, sanitary ware or lightweight plastic. There are three main types:
- hinged - despite its unattractive appearance, it compares favorably with others due to its elementary design, which simplifies repairs at home, and the additional speed that the water flow develops when falling through the pipe;
- installed on the toilet shelf - the most common and familiar;
- built-in - rather resembles a plastic tank built into the wall.
Installing a toilet flush mechanism, installing the tank with your own hands
The installation of the toilet flush mechanism begins simultaneously with the installation of the tank. Follow the link to find out → how to install a toilet, and there is also information about the cistern.
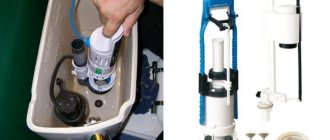
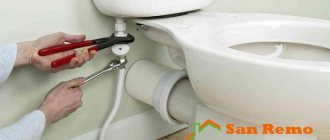
We unscrew the large nut from the neck of the drain and insert it into the lower hole of the tank. Tighten the nut from the outside. The rubber washer, placed on the drain valve body, remains inside the tank and ensures a tight fit of the valve body to its bottom.
Many of the drain devices have a detachable fastening assembly. That is, the upper part with the valve, float, button and levers is shared with the lower part.
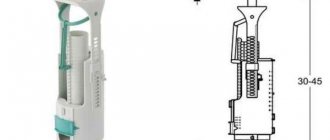
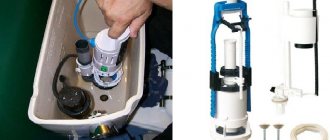
The flush valve of the toilet flush system consists of two parts; they are separated by turning relative to each other
This is done by rotating the parts relative to each other. In this case, the hooks of the lower part disengage from the pins of the upper part. The reverse turn again brings the hooks behind the pins, firmly connecting the elements together.
If your valve has such a device, use it. Before installation, remove the top unit to avoid damaging its thin and fragile parts.
After you have installed the lower part of the water drainage system yourself, we place a gasket on the cistern seat and place the cistern on the toilet so that the protruding nut fits into the drain hole.
Advice.
Before placing the gasket between the reservoir and the saddle, lubricate it on both sides with silicone sealant.
We secure the tank to the saddle using two long bolts and a system of washers. The sequence here is as follows: we place flat plastic washers under the bolt heads, then put on conical silicone washers, tapering downward.
We insert the bolts into the hole in the toilet seat, place silicone washers and tighten them with wing nuts.
Useful tips
And some recommendations from experts:
- Before purchasing pumping equipment, it is necessary to carry out calculations for consumers. That is, calculate the optimal ratio of pump performance and total consumer consumption.
- A preliminary piping scheme is developed, which takes into account all consumers, regardless of their seasonal or off-season use.
- It is necessary to correctly connect the pump to the power supply network. There are many nuances here, so a professional electrician is involved in this matter.
- The owner of the dacha must first decide whether to buy all materials and equipment separately or purchase a ready-made pumping station. It cannot be said that one of the proposed options is better than the other. Therefore, it is better to consult with specialists who will study the features of the dacha and the source of water intake.
Installing a toilet flush system
The tank is installed. Now we install the water supply valve into the tank with a float.
When purchasing a toilet flush system, check with the seller what type of connection it is intended for. The fact is that the tank can have a hole for water supply at the bottom or on the side. And since the valve float must move in the tank along with the water, that is, vertically, then an appropriate valve is needed.
Some models are universal and can be installed both from below and from the side. It’s easy to figure out how to do this, you just have to pick up the valve. But most systems are designed for a specific installation option.
Important!
When purchasing a new drain system, be sure to check what type of connection its float valve is designed for.
When purchasing a mechanism for a tank, it is important to clarify what connection it should have.
Usually the nut and washers are already put on the pipe. In this case, unscrew the nut, remove the pipe from the water supply hole of the tank and tighten the nut again, securing the device in the tank.
I recommend: How to restore and restore a cast iron bathtub
Just in case, keep in mind that the washers on the pipe are located as follows: first, two oblique washers are placed from the thrust flange of the pipe, beveled towards each other, then a soft gasket, which rests from the inside against the wall or bottom of the tank. Only the clamping nut is located outside.
Screw the nut of the water supply hose onto the protruding part of the thread. Before doing this, make sure that there is a sealing washer in the hose nut.
To get rid of the noise of water filling the tank, we put a plastic tube on the supply pipe.
It remains to connect the upper block of the drain valve to the already installed lower part and, if necessary, make adjustments.
Plumbing diagram
And a few words about how to properly organize an autonomous water supply network at your dacha. First of all, the issue of the source of water supply is resolved. After which the pump is selected according to its installation type. That is, these two criteria are inextricably linked. And the second comes out of the first.
And now about the layout. If submersible or borehole models of pumping equipment are used in the water supply system, then surveying the location of the devices will not be necessary. As for surface aggregates, there are two options:
Layout of a surface pump in the basement of a house Source moikolodets.ru
Sometimes a special room is allocated for a surface pump, which is built on the street next to the cottage. It must be insulated.
As for the pipework, these are plastic pipes that are laid at a shallow depth, but must be insulated. Fortunately, you can find special thermal insulation materials for pipes on the market
Particular attention is paid to laying pipes inside the house. Typically, such a passage is planned at the stage of forming a country house project
Because the shorter the distance from the source of water intake to the cottage, the better: less material consumption, the pressure and productivity of the water supply does not decrease. Usually the installation inside the house is carried out either through the foundation of the building or through the wall.
Adjusting the filling of the toilet tank
If noticeably more water is poured out than is necessary for normal drainage, you need to adjust the filling of the toilet tank: lower the float of the water supply unit. And, if on the contrary there is not enough water, raise the float.
The easiest way to adjust lever drain systems is with a float on a long lever.
On older models, it is made of wire and to adjust it, it is enough to bend it or, accordingly, straighten it.
Adjusting the filling of an old toilet filling system
There are also plastic levers made of two links connected by a wing nut. To move the float you need to loosen it and then tighten it again.
For systems where the float moves along a vertical guide rail, adjustment is even easier.
Disconnect the float from the rod. Usually it is held in the socket due to the springiness of the plastic itself. Then, lower or raise the float and connect it to the rod again.
The task is more difficult if the float is located in a special bath. We “snap out” the rod connecting the float and the valve from the socket. Then we remove the clamp that holds the bath on the guide rail. Raise or lower the bath along with the float. Release the latch and connect the float to the rod.
Mechanisms for adjusting the toilet cistern filling system
Toilet flush system repair
The toilet flush system is one of the few devices whose reliability practically does not depend on price. Moreover, cheap, simple models often work longer.
However, over time, even these reliable devices fail, and water begins to leak, or, less commonly, does not enter the tank.
The reasons for breakdowns and the need to repair the toilet flush system are different. Of the main ones:
- Deformation of mechanism elements due to aging of plastic.
- Rusting and oxidation of metal parts (if any).
- Limescale. Gradually increasing, it begins to interfere with the operation of parts, reduce the tightness of the junction of plugs and gaskets, and clogs the water supply openings.
- Mechanical failure of a part due to material fatigue or accidental damage during installation, maintenance or adjustment.
Many problems with toilet flushing can be eliminated by cleaning and adjusting the mechanisms.
Often a breakdown occurs in a new or relatively new mechanism. This happens - during installation or adjustment, the rod, lever broke, or the fastener burst.
Alas, it is unlikely that a complete repair of the toilet flush system will be possible. It is best to purchase exactly the same mechanism, replace the broken part, and hide the rest for the future.
It is best to replace a device that has worked for eight years or more with a new one, without going into too much detail about what broke there.
In this case, it makes sense to get involved with repairs if you won’t be able to purchase a new mechanism in the near future, or if you have a similar one at hand.
A leak in the supply tap may be caused by wear of the membrane. Just try turning it over to the other side. Some models (usually lever ones) allow this.
If the mechanism is three to five years old and there are no obvious mechanical breakdowns, it is usually not difficult to fix the problem.
Sometimes it is enough to lower the water supply float, tighten the nuts, and replace the skewed lever.
Sometimes it is enough to tighten the nut a little or adjust the float of the toilet flush system to eliminate the leak
If surface adjustment does not help, remove and disassemble the problem unit. We wipe the parts from dirt, carefully clean all parts from lime deposits. We pay special attention to the valves and sockets where they fit.
We clean and check how the lever joints move.
It is advisable to clean and inspect the mechanism at least once every couple of years, no matter how well it works.
Comparison of the advantages and disadvantages of both options
Single-button drain hydraulic systems are among the most popular .
Automatic two-button mechanisms are only gaining momentum in popularity. The “low flow” hydraulic system is undeservedly underestimated. However, modern types of cisterns are equipped with a special element - an auger, which causes the water to rotate intensively and powerfully as it falls down , which has a positive effect on the cleanliness of the toilet.
If desired, there is a need to purchase economical one-button flush tanks, in which water consumption is controlled using the “aqua-stop” design . The efficiency is due to the alternation of pressures: the first press promotes draining, and the second stops this process.
Flush tanks operating in dual-mode flushing allow you to save almost twenty cubic meters of water per year, which significantly affects payment costs. True, it is worth considering that modern two-button mechanisms are more expensive than the classic one-button version , but all costs pay off fairly quickly.
