Over time, outdated plumbing fixtures are replaced by new, more comfortable and functional ones, but some details remain the same, practically without changing their purpose.
For example, one of the most important elements of the flush cistern - the toilet float - continues to perform its main function of adjusting the water level, although it has also undergone external changes.
Agree, understanding the structure of the float mechanism is useful to any home handyman. Calling a plumber at the slightest problem with the toilet is not the best option. Moreover, most valve malfunctions can be eliminated independently.
We suggest understanding the design and operating principle of different types of floats. Detailed instructions will help you adjust the mechanism and restore the toilet flush system.
Place of the float in the design of the cistern
The float mechanism itself is just a small part with a simple device, but together with the rest of the tank fittings it performs a significant mission - it is responsible for flushing. More precisely, it is an intermediary between two internal systems: bulk and drain.
To understand what role is assigned to this simple device, let’s figure out how the toilet flush cistern works.
We will not consider elements of a built-in installation or retro models suspended from the wall, but will focus on the most popular solutions - cisterns, which are part of compact toilets and are installed on the back shelf of the bowl.
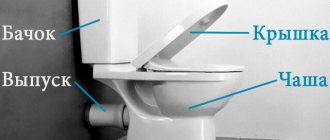
Diagram of the internal structure of a toilet tank with a lower water supply and a side control lever. These are outdated fittings preserved in Soviet-era tanks
Externally, it is a faience (porcelain, plastic) tank, closed on top with a lid with a hole for a control lever, which is increasingly being replaced by a button (single or double). In addition to this hole, there are two more: for the flow of water from the cold water system and for draining liquid from the tank into the toilet bowl.
The fittings are installed inside the tank - a collapsible system of plastic, metal and rubber parts. The configuration, dimensions, and materials used to manufacture the elements differ from one manufacturer to another. In addition, there are several types of mechanisms.
However, they are all united by a common principle of operation: water flows into the tank through the inlet hole (through a flexible pipe connected to the cold water pipe) in the required volume (on average 4.5-6 liters).
Along with the level of water filling the tank, the float also rises. When the liquid level reaches the desired level, the float device blocks the flow of water. This state persists until flushing.
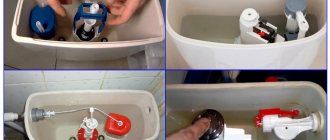
Image gallery
Photo from
Filling valve with side connection
Glass type float with adjustment screw
Flush drain valve
Overflow to remove excess water
During the flushing process, other elements of the system are activated. A button (or lever) moves a rod, to the end of which a membrane (or gasket) is attached. The flush valve opens and water rushes into the toilet.
The function of the float is obvious - adjusting the volume of water entering the tank. If the mechanism fails, water will flow continuously, and the apartment will be saved from flooding by another important element of the system - the overflow.
Rating of the best wall-hung toilets
| Nomination | place | Name of product | price |
| The best inexpensive wall-hung toilets - budget up to 5,000 rubles | 1 | 4 260 ₽ | |
| 2 | 5 460 ₽ | ||
| 3 | 3 920 ₽ | ||
| The best wall-hung toilets in terms of price/quality ratio | 1 | 10 590 ₽ | |
| 2 | 9 850 ₽ | ||
| 3 | 41 920 ₽ | ||
| 4 | 8 650 ₽ | ||
| 5 | 11 900 ₽ | ||
| The best wall-hung toilets with installation | 1 | 6 490 ₽ | |
| 2 | 17 100 ₽ | ||
| 3 | 23 040 ₽ | ||
| 4 | 10 499 ₽ |
Types of float devices
The type of float in the cistern of a compact toilet depends on the design of the fittings: in old-style devices there are plastic balls or cylinders floating on the surface of the water, in new modifications these are moving elements that slide vertically and resemble a glass.
The spherical float is also called a “rocker arm”. Indeed, the thick wire on which the ball is attached is shaped like a household item that has become rare.
Plastic ball fixtures can still be found for sale in plumbing stores. This is explained by consumer demand: not everyone is ready to buy improved fittings for the tank
The principle of operation of an essentially primitive float is quite simple: when flushed, it sinks to the bottom of the tank and, through a rod (the same wire), opens the inlet valve.
Image gallery
Photo from
The simplest float mechanism
Device for automatic water collection
The process of collecting water into the cistern
Pear-shaped float in highest position
Water enters, fills the tank, and the float rises up. At a certain point, it reaches the required level (the volume of liquid can be adjusted manually) and blocks the flow of water. The inlet valve closes until flushing occurs again and the float falls to the bottom.
The modern appearance of the float device vaguely resembles a spherical model. This is a plastic part attached to a vertical rod, which, like an elevator, moves up and down and is also responsible for the timely blocking of the intake valve.
Modern type float mechanism: installed on a vertical “lift”, can have different shapes and is most often a complete part of the tank fittings
The advantage of the improved model is more precise adjustment of the level of water entering the tank. The rod along which the float moves is similar to a ruler with divisions, where notches are made for ease of adjustment.
It is believed that designs with a spherical float are noisier. In fact, the noise level does not depend on the type of float mechanism, but on the method of water supply.
With an upper side connection, it is poured from above (a flexible hose is connected to the hole in the upper part), which is why the noise is created. In tanks with bottom supply, water flows quietly, and if there is noise, it is only due to a malfunction of the fittings.
The best inexpensive wall-hung toilets - budget up to 5,000 rubles
Some inexpensive wall-hung models can effectively cope with the main task assigned to the toilet. Many of them do not have modern options, and the equipment is usually minimal.
Roca Dama Senso 346517000
Rating: 4.8
Excellent manufacturing quality combined with an affordable price allowed the Roca Dama Senso wall-hung toilet to take first place in the ranking. The manufacturer used sanitary earthenware to create the sanitary ware. Thanks to the well-thought-out design, it is easy to carry out hidden installation to the wall. The model has all the necessary options that a modern toilet needs.
First of all, this is an anti-dirt coating, which simplifies maintenance of the bowl. Limescale and rust do not accumulate on a smooth surface. The presence of an anti-splash option will also be useful; when draining water, splashes will not fall on the rim or floor. The fashionable rectangular shape with dimensions of 36x57 cm will harmoniously fit into the interior of a small room.
- high-quality manufacturing;
- possibility of hidden installation;
- anti-splash function.
There are complaints about the quality of the anti-mud coating.
Jacob Delafon Mideo E4345G-00
Rating: 4.7
Jacob Delafon Mideo wall-hung toilet is sold at the most affordable price. It combines convenience, functionality and reliability. Experts note such advantages of the model as ease of maintenance, economical water consumption without loss of performance. The material for production was high quality sanitary porcelain. It is protected from the negative effects of water by a glaze coating. The surface is smooth and wear-resistant.
The model is attached to the wall, it has an oval shape and compact dimensions (52x36 cm). Useful options include the hidden location of the cistern (not included) and effective back flush. When installing it yourself, difficulties arise due to the limited space in the installation area.
- low price;
- backflow;
- laconic design.
The drainage of water is accompanied by splashing.
Gustavsberg Nordic 3 46041001
Rating: 4.6
The design has an oval shape and is intended for hidden installation. The model can be used with various installations, including the Triomont system. The kit contains everything necessary for installation and connection to communications.
Brief installation instructions
Sometimes it is necessary to repair, replace or simply install a new float model - separately or as part of a valve block. Let's consider all the solutions in order. Installation of new spare parts is easiest, since there is no need to disassemble old mechanisms, and the tank and the parts themselves are in perfect condition.
Option #1 – installation of a spherical model
Let us immediately make a reservation that it is necessary to install a new spherical-type device in the only case - if the old element fails. It is unlikely that a new toilet model is equipped with a fill/flush system with this type of float.
A plastic ball or other shaped part can be purchased separately, since the advantage of the outdated mechanism is that the “rocker arm” is easy to install or change without replacing the rod-shaped water drainage system.
The appearance of the ball and shut-off valves may vary. The picture shows a bright orange plastic ball with brass fittings costing 430 rubles
The float is usually sold with a metal holder and a fill valve. The latter is inserted into the water inlet hole (located in the upper part of the tank, on the left or right) and fixed, the “yoke” is positioned horizontally.
Approximately in the middle part it is attached to the “pear” - a rod-type exhaust valve. When pouring liquid into the tank, the plastic ball should lie freely on the surface of the water.
Option #2 – glass-shaped installation
Kits designed for containers with bottom connections are usually fixed in the tank even before it is installed in its rightful place - the toilet shelf. This is necessary since both valves - drain and inlet - are located at the bottom of the tank, and during installation, the parts must be tightened and tightened on both sides.
If the tank is already installed, this will be difficult to deal with.
Plastic fitting kit for a cistern with a single push-button water inlet valve. The package includes a drain mechanism, float, seal, fasteners
First, install a larger drain mechanism, making sure to use the gaskets and washers that come with the kit. Align the device along the axis and tighten the nut from the outside. It is important that the O-ring seals tightly in the hole area.
Then, using the same scheme, the filling valve with a float device is fixed. It is usually allowed for the parts to touch each other or the walls of the tank, but it is better to try to secure them strictly vertically.
Particular attention should be paid to sealing the junctions of devices and openings. It is necessary to use all seals, washers and gaskets that are recommended by the manufacturer and supplied with the kit, with the exception of spare parts. If difficulties arise, just look at the installation instructions.
The float device is replaced using the same scheme, only before installing a new one it is necessary to dismantle the old one. For repairs, you will have to disassemble the toilet cistern.
Which toilet is better, wall-hung or floor-mounted?
| Toilet type | Advantages | Flaws |
| Suspension | + compactness + ease of cleaning the room + spectacular appearance + silent drain | high installation costs the wall has to be strengthened — only a built-in tank design is possible |
| Floor | + wide range + different options for connecting the tank + ease of installation and connection | - difficulties with cleaning the room takes up more space - many models create a lot of noise when flushing |
Repair of valve faults
Troubles usually happen unexpectedly, when there is no way to call a specialist or seek help from more knowledgeable people, so you always need to be prepared to act independently.
Failures of the float mechanism can disable the operation of the drain tank, and flushing it off with water from buckets every time is not an interesting task. Let's figure out how to quickly change or repair the float in the toilet if it has become unusable.
Violation of the tightness of the plastic ball
When the old float wears out, a crack may appear, which over time will turn into a hole. Liquid will begin to flow through the hole into the plastic ball, and it will no longer be able to float up and block the inlet valve. A problem arises - a constant flow of water in the toilet. Water losses quickly turn into financial costs.
Let's find out how to avoid this:
- turn off the water;
- remove the float;
- wipe it dry;
- cover the crack with waterproof sealant;
- dry;
- fix the float in the tank;
- We check his work.
There is no point in repairing a float with a large hole or completely leaky plastic; in this case, we rush to the store and purchase a new part to replace it.
If the float valve fills with water due to a ruptured membrane or a crack in the valve, this sealing device must be replaced:
Image gallery
Photo from
Step 1: Removing the toilet float valve
Step 2: Disassemble the float head
Step 3: Diaphragm rupture - cause of problem
Step 4: Reassemble the Float Device
Skewed float structure
Due to wear of the rubber (silicone) seals or due to poor water quality, the glass-type float device may become misaligned.
Does the plastic float “stick” with each release of water or does it even stop moving up and down relative to the guide “sliders”. Depending on its position, either the flow of water into the tank stops, or, on the contrary, it constantly pours, flowing straight into the sewer.
A common cause of breakdowns is poor quality tap water. It is characterized by a high content of lime and rust, which settle on the walls of the “glass” and on the rods (holders, guides)
First, try cleaning the mechanism without disassembling the entire structure. Perhaps the movement of the float is slowed down by debris that has fallen into the water. If this does not help, you will have to turn off the water, remove the tank, and then the float block. The drainage device may not be touched.
Then we carry out diagnostics and act on the results: we correct the position of the float and install it in place or completely change the block responsible for the water inlet.
Most often, breakdowns associated with changes in the position of the structure are corrected quickly, while it is better not to repair worn-out devices, but to replace them with new ones.
How to prevent the appearance of severe pollution?
Experts recommend cleaning the drain tank at least once a quarter. If the container has not become very dirty during this time, you can simply rinse it with clean water and wipe the surfaces with a napkin.
To make cleaning the tank easier, experts recommend buying special cleaning tablets for it. They not only prevent sediment from forming inside the tank, but also clean the toilet itself, disinfect the device and at the same time work as an air purifier.
But even if you use such tablets, you still need to keep an eye on the cleanliness of the tank. To do this, it will be necessary to clean the inside of the toilet tank 2-3 times a year using improvised means.
Keeping the toilet clean is very important both for the health of the family and for maintaining comfort in the apartment. If everything is done in a timely manner, this procedure will not cause any special difficulties.
Website www.sympaty.net – Beautiful and Successful. Author: Elena Burenyuk. More information about the site's authors
When the problem is with the bowl
Problems associated with the breakdown of the toilet bowl itself are extremely rare. Typically, an unpleasant situation occurs due to improper fixation of the housing to the wall or floor, as a result of which the toilet leaks. When the structure is assembled (especially when choosing one built into the wall), it is quite difficult to solve the problem that has arisen, so you should take care of the correct installation at the installation stage, otherwise you will have to disassemble the complex structure, assessing the condition of the gaskets and the quality of the connections.
In some cases, in order to eliminate a leak in the toilet, you still need to carefully inspect the tank first, since the constant formation of a puddle on the floor can be explained by an insufficiently tight fit of the bulb, damage to the seat due to corrosion processes, improper adjustment of the valves, or a violation of the tightness of the nut connection. In some cases, simply replacing the gasket or worn cuff with new elements or tightening the loose nut at the base of the overflow is enough, for which you first remove the tank. For maximum reliability, a fixing clamp is additionally applied.
If water constantly flows in the toilet, but repairs are not carried out immediately after a malfunction is discovered, limescale may form on the walls. A mixture of water and citric acid, which is applied to contaminated areas and left overnight, can eliminate the unsightly formation. Similar steps can be performed to clean the tank itself.
Provided that the repair is carried out correctly, the tank and the toilet bowl itself will work properly for a long period of time, without requiring a complete replacement of the plumbing fixture. Do-it-yourself repairs are an economical and simple option, so it’s worth thoroughly studying the problem and solving it using one of the methods suggested above.
Plumbing fixtures have become so commonplace in our apartments, houses, and office spaces that their presence is taken for granted.
But some fifty years ago, the majority of Russians did not even imagine that a “latrine” could be arranged inside a house or apartment - almost everywhere they used free-standing sheds installed above cesspools.
And today, problems with plumbing terrify ordinary people - after all, without a properly functioning toilet, the advantages of apartments are negated.
One of the most common malfunctions of the toilet cistern is the constant accumulation of water, which occurs due to the fact that water from the toilet cistern leaks into the toilet
or on the floor of the bathroom (read more about this situation). Naturally, this state of affairs cannot suit anyone, because it leads to the following consequences:
- Unreasonably high water consumption
. This natural resource is becoming more and more expensive every year, and given the widespread installation of water meters, its constant consumption leads to prohibitively high utility bills. - Constant noise in the toilet room
. Taking into account the acoustic characteristics of our apartments and thin walls that do not have high-quality sound insulation, the sound of flowing water does not in any way contribute to the good mood of the residents, especially at night, when the overall noise level decreases. - A malfunction of the toilet cistern threatens to flood the bathroom
with all the ensuing (in the literal sense of the word) consequences, leading to the need to repair the flooring and, in the case of low-quality waterproofing of the interfloor ceiling, the underlying neighboring room.
Constantly filling the tank with water
Repairing a toilet cistern with such a malfunction involves aligning a displaced or skewed float lever. The problem can be solved by placing the lever below the entrance of the water supply pipe at a distance of 2.5 cm.
If you don't have specific construction skills, you may only make things worse
It is worth assessing the condition of the float. There may be damage to the element body and accumulation of water in it, which leads to weighting of the part. In the event of such a malfunction, a leak in the tank can be eliminated by freeing the float from water and sealing the hole, after which the element is placed in the place provided for it in the tank. To seal a hole or crack, use plastic heated to a plastic state or a plastic bag that is always on hand and tightly fixed to the element.
If water constantly leaks from the tank and it is possible to flush only after frequently pressing the button, the problem is a malfunction of the siphon membrane. To replace it, first replace the tank lid with a crossbar, to which the float lever is fixed by tying it up. The tank is emptied of water, the fixing nut used to connect the tank to the flush pipe is removed, and the siphon nut is loosened. After disconnecting and removing this structural element, remove the damaged membrane, replacing it with a new analogue of a suitable size and identical shape. Then perform the steps described above in reverse order.
If there is damage to the flush button, if the toilet tank does not leak, repair the faulty rod by disconnecting the broken part and replacing it with a piece of thick wire. In order for the toilet to work properly after repair for a long period of time, it is better to immediately install a new draft.
Required tools and materials
To repair a toilet float, you will need a set of tools, which will have to be supplemented based on the identified problem. The main things needed will be:
- adjustable wrench or open-end wrenches;
- screwdriver;
- pliers;
- adhesive tape for insulation.
If the float itself or its membrane breaks down, they will need to be replaced, which means new parts will be needed.
Prevention measures
If you follow the recommendations of plumbers, you can avoid the accumulation of plaque on the walls, wash the equipment less often and with less effort. Firstly, you need to monitor the pipelines: rusty metal communications used in the house cause the formation of a red coating. Plastic pipes are considered less problematic.
Directly into the tank you can place special products in the form of tablets designed to protect against plaque. Such household chemicals may also have a gel consistency. Every few weeks, it is advisable to remove the tank cap to ensure its proper condition and promptly eliminate soft deposits.