Everyone has their own aesthetic preferences, which is why the variety of styles in bathroom interiors is enormous. However, almost everyone is unanimous on one issue: the lower part of the bath from the sides should be closed. For this purpose, special bathroom screens are used. They are light, beautiful and easy to install.
Bathroom screens are needed to disguise unsightly details, the space under the bathtub, and sometimes to gain additional space for storing household items.
A few decades ago, these functions were performed either by light curtains or by blank brick walls trimmed with tiles.
Two in one: aesthetics and functionality
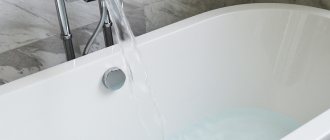
Entering the bathroom, a person sees a bathtub. If the screen is not installed, then the legs of the bathtub and elements of the plumbing system are visible.
They seem unsightly and make the entire bathroom look untidy. The screen can become an excellent decorative element that will cover everything unnecessary and help decorate the room in a single style.
During Soviet times, it was difficult to find a worthy alternative to brick walls under the bathroom. Now there are designs made of light and beautiful materials, but brick screens are still installed in some apartments
The design will protect the pipes from moisture and damage, and will become an additional cabinet where you can store household chemicals, household supplies, plumbing tools and other useful items.
Screens are not only beautiful and practical, they can act as a reliable barrier that prevents children and animals from accessing household chemicals
How to install on corner models
For corner bathtubs, mounting is most often provided not with self-tapping screws, but with special magnets and metal plates. Such magnets are initially attached to the legs of the font.
STEP 1. Height adjustment. Just as in the case of the rectangular model, we adjust the height of the legs based on the screen parameters.
STEP 2. How to attach the plates? On the back side of the panel, in the places where the magnets will rest, we glue the metal plates from the kit with double-sided tape or silicone sealant. While drying, you can secure them with regular tape.
STEP 3. Installation. We apply the front panel and check that the magnets grab the metal plates.
This installation option is convenient because the question: how to remove the screen and then put it back on again does not arise. Everything is extremely simple, you need to apply a little force by pulling the panel towards you, and you can just as easily return it to its place. The previous method is no different from this simplicity; there you will first need to unscrew the screws.
What types of screens are there?
Now you can buy bath screens of any design and made of any material. Manufacturers of decorative panels involve experienced designers in the design of models.
They develop original designs that can fit into even the most sophisticated interior.
For the manufacture of screens, plastic, metal, MDF, polystyrene, plasterboard, polyvinyl chloride, and acrylic are used. Patterns, subject pictures (photo printing), and decorative elements can be applied to the surface of the product.
Often there are models made from combined materials.
Frames for modern screens are made of aluminum, steel or plastic. Buyers often choose models with aluminum frames, because... they are durable and affordable
Glass and mirror screens look very original. They are used not only for their intended purpose, but also to model the space of bathrooms.
For such panels, they use not ordinary glass, but organic glass, because it better resists mechanical damage and shock.
When choosing a material, you should pay attention to its strength, resistance to moisture and high temperatures. A high-quality model can last for decades.
Good performance characteristics imply a higher price for the structure, but this is the case when the investment is completely justified.
Lattice-shaped models are chosen by people who care about good ventilation of the space under the bathroom. This helps to avoid the appearance of dampness, fungus and unpleasant odors.
Subtleties of screen selection
Before purchasing a bathtub screen, you need to think in advance which model is best suited. In this case, several criteria must be taken into account:
- functionality;
- price;
- durability;
- complexity of installation;
- appearance.
If the screen is needed only to cover unsightly communications, you should pay attention to simple removable models or stationary products with a hidden hatch. If you plan to actively use the free space under the bathroom, the screen must have doors. The most convenient are products with sliding doors - this is a universal option for rooms of any size. Hinged doors are convenient to use only in a spacious bathroom.
Sliding bath screen
All fittings must be made of corrosion-resistant material, otherwise the screen will very soon lose all its attractiveness. It should be taken into account that plastic fittings wear out faster and are less durable, while parts made of galvanized steel retain their qualities throughout the entire period of operation. When purchasing, be sure to check the quality of fastening of all elements, the smooth movement of the doors and the tight fit to the frame.
Sliding screen made of MDF
If the repair has not yet been completed, and it is not possible to calculate the exact parameters of the screen, you should purchase a model with the ability to adjust. Such products cost a little more, but there are no problems with installation and fitting. But it is best to choose a screen after finishing work is completed, when it is possible to accurately take measurements and select the best option.
Adjustable screen
The decorative design of the screen should match the bathroom interior as closely as possible in terms of color and texture. In small rooms, mirror screens look very good: the reflective surface visually makes the room more spacious. Photo printing or drawing on the front panel must also correspond to the general style of the interior, otherwise it will not be possible to achieve a harmonious combination. For example, a floral print screen may be very beautiful on its own, but it will look out of place in a nautical themed bathroom. An image of waves, sea life or pebbles on the beach would be more suitable here. If there are a lot of bright contrasting details in the room, it is better to choose a single-color screen, and vice versa; for a bathroom in soothing colors, a model with a large colored pattern is perfect.
Lilies
Tulips
Flower on a stone
poppies
Orchid
Shells
Daisies
Grass
Swans
As for manufacturers, the choice here is also very wide, and the quality of domestic models is no worse than foreign ones, and the price is much more affordable. The main advantage of Russian products is their versatility: thanks to their well-thought-out design, the screens are perfect for any type of bathtub, and can be easily adjusted in height and width, taking into account the communications outlet. The greatest demand is for bathtub screens from the MetaKam, Vannbok, and OSM brands, which are distinguished by a huge variety of materials and colors.
Metacam - bath screens
Vannbock. Bath screen
We select a convenient design
Screens consist of a frame (usually aluminum) and panels. They can be blind or equipped with doors for access to communications and items stored under the bathroom.
There are also models with removable panels; they are usually installed under acrylic bathtubs.
The advantages of blind panels are high aesthetics and durability. The smooth surface can be decorated in any way or left plain.
It will look nice regardless of the presence or absence of additional decor. Due to the absence of moving parts, these bath screens last much longer.
The disadvantages of solid stationary structures include the inconvenience that arises in the event of breakdowns of the plumbing system. To access it you will have to remove the entire panel.
This takes a lot of time, which can cause problems if a leak develops and water accumulates under the bathtub.
In some interiors, screens perform a style-forming function. A luxurious bright model looks very attractive if the rest of the design elements are monochromatic or made in the same style
Designs with doors are more practical than blind ones. The doors themselves can be hinged or sliding. Both options have their own advantages and disadvantages.
In most cases, bathroom owners opt for sliding models.
Hinged doors conveniently open and close, providing access to shelves with necessary small items.
However, you should not choose a screen with such doors for a small bathroom. Open, they occupy useful space and make it difficult to manipulate the elements of the plumbing system.
The doors of the sliding screens for the bathtub open, sliding along the guides. When purchasing such a system, you should pay special attention to the quality of the metal.
The stronger it is, the longer the bath screen will last. It is better to give preference to steel or aluminum.
There are models with plastic frames. They are less reliable, but are quite suitable for apartment owners who do not intend to store frequently used items such as washcloths, towels, shampoos, hygiene products, and household chemicals under the bathroom.
If doors are needed only for access to communications, then you can buy a plastic system.
Doors can swing open not only to the left or to the right. There are models with folding elements. They have the same advantages and disadvantages as swing screens
Preparatory work
A sliding screen under the bathroom, installed independently, is a multifunctional invention that provides attractiveness to the interior, additional protection to the bathroom, and comfortable storage of household chemicals for the bathroom owner. But such an element of the bathroom interior will be easy to use and durable only if its installation was carried out without errors and with high quality.
Installing a screen under a bathtub with your own hands begins with purchasing the screen itself. You can purchase a design that is designed for a standard rectangular bowl, or you can find a design for a curved bowl . It all depends on the bathtub installed in your bathroom. The characteristics of sliding screen models that are present in a wide range on the domestic plumbing market today are described in the table.
| Structure length, cm | Structure height, cm | Screen material | Number of bowl legs, pcs |
| 150 | 50 | Plastic (PVC) | 2 |
| 160 | 52 | Metal | 3 |
| 170 | 54 | Aluminum | 4 |
You can also make such a design yourself, but it will require more time and effort. Yes, and experience in such matters must be present, otherwise the result of the work may not be as good as necessary.
When all the tools and the screen itself are prepared, you can proceed to the preparatory work. Clean your bathroom of unnecessary furnishings so that they do not act as an obstacle to comfortable work.
Choosing a model: important nuances
First, decide on a design that is suitable for your purposes. The most convenient options:
- Blind stationary model with a technical opening without a door. This design is usually preferred by craftsmen who do everything in the house themselves. It is simple, convenient for access to pipes, but does not involve arranging a mini-storage area under the bathroom.
- Removable stationary model without technical opening. If you choose a similar model, then try to choose a panel that can be easily removed if pipe repairs are necessary.
- Screen with hinged doors. If the bath is spacious, then no problems will arise at all. If the room area is small, carefully calculate the size of the doors so that they do not take up the entire bathroom.
- Model with sliding doors. This is a universal screen that will be appropriate in any bathroom.
When choosing, you need to pay attention to the type, dimensions, design of the structure, type and performance properties of the material
Before purchasing, measure the space that needs to be covered. Standard screens have a length of 1.5, 1.6 or 1.7 m, a width of 0.5, 0.55 or 0.6 m. There are also models of other sizes.
So, on sale you can find screens 1.05x0.5 or 1.9x0.5 m.
If you set a goal, you can find a model for any bathtub. The only difference is that among screens of non-standard sizes, models with unusual designs or with unique decor are less common.
If you are satisfied with a design with a smooth, monochromatic surface, then this option can be found in any size.
Sometimes doubts arise regarding the required width. This happens when the screen is selected before finishing work in the bathroom is completed.
Often the owner himself does not know the exact dimensions until the bathtub is installed and the tiles are laid on the floor.
The problem with selecting a model of the required width is also relevant in cases where the floors of the room have a slope. This can be solved using a screen on adjustable legs.
During installation, the legs are set to the desired height on each side.
Models with adjustable legs need to be selected according to length, because... The width can always be adjusted. Adjustable screens come in plain colors or with a variety of decorations
Features for a curved bathtub
Often, screens installed for bowls in the bathroom are rectangular in shape, since standard bathtubs are also rectangular. However, recently the plumbing fixtures on the domestic market are so diverse that a corner bathroom will no longer surprise anyone. For such models, the rectangular option is not suitable. A curved design is required. You can purchase it taking into account the parameters of your corner bowl or create it yourself by following our instructions.
Plastic is more suitable as the main material for this task than others, since it is difficult to bend plasterboard without extensive experience in such matters and securely fix it on a metal frame without damaging or spoiling it.
That's why experts recommend choosing plastic. This is a moisture-resistant material that bends easily and holds its shape perfectly. We also note that today plastic is sold in a variety of colors, which makes it possible to give the bathroom a special appeal and charm.
Universal screen for a semicircular bathtub
First you need to fix the plastic guides to the floor so that they perfectly follow the curve of the bathtub. Using “liquid nails”, wooden blocks are fixed to the top of the bowl, which serve to fasten the upper guide made of metal profiles. Then, using a knife, you should cut out the sashes of the current size and shape from sheets of plastic and fix them below and above the starting profiles. The lower joint is masked by using a floor plinth.
If you don’t want to cut out a plastic model yourself, just buy a ready-made structure and fix it under the bowl, as described above. The main thing is to clearly match the curve of the screen to the curve of the bathroom itself.
The best manufacturers of bath screens
As for manufacturers, there are many of them - both domestic and foreign.
Among Russian screen manufacturers, the trademarks “Techno”, “Vann Bock” (), “Remstroyplast”, “Siar”, Aquamate, Ecroline have proven themselves well. Their main advantage is versatility.
Russian manufacturers take into account the diversity of the sanitary products market and produce models that are suitable for installation under bathtubs of different brands.
They offer many design options, over 30 shades of colors. The materials are varied, including semi-soft panels made of non-woven material.
A big plus of domestic bath screens is their affordable price. They are noticeably cheaper than imported analogues of the same quality, but may be inferior in design and design.
Among foreign manufacturers we can highlight the Italian brands Jacuzzi, Albatros, the Finnish brand IDO and the German Kaldewei.
All of these companies produce high quality products, but often the screens are only suitable for specific bathtub models.
Sliding models of the “Professional” collection of the “Vann Bock” trademark are made in black and white colors. There are screens made of organic glass. They are equipped with beautiful chromed metal handles
Making and installing a screen yourself
Many of our compatriots are accustomed to doing everything in the house themselves. This can be considered a peculiar feature of the national mentality, since the desire to personally participate in home improvement is associated with masculinity.
Such craftsmen can mount the screen under the bathtub with their own hands.
The video describes in detail how you can make a blank screen with a technical niche. The panel material chosen is plasterboard, the finishing is tiles.
The range of screens for bathtubs is huge. It is very easy to get lost in such diversity. If you have difficulty selecting and installing the correct model, seek advice from an experienced professional.
This is much safer than learning from your own mistakes.
Installation stages of finished models
Ready-made bath screens are completed with frames, fittings and fasteners. All this must be indicated in the technical documentation for each specific model.
Installation instructions should also be included. Before purchasing, make sure everything you need is included.
If the dimensions are chosen correctly, then for installation you will need a minimum of tools: a tape measure, a building level and a screwdriver. Before starting work, it is recommended to fill the bath with water.
If the bathtub and screen are installed at the same time, this is not necessary.
Screens may vary in shape and design, but their installation scheme is always approximately the same:
- Measurements and markings. Before installing the frame, you need to once again measure the niche under the bathtub and mark the mounting locations for the frame. If the panels do not fit slightly due to the curvature of the walls or floor, they are trimmed with a grinder.
- Installation of the frame. The frame is mounted under the bathtub and secured in accordance with the instructions; the W-shaped guide profile for sliding models is also installed and aligned.
- Adjustment of legs. If the model has adjustable legs, they are unscrewed so as to achieve maximum fixation of the frame between the floor and the side of the bathtub. To ensure that the supports hold more firmly and the screen does not shake when water is poured into the bath, you can apply a little sealant under each leg and press it to the floor.
- Fastening the frame under the side of the bathtub. When the frame is firmly fixed, the space between the edge of the frame and the side of the bathtub is filled with foam. This will add additional rigidity to the structure.
- Installation of panels. Decorative panels are installed on the frame. If the doors are hinged, they are hung on hinges; sliding doors are inserted into the guide profile. Handles are screwed to the doors.
- Seam processing. It is advisable to treat the joints with sealant. This will help protect the niche under the bathtub from moisture.
Installing screens for acrylic bathtubs has its own characteristics. Most often, these baths are pre-equipped with screens that are suitable in shape and size. Models are usually made of plastic. The kit includes frame, panels, handles, brackets, dowels, screws.
The pictures show the entire process of installing a screen under an acrylic bathtub. Installing screens under bathtubs made of other materials has some differences. For example, in cast iron models you cannot drill holes at home, as there is a risk of splitting the cast iron
If the bathtub is not equipped with a screen, then you can make it yourself from a wooden block and ready-made plastic panels. The frame is attached to the side of the bath using liquid nails, the joints are additionally strengthened by cold welding.
To secure the bottom brackets, drill holes in the floor and install dowels. After installing and adjusting the frame to size, the screen panels are inserted into the guides.
A characteristic click is a sign that they are in place.
Installing decorative panels for a corner bath may pose some difficulties. The sequence of correct installation of a corner acrylic bathtub with a screen is shown in the video:
Installing a homemade screen
Homemade screens, subject to high-quality installation, are more reliable and durable, and therefore many craftsmen prefer this option. The most common method is to make a screen from plasterboard and a metal profile, followed by tiling. As in the previous case, all work on finishing the bathroom must be completed, the space under the bowl must be cleared of dust and construction debris, and communications must be connected.
For installation you will need:
- galvanized profile 75x40 mm and 60x27 mm;
Galvanized profile
- moisture-resistant drywall;
Drywall
- level and ruler;
- metal screws;
- dowel-nails;
- drill with a set of drills;
- metal scissors.
Since this screen will be stationary, you need to take care in advance about the presence of a technical hatch for inspecting communications under the bathroom. You can also make it yourself, but it is much easier to buy ready-made, because the cost of such products is very low. This will save you both effort and time on making the screen. In addition to the usual ones, on sale there are hatches for tiles, which, after cladding, do not stand out at all against the background of the screen.
Step 1. Determine the location of the outer frame post. To do this, step back 1 cm from the outer edge of the side towards the bathtub and put a mark. Next, add up the thickness of the drywall, guide profile, tiles and adhesive layer, measure the resulting value from the first mark and place another one.
Determine the location of the outer frame post
Marking
Step 2. Measure the exact distance from the floor to the side of the bathtub and cut the rack profile according to the measurements. A section of the profile is applied to the wall at the level of the second mark, set vertically and draw a line with a marker to the very bottom.
Step 3. The profile is laid on the floor and one hole with a diameter of 6 mm is drilled in its lower and upper parts. Place the stand against the wall again and mark the locations of the fasteners through the holes.
Profile attached to the floor
Step 4. At the marked points, drill the tile with a spear-shaped drill with a diameter of 6 mm, then insert the drill into the concrete, turn on the hammer drill mode and go deep into the wall to the length of the dowel.
Step 5. Place the profile in place, level it and fix it to the wall with dowel nails. On the other side of the bath they do the same.
Step 6. A horizontal guide is laid on the floor between the side posts. It is also attached to the floor using dowel-nails in increments of 30-40 cm.
Step 7. At the top of the rack they are fastened with a guide made of two 60x27 mm profiles. For reliability, the profiles on the sides are fixed with self-tapping screws with press washers every 40-50 cm. The guide should be 30-40 mm below the side of the bathtub.
Double profile
Profile fixed under the side
Step 8. Install intermediate posts. The lower edge of the racks is inserted into the groove of the guide, the upper edge is cut off on the sides with scissors, leaving only the central part. This ensures a tight fit of the profile to the guide. The distance between the posts is approximately 30 cm.
The photo shows how to cut the profile for the stand
Trimming excess with metal scissors
Attaching the intermediate post from below
Attaching the intermediate post from above
Racks
Step 9. From the side where the drain is located, additional sections of the profile are attached to the frame, forming a frame for the technical hatch.
Technical hatch
Step 10. The sheet of drywall is cut exactly to size, and if necessary, cutouts are made for water pipes. Apply the canvas to the frame and fix it with metal screws to each rack and both guides. The fastening pitch is about 15 cm.
Holes for pipes are cut in a sheet of drywall
Fixing drywall
Advice. To more securely fix the screen in the upper part, you can drill a couple of through holes in the drywall and blow a little foam through them. After hardening, the foam will firmly connect the screen to the wall of the bathtub, and the structure will not move.
Foam blowing
At this point, the main work is completed and all that remains is to complete the cladding. Before gluing the tiles, the drywall must be well primed and wait until the surface dries. Find out the plumbing drain by following the link.
The surface of the drywall must be primed before finishing.
Applying adhesive to tiles
Screen tiling
Screen made of clapboard
Lining is a strong and durable material, so it is often used to install a screen under a bathtub. It will provide maximum protection of communications and at the same time make the room more attractive in appearance.
In stores you can find two types of lining suitable for installation on a bathtub:
- plastic;
- wooden.
Lining made of natural wood must be pre-treated with a special water-repellent composition. If this is not done, then the wooden screen installed under the bathtub will quickly become unusable due to the humid climate of the room - or, even worse, it may cause the spread of mold or mildew.
Plastic lining is more convenient in this regard. It is not afraid of moisture, and in all respects it is in no way inferior to wood. The method of installing any lining is practically no different from the option with plastic panels. The starting frame must also be pre-made. It is possible to use wooden guides instead of metal ones, but it is not recommended - this material is not very suitable for the humid climate of the bathroom. Self-tapping screws are used to secure the sheets.
Types of screens by structure
Screens, as a rule, come in two standard lengths: 1.5 m and 1.7 m. The height can be 506, 550 or 560 mm. The height is adjustable using the legs.
The structure of the screens can be as follows:
- Conventional screens are plastic panels enclosed in a frame with certain dimensions;
- Universal screens - plastic panels are enclosed in an aluminum frame, which can be reduced in length. This allows you to install a screen where sewer pipes pass;
- Screens without end frames;
- End screens – cover the end part of the bathroom.
Such screens are not expensive. You can buy, or you can make a sliding screen under the bathtub with your own hands. As a frame (frame), you can use plastic guides, which are attached using liquid nails.
Plastic panels are inserted into these guides.
Advice!
To stiffen the screen, it is better to take three panels.
The screen is ready. All components can be purchased at the nearest construction supermarket or market.
Making a screen frame with your own hands
I offer another option for making a screen with your own hands:
Again, we make a frame for the screen from the ceiling profile. We attach the profile under the side of the bathtub using wooden blocks, which are installed vertically along the height of the bathtub. The bars need to be lined between the floor and the bathtub. Then we attach the profile to the wall using wooden blocks and screws. The frame is ready. Now you need to glue plastic guides into this profile. And insert the screen content into them. It can be plastic, plexiglass, gypsum panels, vinyl lining. In general, everything that is at hand. We take two panels and cut them to fit the screen. Insert into the guides.
Note!
To make opening the screen easier, you can glue handles to both panels.
My decision
Having summarized all the methods available to me for installing sliding systems, I came to the conclusion that they are not suitable for me either in terms of cost or functionality:
- In the case of plastic, strength is possible only with the smallest number of moving elements. If a blind type of screen is selected, then its installation is carried out using self-tapping screws, and the sliding structures are installed on runners similar to sliding wardrobe doors.
- Installing a screen on an acrylic MDF bathtub does not guarantee a long service life due to the specific operation of this room. You will have to treat it annually with special compounds with a water-repellent effect.
The custom sliding screen also did not please with its durability.
Advantages of plastic
Still, I was leaning towards a plastic design, since the properties of this material had the greatest price/quality ratio. The main ones are attractive appearance, excellent operation while maintaining original properties, and low cost.
There are two options for obtaining plastic panels - purchasing ready-made structures or making them yourself. In the second case, you will also have to make a frame and carry out preliminary moisture treatment, including sealing the joint between the panel and the floor.
It should not be forgotten that plastic often bends when used in large solid structures. To avoid this, you should strengthen the structure with an additional profile to add stability.
But I didn’t want to delve into how the screen is attached to the acrylic bathtub in order to protect it from damage, the repair of which was not part of my plans.
The cheapest solution available in plumbing stores. Actually, the quality is appropriate.
What is the solution, you ask?
From everything I saw on various construction and repair forums, I liked the idea of ordering a sliding screen from companies producing metal-plastic windows and sliding systems for balconies and loggias.
My solution is plastic sliding screen panels based on a PVC window profile.
There are a number of significant points in such an elegant solution:
- Initially, the window profile is designed for serious loads (wind resistance + precipitation). This means that the likelihood of damage due to careless handling is minimal;
- No complex preparatory operations are needed. Attaching the screen to an acrylic bathtub is very simple: 2 side posts made of profile, to which the frame is attached with self-tapping screws. Installation to the floor is also simple - the frame is secured with dowels, and at the point of contact with the edge of the bathtub it is coated with transparent silicone
The photo shows another option for arranging a screen from a window profile. But due to lack of space in the room, it did not suit me.
The solution to the problem has been chosen, what next?
It’s simple - I pick up a newspaper with advertisements, open the construction services section and call companies, asking about the timing and cost of manufacturing a window structure with plastic instead of glass. I was lucky, and literally the third company answered my question with a question: isn’t this design for a bathroom?
It turned out that similar products had already been ordered from them, and agreement was not a problem. I just took measurements with my own hands, expressed my wishes, went to the company, where I selected samples and paid for the work.
And a week later I was delivered the long-awaited structure, which I installed myself. A PVC window screen with external dimensions of 1800 mm by 645 mm cost me only 1700 rubles!
For comparison, the cost of ready-made solutions:
| Name | price, rub. |
| Screen with sliding sections ODA 1.70x0.5m | 1200 |
| Screen ultra light Metacam 1.80x0.5m | 1800 |
| Screen ultra light Metacam Premium Art 1.80x0.5m | 2600 |
| MDF screen with mortise handles 160x50 cm | 4600 |
| MDF screen Van Laft 150x55 cm | 4800 |
How to decorate
I won’t talk much about installing the screen - you’ve probably seen how windows are installed many times. The instructions are simple - accuracy and precision, that’s all the basic requirements.
I’ll tell you about how I decorated the screen, why I purchased vinyl film with a pattern. It was possible to order it according to the size, but no one promised quick execution of the order, and I wanted to finish the renovation work in the bathroom as quickly as possible.
An option for decorating sliding panels using film. Half an hour of work.
My choice as a resident of Sevastopol fell on the marine theme. Sand, shells, starfish - a familiar and pleasant installation for a sunny bathroom. It was enough to adjust the drawing to the size and paste it on, and the room was transformed.
Brickwork under tiles
The most reliable and durable base for a tile screen is considered to be brickwork. In addition to this material, you will need a cement mortar: M400 cement with sand in a ratio of 1 to 4.
When laying the first row, pull out a couple of bricks in the middle to later create a niche for feet here. Do not forget to leave an opening in which the inspection hatch will be mounted. After the masonry is completed and the mortar has dried, the partition must be leveled with plaster. This is to ensure that there are no unevenness or differences when installing the tiles. Between the top row of bricks and the bathtub you need to leave a gap of 2-3 cm, which will need to be subsequently filled with foam. You can start gluing the tiles to the screen after a few days, when the solution has completely dried and the partition has settled. If you start gluing the tiles right away, they may fall off after a while.