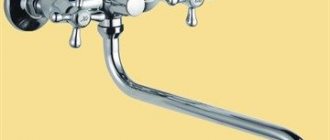
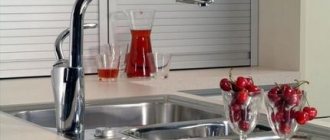
In the bathroom, two types of faucets are most often installed - on the edge of the bathtub and sink or on the wall. Floor models are installed less often.
The wall mounting option is the most convenient and common, as it allows you to hide communications and use one mixer for both the sink and the bathroom. Installation of this model is quite simple, so you can do the job yourself. The main thing is to follow the technology and reliably waterproof the connections.
Preparation for installation
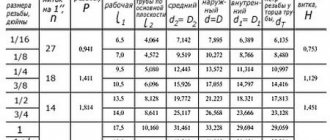
To install the mixer, you need to purchase a complete device. The set includes: body, spout, eccentrics, shower hose and watering can, fasteners, seals. The main thing you need to pay attention to when choosing a device is the distance between the centers of the fittings for connecting the water supply pipes. GOST 25809-96 provides a distance of 100 and 150 mm. Water pipes are not always routed perfectly, so eccentrics are included with the mixer; with their help, you can adjust the distance by 1-2 cm.
Adjusting the center distance using eccentrics.
The only installation tool you will need is an adjustable wrench. And to waterproof the connections you need FUM tape, plumbing flax or thread.
Purpose of the design
A water tap is a necessary part of the water supply network, which serves to regulate the flow of water. Different sections of the water supply require taps with different purposes.
Taps with a special spout - spout - allow you to obtain water for household needs.
In places where a home pipeline is connected to a centralized network and at pipeline nodes, simple shut-off valves are required, the main task of which is to turn the water supply on and off; such taps do not have a spout.
If the house has a hot water supply, then you need a mixer - a tap that mixes the two streams in the required proportion.
Selecting a thread sealant
Rewinding is only needed for eccentrics.
The quality of installation of the mixer depends on how reliably the threaded connections are waterproofed. For this purpose use:
- Plumbing linen.
- Plumbing thread.
- FUM tape.
Linen is a time-tested material. Despite the emergence of many other methods of waterproofing, it is still popular among professional plumbers and amateurs. The quality of the seal is at a high level. Correct linen winding does not move when screwed in and is not cut by thread. The external bushing with flax winding can be adjusted in space, but by no more than ¼ turn.
To wind the thread, flax is twisted into a braid. Then they are wound tightly in one layer, so as to hide the thread. The tail of the thread must be clamped with the first turn. The direction of the winding should be opposite to the direction in which the part will be screwed. Then the flax will remain in place when connecting the threaded pair.
The only disadvantage of flax is that it is not slippery enough. It is imperative to use special plumbing lubricants (pastes) with it. They prevent the fibers from being cut when screwed in and allow the flax to crumple tightly along the thread, making the connection as reliable as possible. In addition, it protects flax from destruction under the influence of moisture.
Plumbing thread is a less common material for waterproofing threaded pairs, as it is quite expensive and has specific uses. The thread is wound not along the thread, but crosswise. The tail is also clamped with the first turn. The material is reliable and easy to use, ideal for small jobs. Allows you to twist the connection in the opposite direction up to half a turn.
FUM tape is a popular material among amateurs and professionals, as it is very easy to use and fix on the thread. The tape is wound in several layers - from 3 to 10, depending on the diameter of the threaded pair, the density of the connection without winding and the thickness of the tape itself. The winding should be done from the base of the thread to the edge. The tape is wound along the thread, pulling slightly. The end must be cut, not torn off. FUM tape is quite smooth, so it does not require the use of additional lubricant.
Important! After twisting, the element with a winding made of FUM tape cannot be rotated in the opposite direction. To immediately install the eccentric correctly, you need to tighten it without winding and remember the number of turns and location in space.
Types of eyeliners
Unlike bathroom faucets, which are hung on the wall above the bowl, kitchen varieties are mounted on the sink. In this regard, water is supplied to the faucet body using various types of connections.
Most modern faucets are of the cartridge type; there are two closely spaced threaded recesses inside their body to connect hoses.
A standard mixing water connection has a fitting with an M10 external thread (diameter 10 mm at the crest of the thread) and one or two ring gaskets for screwing into the tap holes. Its internal diameter is standardized and approximately equal to 8 mm; for screwing to the body, the nipple design has a hexagon designed to use a 10 mm key.
On the other side of the hose there is an insert with a collar that holds a union nut with a standard 1/2 inch (15 mm) diameter. When screwed, the joint is sealed by a flat-shaped internal rubber gasket.
Rice. 5 Flexible braided liner - design and materials of manufacture
Flexible rubber braided
Liners made of thin-walled rubber with aluminum or stainless steel braiding are leaders in use in kitchen sinks. They are highly flexible and strong enough to last in hot and cold water supply systems for at least 5 years.
The inner tube of the hose can be made of ethylene propylene diene rubber (EPDM), cross-linked polyethylene (PEX).
The crimp sleeves, one of which acts as a fitting, and the second holds the union nut, are made of AISI 304 stainless steel (the sleeve for the nut can be made of brass). The American union nut is often made of chrome-plated brass.
Rice. 6 Design of multilayer liner
Polymer
Polymer eyeliners, the main material of which is polyvinyl chloride (PVC), are a rare guest on the domestic market. They are mainly used for the installation of imported mixing devices from the world's leading manufacturers, if they are included in the package.
Multilayer
These are high-strength hoses that, in addition to the inner tube and braid, have an outer sheath made of polyethylene, nylon or other plastic.
Thanks to this, they are able to withstand pressure in the network up to 20 bar, which is several times higher than the maximum pressure of cold water in household communications, equal to 6 bar.
It is clear that the service life of such eyeliners is much higher than usual; it can reach up to 15 years.
Rice. 7 Polymer and bellows hoses
Bellows
Flexible hoses made of corrugated stainless steel can withstand significant temperature loads and pressure in the system, reaching up to 20 bar (depending on the wall thickness). Bellows liners have a long service life, reaching up to 25 years.
Corrugated pipes do not change their cross-section when bent, they dampen vibrations and water hammer in the system well. Their disadvantages include insufficiently high flexibility, due to which the bending radius of the sleeve is larger than that of polymer products. In addition, the rigid shell of bellows pipelines often does not withstand constant bending and movement.
However, operation under the kitchen sink does not involve any movement of the corrugated pipe, so it can be used for a very long time.
Hard
Rigid eyeliners are not found on sale as often as their flexible counterparts. They are made from metals: stainless steel, brass, copper.
Some experts make them with their own hands, assembling them from pipe sections and fittings by soldering or welding.
Rice. 8 Examples of using stainless and copper hard liners
Related article:
Bellows water line: basic parameters, selection and connection . If you are reading about how to connect a kitchen faucet to a water supply, then you may be interested in learning about the types of corrugated water connections in a separate article.
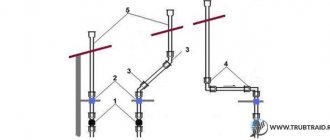
Installation of eccentrics
The best option is if the water sockets are installed at a distance equal to the center distance on the mixer. Experienced plumbers recommend thinking about this at the stage of installing water pipes and using ready-made water sockets; all that remains is to secure them level.
A ready-made water socket will help you install the mixer evenly.
If the distance between the pipes is less or more than required, you can center the eccentrics. It is better to do this before winding. At the same time, remember the number of turns and orientation in space; it is better to mark it with a marker. This operation can cause you to lose a level. If the mixer deviates slightly from level, it will not be very noticeable. But moderation is important here. The device must not be installed too crookedly.
Next, the eccentrics need to be wrapped with FUM tape, flax or thread and screwed in. The part should fit tightly with force. First, screw in the eccentric by hand, then with an adjustable wrench.
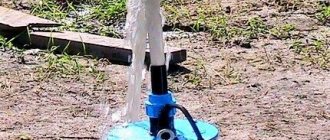
It is better to check the tightness of the connection immediately rather than after installing the mixer. To do this, you will need plugs with rubber gaskets. You need to screw them onto the eccentrics and open the tap; if water does not drip, then the connection is reliable and you can continue working.
Plugs for checking thread tightness.
Before installing the mixer itself, it is necessary to seal the gap between the tiles and the water sockets with silicone sealant. This is important so that water flowing down the wall does not get behind the tiles.
Areas that need to be sealed.
Eccentrics can have different lengths; it is best to choose them so that after installing the mixer, the eccentric thread is completely hidden under the body of the device. If necessary, the eccentric can be shortened with a grinder, but only on the side that is screwed into the pipeline.
For some types of eccentrics, a hex wrench may be useful; instead, you can use a bolt with a suitable head and a gas wrench.
Types of eccentrics.
How to dismantle old equipment?
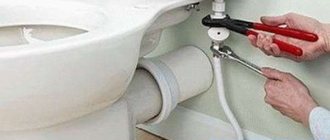
How to install a sink correctly? You should start by dismantling the old device. To do this, first unscrew the nut securing the mixer. After which the device is disconnected from the liner, carefully removed and put away. Then the drainage elements are dismantled. The nuts from the bottom of the sink are unscrewed. The siphon is disconnected from the drain outlet, from which the water is immediately removed. If it is necessary to replace the siphon, it is separated from the drain pipe. At the end of the work, it is recommended to tightly close the opening of the sewer pipe with a rag, stopper or other suitable object to prevent the appearance of an unpleasant odor. The sink is removed from the support.
Mixer installation instructions
First you need to screw in the reflectors. Then the mixer itself. In the holes of the device under the nut you need to put gaskets with a metal mesh (sometimes without it). The smooth side of the gasket should be on top, the raised side should be directed inside the mixer body. The mixer nuts are screwed evenly to the eccentrics, this is necessary to avoid distortion of the device. First, the nuts are tightened by hand, then with an adjustable wrench. To avoid scratching the body of the device, the key should be used through a cloth. You need to tighten it in the same way - step by step. First half a turn on one side, then half a turn on the other side. At the last turns it is important not to overtighten, otherwise the gasket inside the nuts may be cut, which will lead to leakage.
The fabric will protect the chrome coating from damage.
The next step is connecting the shower head hose. The end with the nut is screwed to the mixer. The second end - with a cone-shaped part - goes to the shower head. The connection must be sealed with rubber gaskets. This connection does not tighten too much.
Next you need to connect the spout. To do this, just tighten the nut that comes with the gander. The shower head and spout can be purchased separately if their appearance or size is not suitable.
Complete installation of a bathroom faucet takes no more than 20-30 minutes.
Preparatory work and dismantling
Before you begin repairing any plumbing fixtures, the faucet is no exception, you must turn off the cold and hot water supply. There is no need to shut off the riser in the entrance; it is enough to use the taps that regulate the water supply to the apartment. If there are valves that regulate the water supply only to the kitchen, you can limit yourself to them. Immediately after this, you need to open both mixer taps to balance the pressure.
After this, you can unscrew the supply hoses. The water accumulated in them is poured into a basin and allowed to drain completely. The time for the most difficult part comes - you need to unscrew the nuts holding the old device in place and dismantle it. At first glance this is simple, but in practice everything is far from so. Dismantling the mixer involves a number of difficulties:
- narrow space between the wall and the bowl;
- extremely uncomfortable position for working with a key;
- rust and plaque on the threads.
It is extremely inconvenient to work in tight spaces; you can’t get to the nuts with a wrench; if the threads are oxidized, it’s easy to “lick” the edges. This is a problem, but the mixer must be removed, therefore, you will have to look for a way out. In some cases, this will involve dismantling the sink. It can be easily removed, you just need to disconnect the sewer drain hose and walk around the perimeter with a sharp object, knife or screwdriver.
It is enough to remove and turn the sink over, and most of the inconvenience will go away by itself. You can slowly inspect the connection in the light and choose the optimal dismantling strategy.
Advice! It is easy to overcome rust and oxide layers using WD-40 or its analogues.
If everything is very bad, if the connection has “grown together,” you will have to take up the grinder. It is important to work with extreme caution to avoid damaging the thin metal.
Attaching the shower head holder
How to attach the holder to the wall depends on what material it is made of. If it is concrete, then dowels and screws will be required. Installation steps:
- Mark the location of the fasteners on the wall. A pencil or marker is suitable for this. The holder must be placed at the installation site at the required height and marks must be made through the holes for fasteners. To prevent the drill from sliding on the surface of the tile, you need to slightly damage the smooth coating of the tile using a self-tapping screw or a pobedit drill. It should be placed in the center of the mark and knocked down with a hammer.
- Drill holes and insert dowels into them.
- Secure the watering can holder with self-tapping screws.
Installing a holder in a plasterboard wall lined with tiles is more difficult - you need to know the location of the rack profile or mount it in advance, at the stage of constructing the partition. Only in this case is the secure fixation of the holder guaranteed. The first two stages of installation in drywall are similar to mounting on a concrete wall. You only need to drill the tiles and the adhesive layer. In this case, the holder is attached to metal screws with fine threads.
This completes the self-assembly and installation of the faucet in the bathroom. All that remains is to turn the water supply valve and use the device for its intended purpose. If all the work is done correctly, the tap will not leak for a long time.
Advice! If you need bathroom renovation specialists, there is a very convenient service for selecting specialists from PROFI.RU. Just fill out the order details, the experts will respond and you can choose who to collaborate with. Each specialist in the system has a rating, reviews and examples of work, which will help with the choice. Looks like a mini tender. Placing an application is FREE and does not oblige you to anything. Works in almost all cities of Russia.
If you are a master, follow this link, register in the system and be able to accept orders.
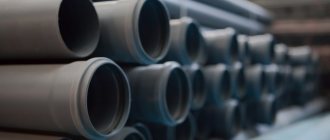
Water pipe materials
Currently, not only in individual houses, but also in communal apartments, owners are laying new or replacing outdated water supply lines with pipelines made from the following traditional or modern materials:
Steel. Laying steel water pipes in comparison with polymers is economically unprofitable, labor-intensive and time-consuming.
Since the main technology for joining them is electric arc welding, installation requires the services of a highly paid specialist with a welding machine. It is almost impossible to install a steel water supply system with your own hands without welding equipment and skills, so such pipes are obsolete and are practically not used in households.
An equally labor-intensive method of installing steel water pipes is the use of threaded connections. To join the fragments, you will need to cut threads on pipe sections with a special tool for connecting corner couplings, tees, and fittings.
To connect a mixer to a steel pipeline, an external thread is cut at the pipe ends that corresponds to the internal diameter of the flexible hose union nuts.
Rice. 2 Steel and copper water pipes
Copper. Copper pipes can be connected to each other by soldering, however, this technology also requires high professional skills and special equipment, and a wide range of consumables.
To connect a copper pipeline to a kitchen faucet, threaded fittings are soldered onto the pipe ends; less often, threads are cut.
Thin-walled pipes. Pipelines with thin walls, popular in the West, connected by press couplings, are not widely used in our country due to their high cost. In addition, they are used mainly for external installation in heating and hot water supply systems.
Thin-walled pipes are produced from stainless steel, copper, galvanized and steel alloyed with various additives; electric press tongs are used for installation of communications. To connect fittings and equipment, press fittings pressed into pipes are used.
Corrugated stainless steel. The main purpose of corrugated stainless steel pipes is for use in water-heated floor heating systems.
They can be used for laying water supply lines both on top and in grooves under plaster walls.
To connect to the fittings, the end of the corrugated stainless steel pipe is flared and a union nut with a flat sealing gasket is placed on it.
Rice. 3 Thin-walled and corrugated stainless steel pipes in water supply systems
Related article:
Connecting a bathtub to a sewer system - types of siphons, connection options, installation . If you are renovating your apartment or have decided to change not only the faucets in the kitchen, but also the drains in the bathroom, then it may be interesting to read an article about connecting the bathroom to the sewer.
Polypropylene (PP). Polypropylene is the leader in use among plastics in water supply and heating networks. Both conventional and fiberglass and aluminum reinforced pipes are widely used. The first type is used in cold water supply (CW) networks, products with reinforcement are used in hot water supply (DHW) and heating communications.
Polypropylene pipes are connected to metal threads by soldering adapters from plastic to metal.
Cross-linked and heat-resistant polyethylene (PEX). This type of pipeline is widely used in underfloor heating systems. For a number of reasons, it is not used in water supply networks, although a polyethylene pipeline can be laid under plaster walls.
To connect soft and elastic polyethylene pipes to fittings, a technology has been developed using fittings and tension couplings put on with a special tool.
Metal-plastic. Metal-plastic is pipes made of cross-linked polyethylene with an inner shell of aluminum. Metal-plastic is the second most widely used material after polypropylene in hot water supply and heating networks. To connect it, various types of fittings are inserted and pressed into the pipe shell.
Rice. 4 Water pipes made of polypropylene and metal-plastic
general description
Most fishermen use Cheburashkas of the classic round shape. This is due to the ease of their manufacture and good performance characteristics.
Round sinkers have maximum weight with a minimum body volume, which has a positive effect on casting distance and the behavior of the bait in strong current conditions. This geometry allows the bait to quickly reach the bottom and pass well through thickets of aquatic vegetation.
Another common form of “Cheburashka” sinker is called “filda”. This type is distinguished by its oblong shape and laterally flattened body, which greatly facilitates its passage through snags, grass thickets and other underwater obstacles.