Comfortable living in any home cannot be imagined without a comfortable bathroom. The main element in it is the toilet. However, if it does not function very well, inconvenience will occur. To ensure comfortable use of this plumbing device, it is necessary to assemble it correctly. The most difficult part is its tank. To a person who has not assembled it with his own hands, it may seem complicated. But that's not true. Let's look at how to install a tank on a toilet, assemble its mechanism and put it into operation.
Device and principle of operation
In the current level of competition, manufacturers are trying to offer the consumer maximum choice. This also applies to tanks. The differences will be in the material used, quality of implementation, and price. In order to understand how to adjust a toilet tank or install a new one, you first need to understand its structure.
The basic work will be the same for everyone. The differences will be in the design of the tank . They may be as follows:
- One operating mode – one button;
- Equipped with a dual-mode operation mechanism - two buttons.
A tank with one button means the entire volume of water is released at once. The presence of two buttons and 2 operating modes provides significant water savings. They allow you to drain only half the volume when draining. With this design there are two buttons. The large one will drain all the water, and the small one will drain partly.
The water discharge process can also be performed in different ways. Here, the methods of transmitting force to the valve that closes the drain hole differ.
The liquid flushing pattern may vary.
- Direct flush. The water from the tank drains directly into the toilet. Does not change direction of movement.
- Reverse flush. During flushing, the liquid changes direction of movement. It is more efficient, but noisier.
If you know the structure of the cistern, then you can easily figure out how to fix the toilet cistern. Let's now look at the principle of operation and structural elements . There are two phases of work:
- The process of collecting the required amount of water;
- Direct flush.
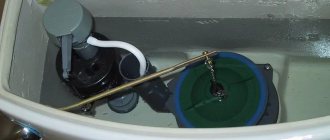
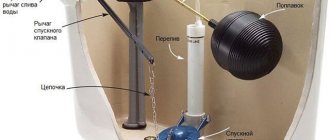
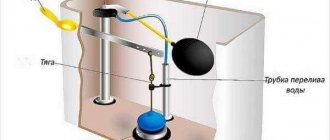
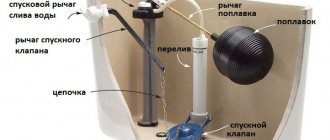
The design of the drain tank will be similar to a regular hydraulic valve. The main elements are the locking element, the float and the lever system. By pressing a button, we act on levers. They lift the lock that closes the drain hole. As a result, water is supplied to the toilet flush sink.
With the external design everything is simple. It has only 3 elements - a tank, a lid, and a drain button. The internal part is more complicated. It includes the following:
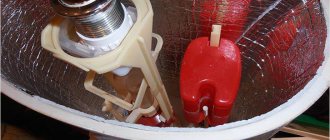
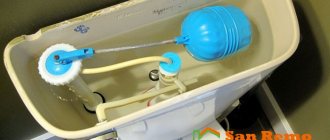
- Float valve. Controls the presence and level of water. It includes a float and its lever. The faucet body contains gaskets, a piston, and a union nut for connecting the water supply hose.
- Pear. Rubber element that covers the drain hole.
- Drain fittings. Transfers force from the button to the pear.
In order to understand how to assemble the tank, you need to understand the principle of operation of the drain mechanism. He's next. When the button is pressed, the lever system transmits movement to the rubber valve (bulb). It rises, freeing the passage of water down. The water level is falling. At the same time, the float lowers, opening the water supply tap. The container is filled to a certain level. The float is understood and the tap closes.
For smooth and smooth operation during installation, it is necessary to adjust and fix the float in a suitable position. Finding out the required position is easy.
- More water is supplied than required. Lower the float lower.
- A lack of water indicates the need to raise the float.
Basic elements of a drain tank
Structurally, all variations of flush cisterns are designed approximately the same. Each of them has three main mechanisms.
Drain or shut-off valves are designed to regulate the flow of water into the toilet bowl. Prevents liquid leakage from the reservoir.
During the process of filling the container, the water in it causes the shut-off valve to be pressed as tightly as possible against the drain hole, which prevents water from flowing into the bowl.
If there is constant water leakage, this may be due to a problem with the shut-off valve. Read more about the shut-off valves of the drain tank below.
The filling valve is combined with the water supply device. Designed to control the liquid level in the drain tank. Stops water supply as soon as it reaches a certain level.
To determine the amount of liquid in the tank, a float is used, connected by a rod to the filling valve.
Regardless of where the fill valve is located - the valve is on the side or below - the float is placed vertically in the tank. In older models - horizontally.
The overflow and drain mechanism is represented by fittings equipped with a start button or lever. Designed to prevent water from overflowing from the tank if the float valve breaks.
The overflow system is connected to the drain; when you press the start button, it is activated. Excess water is discharged to the sewer. An important element of the mechanism is the float valve. Water leaks from the tank are most often associated with its functioning.
The float valve was ubiquitous in older models. The float rises along with the water arriving in the container and closes the valve at a certain level
You need to understand that all common malfunctions of the drain tank are associated with these mechanisms. And to eliminate the problems, it is these elements that will have to be replaced or adjusted.
If chips or cracks appear on the surface of the tank, most likely it will have to be replaced. Despite manufacturers' statements, most modern adhesives used for repairs cannot cope with this task.
Image gallery
Photo from
Permanent damage to the toilet cistern
Repairing damage with universal glue
Application of epoxy resin
Using silicone sealant
Types of installation of waste cisterns
If you need to figure out how to fix a toilet tank, this is one event. If you are considering installing new equipment, then you should definitely know that there are 3 types of installation of drain tanks.
- Tank on the shelf . Behind the drain bowl there is a shelf designed for installation. It is on this that the container is mounted. The process of draining the liquid is carried out with a button.
- Located separately . It is located on top of the wall. Connected by a pipe. Draining occurs after exposure to the rope or chain.
- Built-in . The entire structure is called an installation. Combines with hanging sanitary ware. The toilet bowl is mounted on the wall surface. The drainage container is hidden behind it in the wall. The liquid is drained by a button located on the wall.
Types of flush cisterns
Flush cisterns are produced in the following types:
- Flush cistern installed on a toilet with side or top flush
- Flush cistern low, middle and high with side release
Flush cisterns are divided into three conditional groups according to the height of their location to the toilet:
- BN - low-mounted (shelf) flush cisterns - installed on toilets
- BS - mid-mounted (mounted) flush cisterns - mounted on the wall at a height of no more than 1 meter; through the supply pipe
- BV - high-mounted (mounted) flush cisterns - mounted on the wall through a supply pipe at a height of up to 2 meters
Low- and mid-flush cisterns are installed in residential and public toilets. High-mounted flush cisterns are installed mainly in public toilets.
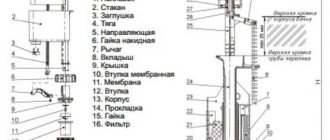
Low- and mid-mounted flush cisterns consist of the following parts:
- housing (1) with cover (2)
- drain valve (11)
- float valve (7)
- drain fittings
High-mounted flush cisterns consist of the following parts:
- housing with lid;
- a lever, which at one end is connected to a flexible siphon, and the other to a release handle (chain).
The following terms are used in the design of flush cisterns:
Filling fittings are a device that automatically fills a flush tank with a certain amount of water after it is emptied and seals it hermetically. Drain fittings are a device, manually or automatically activated, that ensures the drainage of water from the flush tank into the toilet (floor bowl). Flush tank is a non-pressure, water-accumulating reservoir that is filled automatically from the water supply network and emptied manually or automatically to ensure flushing of the toilet (floor bowl).
An overflow device is a device that diverts water from the flush tank into the toilet in the event of an emergency failure of the filling fittings. Useful volume is the amount of water supplied for flushing from a tank filled to a level 20 mm below the overflow level, with a single impact on the trigger handle for no more than 2 seconds. with the filling valve closed.
The outer diameter of the end of the flush pipe connected to the toilet is no more than 50 mm. The dimensions of the holes in the tank body for connecting the filling fittings to the water supply pipe provide the possibility of attaching pipes Dy=15 mm or less. The useful volume of the tanks is at least 6.0 liters.
Installation of the tank on a shelf
Now this is the most common layout option. Here the container is installed on the toilet itself through a special gasket.
The process should begin with the rubber cuff lining. This gasket must be selected as best as possible. Its service life depends on its quality. If you use low-quality rubber, after some time it will dry out and water will penetrate.
Please pay attention! The gasket must be made of elastic rubber or a similar material. If purchased separately, check that the shape is correct.
The surface of the shelf should not have any defects. After installation, the cuff should fit as tightly as possible into the opening of the shelf and the tank. In order to eliminate the possibility of leakage, it is advisable to treat the cuffs with a layer of sealant. This will also help keep the elastic in place during installation.
Then pay attention to the side openings of the tank. Check that they match correctly with those on the shelf. They are necessary for installing the mounting bolts. They must also have sealing gaskets.
The holes must be aligned and the bolts inserted. Using a suitable open-end wrench, carefully tighten them. Don't forget to install gaskets on both sides. If you miss installing them, you may end up with a split or leak.
After fixing the container, you can begin installing the drain fittings. The whole process is shown in the image. Detailed assembly instructions should also be included in the included instructions.
Please pay attention! The connected water supply hose must also have a rubber gasket. In its absence, leaks will occur.
After securing all elements of the drain mechanism, water can be supplied. Check the water supply process immediately. If in doubt, adjust the float valve.
Operating principle of toilet valves
In this post, I will tell you the principle of operation of the drain fittings for a toilet cistern and the principle of operation of the filler fittings with side and bottom supply.
I’ll break it all down into small pieces so that you can understand the principle of operation. And when we know the principle of operation, we will be able to clean or repair this device, if necessary.
I will show the principle of operation of drain and fill valves using several examples.
The fittings of this manufacturer are installed on toilets, “Santeri”, “Santek”, “Rosa”, “Dela”, “Keramin” and others. This flush or fill fitting will fit toilets from other manufacturers. The most important thing is that the diameter of the filler hole is 1/2 inch thread,
and the diameter of the drain hole was around 61-65 mm.
Water enters the toilet tank through the fill valve. I'll start with the fill valve. And I’ll start with the oldest fill valve, which was installed on old Soviet toilet tanks.
He is the oldest and is gradually fading into oblivion.
I will show the operating principle of this valve so that people who already use it can disassemble it and repair it, clean it first. So that they are not afraid to take it apart. Well, if it’s time to change, I recommend changing to this one.
More compact and cheaper. But that doesn't mean he's worse.
What does it consist of?
Polymer float, metal rocker arm,
rocker holder,
holder axle,
retaining nut, gasket,
body nut,
threaded part of the body, the body itself,
membrane,
the pusher on which the rocker arm holder presses
and filler tube.
The operating principle is simple. Water is gathering. The float floats up. This whole mechanism presses on the pusher.
The pusher presses on the membrane, and the membrane, in turn, blocks the passage of water.
You might wonder why such a long thread is needed? It's actually simple. The filter is hidden in this thread.
If water stops filling into the tank, here is what you can do in the case of this valve. First you need to make sure that water is already reaching the valve. Turn off the water. Remove the liner and check if the mesh filter is clogged. If it is not there, then you will have to remove the valve.
How to remove the valve, see the previous post.
Unscrew the housing nut.
Separate the valve.
There is a nozzle on the threaded part.
Clean it, for example, with a wire in the opposite direction of the water flow. Remove the membrane and wash it. Rinse all parts in water and reassemble everything in reverse order. If there is no serious damage, then the valve will continue to operate.
Please note that the valve cannot be assembled incorrectly.
At a certain place the valve has a joint between the parts. Align these grooves and tighten the connecting nut.
But this tube is needed so that water does not create too much noise when filling the tank.
In my case, the tank is made much larger than it actually is. It was made specifically to fully demonstrate the operation of the fittings and methods of height adjustment.
The second type is a filler valve with side water supply.
As I said earlier, this one
you can safely change to this one. It will also fit very well in an old Soviet toilet if anyone still has one.
What does it consist of? Float, pusher, nut, oblique washer. Needed in case the wall of the tank is slightly tilted inward.
This washer can be used to align the supply valve to a vertical position. Now you can see that it can be tilted one way or the other in any direction.
Elastic sealing cone-shaped gasket with an angle of 120°C,
two successive levers, a rod along which the float moves and the same rod is a flow extender,
the filter, the body itself, which consists of a threaded part with a nozzle and the main part of the body in which the rod and elastic membrane lie.
There is a sealing gasket between the two parts of the housing.
The operating principle is similar. The mechanism presses on the rod,
the rod presses on the membrane, the membrane shuts off the water.
The principle of cleaning this valve is similar to the first. The only difference is that in order to disassemble the valve into two parts, you do not need to unscrew the nut. Because she's not here.
You need to grab the two parts of the body and disassemble it. Unscrew it a little, turn it about 30° and it will come apart.
The next valve is with bottom water supply.
Components: float, rod, rocker arm,
float holder or float guide. Guide extension.
The holder extension is needed in case my tank is too deep and I want to increase the water level. In this case, I move the float as high as possible. To prevent it from falling off, I install an extension cord. Valve body two parts, threaded part with nozzle,
the second part with a pusher and a membrane,
nut, filter, cone gasket, swash plate. The principle of operation is similar to the first one with the only difference that it is not horizontal, but vertical.
The fourth type of fittings is with bottom water supply.
Float, pusher, float guide, which is part of the valve body, guide extension if you have a deep reservoir, rocker arm, rocker arm axle, nut holding both parts of the body,
pusher, elastic seal, membrane, return element, which redirects water down for silent filling of the tank,
the second part of the body with a metal thread inside which a check valve is installed. A check valve, in principle, is not needed, because when the valve is closed, water still does not flow out of it, but for some toilet manufacturers the issue is fundamental.
That's why it produces such valves.
The fifth type of valve is similar to the one I just talked about, with the only difference that there is no check valve inside it and it has a polymer thread rather than a metal one.
In terms of reliability, plastic threads are not inferior to metal threads in this case.
But for some manufacturers it is the metal thread that is important.
Perhaps it’s worth checking how long the valve with metal threads and with plastic threads holds. Not so much how long it holds, but to see what will burst faster, the valve will rupture, or the flexible line will come off the thread. I think we'll do it in the end. To clean this valve, you need to unscrew the nut and clean it with something like a wire in the opposite direction.
This is if there was no filter or if the filter was cleaned, but the water still does not fill. It is not necessary to remove the valve from the tank for this operation. Well, I think it’s time to check the valve for rupture now.
The first thing that came to hand was a valve with a metal thread.
I did not put it in a transparent tank, because... I was waiting for the valve to break and I was afraid of damaging the transparent tank. Installed a standard tank.
I poured water into it and waited for the valve to take off. But no, the flexible line did not break and the valve did not bang. The valve does not allow water to pass through in the closed position up to 20 bar.
Although the operating pressure is 2 times lower. After 20 bar, the valve began to let water through with a shock. Even after the breakdown, he holds his 12 bar. The second valve with polymer threads showed a similar result. I took them both apart to look at the damage. At autopsy, no damage was found. Put it back together. I checked. Both valves are in working order. Then I tied the float in the closed position with wire and repeated the test. The result is the same on one and the second valve.
After failure, the valve allows water to pass at a pressure exceeding 12 bar. And it lasts until 12. As a result of the fact that no damage was found inside during disassembly, I can assume that the pressure simply displaces the gasket. After reassembly, the valve is ready for operation again.
It turns out that excess pressure with this valve is not as scary as it seemed to me at first glance. And you don’t have to worry about the valve popping out of the tank during operation.
I was asked a question: what pressure can the valve close? The official operating pressure of these fill valves is 10 bar. But the water filling starts from 0.5 bar or from 0.1 bar for such valves.
Externally, the fill valves seem unremarkable, but they have some engineering solutions that allow these valves to operate as quietly as possible and close quickly when water is filled into the tank.
The quality of valve operation depends little on the degree of water contamination. They can be installed in a tank with different wall curvatures. Due to the cone-shaped gasket with an angle of 120°C with an inclined washer.
Despite the fact that they have tried to make the valves as efficient as possible, they remain affordable. To make sure, you can go to a search engine and look for IncoEr valves and make sure that they are not expensive.
Now I will talk about the principle of operation of the drain valve.
All drain valves have the same basic structure. The functionality of the valves varies depending on what additional elements are installed on these valves.
The advantage of this design is that if you want to put another valve, for example, the valve where the handle was, you want to put a button or you want to put a double flush button. Or you wanted to install fittings with double automatic drainage. In all these cases, you do not need to remove the reservoir and change the socket or seat.
Simply unscrew and install a new valve. I wrote how to do this in a previous post.
The valve base includes: seat, nut, gasket,
retractable overflow tube,
extremely elastic gasket holding the pad under the washer,
guide, valve body bottom, automatic drain float,
red case cover or blue elite version. Engineers tried to make the most simple and reliable design for long-lasting operation of the valve. One of the engineering solutions is the edge of the valve seat.
It has a sharp shape. The valve seal is made of elastic material that is resistant to aggressive media that may be contained in tap water.
One way or another, the water is not perfectly clean and over time the valve and the tank itself become covered with a brown coating.
So this connection, the seat and the valve, are designed in such a way that under water pressure when the tank is filled, the valve sags, and the gasket is pressed deeper, thus cleaning itself and the edge of the seat.
As a result, the most important sealing spot - the elastic seal and the sharp edge of the valve seat - always remain clean. However, if your drain valve starts leaking water, it doesn't necessarily have to be a valve, disassemble the valve and look at the condition of the rubber seal and the seat/seat where the gasket meets the plastic part. If necessary, clean in such a way as not to damage the socket or tear the elastic gasket.
According to the manufacturer, since the creation of this valve design, there has not been a single complaint from users about the leakage of the drain fittings.
Quite often people ask me the question: why does the water from the tank not drain well into the toilet? It seems that everything that can be adjusted has already been adjusted and the button is pressed all the way, and the filling of the tank is set to maximum, but when you flush the water, the water goes so-so? So, now I will tell you how this problem was solved by engineers.
The intensity of the water drainage flow in this fitting does not depend on whether the drain is small or full.
In both cases, when draining, the valve opens the drain hole completely. Water enters the hole from all sides. During descent, a vacuum is created in the tank, which prevents the free flow of water from the tank. Some manufacturers make holes in the rear of the tank to allow air to freely enter the tank, but not everyone is ready for this. In my case, there is not a single hole in the walls of the tank.
The manufacturer offers a button with a special breather, which ensures sufficient air penetration into the tank.
As a result of these two engineering solutions, an intensive drainage of close to two liters per second is ensured. Then, like other manufacturers, the drain rate can be 1.2 or 1.5 liters per second. Actually, this is the answer why in some toilets the water does not drain well, while in others it drains well. Everything very much depends on the design of the reinforcement.
I showed the base of the valve, and now I will show what is attached to them in order to get all the different things that I will talk about now. I'll start with the simplest release mechanism by lifting the handle up.
This mechanism is especially popular among older people. Due to the fact that pulling out the handle is easier than pressing a button with your finger.
This valve consists of a base plus: an overflow extension tube, a clamp for this tube,
holding base and nut for cover.
Adjustable threaded rod, handle, drive rod holder, rod nut,
valve lift drive rod.
Installation is very easy. I installed the valve body, tightened the nuts holding the handle, and connected the valve and the stem with a rod. The rod was passed through the hole. All is ready.
Adjustment.
There are no problems in adjusting the fittings to the height of the tank. I loosen the nut that holds the overflow tube extension in place.
I lift it up to adjust the height so that I can fill it with more water than is currently installed. Please note that when you install the overflow tube, do not install it too high. The overflow tube must be installed lower than the edges of the tank. Not edges, but additional holes. For example, there may be holes for air supply on the right or left and back. What I wrote about earlier. We adjusted it, lifted the overflow tube, and tightened the nut. After which the thrust that the valve itself pulls
It can be easily detached, moved to the side, raised to the desired height and snapped back into place. And the nut must be tightened so that it is close to the valve itself.
Thanks to this nut, you can stop the flow during draining. The function is called stop flow. When you pull the handle, the handle remains in the raised position until all the water has drained from the tank. In order to stop the flow, let’s say you decided that you didn’t need to drain all the water, the fact that it was already glass was enough for you. In this case, you need to hit the handle and thus the valve will turn off the water back.
The next valve is a push-button valve. Consists of a base. Added to it:
slightly different overflow tube without thread,
overflow extension tube,
spline nut,
two valve struts,
two clamps for adjusting valve risers, adjusting valve posts with numbers,
craving,
rocker,
pusher with thread and return spring,
white button, which is suitable for hidden installation in a tank with a 40 mm hole and for tanks with a 24 mm hole for the rod.
This button can be installed on a lid with valve diameters of 24 mm or 40 mm.
To adjust the drain fittings to the height of the tank, simply lift both red clamps up and raise or lower the adjusting posts so that the numbers match.
Move the lock to the down position. Close the lid. Tighten the button and you can use it. Please note that before raising or lowering the guides, you must release the rod. Because the rod will not allow you to adjust the height of the fittings to the desired position. To adjust the height of water rise with the filler valve, everything is very simple. I disconnect the float and move it higher or lower to increase or decrease the volume of water being filled.
Lately, designer tanks are increasingly appearing in which the outer part is slightly inclined towards the inside of the tank. In this case, reinforcement with a thick head may not be suitable for such tanks. In the case of this fitting, the head does not take up much space and thanks to these guides you can adjust the button to fit any tank.
If in this position it turns out that the amplitude is not enough, then you can take it and rotate it 90°. Then it moves more to one side. Please note that here you can fix the valve itself in 3 positions. The third valve from the set is similar to the previous one with the only difference that this valve already has a shiny button. Just like in the previous one, when you press the button, the full volume of the tank is emptied. Before moving on to the next valves, I will show you the principle of operation of this valve.
So, what causes the water to drain? Look, when I press the button, the water should drain as long as I hold it, because as soon as I release it, the water pressure presses on it and, by all logic, it should close. The valve should have pressed down and closed the hole.
But this doesn't happen. The question is why? And all because at the base of the valve there is a special float, which allows the user not to constantly hold the button until the tank is completely empty. Look, the water is gone. When she left, her space filled with air. When the water is filled back, then in this small float, which is located behind the red part of the body,
Air remains as a result of which the float is always at the top while the water is in the tank. And on the body of the overflow tube there are hooks for this float.
As soon as I press the button, the tube rises, hooks onto the float and the float holds the valve in the upper position until the water comes out completely and the float drops, releasing the valve behind it. This is such a simple design.
If I don’t need to drain the entire volume of the tank, but only need to drain part of the tank, in this case I will have to purchase another fitting, which is equipped with a different button. Double flush button. Look, when you press the small button, both are clamped, but not deeply.
In my case, the water drains while I hold the button. If I press the larger one, the button is pushed deeper and the water is completely drained. I can release the button as if it were a single button with the tank emptying completely. How it works? Remember, there is a float at the base, which is always at the top, and there are hooks on the overflow tube. When you press the small button, the valve rises, but does not reach the hooks and does not lock in the raised position. And if I press the big button, the valve rises higher, just the minimum distance that is necessary to catch the hook of the float. With fittings with a double flush button you can save your water.
The next type of valve is also a double flush valve, but here there are two automatic flushes in which the small flush is also adjustable. This means that by pressing the large button I can press it once and the water will drain completely from the tank until the valve closes. Same thing with the little one. I can press the little one once. Let it go and the water will flow until it reaches the level that I adjusted.
The components of such a valve are similar to the previous one. Adjustable drain body, rod rocker,
adjusting rod, float.
It works similarly to the previous float. Let's say I adjusted it to half the tank. Reaches a shallow float. The float rises up and sits in this position until I press the trigger.
As soon as I pressed the trigger, the float rocker hooks onto the second release on the overflow tube and stays there until the water drops below the first float. After the water drops below this float, the rocker will release the valve and the valve will fall into place and shut off the water if the small release was activated.
Adjusting this valve is very simple. You need to remove the button and the reservoir cap. Using this little red handle, twist the rod that raises the float higher or lower.
But if you have “diaye” fittings, then you need to twist the yellow rod.
Please note that, unlike other drain valves, the volume of the small drain in the fittings is not adjusted stepwise, but smoothly. All. The small drain has been adjusted; all that remains is to close the lid, tighten the button and you can use it.
The IncoEr campaign offers several types of buttons. The first simplest one is the white button. Universal for tanks with a hole of 24 or 40 mm.
The second has the same white border, but the button itself is shiny with a single flush.
And two double flush buttons that differ from each other. This is a metallic button
and a plated button.
Outwardly, at first glance, they are no different. Unless they are considered in more detail. The first is a metallized coating.
In short, metallized particles are attracted to the button and settle on it in the plasma environment of an anomalously glowing discharge in magnetic fields.
In fact, everything is much more complicated than I said. Next, the button is varnished. The advantage of this button is the price. But the disadvantage of such a coating is that if aggressive chemicals are used when cleaning and wiping the room, or fittings with such a button are installed in public places, then such a coating will wear out over time. But the second option is galvanic coating.
This is a completely different type of coating. In short, metal sticks to the product under the influence of electric current. First comes copper plating. Then a nickel plating bath and finally chrome plating. This coating no longer peels off either at home or in public places. The disadvantage of such coverage is the price. The price of this button is several times higher than the metallized one. Therefore, all Russian manufacturers of toilets in the economy segment are equipped with metallized buttons. These buttons differ in appearance. The metallized interior is not painted. Galvanic coating on all sides of the button. Even when I pick up the galvanic and metallized ones, one of them feels heavier and more pleasant to the touch. She's even a little cold. Almost metallic, and the other one is actually light.
It is clear that it is plastic. This one is completely plastic. If you don’t pick it up and try it by weight, you won’t be able to immediately tell whether it’s metal or plastic. This will be immediately clear. There is copper plating and more metal than on this button. This button is better. It is more durable, but at a price.
We have a separate type of fittings for the more expensive segment. This is a DUAL fitting.
Installed on products.
The fittings have a different body color. Galvanized buttons. A colorful manual, original packaging, a plastic wrench for tightening the nuts and a more expensive gasket between the tank and the toilet with a memory function.
In order to activate this function, before installing this gasket, bring your open palms to it and say: “Remember, you toilet gasket remembers its shape. You are round, have an even edge along the outer and inner edges at the top and bottom. You can hold water and maintain its shape at any time after installation and be ready for a new installation.” Although, even if you don’t say the mantra, it will still remember its form. After reading this post, you know the working principle of the drain and fill valve. You will be able to disassemble and repair these valves.
I really hope you found this post helpful.
Installation of a separate tank
First, you will need to measure the height of the tank mounting. Here it is necessary to relate the height of the fastening to the fastening of the lower end of the pipe. The pipe can be metal or plastic. Diameter – 32 mm. It connects to the cistern and toilet.
After marking the height, prepare the holes using a suitable power tool. If the kit does not include special fasteners, fix it using dowels. However, it will be more convenient to use special brackets. They can be purchased separately.
Before installation on the wall, assemble the drain fittings. The sequence is the same as in the previous case. Be sure to follow the factory instructions.
Next, fix the container at the required height. Using rubber seals, connect the pipe. You supply water to the tank. Check the system for leaks. If there are no leaks and the water level is correct, you can start using it.
Operating principle of dual-mode drain
Modern models of flush cisterns are equipped with a double flush button. This is a tribute to the fashion for saving water.
Such devices are designed for two operating modes:
- standard – for dumping the entire tank into the bowl (4 or 6 liters);
- half - to pour out only part of the volume (2 or 3 liters).
Such a system is more economical in terms of water consumption. But it is also more capricious in terms of setup and repair. The number of internal elements in it is increased, which means the risk of failure of this device increases.
A two-mode flush tank with a pair of buttons allows you to significantly save water, since in some cases only part of it is used, and not all of it
In addition to the dual option, the button for the dual-mode drain mechanism can be one. In this case, the volume of water released depends on the force of human pressure on the lever.
While the button is pressed, the drain hole remains open, and when released it returns up and at the same time the drain is blocked.
Installation instructions
On a toilet with a solid cast shelf, the tank is bolted to the toilet shelf. When installing a cistern mounted on a separate shelf, the rubber cuff located on the shelf nozzle is placed on the toilet flare and after that the shelf is attached to the toilet.
When installing and screwing the seat under the vertical bleed valve (11) to the tank, you must strictly ensure that the seat is not skewed and that the vertical bleed valve fits well into the seat. Otherwise, water will constantly flow into the toilet.
Make sure that the overflow nut (6) is tightened tightly during assembly. Otherwise, water will constantly leak into the toilet, and you can tighten the nut later only by disconnecting the tank from the toilet shelf. The float valve should completely shut off the flow of water into the tank when it reaches a level 20 mm below the overflow.
Table 1. Installation dimensions according to GOST 21485-94 for flush tanks
| p/p | Tank type | Installation height (from floor level to tank bottom), mm | Connecting filling fittings to the tank body |
| 1 | 2 | 3 | 4 |
| 1 | BU-flush cistern, directly installed on the toilet | determined by the height of the toilet | side or bottom |
| 2 | BN - low-level flush cistern | up to 650 | Same |
| 3 | BS - mid-flush cistern | from 650 to 900 | Same |
| 4 | BV-high flush cistern | from 900 to 1900 | lateral |
Cisterns of types BN, BS, BV assembled with a flush pipe, a tank of type BU assembled with a shelf must be sealed with the drain valve open and closed. The tank kit should include:
- tank body with lid
- filling kit
- drain fitting kit
- flexible liner (according to current technical documentation)
- flush pipe (for tanks types BN, BS and BV)
- shelf according to GOST-22847 (for BU type tanks)
- passport including technical description and installation and operating instructions
The completeness of the filling and drain fittings is indicated in the technical documentation for the specific type of fittings. The drain fittings for a BU type tank are equipped with a gasket installed between the tank and the shelf, and fittings for fastening it to the shelf.
Tank Troubleshooting
The tank may leak water due to a crack in it. The same applies to the cup. In this case, the question of how to repair the flush tank or bowl does not arise: the entire toilet is usually replaced. A small crack in the top of the ceramic pieces can be repaired. To prevent it from spreading further and increasing water seepage, it is drilled at the ends and treated along the entire length with sandpaper. The work is done carefully.
If the crack progresses during operation, the toilet should be replaced.
The surface is degreased and the gap is filled with epoxy resin. After hardening, the seam is sanded.
USEFUL INFORMATION: Cost of turnkey bath and toilet renovation: calculation of the cost of bathroom renovation
Problem #2: External leaks
If an external leak appears, you can repair the toilet yourself and not call a repairman. Typically, problems arise due to a loose seal between the toilet bowl and the tank, or if the seals under the screws are worn out.
In the first case, it is enough to remove the tank, check the gasket and, if it has become too hard or cracked, replace it.
It happens that the reason for such a leak is trivial - the gasket is installed incorrectly. Then it’s enough just to put it in place, or better yet, change it.
If a leak appears at the connecting screws, they need to be unscrewed and the rubber seals replaced. To do this, it is not even necessary to remove the tank itself.
When choosing new seals, it is better to give preference to cone-shaped ones rather than flat ones. They adhere much more tightly to surfaces.
When tightening the screws after replacing the seals, it is important to ensure an even distribution of forces to prevent distortions, otherwise a new leak may appear. To do this, tighten the screws little by little and one at a time.
Installation repair
Modern models are not only special designs, but also differ in the way they are installed. The installation of a toilet deserves special attention. Since the installation of a drain pan has its own characteristics, there are also requirements for repair work. Once the false walls are installed and finishing work is completed, it is almost impossible to get to the tank, so you should check everything carefully in advance.
If the installation tank stops working properly, this means:
- Leakage problems. To eliminate them, check the underwater hoses through the inspection hatches.
Types of toilet breakdowns
The design of the flushing tank, regardless of its type, consists of two parts, one of which is responsible for accumulating water, and the other for draining it. If any of them is faulty, the entire mechanism does not work properly. Remember that you must use the faucet to turn off the water supply before starting any repairs. This can be done manually.
Types of damage:
- Deformed float.
- Gaskets are worn and do not provide a proper seal (need to be replaced).
- The float fix is not strong enough.
- The rubber pads are worn out (replacement is required).
- The shut-off valve is faulty.
Adjustment
The drain is adjusted by adjusting the flow rate. To do this, you need to open the tank lid and move the float on the drain structure.
This slider can be lowered or raised, its position affects the filling mechanism and will affect the volume of water in the tank; the lower the bar is set, the less water will be collected and consumed.
Conclusion
The dual flush mode can reduce the amount of water consumption by exactly half, and an additional setting can lower this bar even lower. The main thing is to choose a model and make simple adjustments correctly.
Watch the video on the topic:
Any toilet tank, from the point of view of plumbing equipment, is a part of the toilet that is necessary to maintain a certain water level. The water accumulated in the device is used for flushing, and the built-in mechanism is responsible for dosing the flush and limiting the filling of the container.
A significant part of modern tanks are equipped with a push-button system. One or two buttons are often interchangeable without sacrificing performance. How does a toilet flush cistern with a button or two work?
Repairing an old tank
Common faults that can reduce the effectiveness of an old tank:
- It is no secret that each part also has a certain life expectancy and fastening rings. A decrease in the properties of these products leads to shutdown of the valve. Repairing an old model toilet at this stage consists only of replacing the clutch.
- Damage to the float can only be repaired by replacement.
- Damaged old style gasket. To replace it, simply remove the lid and remove the valve found on the older style toilet.
Installing an old toilet
1. If you have no installation experience and will be installing a direct flush toilet, you will need the following instructions. The plumbing must be connected in such a way that it is completely aligned with the screw flange built into the floor surface. Then the entire device should be turned sideways and the O-ring should be installed to ensure a tight connection. 2. When replacing an old toilet, be careful in any action, the new plumbing equipment must be installed exactly in the same place where the old one was. 3. When choosing plumbing installations, give preference to proven and reputable brands and stores. They will be able to provide a guarantee for the long life of the product. 4. Installation of a direct release toilet begins with applying the necessary markings to the floor surface. Then install the screw flange with the special handle. This flange has a round hole in the middle into which the sewer pipe is inserted. Then attach the toilet, spread it on the collar until it clicks.
What to do if water constantly flows into the toilet from the tank? In this case, the main cause of failure is damage to the siphon, or rather its membrane. The way out of this situation is to replace the membrane. What should I do if the lowering lever only works after a few presses? If the release lever does not operate properly, the siphon diaphragm is the cause of the problem and must be replaced.
Slowly filling the tank with water
The low rate of water flow into the toilet tank is due to clogged filters. We carry out repair work in the following order:
- by turning the tap handle, turn off the water flowing into the toilet from the cold water supply system;
- unscrew the flexible line from the water supply valve to the toilet, located either below or on the side, depending on the model of the plumbing product;
- in a clogged hose, remove the blockage and check the water pressure in the water supply by lowering the end of the flexible line into the toilet, if it is long enough;
- otherwise, we use a five-liter plastic bottle or canister to drain the water;
- turn on the tap, if the pressure is good, then we proceed to clean the water supply valve from accumulated debris;
- this part is not available in all toilet models, but if it is, it needs cleaning;
- pull the filter out of the valve using pliers, grabbing the part by the small pin;
- We wash the removed grill in the sink under running clean water to remove clogged solid particles and accumulated mucus;
- then we put the washed filter in place, turn on the water and see if the problem is resolved or not.
Repair of a toilet with side water supply
If there are any defects in this type of drain bowl, you will most often need to buy a new check valve and replace it.
Problems you can solve yourself:
- Low water pressure may indicate a blocked inlet filter. To clean, remove and wash the product. There may be a second reason - a dead diaphragm valve. We wrote above how to repair the drain tank in this case.
- Float. To eliminate the error, just adjust the position of the rod.
How to choose the right plumbing fixtures?
When choosing a toilet, pay attention to the following.
- Mounting method: monoblocks, compact and separate toilets. The choice is made taking into account the size of the room, design and labor intensity of servicing the tank.
- Accessories. Most parts that have low strength and reliability are made of plastic.
- The presence of positive reviews, a well-known manufacturer, a guarantee and a certificate.
