How to change a hose on a faucet
How to change a hose on a faucet
One of the thin places where the mixer is connected to the water supply wiring is the hose. After a long period of operation, it often begins to leak, which is due to the peculiarities of its design. The mixer itself works properly. In this case, it is enough to replace the old connection with a new high-quality product. It is important to first choose the right replacement.
What is flexible eyeliner?
First of all, although this option for supplying water is considered budgetary, it is quite reliable, provided the materials are chosen and the connection technology is followed.
In essence, a flexible hose is a rubber hose (the same as a watering hose) placed in a tight-fitting braid made of metal threads. Its main function is protection from external and internal mechanical damage. The latter may occur due to water hammer. In accordance with the standards, such connecting hoses must be designed for a pressure of at least 10 atm.
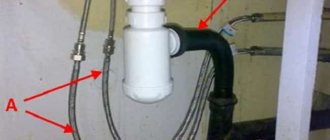
Below is an example of connecting a herringbone sink faucet with flexible hoses (A) used to supply cold and hot water.
Connection example using flexible hoses
Please note that the sink siphon is connected to the sewer with a corresponding flexible connection (B).
Touch basin mixer Swedbe Europe 6030 RUB 12,365
12748 RUR
Mixer Aquanet AF300-10С 4390 rub.
Mixer Aquanet AF320-10С 4990 rub.
Grohe single lever basin mixer 34294001 RUB 12,960
Grohe single lever basin mixer 23106DC1 RUR 28,320
Kinds
These water hoses come in the following types:
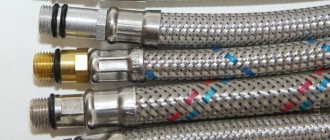
- for connecting the washbasin mixer, shower cabin and other equipment to hot water. To identify them, red threads are added to the braid (“A” in Fig. 2);
- for connection with cold water supply pipes. Their braid contains blue threads (“B”);
- universal, allow connection to any type of water supply. The braid of such pipes is marked red and blue (“C”).
Rice. 2. Hoses for cold and hot water, as well as universal ones
In addition, the eyeliner differs in the braid material, which is reflected in certain characteristics, namely:
- Aluminum reinforcement. Currently practically not used. The only advantage is the low price, which is not justified due to the short service life (3 years). In addition, such protection cannot withstand pressures of more than 5 atm. But the main drawback is instability to corrosion. In a damp room, the braid quickly deteriorates and the rubber hose quickly becomes unusable. Therefore, such pipes can be used when connecting kitchen equipment, for example, a mixer with a pull-out shower head (with a flexible hose), but they are not suitable for a bathroom or shower.
Aluminum braided eyeliner
- Stainless steel braid (the most common type). This design option significantly extends the service life (a high-quality product can be used for at least 10 years). These pipes can withstand a pressure of 10 atm and they have no restrictions on the type of premises, that is, installation is allowed even in a steam room.
Stainless steel braided eyeliner
- Nylon braiding significantly improves performance. They can be used for 15 years, and they are designed for pressures of up to 20 atm and a temperature of the technical environment of 110°C. True, the cost of these pipes is higher than that of the two previous types. In everyday life, it is not advisable to use eyeliner with nylon braid.
Nylon braided eyeliner
There are pipes where the hoses are made not of rubber, but of rubber; they are more reliable, but also much more expensive.
As additional protection, the braid can be coated with a silicone layer, according to manufacturers, this allows the service life to be extended to 20 years.
Bellows liner.
Despite the fact that it is also physically flexible, it is customary to distinguish this type of eyeliner as a separate type, due to significant design differences. The peculiarity of the bellows liner is that the shell is a metal corrugation, durable and flexible; in addition, there is no rubber hose inside.
Bellows liner
It is also worth noting that the fitting together with the terminal clamp are connected to the corrugated hose by welding, this significantly increases the reliability of the design. The service life of products of this type is at least 25 years, and they can be used to work with process environments heated to 250°C. As a rule, corrugation is made of stainless steel, but there are VIP category plumbing fixtures where brass and copper are used for this purpose.
This is a new type of liner, and at the moment there have been no appearances of non-original products on the market and the price is significantly higher than conventional connecting hoses.
Installing a faucet on a sink
Faucets that supplied hot and cold water separately are practically a thing of the past. They have been replaced by faucets that mix cold and hot water by changing the location of the device handle. In our article we will talk about the nuances of installing a faucet on a sink.
The mixer is an integral part of the plumbing system
Choosing the right mixer is the key to long-term and convenient use of the product.
When purchasing a mixer, you should pay attention to:
- the material from which it is made;
- sealing parts;
- spout type
High-quality faucets are made from bronze or brass. Their main difference is the yellow spout neck of the device. If the neck is gray, then the mixer is made of silumin. This material wears out quickly due to corrosion.
The sealing elements must be rubber. The mixer kit must include a split spout spacer ring. Some unscrupulous sellers claim that it does not need to be installed. But that's not true. The absence of a spacer ring will cause the mixer to become loose and leak.
As for the type of spout, it is better to purchase a faucet with a swivel spout for sinks. This is explained by the fact that models whose spout does not turn are inconvenient to use. Often the stream of water hits the edge of the sink or flows down its edge. And you won’t be able to wash your face properly when water is pouring into one point.
Mixer assembly
The main elements of a mixer for large sinks (made of stone or cast iron) are:
- 1-2 stud screws;
- a pressure plate having a rubber gasket;
- nuts
If the sink is made of light stainless steel (for example, a kitchen sink), then a plastic support plate is also used. It is attached between the shell body and between the rubber gasket of the pressure plate. The plastic plate will provide the mixer with a more rigid attachment to the sink.
Mixer assembly
The tightness of the lower nut is first checked. It must be done by hand along the entire thread. After tightening it, the faucet should not wobble on the sink. If this does not happen, then you were given a defective product.
A spacer ring is placed at the base of the spout. It should fit into the groove. The ring is quite tight and may not immediately fit into the hole. To install it in place, it should be squeezed with tweezers near the cut, and the lower part of the spout should be lifted slightly. The click of the ring means it is locked correctly.
Attaching flexible hoses to the mixer
A liner is provided to connect the mixer to the water pipe. It can be rigid (copper tubes with a diameter of 10 mm) or flexible (a metal braided hose equipped with a fitting or union nut). Flexible eyeliner is more convenient.
In order to properly connect the flexible hose to the mixer, you must adhere to the following requirements:
- It is forbidden to install the liner in a highly tensioned position.
- To prevent damage and leaks, the connecting elements are not tightened all the way.
- The eyeliner should be positioned in its natural state, without excessive twisting or kinking.
- The diameter of the liner should be 5-6 times less than the bending radius.
- To avoid premature corrosion, it is necessary to connect elements from compatible materials (for example, steel parts are joined to steel products, brass to brass or copper, etc.).
Despite the presence of rubber seals in the fitting, it is necessary to additionally use winding material, which will improve the sealing of the connections. The best solution would be to use sanitary flax and sealant.
Flexible connection to the mixer
Tightening the union nuts should not be accompanied by turning the connection. This process involves holding the crimp sleeve with pliers. When tightening the nuts, you should try to twist the line a little in the opposite direction.
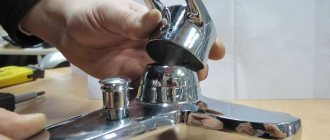
Installation of a faucet on a sink
After fixing the flexible hose, the mounting screws and bottom gasket are installed to seal the mixer. Having done this, you can begin installing the faucet on the sink. The pins are tightened. Depending on the type of construction, a screwdriver or wrench is used. In the second case, the nuts need to be locked.
Flexible hoses attached to the faucet are passed through holes in the sink. Sometimes you may encounter that two union nuts do not fit into the sink hole at the same time. It becomes impossible to lower two flexible hose tubes at once. In this case, one liner tube is passed into the sink, and the second is connected to the mixer through a hole.
The lower fastening of the mixer is being assembled. If the mixer is mounted on a sink with thin walls, then the design is complemented by a plastic support plate. The nuts located on the studs are tightened using an open-end wrench.
The nuts are tightened in such a way as to ensure reliable fastening of the mixer to the sink. It should not move when turning the spout or water handle. But you shouldn’t overdo it with tightening the nuts either, since you can damage the surface of the sink, tear off the nuts and threads on the studs, and also deform the pressure plate.
Connecting a flexible line to the water supply
A completely logical question immediately arises: how can a flexible hose be connected to a water pipe, when tightening the fitting can be accompanied by simultaneous unscrewing of the hose from the mixer body? To avoid this, a liner is used, one of the fittings of which has a left-hand thread (usually it is screwed into the mixer body).
Particular attention is paid to the thread of the water pipe. If it is threaded on a thin or metal pipe that will rust, then a stainless steel protective tip is installed between the union nut and the thread.
Connecting the faucet to the plumbing system
The best solution is when, when connecting the liner to the pipe, the internal thread has a minimum length of within 1.5 cm. The thread should be located on a thick wall, and the elements are screwed in using a winding for sealing.
Sealing rubber gaskets are exposed to hot water, which reduces their service life. But this is not the only reason for their premature wear. During installation, seals must not be turned flat or over-tightened.
The correct assembly of the gaskets is as follows. On one side, the threaded connection of the water pipe is held with an adjustable wrench, and on the other side, the crimp sleeve of the union nut is held with pliers. And only after this the union nut is tightened.
Useful tips
When installing a faucet on a sink, there are a number of nuances that will help carry out this work more efficiently and in a short time. In particular, it can be easier to work with flexible hoses if the hoses have different lengths. During installation work, the fittings on the two connections will not interfere with each other, and they will fit into the hole in the sink one after another.
If a new sink was purchased along with the faucet, then its fastening is carried out on a structure that has not yet been fixed. This will make it more convenient to install the mixer. The sink will be installed with the faucet already installed on it.
When replacing an old mixer, you may encounter the problem of its quality dismantling. Unscrewing the faucet can damage the water pipe, since settled salts often cause tight “sticking” of the connections. This problem is solved with the help of brake fluid, which is used to treat the joint. After 15-20 minutes the mixer will unscrew without problems.
Sometimes it happens when the faucet fastening element has an unsuccessful design. For example, when the fastener consists of a thin pressure plate and a pin, which is shifted to the outer part.
It will not be possible to securely fix such a fastening element, since it will only be properly attached to the sink at one point. As a result, a gap may form in the area opposite this point.
To prevent water seepage, such a gap is sealed with silicone sealant.
about installing the mixer:
Source: https://akvauyut.ru/ustanovka-smesitelya-na-rakovinu/
How to replace eyeliner
Ceramic sink BelBagno 13100-KL RUR 11,970
Ceramic sink Gid 9010E 71106 11050 RUR
Furniture sink Della Mia 85 RUB 3,750
Furniture sink FLORENTINA Prima 100 10.010.01000.001 8470 RUR
Countertop washbasin Jacob Delafon EVC11200 RUR 33,320
When replacement is necessary
It is necessary to change the hose if:
- The flexible line broke. Breakage of the braid or rupture of the internal hose will lead to the formation of a leak and, as a result, flooding of the room. The causes of leakage may be high pressure in the system or mechanical impact;
Loss of tightness of the connecting hose
- A flexible hose leak was detected at the junction with the mixer or water pipe. The causes of leakage may be natural wear of the gasket or a crack in the fitting (nut).
Leak at the hose connection
Flexible line replacement process
To install a flexible water supply to connect a mixer, you must:
- turn off the water supply. This can be done using a tap installed in the apartment;
- open the mixer taps to drain the remaining liquid;
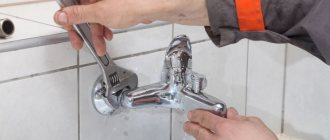
- Using an adjustable wrench or a wrench corresponding to the diameter of the union nut, unscrew the hose from the water pipe. If the connection point is rusty and the hose does not unscrew, then you should not make any effort to remove the liner. In this case, a solvent or WD 40 liquid is applied to the rust, which removes plaque;
Disconnecting a flexible hose from a water pipe
- remove the mixer. To do this, it is necessary to loosen the nuts securing the device;
Places for fixing the mixer to the plumbing equipment
Installing flexible hoses on the mixer
- Attach the supply hoses to the outlet of the water pipe.
- When you turn on the water for the first time, it is recommended to check the flexible hose and connection points for leaks. The average inspection time is 20 – 30 minutes.
The process of replacing connecting hoses is presented in the video.
Replacing flexible hoses yourself is not a problem. The main thing is to choose the right hose that meets all the parameters.
Installation of connecting hoses
Having dealt with the types, let us consider for general reference the typical design of a flexible liner.
Rice. 7. Design of flexible pipes for mixers
The product consists of the following main elements:
- Sealing gaskets to ensure the tightness of the connection and prevent leakage “A”.
- Brass or steel nipple "B".
- Rubber or caoutchouc hose “C”.
- Aluminum, stainless steel or nylon “D” protective braid.
- Press the sleeve (clamping the nipple) “E”.
- Connecting fitting (steel or brass) “F”.
- Union nut "G".
The liner is manufactured with three types of connections: nut-nut, fitting-nut and fitting-fitting. Standard sizes for the nut are 1/2“, for the fitting - M10. Sometimes you may come across a non-standard connection, for example an M8 fitting or a 3/8“ nut. In this case, you will need an appropriate adapter for a kitchen faucet or other equipment.
The length of flexible hoses can be from 500 to 2000 mm; we recommend choosing the appropriate size so as not to install extension connections.
Note that the fitting can be short or long. The latter is more convenient to connect the mixer.
Eyeliner with short and long fittings
