Greetings, friends.
In this article we will learn how to repair a crane axle box with your own hands.
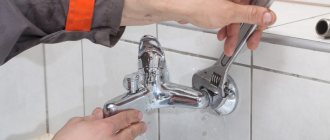
The main reason for the failure of a kitchen faucet is the breakdown of shut-off valves. Modern cranes are a reliable and durable mechanism, but constant exposure to moisture often leads to failure of the crane and axlebox.
There are three solutions to this problem:
- Completely replacing the faucet is a radical and expensive solution, since a good faucet costs a lot of money. It justifies itself only in case of violation of the integrity of the housing, or replacement of low-quality plumbing fixtures made of silumin. There are times when people simply want to change the design of the kitchen or bathroom - here they also cannot do without replacing the bathroom.
- Replacing the valve axle box is the most common option. Unscrew the broken valve axlebox, buy a new one, and install it in place.
- Repairing the axle box crane - all of the above methods require financial costs, so it makes sense to try to repair the axle box crane.
IT IS IMPORTANT TO KNOW!
Crane axleboxes vary in size and threaded connection. Therefore, my advice to you is to buy a new axle box, take the old one with you. Save time and nerves.
The main reason for leakage of ceramic faucet axle boxes
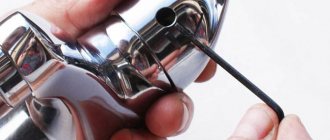
The most common cause of leakage of ceramic tap-boxes of water mixers and the need to repair them is wear of the plastic pressure washer (marked with an arrow in the image), which can be made of polypropylene, caprolon or fluoroplastic.
Pressure washers made of polypropylene and caprolon, unlike fluoroplastic ones, are not sufficiently resistant to elevated temperatures, so more often due to their wear they fail and require repair. The wear of the plastic washers of these products is also increased by the fact that, usually, the hot water tap is used more often.
When the pressure washer wears out significantly or is completely destroyed during operation of the water tap, a gap appears between the ceramic plates and the faucet begins to let water through in the closed position.
The thickness of the new plastic washer from the photo is 1 mm, the inner diameter is 10 mm, the outer diameter is 12 mm. You can buy one if you find the same one, or make it yourself, but there is a method that will significantly increase the life of a ceramic faucet axlebox until the next repair, which is to make a pressure washer from a piece of copper wire.
Leak at the connection point of the shower hose and shower head
Even during the operation of the mixer, leaks often form at the connection points of the flexible hose to the mixer and shower head. Gaskets are installed in these places, which become deformed and fall in over time. If a leak occurs, disconnect the hose and replace the gaskets.
The hose is connected to the mixer using a hex nut. You need to unscrew it and change the gasket.
To replace the gasket where the shower hose connects to the faucet, you will need a wrench.
The connection between the hose and the shower head is made using a conical relief nut, which can be unscrewed without a tool and even a girl can do it. There is a gasket on the pressure hose that needs to be replaced with a new one.
Note! The hex and flare nuts for connecting the shower hose are very thin, so you should not use much force when tightening them, as they may burst.
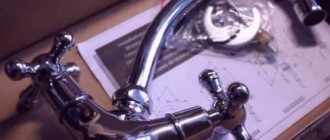
Repair of ceramic faucet axle box (leakage repair)
Repairing a water faucet with ceramic plates consists of replacing a worn plastic washer:
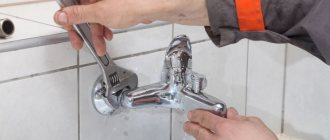
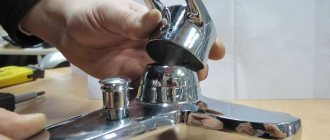
- For a crane axle box that requires repair, remove the rod clamp.
- Take the valve axle in your left hand, clenched into a loose fist, with the rod on the side of the thumb, and squeeze the body of the product with a ring of the index and thumb.
- Press the valve stem with sufficient force with your thumb or the palm of your right hand, and the entire contents will fall out of the body into your loosely clenched left palm.
- Remove the remnants of the pressure washer if it is really worn out and the reason for the need for repair is in it (this will be immediately visible by its thickness and appearance, and sometimes only scraps of the washer remain).
- Select a copper wire with a diameter of about 1 mm, wrap a ring of wire around the stem of the valve axlebox in the place where the plastic washer was. If necessary, grind it on both sides with fine sandpaper if the assembled ceramic tap-box is difficult to rotate (you need to check by installing the product on the mixer).
- In some faucet axle boxes, a homemade pressure washer made of wire with a diameter of 1 mm can move so far that the rod will slip through it and the tightness will be broken. In this case, you will have to connect the ends of the copper ring by soldering, then grind off the excess solder, or take a wire of a larger diameter and flatten a washer from it to 1 mm. Such a ring will first have to be installed in the body of the valve axle box, and only then the rod must be inserted.
- Before final assembly and installation of the repaired faucet axlebox into the mixer, apply a little waterproof lubricant to the copper ring.
Pressure washers
From left to right: worn plastic washer; ring made of copper wire Ø 1.2 mm; wire ring Ø 1.8 mm.
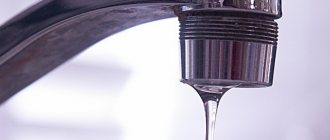
What to do if the new faucet is dripping?
Sometimes even a faucet that was purchased and installed relatively recently begins to leak. In such situations, the reason, as a rule, is simple to the point of banality - the device has a manufacturing defect, which is difficult to identify during external inspection.
Important information! Cracks and chips inside the structure can hardly be eliminated on your own - even an experienced plumber will not be able to do this. That is why the only correct solution is to return the faucet to the store and ask the seller to replace the defective model.
New faucet
Finally, we note that the faucet in the kitchen or bathroom can start dripping at any moment. To solve this kind of problem, you can go one of two possible ways - to involve a qualified specialist in the work or to try to do everything yourself. However, if you know the exact cause of the leak and how to properly eliminate it, then no difficulties should arise.
Note! To prevent a leak from appearing at the most inopportune moment, regularly carry out preventive measures - change gaskets in a timely manner, check the condition of locking mechanisms. All this will significantly extend the life of the crane!
Making a plastic washer
Sometimes a washer made of copper wire moves apart immediately, but a soldered one only holds when the valve axle is not tightened. And then, when the tap is opened, the loosely tightened faucet box may begin to turn away.
In this case, there is no way to do without a plastic washer. To make it you will need durable material. Polyethylene lids for glass jars are not suitable - they are too soft, the side of the stem will fall into such a washer after heating.
Polypropylene washers can be made from thin-walled plastic containers. At the bottom of such containers there is a triangular icon and under it the letters “PP”, which indicate the material of manufacture - polypropylene. The thickness of the plastic on the lids of round containers in which marinated meat for barbecue is sold is 0.6 mm.
Suitable for making washers are plastic water bottles (0.3 mm thick), detergents (shampoos, gels, conditioners), the material of which is polyethylene terephthalate (PET). Naturally, you will need 2 or 3 of these washers (from plastic containers and bottles) to repair one ceramic faucet axle.
We place the selected piece of plastic (or several pieces folded together) between two wooden blocks and drill several holes with a ∅ 10 mm drill (or another diameter, depending on the diameter of your rod where the washer is installed). The edges turn out quite smooth. It is better not to trim small thickenings along the inner edges.
Next, use scissors to cut out blanks with one hole from a piece of plastic and cut off the excess from the outside to a width of 2 mm. The outer edges of the cut washers can be easily adjusted to size using a fine-grained block or sandpaper.
We solve the problem with different types of mixers
Water is dripping from the tap - what to do?
The procedure will depend on what kind of mixer you are dealing with. If there is only one handle sticking out above the spout, which regulates both temperature and pressure, then you have a single-lever mixer installed.
Based on the type of working unit, such devices are combined into two groups:
- ball;
- cartridge
If you have to rotate two knobs to adjust the pressure and temperature, then your mixer is of the two-valve type. They, in turn, are divided into two types:
- With a screw rod (to open the water, the thumb must be turned several times).
- With ceramic elements (the wing rotates only 90 or 180 degrees, which is why such devices are called semi-rotary).
We will begin our educational program with the taps of the oldest design - with a screw stem.
It would seem that what could be difficult about changing the gasket in a mixer? However, nowadays there are many types of cranes and not everyone knows how to properly disassemble it and make simple repairs. You will learn how to change the gasket in the faucet yourself in the article.
Which faucet manufacturers are considered the best, read here.
Cartridges in faucets sometimes become unusable, but their design is quite simple and repairing the faucet is not difficult. Here https://aquacomm.ru/cancliz/mnogokvartirnyie-doma/santehnika/kak-pomenyat-kartridzh-v-smesitele.html we will look at the main signs and causes of failure and methods for replacing the cartridge.
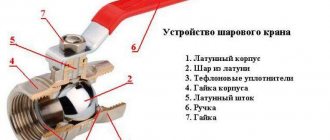
Crane axle box device with ceramic plates
The ceramic faucet for a water mixer consists of the following components:
- The valve stem with a plastic pressure washer and sealing rings.
- Ceramic crane axle housing.
- Sealing gasket (pressed against the valve seat).
- Fixed ceramic plate.
- Movable ceramic plate.
- Rod lock.
As you can see in the image, in a ceramic faucet, only the plates that shut off and open the water are actually ceramic.
If any components of the ceramic faucet are coated with salts from hard tap water, including the sealing gasket (number 3 in the photo), place them in a citric acid solution for a while to remove the deposits.
Replacing the cartridge in the mixer
We'll look at how to disassemble a single-lever mixer with a cartridge below. Don’t be surprised by the unusual appearance of the mixer; the operating principle of most of them is the same. The main difference is the design of the rod.
We perform all actions counterclockwise.
Unscrew the decorative cap.
Loosen the locking screw and unscrew the mixer handle.
Using an adjustable wrench, unscrew the nut securing the cartridge and remove the latter.
Some tips from practice
- Do not close the ceramic valve axle with rotation limiters by a quarter or half turn with great force, and, moreover, do not try, using such efforts, to loosen the handwheel 1 (handle) of the valve on the splines during dismantling. The result can be disastrous: due to damage to the limiters, a completely closed repaired faucet will allow water to flow through, and if the handwheel is slightly turned towards opening, the flow will stop completely. You will have to either partially open the valve after each closing to eliminate any leakage, or replace the valve axle.
- If threaded connections cannot be unscrewed or handwheels cannot be removed from the stems of faucet axle boxes requiring repair, place cotton wool or a cloth moistened with 70% vinegar essence2 on the problem areas for about an hour3, sometimes adding essence drop by drop. Vinegar penetrates into hard-to-reach places and softens rust and deposits from tap water. The procedure may need to be repeated. Protect the decorative coating of the faucet from contact with vinegar essence, as it may not be resistant to acids.
- Dip the handwheels and decorative trims, covered with a coating of salts from hard water, into a solution of citric acid (2 heaped teaspoons per glass of water), and they will return to their original state. If you have an expensive faucet and you are not sure that citric acid will not harm it, try it first in an inconspicuous place. Observe how the reaction proceeds: hissing, the release of bubbles. If the process stops and the plaque is not completely cleared, replace the solution with a new one or add more citric acid to the same solution4.
1So I ruined the faucet axle box on the kitchen mixer, the handwheels of which are very difficult to remove from the stems; when installed, they snap back into place only with the help of a fixing screw. Exactly the same handwheels in the bathroom can be removed and installed on the slots without difficulty.
2I usually use undiluted 70% vinegar essence, less often slightly diluted with water. Vinegar works where WD-40 fails.
3It is impossible to accurately predict the time a threaded connection will be ready for unscrewing; it can range from half an hour to several hours, depending on the initial state.
4I add citric acid to the same solution, having first removed the parts to be cleaned from it, and after the added acid has dissolved, I immerse them back. When cleaning the rods and bodies of repaired ceramic valve axle boxes from plaque, I do not remove the rubber sealing rings from them.
Leaks where the faucet connects to the water supply
There are situations when the tap begins to leak at the points of connection to the water supply. The procedure for eliminating a leak depends on the installation location and the method of connecting the mixer.
Leakage at the junction of supply pipes
The cause of leakage at the connection point of the wall-mounted mixer at the connection points to the pipes coming out of the wall is the sealing or misalignment of the gasket. To eliminate this malfunction, you need to unscrew the fixing nuts, disconnect the mixer and replace the gaskets with new ones.
Leakage of supply flexible hoses
Faucets installed on the side of a bathtub or sink are connected to the water supply using flexible hoses. The formation of a leak at the connection point is the result of wear or chafing of the seals placed on the thinned end of the hose.
The O-rings on the thin end of the hose can wear out, causing a leak.
To replace the rings, you need to remove the faucet from the sink, since doing this from the bottom of the plumbing fixture is difficult and sometimes impossible. Having removed the mixer, unscrew the hoses one by one with a wrench, replace the rubber rings on them, after which all the elements are installed in place.
To replace the O-rings on the flexible hose, you need to dismantle the mixer.
If the water pressure drops
There are situations when the water pressure in one of the taps decreases significantly. The reason for this problem is an aerator clogged with scale and other debris - a mesh filter screwed into the end of the gander. To fix this problem, just unscrew the aerator, rinse with water and clean the filter mesh with a needle or thin awl, and then screw it into place.
A clogged strainer is the cause of reduced water pressure.
The considered malfunctions and methods for eliminating various leaks will allow you to repair faucets yourself without calling a plumber. As practice shows, many types of leaks and breakdowns can be avoided if you take good care of your plumbing. The quality of mixers and the degree of mechanical purification of water also play an important role, so installing coarse and fine filters is sometimes simply necessary.
Repair of two-valve mixer
Let's figure out how to fix a two-valve faucet so it doesn't drip.
So, if when using the mixer you actively turn the wing, like a steering wheel, it means that there is a rod installed inside it with a thread and a gasket at the end.
When the stem is screwed in, the gasket moves towards the seat and blocks the flow of water; when unscrewed, the opposite happens.
Before taking any action, you need to find out which faucet is leaking. Many people lose sight of this point and quickly dismantle the “cold” faucet, since the water dripping from the faucet seems to be cold. After fiddling around for a couple of hours and sending a perfectly working gasket on an undeserved vacation, they run into an unexpected result: water is still dripping. It can’t be any other way, because a “hot” faucet is leaking, and the water is dripping cold because it has time to cool down in the pipes.
To prevent such an oversight, we do this: close the root valve on the cold water pipe and see what happens. If the water stops dripping, then we will disassemble the “cold” tap; if it does leak, then most likely the “hot” valve is to blame. Just first you need to close both root valves.
Before “disassembling”, open both taps on the mixer and see if water flows. After all, the root valves may also turn out to be leaky, then an unpleasant surprise awaits you after disassembling the faucet.
The crane axlebox is very easy to disassemble:
- Having fully opened the tap, you need to remove the plastic cap in the center of the wing (pry it off with a knife or screwdriver) and unscrew the screw hidden under it.
- After removing the wing, unscrew the nut with an adjustable wrench and remove the valve axle.
Further actions will depend on the malfunction.
How is the gasket replaced?
A worn gasket (shattered or torn edges give it away) can simply be pryed off with a knife, after which it can be easily removed.
In its place you will need to install another one - purchased or homemade.
If you decide to make your own gasket, use small scissors to chamfer the bottom edge of the gasket.
This measure will prevent vibrations when opening and closing the tap.
Grinding the seat
If you notice that the gaskets are wearing out too quickly, your saddle may have scratches. Grinding its surface is carried out using a special tool - a roller cutter, which must be secured in the drill chuck. After removing the scratches, you can install a new gasket and assemble the valve axle.
Blitz tips
Tip 1. If the thread is soured (sticky), the latter can be treated with a chemical, for example, WD-40. After 15–30 minutes, in most cases the axle box can be unscrewed.
Tip 2. If there is no waterproof lubricant, it can be replaced with graphite.
Tip 3. Most often, faucet axles fail on cheap faucets, about the quality of which you can say: “it’s not cheap, but cheap.”
Tip 4. You should not neglect installing a mechanical cleaning filter, especially if water meters are installed, this will save nerves, time and money in the future.
DIY faucet repair
Hygienic shower for toilet - types and installation methods
How to prepare for repairs
Before you repair a faucet, you should prepare for the work so that you don’t get distracted by little things later. The preparation process is as follows:
- If the packaging from the faucet installed in the shower stall or in the kitchen has been preserved, then it should be found. Firstly, in this box, most likely, you will find instructions that will describe in detail how to repair the faucet in the bathtub. Secondly, there may also be a repair kit, which many manufacturers supply with their products. Using the parts from the repair kit, you can easily fix a dripping faucet.
- To avoid repairs to the water supply, you first need to turn off the water supply by closing the valve. You need to turn off the supply of both hot and cold water.
- All that remains is to prepare a basin or other low container to collect leaking water and dry cloths to wipe away splashes that will certainly form during the repair process.
Advice! Those who do not know how to repair a crane axle box and are faced with the need for repairs for the first time should first visually see how the work goes on video.