It is not always possible to call a specialist, so it makes sense to find out how to disassemble a ball mixer in the kitchen or bathroom on your own, how to properly repair it, and also return it to its former performance. It won’t be as difficult to do this as it might seem, so it makes sense to try even for those who have never been interested or involved in such things before.
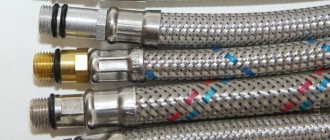
Tools and materials for replacement
- adjustable (gas, pipe) wrench;
- fluoroplastic sealant (FUM) in the form of a tape or in liquid form;
- flax - as an alternative to FUM;
- sealing paste – optional;
- hand die and die - for cutting threads (if needed).
The set of tools and materials is minimal, which indirectly confirms the ease of replacement. Although the relatively simple installation is still preceded by careful consideration of everyday nuances.
Problems during operation
Even high-quality plumbing fixtures fail over time. The service life of the faucet depends on the material from which it is made, the quality of the tap water and the intensity of use. The most common problems that arise when using single-lever models are:
- Cracks on the device body. They arise due to poor quality material and installation errors.
- Aerator clogged. The cause of this malfunction is the poor quality of tap water.
- Wear of rubber gaskets. Seals are consumables; they wear out over time due to the high intensity of use of the device.
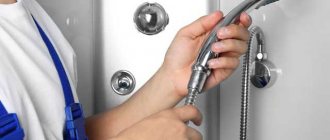
Replacing a ball valve begins with preparation
Since the installation point has already been determined (instead of the old model), clear yourself a place to work. During installation, access to the pipeline and fittings must be free. If the faucet handle is larger in size than the previous one, check how convenient it is to use and whether it will rest against the wall when turning.
The key stage of preparation is turning off the water supply. You can change the tap only when the riser is completely closed. Therefore, arrange a shutdown with the water company, and warn your neighbors in advance (if you live in an apartment building).
After shutting off the riser, drain the water from the piping system. Yes, some part of it will still remain. To prevent water drips from interfering with your work, prepare in advance a bucket (or some other container) for additional drainage and a rag for wiping.
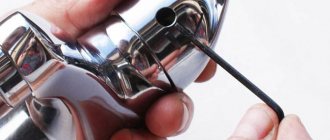
Sealing
Before all work, it is necessary to prepare the wound tow and wrap it around the threaded parts of the outlet in a clockwise direction. So, when installing the tap, the seal will not unwind. For the best effect, it is advisable to rub it in place with your hands.
Check it out here too!
Low and high pass filter: making frequency filters and how to create high-end circuitry (95 photos + video)Do-it-yourself electric bike: how to build an inexpensive and powerful electric bike from scratch (100 photos)
How to choose a gas boiler - the best models and manufacturers. Review of modern boilers and options for their application (145 photos and videos)
Replacement of the ball valve is completed by installation
Correct installation is carried out in stages:
- Carry out a test screw - on the thread without a seal, up to 4-5 turns.
- If the tap is easy to install, remove it and tightly wind the selected FUM tape (optionally, flax) to seal the joint. If the reinforcement does not screw on, take a die and run it along the thread. After this, repeat the previous steps until you can complete the installation without difficulty.
- Screw the tap on again, but this time onto the thread with the seal - the same 4-5 turns.
- If during installation the new reinforcement dangles or moves too easily, remove it and add more flax (or FUM tape, depending on what you chose). It is important to achieve a tight installation.
- If the free end of the fitting has an open thread, wrap it with sealant and attach the flange of the water supply pipe to it. By analogy, the wrapping should also be tight.
As soon as you assemble the communication line with the new part, turn on the water, but first only for testing. Check for leaks. If moisture does not run or collect at the joints, you can completely restore the water supply.
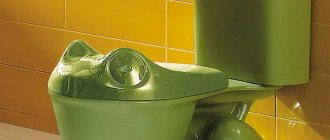
DIY repair of a ball mixer in the kitchen
It should be understood that the repair of ball mixers for bathtubs, as well as for kitchens, will be practically no different, since the same device is assumed. The main thing is to purchase consumables and components correctly, otherwise it’s easy to get into trouble. So, if you are going to repair a faucet, first disassemble it, remove the broken or damaged part and be sure to take it with you to the store. There you can present it to the seller, who will then immediately figure out what exactly you need and you won’t have to run back and forth ten times.
Remember
Before disassembling the ball mixer in the kitchen or bathroom, you must first completely shut off the water supply in the apartment or house. To do this, it will be enough to tighten the general taps and then release the remainder from the system. If there are none inside the apartment, then you will have to connect the housing office to turn off the entire riser, otherwise the hour is uneven, you can flood your neighbors, which is fraught with serious consequences.
Tools and equipment
- The screwdriver is flat and also figured. Such goodness is in the household of any home craftsman. It is worth choosing powerful screwdrivers with a strong handle, since screws, washers and nuts can “stick” from hot water.
- Wrenches and adjustable wrenches of suitable size and shape.
- Plumbing fork puller, if available. You can get by with a punch and a hammer.
- Hexagons, as well as other socket heads, if required.
- A knife with a sharp tip.
- Pliers or pliers.
Sequencing
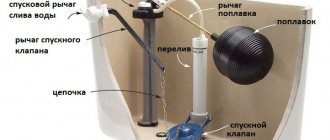
Having collected everything you need, and most importantly, purchased the necessary spare parts and components, you can begin repairing the ball mixer, regardless of whether it is installed in your kitchen or in the bathroom. It won’t be difficult to cope, the main thing is to be careful, clearly monitor your actions and not make more effort than necessary. Professionals recommend filming every step of your repair so that you can easily restore the sequence of events and assemble the crane without problems.
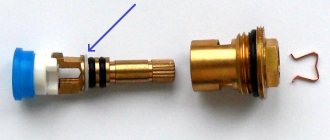
- Pry out the plug with the blue and red dots on it using a knife or flat-head screwdriver and set it aside so as not to lose it.
- Unscrew the screw under the plug with a curved or flat screwdriver, depending on the design.
- Lifting with a screwdriver, remove the lever handle from its place.
- Under the handle, the dome of the tap will immediately become visible, along which the lever for switching pressure and temperature conveniently slides. Remove the dome by easily prying it off with a screwdriver or knife.
- Unscrew the lock nut that holds the ball with the rod, adjustable or gas wrench attached to it.
- Remove the ball from the valve body and inspect it carefully. If it is not damaged anywhere, is not worn out or has not burst, then it can be washed, cleaned, wiped and put back in place. But if there is visible damage on the ball, then it must be replaced.
- Remove the rubber seat-gaskets from the mixer body on which the ball mechanism with grooves and slots rested. If they have their original appearance, are not deformed or damaged, then they do not need to be replaced, but in other cases replacement will not hurt.
- Unscrew the spout tube where leaks may occur. There are two sealing rings that will have to be replaced with new ones, fortunately, today such gaskets can be purchased either individually or as a complete set.
- Unscrew the mesh aerator attached to the end of the spout and clean it with a stiff brush, rinsing it with a strong stream of water.
- Thoroughly rinse all internal cavities of the body to remove lime, sand and other deposits, then reassemble the mixer with new parts in the reverse order. After such repairs, the mechanism should work like a watch.
Please note that repairing a ball faucet in a kitchen or bathroom is not so difficult, but you should carefully ensure that it is not twisted too tightly, but also not loose. Either option will lead to rapid failure of the crane, so you should always keep this in mind. If there are manufacturing defects, defects, cracks and chips on its body, from which water is leaking, then there will be no choice but to buy new equipment.
Useful tips for replacing a faucet
- Connections with pipes with a diameter of less than 2 inches can be sealed using liquid FUM.
- Screw the tap in the same direction in which you wound the tape - this will promote tight installation.
- For better sealing of the joint, flax can be combined with a special sealing paste.
- Install a stuffed ball valve - it can be repaired if a leak occurs.
- Screw the fittings tightly, but not too tightly - if you overdo it, the threads will burst.
- Make sure that the arrows on the markings of the installed part are located in the direction of water movement, otherwise you will get confused when opening/closing it.
- After installation, look again at how freely the handle moves and whether there are any obstacles to its rotation. If there is interference, it is better to reinstall the fittings at another point in the pipeline.
Knowing how to change a ball valve, and taking into account all the tips given above, it is not a problem to ensure the most correct, and therefore reliable, installation.
Conclusion
As a result, I would like to note that the range of these products on the market is quite wide and some manufacturers introduce their own design innovations. We talked about the most common system. But don't be alarmed if your faucet has an extra seal or another gasket, the basics usually remain the same.
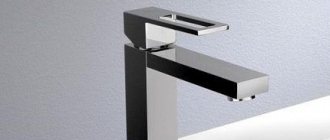
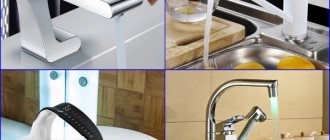
Assortment of different mixers.
Did you like the article? Subscribe to our Yandex.Zen channel
Possible faults
If a faucet is leaking, then, first of all, it is necessary to find out the cause of the malfunction.
- Damage to the body. This malfunction is typical for inexpensive models, the body of which is made not of brass, but of silumin. This material is fragile, so it can crack if hit or other mechanical stress occurs. Such cracks may not be noticeable at first glance, but over time the faucet body will burst at the site of damage and the faucet will begin to leak water.
Advice! If the body of the mixer is damaged, then the faucet can be urgently repaired using “cold welding”. However, the service life of a faucet repaired in this way is short, so the mixer will need to be replaced in the near future.
- Water leakage. If water leaks from the faucet spout in the closed position, then the reason for this is wear on the o-rings. These rings are located inside the ball mechanism; they must be hermetically adjacent to the working area. Premature wear can also be caused by a blockage if a piece of rust or a grain of sand gets between the O-ring and the ball.
- If you have problems adjusting the temperature of the supplied water, then the problem is most likely a clogged faucet cartridge.
Advice! When using inexpensive faucets, clogs are often caused by wear and tear on the O-rings. Therefore, in order to repair the faucet, you have to not only clean the hole, but also change the seal.
- If water comes from the tap with poor pressure, provided that the water supply system is working normally, then the cause of this is most likely a clogged valve.
Advice! To avoid blockages, it is recommended to install filters - in the water supply to the house or on the pipe supplying water to the sink (washbasin).
Marking
The following is applied to the body:
- Manufacturer's emblem.
- Nominal diameter - DN - in mm and inches, but for small bodies the "inch" symbol may be omitted.
- PN - working pressure in bars. A bar is equal to 1 atmosphere and 0.1 MPa.