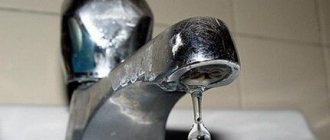
To seal the mixers, special rubber rings are used to prevent water from leaking from the gander when the valves are closed. When elements are damaged, fluid begins to leak. An apartment owner who knows how to change the gasket in a bathroom faucet can independently fix the problem in 20-30 minutes.
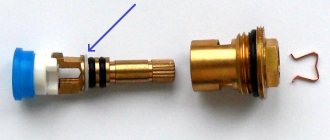
The gasket is an important part of the valve design; it seals the valve seat and its body.
Gasket location and signs of wear
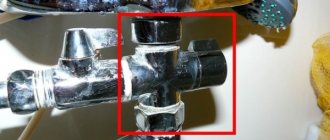
Rubber O-rings are located inside the faucet to prevent water from entering the gap between the seat and body. The valve design uses a screw or worm that presses the seat with a seal to the body part, which has a channel for supplying liquid.
Additional gaskets are located at the place where the jib is attached to the mixer body and at the points where the device is connected to the water mains. A sign of wear on the rubber gaskets is water leaking from the gander when the taps are turned on.
Tools and consumables
To replace the gasket in your bathroom faucet yourself, you need to prepare:
- gas or special adjustable wrench for plumbing work;
- a screwdriver with a flat and Phillips blade for removing the valve head;
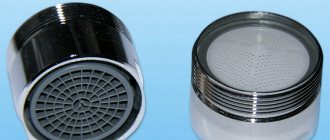
- a set of spare rings;
- stationery knife;
- pliers.
Since during the repair process it may be necessary to remove the faucet, you should prepare flax tow to seal the threads. Instead of tow, synthetic tape or a special sealant can be used. For the manufacture of non-standard seals, sheet rubber with a thickness of 2.5-3 mm is used. The part is cut out with scissors or a metal punch of the appropriate diameter.
Replacing a gasket is a very neat job that does not require rushing.
Preparatory work
Changing a faucet gasket is not a difficult task, but it requires preparation. First, you need to make sure that the water can be reliably shut off with the valve. If for any reason the valve is faulty, you must call a plumber. You cannot carry out work on the water supply without shutting off the water - the pressure will be unexpectedly strong, and you risk seriously flooding your neighbors!
A replacement gasket must be purchased in advance. If you have already replaced it, you should know the dimensions, otherwise you can buy a set of gaskets for plumbing work. Prepare cardboard to place on the bottom of the bathtub or ceramic sink - this will protect the plumbing from damage if a key or other tool falls. Fill a bucket or other container with warm water in advance; the faucet box may have to be washed to remove rust, limescale or sand.
From the tool you will need:
- Adjustable plumbing wrench. If you don’t have one, you can get by with a set of regular wrenches;
- Screwdrivers, Phillips and flathead;
Thin knife, scissors.
Preparation for repair
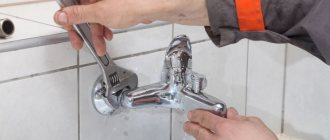
Before you start changing the seals, you must shut off the water supply using the valves located on the water pipes. The taps are located in the bathroom or placed in a separate panel at the entrance of the mains into the room. If the apartment valves are faulty, then you need to contact the management organization with a request to shut off the water supply to the house. In this case, the repair begins with replacing the taps. The enameled surface of the bath is covered with sheet cardboard or an old blanket, and foreign objects are removed from the bathroom.
Replacing the valve flywheel
It should be remembered that the crane flywheel
can only be replaced with a similar one.
Its inner surface is shaped in such a way as to prevent the lock washer
.
READ ALSO: Sink with cabinet for the bathroom
Sometimes screw
, securing
the flywheel
, does not turn.
Then you should hit the end of the screwdriver with the blade in the screw slot 3-4 times. If the screw does not budge in this case, unscrew the head
and break
the flywheel
if it is earthenware, or cut it with a hacksaw if it is plastic.
Now the faceted end of the rod
You can place the edge on the hammer head and hit the opposite edge with another hammer.
After this, you should unscrew the screw
with pliers.
If it breaks off, you can grind off the protruding part of the screw with a file, tap the end of the screw, drill and cut a new thread
.
Step-by-step instruction
The repair process depends on the valve design; standard screw valves use several gaskets. The elements come into contact with the surface of the brass body, and during operation, wear is formed on the parts. In this case, installing a standard size gasket does not eliminate the leak. The owner can mount a ring with increased dimensions, but it is recommended to replace the assembly.
During repairs, it is necessary to remove the layer of salts and limescale that forms on the surface of the mixer. Household chemicals or vinegar are used to remove foreign substances. The softened coating is removed with water, and then the surfaces are wiped with a dry cloth.
Valve tap
A classic faucet with a worm axle drive is used in budget-class faucets. Water may leak from the O-ring underneath the valve body or leak through the gap between the rotating stem and the faucet's outer shell. Due to a leak, liquid may leak or drip from the gander (with the taps fully closed). Before starting work, remove the plastic plugs from the heads and pry off the elements with a knife or scissors. It is recommended to place the parts on a shelf, since spare parts are not supplied with plugs.
The cause of faucet leakage in most cases is wear of the sealing gasket.
Description of actions step by step:
- Using a Phillips screwdriver, remove the screws securing the valve head. When unscrewing, difficulties may arise due to damage to the head (for example, during previous repairs). In this case, screwdrivers with different blade sizes should be used, and the screw must be replaced.
- Using a plumbing tool, unscrew the valve from its seat in the mixer body.
- Disassemble the tap; the parts are secured with a nut and a locking ring. Disassembly is carried out in a vice; an additional key is required for operation.
- Remove damaged gaskets and install new elements (factory type or self-made).
- Reassemble the assembly in the reverse order and screw the body into the mixer until it stops.
- Replace the head and then check the functionality of the equipment.
Ball mixer
The ball valve is characterized by reduced dimensions; the design uses a steel spherical element with a through channel. The position of the locking part is adjusted using a lever, which allows you to change the water pressure at the outlet of the gander. The design uses gaskets, and a bushing made of a special material is installed around the ball.
Sequence of actions when replacing gaskets in a ball valve:
- Using a sharp tool, remove the plug with the marking indicating the temperature of the water in the lines.
- Unscrew the fastening screw and pull the lever or wing off the slots.
- Using an adjustable wrench, unscrew the clamping nut.
- Clean the hole from salt deposits, and then pull the ball out of the seat.
- Remove the damaged ring.
- Install the original seal, which is located in the shaped groove. It is not recommended to use rings that are not intended for the type of faucet being repaired, since the connection will not be tight.
- Check the condition of the bushing; if increased wear or grooves are detected on the surface of the part, the unit must be replaced.
- Insert the ball into the standard socket, and then tighten the nut. After installing the control lever, you need to make sure that there is no water leakage.
To repair a ball valve, you need to understand its structure.
Single lever design
The single-lever mixer is characterized by reduced dimensions; the design uses a single cartridge with lever control. Deflection of the control allows you to adjust the water pressure and temperature. The lever design uses a fastening threaded element with an internal hexagon. After removing the handle, you need to unscrew the decorative cap and then unscrew the locking ring.
Then the cartridge is removed from the cavity of the mixer, under which there is an o-ring. It is recommended to visually check the condition of the cartridge; if damage is detected, the unit must be replaced. The mixer is assembled in the reverse order; the repair procedure is shown in the video.
Checking the correctness of the repair
Functionality check is checked by water supply. It is forbidden to turn on the flow at full pressure, since the liquid can damage or tear off the installed gaskets from their seats. The tap opens gradually at 50% of the valve stroke, and then pauses for 1-2 minutes. After this, the valve is smoothly turned in the direction of increasing pressure, while at the same time the absence of leaks is visually checked. After closing the tap, the mixer is inspected for leaks; drops of water and extraneous sounds from the body (humming) are not allowed.
After the tap is repaired, it is checked for leaks.
How to change a faucet in the kitchen
Repairing the faucet and eliminating leaks is not always possible and sometimes impractical. In this case, it is recommended to buy a new faucet and replace it. To do this, you need to equip yourself with screwdrivers, an adjustable wrench, pliers and a container for water. Regardless of the type of mixer purchased, the procedure will be the same:
- Turn off the water and open the valves or lever to relieve pressure and get rid of any remaining water in the system.
- Disconnect the flexible hoses from the hot and cold water supply pipes. Immediately prepare a container where the water will be drained and drain it.
- Unscrew all connections between the sink and the siphon and disconnect it. It is also recommended to remove the sink, if possible.
- Unscrew the faucet fastener from the bottom of the sink and remove it from the sink along with the flexible hose.
- Before installing a new faucet, it is recommended to replace the flexible hose to ensure durability. After purchasing, carefully screw the hoses into the new faucet, without tightening too much, so as not to pinch and damage the gasket.
- Install a sealing ring into the faucet body to prevent water from getting under the cabinet.
- Insert the flexible hose into the hole in the sink, fix the faucet in the desired position and tighten it using the plate and bolt.
- If you removed the sink, attach it back, sealing the joints with sealant.
- Connect the flexible line to the pipeline, install a siphon and open the water supply to the mixer.
After carrying out this work, be sure to ensure that the entire system is operational and that there are no leaks.
Possible problems and their solutions
List of main problems that arise when replacing gaskets in a mixer:
- After installing the axle box or cartridge in place, water leaks through the gaps are observed. In this case, it is necessary to carefully tighten the threaded connection by 1/8 or 1/4 turn, and then check the tightness of the joint. It should be remembered that over-tightening increases pressure on the rubber gasket, it collapses, and water begins to leak again.
- Water leakage due to the destruction of gaskets made of soft or poor-quality rubber. The parts are destroyed by the metal edges when tightened with little force. It is recommended to purchase a set of rings from another manufacturer.
- Filtration of water from the tap assembly due to improper installation of gaskets or the use of non-standard elastic elements. If during the assembly process the rings are installed skewed, then the pressure of tap water squeezes out the parts, and water begins to flow from the faucet body.
- Error when identifying a defective element. For example, in addition to wear of rubber parts, metal structural elements may be destroyed. If, after replacing all gaskets and properly assembling the mixer, water continues to ooze from the gander or valves, then disassembling the device is necessary to search for damaged elements.
- Damage to the outer chrome surface of the mixer bodies and knobs using metal tools. To protect parts, a rag or cloth is used, which is placed on the surface of the mixer before starting repair work.
Preventive measures
In order not to have to deal with leaks, it is advisable to take care of their prevention. Timely prevention will delay the repair of valves and taps. Measures to prevent breakdowns include:
- selection of plumbing products and spare parts for them based on quality, not price;
- the use of water filters, especially if the water supply is through old, worn-out pipes;
- timely maintenance - disassembling crane mechanisms, cleaning and lubricating moving elements;
- Mixer valves should be tightened until they stop, but without excessive force that could damage the seals.
New parts that ensure tightness must be of high quality and correctly installed. Only in this case will expensive water pressure devices serve for a long time and reliably.
Recommendations from experts
Experts recommend using axle boxes and mixers made of non-ferrous metals (for example, brass). Steel structures with an external protective coating have a reduced cost, but are susceptible to corrosion.
It is not recommended to purchase products made from silumin, since the parts do not have high strength and are destroyed when exposed to water. There have been cases of destruction of the mixer body when unscrewing the axle box.
The most convenient mixer to use is the lever design with a replaceable cartridge. The equipment has a simple design; repair consists of replacing the O-ring or cartridge assembly. To increase the service life of the ceramic element, it is recommended to install filter elements that separate scale particles and sand from the water flow. Additional cartridges allow you to capture salts dissolved in water, reducing the amount of deposits on the surface of the mixer.