( 2 votes, average: 1.00 out of 5)
A toilet flush system is a mechanism that is mounted inside the tank. To make using the toilet convenient, the flush mechanism must be correctly selected, installed and configured. It is these issues that the article will be devoted to.
This system is responsible for supplying and draining water
Meet the toilet flush cistern
If you are interested in how to adjust the toilet flush cistern, then first of all you need to clearly understand its structure, since a large range of such devices are only similar in principle, but each of them differs in nuances.
Bringing the drain mechanism into working condition can be done from the side, by pressing on the lever, or by lifting or pressing the rod in the center of the lid. In addition, the adjustment of the water level in the tank, the drainage method (large/small), and so on may also differ.
All this will be discussed below, as well as the video in this article.
Self-repair of a toilet cistern with one or two buttons
Modern plumbing fixtures are quite reliable equipment.
But, like any technical devices, sooner or later they can also fail. And often this happens at the most inopportune moment. For example, when you come home from work in the evening, you suddenly discover that the toilet tank is leaking. What to do? It's too late to call a plumber. And usually there is no need, because most of the malfunctions that lead to tank leaks can be dealt with on your own, saving on the labor costs of a technician.
But first you need to carry out diagnostics and determine the causes of the problem. First of all, to do this, you need to remove the lid from the toilet's storage tank.
Such different tanks
General operating principle
Note. Any of the models, regardless of the timing of its design, is quite suitable for work. But for all of them there is one main condition - correct adjustment. Drain tanks of the new type with factory “default” settings do not need adjustment, although this is quite possible if necessary.
- As already noted at the beginning of this article, the variety of models of containers used for flushing the toilet has not affected the general principle of operation for several decades - water still enters the toilet through the flush valve and its level is regulated by a float. In addition, the instructions in any case require that the water tank be located only on top and it can be located on the plate stand of the toilet itself, on the wall, under the ceiling or in a niche, inside the wall - but, in any case, on top.
- Also, the flushing mechanism for the toilet tank or shut-off valve, as it is also called, always ensures access to water and filling of the container automatically, without outside intervention, although the level can be adjusted in any of the models. Control (draining) is carried out only manually, using a handle, button or key, which lifts the shut-off valve and empties the tank completely or partially. After a certain volume of water flows through the siphon into the toilet, the outlet valve takes its original position and the tank is refilled to the required limit.
- The initial water level or adjustment of the toilet flush cistern of any type is carried out using a float, which is connected by a lever to the shut-off valve on the water supply. The float always floats on the surface and when the water level rises, it also rises along with the lever and at a certain moment the lever brings the valve to the “closed” position - after which the water supply stops.
Old models
If we talk about the distinctive features of old-style models, here, perhaps, we can name the main defining features by which one can determine whether the cistern belongs to the old generation.
- Firstly , this is a container made of cast iron or earthenware.
- Secondly , the lateral (occasionally central) location of the lever for draining water.
- Thirdly , exclusively lateral water supply.
Considering that previously a bathroom (especially in the Soviet Union) was always considered a utilitarian type of room, then few people were interested in design at all, therefore, all models of that time were completely devoid of any frills. The shut-off valve of such a tank consists of a simple drain mechanism and an equally simple automatic machine that regulates the water supply to the tank.
In this case, water drainage is ensured by a simple design, which is a wide outlet siphon with a rubber or plastic valve, which in its shape is very similar to a plumbing plunger.
The stem from this valve, as a rule, is led to a side handle, with the help of which it is raised to allow water to flow into the hole. The closed state of the valve is stabilized by the influence of gravitational forces.
As water enters the tank, the float rises, dragging a metal lever with it, which in turn puts pressure on the shut-off valve.
That is, this valve is gradually brought to the hole where water comes from and at the last moment closes this hole completely. After the water is released from the tank, the float falls down, dragging the lever with the valve along with it, and the whole process is repeated again.
Despite the fact that this configuration, as you see in the top image, is quite cumbersome, it is extremely reliable in operation - in some apartments such tanks stood for about 50 years without any repairs, although minor maintenance was carried out.
This was possible due to the absence of small springs and plastic parts that deteriorate over time, as can be seen in modern models.
Single button models
Flush cisterns for toilets, in which the process itself is started by pressing a button in the center of the lid, look, of course, much more attractive than similar containers equipped with a side lever or a central, rising rod with a ball above the lid. As we have already said, the water-drawing mechanism here also consists of a float with a lever that presses on the shut-off valve at the water supply hole (see also the article “Old-style toilet tanks - features of their design and recommendations for repair work”).
But in new models, this device was replaced with a ball valve, which carries out this adjustment, and the entire mechanism is a single block of a button, a rod and a valve (ball valve).
This block has a thread with which it is installed in the drain siphon, and it is also equipped with a hole for discharging water in the event of failure of the shut-off valve (faucet) on the supply. The lever, which is connected to the button, operates on the principle of a reverse mechanism, that is, when downward pressure is applied, the valve rises up.
Note. Fixing the valve in the closed state here, as in old-style tanks, is possible under the influence of gravity.
Such designs have one undeniable advantage, and these are not even factory settings, no, they are modular repairs. That is, if the drain mechanism fails, you simply remove it from the drain tank and go to the store with it.
A plumbing salesman will easily select the desired modification of the device for you, especially since its price is 3-4 times less than the cost of a new flush cistern. It simply does not make sense to repair such mechanisms - they are designed for one-time use and interfering with the functionality is acceptable only for adjusting the float (the water level in the tank when filled).
Model with two buttons
Recently, a toilet with a flush cistern in accordance with GOST 30493-96 with two buttons, each of which allows you to use a certain amount of water when flushing, has become increasingly in demand.
Such devices have gained popularity not only in residential areas, but also in cafes, restaurants and other public institutions. Since the correct (targeted) use of buttons consumes a minimum amount of water, therefore, this affects the budget allocated for utilities.
That is, in this case, it is possible to consume two different volumes of water, and if with one button you drain 7-8 liters of water, then with the other you will reduce this volume to 3.5-4 liters.
Note. If we talk about identification characteristics, then dual-mode models are easily recognized by the presence of two buttons or keys in the very center of the lid. To determine the amount of water to be drained, as a rule, they are guided by their sizes - whichever is larger, there is a larger volume of liquid to be drained.
The one-piece, non-separable body of the drain fittings, which in height occupies almost the entire space from the lid to the bottom of the flush cistern, is practically no different in appearance from a single-button mechanism.
Related article: Hygienic shower built into the wall
Installing such a mechanism with your own hands is also no different from a single-mode system - the same fastening with internal or external threads and the same inlet valve system for drawing water into the tank.
But there are two slider-type levers with which you can set the low flush mode, that is, adjust the amount of water discharged into the toilet.
But just such an adjustment may not be available on every mechanism, since each manufacturer makes its own modifications and it is simply not possible to list them all. Repairing real fittings also does not make sense, as in single-button devices, therefore, in case of failure, the unit is simply replaced modularly.
Note. For public institutions, the most common is a double mechanism, where there is no volume adjustment, that is, the work occurs in the “default” mode from the manufacturer. But for private houses or apartments, such tanks or shut-off valves individually are not of particular importance in terms of savings - they are too insignificant.
Adjustment
The water consumption you receive at the end of the month in your apartment depends approximately 50% on how often you use the toilet, and only 25% on drinking, eating and washing dishes, and another 25% on showering or bathing. But you can always adjust these costs yourself if you adjust the drain tank at your discretion.
The average consumption of a “large” drain is about 7-8 liters of water, but it can be made more or less by setting the float to a certain height, as shown in the top photo.
From the material given above, you understand that the float is directly connected to the shut-off valve for supplying water to the tank, therefore, the lower you lower it, the faster this valve will close, and less water will be drawn into the tank.
In modern models, the float can be moved along the ribbed bar, leaving it in the position you need, but in older models you can simply bend the metal rod to change the level.
General information
The most common toilet design is the “compact” one, when the tank is installed directly on the toilet. Many manufacturing companies today produce exclusively models with buttons - one or two.
The option with two buttons is a more complex drain fitting device, but it allows you to save water when flushing:
- When you press one button, the tank is completely emptied.
- Activating the second button leads to partial emptying of the tank.
How to remove the cover?
Many modern models are equipped with buttons with rods, so that removing the cover is effortless. However, many modifications to flush tanks require certain manipulations to remove the lid.
If there is only one button
On models with one button, to remove the cover, you must press the metal ring that surrounds the button and then turn it counterclockwise.
Important! If you are unable to turn the ring, add a few drops of liquid oil or try to complete the task using a screwdriver.
Carefully move the lid to a perpendicular position and release the drainage tank from the plastic clothespins. After such simple manipulations, all that remains is to remove the lid and put it aside.
If there are two buttons
To remove the lid on a two-button tank, press any of the buttons. In this case, the technological groove becomes accessible. Now all that remains is to dismantle the buttons, one by one. Next comes dismantling the mounting screw and removing the cover.
Basic malfunctions and ways to fix them
Before carrying out repairs to adjust the water level in the toilet cistern, it is necessary to find the root cause of the problem. There are 3 types of typical breakdowns:
- Water constantly flows - into the room or sewer.
- There is no water pressure at the entrance to the container.
- The drain mechanism cannot be controlled.
The reasons for these breakdowns are different. The repair algorithm also depends on the cause.
The bulb (plug) does not fit tightly to the drain hole
You can minimize the risk of such a problem if you purchase reliable plumbing fixtures from trusted manufacturing companies.
Diagnosis is quite simple. Remove the cap and apply additional force to the plug rod, pressing it against the drain hole. If the leak is eliminated, the situation can be corrected by slightly making the plug heavier by hanging a stainless steel nut on it.
If the described manipulations do not eliminate the leak, you need to replace the plug or clean the surface of the drain hole from deposits. This is especially true if the water is too hard.
The mechanism regulating the water supply to the drain tank is faulty
In this case, the constantly flowing water is discharged into the toilet through the overflow tube. Pay attention to whether the fitting components are in good condition: fasteners, rods, inlet valve or float.
If any of the listed parts malfunction, they must be replaced or repaired.
Important! A simpler option is to adjust the position of the float and then fix it.
Water leaking into the room
How to adjust the toilet tank if the water flows not even into the sewer, but into the bathroom? There are two reasons for this malfunction:
- violation of the integrity of the tank;
- insufficient fit of gaskets at threaded connections.
In the latter case, the malfunction can be eliminated by tightening the threaded connection or replacing the rubber gasket.
Insufficient water pressure (or its complete absence) at the entrance to the drain vessel
The reason for this phenomenon is contamination of the intake valve. To eliminate this situation, you need to install a water filter directly in front of the connection point to the water supply system.
If such a problem occurs, release the water from the tank and close the water inlet valve. Then unscrew the valve and clean its inlet hole with a sewing needle or thin wire. Then rinse the valve under running water.
Possible faults
Even if all operating rules are followed, plumbing products are not protected from breakdowns. The push-button water drain system can also be susceptible to various malfunctions. Since the drain system is hidden inside the tank, before determining the problem, the tank will have to be disassembled by removing the top cover.
Most often, when operating drain mechanisms using a button, the following series of malfunctions occur.
- Continuous leakage of water through the flush tank. This malfunction is associated with overflow of the maximum permissible water level. In this case, water flows into the sewer all the time, getting there through the overflow tube. To fix the problem, you need to bring the water level to the required level by adjusting it.
- Weak water flow when flushing . The problem may be caused by sand or other small debris stuck inside the drain valve. To cope with the malfunction, the entire mechanism must be removed from the tank and the drain valve must be cleaned with a soft cloth.
- When pressing the release button, the water does not drain. The reason for this may be the lever connecting the button with the drain mechanism - it sometimes jumps out of place. To fix this, the bar with the hook must be returned to its original position and secured.
Before starting repairs, you should turn off the water and completely empty the tank using a special valve located in its bottom.
You can learn how to install a double flush button on a toilet tank instead of a single one in the following video.
Problems with two-button tanks
To implement the principle of complete or partial emptying of the cistern, the fittings are equipped with a diaphragm valve. The most common faults are:
Constant leakage of water
The reason is wear of the locking membrane. The problem can be eliminated by replacing the membrane.
Recession of control buttons
This is the most common malfunction. To avoid this, do not press the buttons too hard. If the buttons are stuck, return them to their original position by first removing the cover.
Water remains in the tank: the drain does not work
The problem occurs when parts of the lever mechanism break or become separated. The problem can be corrected by replacing failed parts or properly securing the hooks.
Adjusting the toilet cistern: self-regulating water supply
The essence of adjustment, regardless of the number of buttons, is to correctly install the float.
Important! The correct position of the float is such that the water supply stops when it reaches a level of 2-3 cm from the edge.
Regulation is carried out by bending the brass rod or moving the float along the guide and then securing it. In models with a vertical float position, its correct position can be achieved by rotating the adjusting screw in one direction or another.
Important! Also make sure that the top edge of the overflow tube is located 1-2 cm higher than the water level in a completely filled tank.
Float adjustment
In situations where there is either too little water in the tank, or, on the contrary, an excessive amount, it is necessary to adjust the float itself, which controls its level.
To do this, you must perform the following steps in this order:
- First of all, you need to remove the toilet tank lid. Most often, this will simply be done by unscrewing the button fastening, after which you can freely remove the roof. However, there are also options in which it is necessary to slightly lift the lid and disconnect the chain holding it inside.
- Next, access to the main necessary mechanisms of the device will be open. The setting itself depends on the device of the particular system. If the float is mounted on a brass version of the lever, it is enough to simply bend the latter by hand. Due to this, the position of the float will change, and, accordingly, the maximum water level. When such a lever is made of plastic, adjustment is made using a screw. There are also other models where the float is mounted on a special plastic ratchet. It is she who holds him in the right position. Very rare, but there are also options where this element is attached to a metal spoke. In such a case, to make adjustments, it is enough to slightly reduce the distance between the fixing plates.
- When all manipulations with the mechanism have been completed, you need to reinstall the cover and release device.
The device of the drain tank: mechanisms and adjustment
The time when toilets ceased to be a luxury, after street toilets, is long gone. However, installing them in apartments required modification of the latrine with filling and draining systems. After all, without these systems, there can be no talk of any convenience or hygiene, the toilet will simply turn into a stationary potty, which will have to be constantly cleaned and washed by hand. However, this situation is familiar to many, when the cistern device begins to take on a life of its own, incorrectly performing its assigned functions.
Related article: The insides of a toilet cistern
It would be useful for a home handyman to know how common models of plumbing mechanisms of toilets function and are configured, for which we will consider what the majority of our compatriots use today.
Main types of drainage equipment designs
First of all, they depend on the type of filling and drainage mechanisms. The water drainage functions are performed by lever, push-button and automatic products.
Lever
The float (1) controls the inlet valve (3) through the lever (2). The water level depends on the adjustment of the float lever on the valve lever (4). The water pressure during filling is adjusted at the valve using a set screw.
Lever models were the main models installed on toilets of the last century. They are still used in some places today. Lever devices are distinguished by their simplicity. The first products drained only at the moment of pressing, while the shut-off valve was manually held (by the “pull” - a chain or fishing line). Then came systems that use the siphon effect, which themselves control the flow after activation. But both the first and subsequent models are characterized by increased unregulated water consumption. In addition, such plumbing does not meet current aesthetic requirements.
Push-button
The toilet flush mechanism, made in a push-button version, is installed on most modern plumbing products. The predominant location of the button is at the top, on the covers of compact systems, and can also be on the wall for products installed in building structures. Their advantages, in addition to good aesthetics, lie in the ability to adjust the drain and overflow parameters. Push-button mechanisms also, once activated, hold the shut-off valve open without human intervention. And models with paired buttons allow full or partial discharge of liquid into the toilet.
Automatic
Today, there are rare and expensive products for draining water, which justify themselves when installed in luxury products or used in public places. Their work is controlled by infrared sensors.
Shut-off valves for the toilet, represented by filling mechanisms, work, as many years ago, using the principle of a refill valve, opened and closed by a float. In the classic version, the float transmits force to the valve of a faucet with a side connection through a horizontal rocker arm.
Floats that shut off the water supply through a system of levers.
However, now more often floats are installed that move along a vertical guide, cutting off the water supply through a system of levers for both the side supply and the bottom.
Important! Modern filling valves, due to their design features, allow you to collect water much faster than systems with a rocker arm.
Assembly of cisterns
The further comfortable operation of the plumbing will largely depend on how to assemble the tank and then adjust it. Naturally, each type of equipment has its own installation secrets, which are quite accessible to the home craftsman.
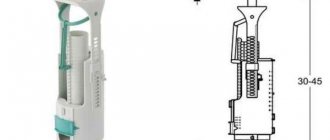
The sequence of assembling a tank with a top button (Figure 1) is as follows:
- We fix the outlet valve (5) in the large central drain hole of the storage tank. You can install the entire mechanism or only its lower part. At this stage, as at all subsequent ones, it is necessary to control the tightness of the gaskets, securely fixing them with threaded elements to obtain tight connections.
- If you are assembling a model that includes fittings for a toilet cistern with a bottom connection, you should also secure the inlet valve (2) with a float (3) in the corresponding hole in the plumbing product.
- Insert an elastic gasket (6) between the toilet bowl and the flush container. It must be carefully centered, and then tighten both halves of the plumbing into one with screws (7).
- In a model with side water supply, we fix the inlet valve.
Diagram of the inlet fittings of the drain tank with a side connection.
- We connect the external water supply to the fitting (4).
- We install its upper part (without the button) on the exhaust valve.
- We open the water supply, check the tightness of the connections, the operation of the filling and draining mechanisms, and, if necessary, adjust their functionality.
- Now the lid for the toilet tank is put in place, into which we attach the button (1).
Important! After the final assembly of the plumbing structure, you should perform several control drains of water and carefully check for leaks. This is done by visually inspecting the connections; you can also lay a newspaper on the floor under the tank, on which possible drops of water will be clearly visible.
Lever flush tanks are found today, although not often, but are sometimes still used as reliable, time-tested devices. Therefore, questions may arise regarding their installation. Although they are made from different materials: plastic, ceramic or cast iron, their assembly is very similar.
- First of all, we fix the lower siphon part of the drainage mechanism inside the container.
- A lever mechanism and fittings for a toilet cistern with side inlet are installed.
- We hang the storage tank on the wall behind the toilet coaxially with the bowl and connect the external water supply through a flexible hose.
- On a cast iron structure, we connect the flush pipe through the corresponding threaded fitting, and on a plastic one, we use a crimp coupling with an annular sealing insert.
- We connect the toilet with the flush pipe using a rubber cuff, which is fixed on both sides with clamps.
There are lever ceramic compact products installed in the saddle of the toilet bowl. In this case, the assembly of the structure is carried out in the same way as in the push-button model, using tightening screws and an elastic gasket.
The toilet doesn't flush well
How to adjust the toilet if, after a certain point, the flush has sharply worsened?
If the toilet begins to flush poorly suddenly, literally in one day, and the flush does not depend on how much water is in the tank, most likely something has gotten into the outlet of the tank or the drain of the toilet itself. You understand that adjusting the water level in the toilet tank will not help here.
Most often, this item is a rubber hose from a float valve. It is put on the valve outlet so that water is drawn into the tank silently. Rubber loses its elasticity over time; the hose slides off the valve and starts swimming alone.
Usually, after the next flush, his regatta ends somewhere between the release of the cistern and the toilet bowl. And since water passes through a piece of rubber extremely poorly, we immediately face the consequences.
However, if the tank is without a lid, the most unexpected objects can sometimes be found in the tank outlet. The imagination of preschool children is especially limitless.
And in this case, do not rush to despair
Carefully lift the tank (the flexible connection can be left on) and place it on the toilet; To avoid leaving chips, it would be a great idea to put a rag or towel underneath. We extract from the recess in the shelf something that should not be there.
By removing the tank, it is easy to get to the toilet flush
The cuff will most likely have to be replaced: as already mentioned, over time the rubber loses its elasticity, and after reinstallation the cuff is likely to leak.
If you have a tank and shelf design like this, you can get to the blockage through the gap between the shelf and the toilet
Setting up plumbing toilet cisterns
The completion of the assembly of plumbing does not mean the end of all work on its installation. Often the toilet cistern fittings need to be adjusted, after which the filling, overflow and flushing functions must be performed flawlessly. Also, sometimes it is necessary to adjust mechanisms during their long-term operation or replacement.
Important! First of all, for all types of equipment, check the shut-off valve of the toilet cistern and the tightness of its fit to the seat. Usually on new equipment, if everything is assembled without distortions, then there should be no leaks.
Adjusting the cistern with a button
What should you pay attention to when setting up modern “push-button” plumbing?
- The height of the flush valve is set (Figure 2). Its design must correspond to the dimensions of the storage container under the lid, taking into account the button (1). Disconnect the rod (2) from the latch of the overflow tube. Release the rack clamps (3) on both sides. Move the racks (5) in the required vertical direction, guided by the scale marked on them. Secure the clamps and rod in the new position.
- The height of fixation of the overflow tube is adjustable. There are two requirements for this parameter: the surface of the water in the toilet tank should be 15-20 mm below the overflow edge, but at the same time, the fully pressed button should not touch the top of the tube. To do this: Set the size of the gap between the edge of the overflow and the top (4) of the rack (5), (Figure 2). To perform this operation, you will have to release the rod (2) and the pressure ring or clamp on the tube. Lower or raise it to the required height. Fix overflow and draft.
- The functionality of the filling fittings is configured in accordance with the requirements of the previous paragraph regarding the filling volume. In order for the inlet valve to ensure the optimal water level in the cistern, the position of its float must be set. If you need to set an early cut-off of the supply, then the float is lowered lower or fixed higher if the volume of liquid is insufficient. Changing its position is carried out by rearranging the rod similar to the rod on the drain valve.
Related article: How a toilet works
Adjusting the two-level drain
In modern push-button toilet sets, it is not uncommon to have a two-level water discharge. Such models require small and full drain settings.
Adjustment of two-button drain mechanism.
We regulate the discharge of the entire volume of liquid by using a damper, increasing this parameter, moving it down and, decreasing, moving it up. The partial discharge of water is set by a small flush float, which, after opening the lock, we move down or up, respectively increasing or decreasing the flow rate.
You can learn more about adjusting the two-button release mechanism from the video:
Adjustment of old models
In conclusion, it is worth mentioning the adjustment of “classic” systems with lateral water supply. The design of an old-style toilet cistern involves only adjusting the inlet valve.
Its work depends on the position of the float, which is lowered or raised. For this purpose, if the rocker arm is brass (steel), then it is simply bent into the desired position, and if it is plastic, then the geometry of the lever changes after loosening and then tightening the mounting screw.
Adjustment of the overflow and exhaust valve is not provided in such models, and problems arising with them, as a rule, lead to repair work or complete replacement of the mechanisms.
Fixing a leaking tank
Why eliminate it - I think it’s clear. This includes wasteful water consumption, constant condensation on the surface of the tank and pipes, and a toilet bowl that quickly becomes contaminated with rust and lime deposits.
The tank overflows because the float valve does not turn off the water in time. Water flows through the overflow.
How to adjust the toilet tank in this case? Exactly the same as in the previous case. Bend the float lever so that the water stops at a level a couple of centimeters below the overflow.
Brass or galvanized steel arm is very easy to bend to any angle
Please note: in houses where there are pumps installed and operating on a pumping timer (pumps for raising water to the upper floors at peak water consumption), the water pressure can vary greatly during the day.
It makes sense to adjust the water pressure when pumping is running, when it is at its maximum.
Then, at a lower pressure, the float will shut off the water at a level two to three centimeters lower.
The bulb blocking the drain in the tank has lost its elasticity and no longer completely blocks the water. Water flows from the toilet tank constantly. even if it is not full.
The photo shows the same pear. Here it has just been replaced along with the stem and mount
Setting up the toilet cistern flush fittings
There is an interesting statistic: up to 50% of household water consumption comes from flushing the toilet. The rest is roughly equally divided between showering and other household needs. If you optimize the water consumption from the cistern, you can save a lot.
Difficulties in adaptation
Toilet bowls are available in a variety of shapes, colors, and sizes on the market. At the same time, the fittings that control filling and dosage during flushing cannot boast the same variety. Different manufacturers of tanks usually complete their products with two or three standard drain models, so initially the factories that produce fillings for plumbing set certain average settings, which are not always optimal for a specific tank model or the needs of the end user. The most common flush fittings are Geberit and Alcaplast brands.
The most modern designs have two buttons that allow you to use the full volume of the tank or only half (usually 6 and 3 liters with the ability to vary the volume of consumption in one direction or another). But even simple adjustments to old primitive models significantly reduce the average monthly water consumption.
Reducing the flush volume
Why is this necessary?
The toilet and cistern provide up to half of the total water consumption. Another approximately 25 percent each comes from washing dishes and taking a shower.
If water is very expensive in your region, it is logical to save it. The most obvious way is to reduce the water consumption for each flush of the tank.
Tip: many fitting kits allow you to use water more flexibly.
The tank is equipped with two buttons; pressing one of them leads to a flush using the entire volume of water (usually 8 liters), pressing the second - to the consumption of half of this amount.
The operation of a float valve is very simple: water is drawn in, the float floats up and, using a lever, moves a brass or plastic plug, which, with a rubber gasket, blocks the nozzle supplying water.
How to adjust the float in the toilet so that it shuts off the water earlier?
Here the entire mechanics of the valve is depicted extremely clearly. To shut off the water earlier, simply bend the brass lever (No. 6 in the diagram)
One of the alternative designs. Usually it is enough just to carefully inspect the valve to understand the method of its adjustment.
Next we adjust the drain volume.
It doesn't matter what the set of levers and pushers leading from the button to the valve looks like. Kinematics can be very diverse. But it is important to find a glass with an adjustable height on the outside of the unit - this is the unit responsible for the drain volume.
To adjust it, in most cases, you need to disconnect the plastic rod from the button to the drain valve, and then squeeze out the plastic petals of the latch or remove the latch of the glass that regulates the volume of drain water. Holding the glass vertically, it is moved to the desired level and fixed there with spring petals or a latch. Then attach the exhaust valve rod.
The most advanced system may have a dual-mode release. Structurally, the unit is made in the form of two separate, independent drain valves, located symmetrically on both sides of the overflow safety siphon. Their adjustment is absolutely the same. Only one valve is set to maximum drain, and the second to half of the first.
When installing the tank lid and setting the height of the buttons, you should make sure that the control buttons on the tank lid have a slight backlash - this is necessary for the normal operation of the entire mechanism.
If adjustment is required for fittings that have already been in operation for some time, then difficulties may arise due to deposits - rusty or limescale deposits. It’s easy to get rid of them using regular vinegar or anti-scale chemicals - just add them to a tank filled with water and wait a few hours. And the inner surface of the tank will become noticeably cleaner.
As a bonus, we suggest watching the official video from Geberit, which will help you understand how the fittings work, how to install and configure them.