A single-lever, or as it is also called a joystick, mixer confidently takes the place of obsolete valve devices. It is simple, easy to use and quite reliable. You can repair it yourself, without turning to a plumber for help.
After reading the article we presented, you will be able to repair a single-lever mixer with your own hands. We have listed all types of breakdowns typical for this type of plumbing fixtures. We describe in detail how to fix breakdowns. Taking into account our recommendations, you can easily repair a device with one lever.
Advantages of a single lever mixer
Like any mechanism, the mixer sometimes breaks down. The failure of a plumbing fixture in the bathroom or kitchen is the most common breakdown, which is impossible not to notice - puddles on the floor and the irritating sounds of falling drops that do not stop day or night will not leave anyone indifferent.
The above troubles can be eliminated quite simply and quickly on your own. Of course, for this you need to at least theoretically become familiar with the internal structure of the mixer, know the reason for its failure and how to eliminate it.
A single-lever mixer is a plumbing fixture that is distinguished by its simplicity of design, excellent functionality, durability and, most importantly, ease of operation.
All these issues will be discussed in detail below.
However, first let’s look at the advantages of this plumbing fixture, to which it owes its popularity:
- Simplicity and maintainability. This has already been mentioned above - due to its simplicity, a single-lever mixer lasts a long time, and this period can be extended by timely repairing the product.
- Ease of use. There is no need to turn the valves; just lift the mixer joystick up in one motion to let the water flow. To adjust the temperature, the lever is turned left and right, and the pressure is adjusted by vertical movement of the lever.
- Durability. The simpler the design, the less often it breaks - a single-lever mixer consists of a small number of parts, and if you treat it with care and install a filter on the water, the product is guaranteed to last more than 10 years. Of course, this only applies to high-quality faucets.
On sale you can often find products made from fragile, short-lived, but very cheap silumin. In the best case, such a mixer will work for two years.
It is worth mentioning simple repairs. Simply put, any smart housewife can do a simple repair of a single-lever mixer with her own hands. Basically, it all comes down to a banal replacement of the disk cartridge or ball, depending on the design of the device. But let’s not get ahead of ourselves and consider the internal structure of the mixer.
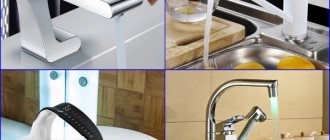
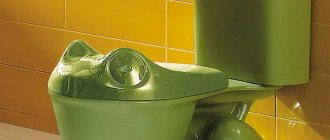
Image gallery
Photo from
Single lever mixer for bathroom installation
Easy to use device
Originally designed mixer
Brass shut-off and control valves
Which cartridge lubricant should I choose?
The problem of the faucet being difficult to operate can be solved by removing the ceramic cartridge and coating the discs inside with lubricant.
Let's look at what types of lubricating compounds are better and what they are:
Tsiatim-221 is a plastic composition made in accordance with GOST. Perfectly suitable for metal parts, rubber, plastic, ceramic, as well as for friction units. This lubricant is often used not only for mixers, but also for bearings in electrical machines and aggregate bearings in aircraft.
The consistency of Ciatim-221 is such that it does not dissolve in water. Resistant chemical composition - provides good lubricating quality, even at a pressure of 600 Pa it is not washed off. Temperature changes from -60 to +150 degrees will also not cause harm to the composition.
Due to its characteristics, Tsiatim-221 is in great demand, so purchasing it is very problematic, and sellers offer a less effective analogue - Tsiatim-201.
Silicone Grease. This composition is used to fill the space between the plates of the ceramic cartridge - the gap is too small, and without lubrication it is impossible to even move the handle from its place. This consumable material softens the rotation of the lever and allows it to be turned freely. If you feel like the lever is sticking when turning, then you need to update the silicone lubricant.
Silicone grease is a white, translucent paste. Do not confuse it with silicone sealant under any circumstances, otherwise the faucet will have to be thrown away. One application of paste should be enough for 50,000 lever revolutions. It is usually sold in auto parts stores and car markets. Price 8-10 dollars.
When applying silicone grease to the top plate, for convenience, the cartridge should be held upside down, but keep in mind that in this position it will be the bottom plate - there is no need to pour it into the holes. Next, you need to distribute it evenly; to do this, rotate the rod in the cartridge. If necessary, you can apply a little more.
If, after applying the composition, sand or rust still gets between the plates, then you need to buy a new cartridge.
RAVAK – Teflon lubricant. It is also insoluble in water, but is washed out over time, so the frequency of the need to lubricate parts increases.
But thanks to the list of advantages, Teflon grease is in demand among consumers:
- wide temperature range - withstands where others fail;
- It is enough to apply one drop on the face - ergonomics;
- its property does not allow it to turn yellow over time, as is usually the case with pastes;
- It can also be used to lubricate door hinges and shower enclosures, shower frames, and door handles.
This information will help you select and apply faucet lubricant correctly to prolong the operation of your plumbing fixtures.
Device design with one handle
Let us repeat once again: the design of a single-lever mixer is quite simple. There are no traces of constantly breaking crane boxes here.
If you do not take into account the presence of spouts, shower heads, and various types of switches, the device consists of only two main parts: a monolithic metal body and a cartridge with a locking device consisting of two disks or a ball. They are “responsible” for controlling the flow of water and regulating its temperature.
The design of a single-lever cartridge mixer is characterized by simplicity and a minimum of parts: the cartridge is a consumable material, the rest of the parts are permanent, but can be replaced
The cartridge is placed in a housing and securely secured inside with just one nut, which is neatly hidden under a decorative cap. The cartridge control joystick is installed directly on its lever. Everything is simple, no tricky elements, therefore no serious damage.
The internal structure of a single-lever mixer may differ - a disk cartridge and a ball can open/close the water and regulate its temperature. Let's consider the structure of both designs.
Disk version design
As the name implies, inside such a device there is a special cartridge bulb with a locking and adjustment mechanism. In expensive faucets, the cartridge is made of high-quality ceramics; in budget options, it is usually plastic.
An inexpensive cartridge model whose body is made of plastic. The valve of a disc mixer is a pair of discs with holes for cold, hot and mixed water in the cartridge. When the surfaces of both disks are aligned, the flow through the device stops
The cartridge mixer is very easy to use, but those people who are accustomed to a valve mixer will need to practice a little at first, since the joystick turns very easily.
But you get used to the good things quickly: the desired temperature and water pressure can be adjusted with one easy movement. When the disks are partially or completely combined, a stream with the characteristics required by the user is formed.
The cartridge mixer consists of:
- Spout, or, as it is also called, “gander”.
- Switch equipped with a fixing screw.
- Lock nut.
- Actually, the cartridge.
- Housings with a seat for a cartridge.
- Gaskets, studs, nuts - parts to ensure tightness.
The locking mechanism discs are most often made of ceramic, less often of a steel alloy. There are protrusions on the top and holes on the bottom, their shape is complementary to each other. When fully aligned, the projections overlap the holes, resulting in a sealed connection.
When partially blocked, water flows into the spout. The smaller the protrusions of the upper cartridge cover the holes of the lower part of the shutter, the stronger the jet.
A rod is attached to the upper disk, the position of which can be changed to move the plates relative to each other. This way the amount of water passing through the cartridge plates is adjusted.
It should be noted that the plates are ground together very tightly - this is a necessary condition for the normal operation of the mixer. For this reason, cartridge models really “dislike” dirty water with foreign mechanical suspensions, since miniature particles get between the plates and lead to their rapid wear, resulting in premature failure of the shutter.
To extend the life of the product, some manufacturers immediately install a filter for rough water purification in front of the inlet pipe of the mixer at the factory. It is recommended to follow their example: install a good filter on the water supply yourself and safely supply purified water to all plumbing fixtures.
What does a ball mixer consist of?
As in the case of the disk model, the name indicates the design features of the shutter mechanism of the device. In the ball model of the mixer, the water pressure and its temperature are regulated by a special ball.
The part is made of metal, the ball is hollow inside. The outer part is perfectly polished. The ball has three holes - two for cold and hot water, the third for mixed.
The rod is rigidly attached to the part, its other end is attached to the mixer control handle. Thus, when you press the handle, the rod rotates the ball, opens/blocks access to water and regulates the temperature of the stream.
Scheme of a ball mixer. The principle of operation is the same as that of the disk counterpart, but the design differs in some details
Operating a ball mixer is much easier and more convenient than a disk mixer, since the parts are smooth, perfectly adjusted, and the joystick moves very smoothly and softly. The ball is installed in a kind of sleeve cartridge, which can be easily removed from the device in case of repair or replacement.
By analogy with a disk device, a ball mixer is very demanding on water quality and reacts poorly to hard water and high iron content.
Most ball valve leaks occur due to debris getting into the gaps between the ball and the rubber seats that hold it. Installing a water filter in front of the mixer in this case is also considered a mandatory procedure.
Blockage in pipes
In some cases, after cleaning the filter nozzle, low pressure is still observed. The cause of this problem is often a blockage in pipes or flexible lines that blocks the flow of water.
Most often, such a nuisance is typical for outdated water supply systems where metal pipes are installed. Clogging occurs because rust particles accumulate in the pipes over the years and form a blockage.
If the flexible hoses become clogged, they will need to be dismantled, then cleaned or purchased new ones.
If such a problem is detected, the first step is to shut off the tap water supply. In the case of flexible hoses, you will have to thoroughly clean them using a cable. However, this is only relevant when the blockage is minor.
Rust often accumulates in old pipes
The same should be done with water pipes in case of blockage. If contaminants are collected regularly, it is better to replace them. It is recommended to install modern plastic pipes, because they do not corrode.
Prices for special cleaning products
Special cleaning products
How to fix a ball mixer?
The ball mixer was invented almost half a century ago, and since then its design has essentially not changed. It is very simple and quite reliable - there is nothing to break here.
If any problems arise, most often they are associated either with low-quality materials from which the plumbing fixture is made, or with bad water. As in the case of a disk mixer, the gaskets must be removed, carefully examined for damage, and then either replaced or cleaned of dirt, washed, dried and reinstalled.
The most common type of malfunction of a ball valve mixer is a poor flow. Occurs most often due to a clogged ball mechanism
For ball valve faucet models, the disassembly and repair process is similar to the one above. The only difference is the position of the ball, which rotates relative to the rubber seats tightly pressed to it. The contact density of the parts is ensured by the water bursting the mechanism.
The lever itself, which transmits movement to the control rod, is removed in the same way as in disk models: you need to uncork the decorative plug, unscrew the screw, remove it, and then remove the mixer lever.
Next, you need to unscrew the clamping nut and remove the washer that is located under it. This opens up access to the ball. The ball itself is easy to remove - you just need to pull the rod.
Internal view of a ball mixer. The ball valve mechanism is located inside a cartridge made in the form of a sleeve. The ball inside it is held by saddles, the strength of the position of the sleeve itself is ensured by a cuff and springs
At this point, disassembling the mixer can be considered complete and we can begin inspecting the parts, replacing them or cleaning them from contaminants.
As noted above, most often the problem consists of deposits of salt and grains of sand on rotating parts and the mixer elements in contact with them. All dirt must be carefully removed and the springs must be inspected - they can also be dirty. In addition, the springs may lose their elasticity and need to be replaced.
The cause of a faucet breakdown may also lie in the ball itself. Ideally, it should be made from high quality stainless steel. In this case, it only needs to be cleaned of dirt.
In fact, manufacturers, especially Chinese ones, skimp on expensive materials and produce parts from low-quality metal. Over time, the surface of such a ball begins to peel off and rust, the water holes become clogged with rust particles and the mixer fails.
In this case, cleaning the surface will not help; the ball will have to be replaced. The old part, as in the case of a disk cartridge, needs to be taken with you to the store for comparison.
You need to reassemble the ball mixer in exactly the reverse order, work very carefully and center the parts. An incorrectly installed element will wear out quickly and may cause another breakdown.
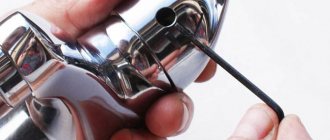
A separate item needs to be mentioned is the most common and, at the same time, insignificant problem - clogging of the mixer aerator. This small part is a regular mesh and is designed to prevent splashes. Over time, the mesh cells become clogged with salt deposits and miniature particles of debris.
Removing the aerator is very simple - you need to unscrew the washer at the end of the spout and pull out the part. If the mesh has not become completely unusable, but is simply clogged, it needs to be cleaned and replaced.
Image gallery
Photo from
Step 1: Unscrewing the aerator from the faucet body
Step 2: Using an adjustable wrench during disassembly
Step 3: Soak the aerator overnight in vinegar
Cleaning the aerator before reinstallation
The aerator can be replaced if you can find an analogue that is suitable in size, or, as a last resort, use a mixer without it.
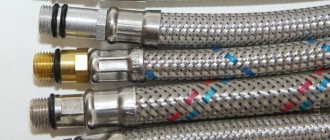
Another problem is clogging of the flexible mixer connections.
Flexible connections - rather thin tubes - have a small diameter and can easily become clogged. Particularly prone to blockages are the connections between tubes and other parts.
Considering the state of modern water pipes and the quality of city water, there is nothing unusual here. In this case, you need to turn off the water, unscrew the inlets, clean them, inspect them for damage to the threads and install them back.
Features of cleaning the aerator
A sign of a clogged aerator (fine mesh in the “spout” of the faucet) is poor water supply. This mesh is necessary to spray the flow of water into small streams in order to filter from polluting particles.
Filter nozzle (aerator)
Cleaning the aerator: step-by-step instructions
Step one: first you need to prepare special products for cleaning the mesh - these can be various mixtures based on alkaline and other active components. If you do not have such means at hand, then you can use acetic acid or lemon juice.
Cleaner
Step two: in order to remove the aerator, you need to remove the threads. This should be done carefully using a key. However, you should not try to strip the threads by mechanical force, as this will lead to irreversible damage. It is recommended to lubricate it with an oil solution, which will make the process easier.
Removing the filter nozzle
Step three: now you need to add lye or lemon juice to a glass or plastic container with hot water (the solution should be concentrated), and then place the dismantled aerator there.
The nozzle is kept in the solution for about half an hour until all the rust and limestone are dissolved
Note! Alcohol, ammonia, and liquid soap can be used as auxiliary agents. In addition, for a visible effect, the container should be shaken several times after soaking the aerator.
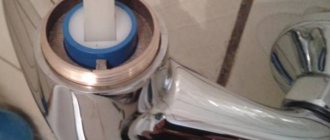
Replacing the rubber gasket
Humanity will make a breakthrough in its development when it invents eternal gaskets for plumbing fixtures, because in modern plumbing fixtures this is the main failure. They are replaced either at the junction of the body with the spout, or at the locking box, where it may simply be missing.
Kitchen design in a country house. The most successful examples of kitchen design in a private home
Before changing the gasket in the crane box, perform the following operations:
- After removing the plastic plug, use a Phillips screwdriver to unscrew the screw securing the valve handles.
- Remove the decorative nut. If it is not there, then immediately unscrew the faucet axle box from the mixer body with an adjustable wrench.
- Replace the worn part on the housing and axlebox shut-off valve.
The gasket in a mixer with a ceramic axle box occurs in a similar way.
Before replacing the gasket at the junction of the two parts, it is a good idea to wrap the adjustable wrench with a soft cloth, paper or electrical tape so as not to damage the faucet coating. After removing the low tide, replace the old gaskets with new ones and reassemble the mixer in the reverse order.
The cartridge is produced in a non-separable form, so the wear of the rubber cannot be repaired - you need to change the entire cartridge!
Kinds
Let's start with definitions. There are taps and mixers in the bathroom and not in the kitchen. Taps only supply water; mixers also allow you to regulate its temperature by mixing two streams - cold and hot water. In this article we will talk specifically about taps and how to repair them. Faucet repair is very similar, but has its own characteristics. By the way, you can read about repairing single-lever faucets here.
There are several types of taps for the bathroom or kitchen:
- valve;
- single-lever (also called cartridge or flag).
Cranes - flag and valve
Their devices are different, so the repair, even with the same damage, is significantly different. Therefore, we will consider each type separately.
What is needed for repair
Before you start repairing a kitchen faucet with your own hands, you need to prepare all the tools and necessary faucet components.
You will need:
- Hex wrench;
- Adjustment key;
- Cutter knife;
- Screwdriver and hammer.
Repairs also require additional materials - dry rags, lubricant. And if the faucet leaks, you will have to buy additional spare parts: a new cartridge or its parts (for a single-lever mixer), sealing rings, a faucet axle (for a two-valve design).
Final part
Replacing a faucet or installing a new faucet is not too difficult. The main thing here is to follow certain rules and not forget about some of the nuances inherent in a particular model. Do not ignore the installation instructions compiled by the manufacturer - they can help answer many questions. You also don’t need to be afraid to change the faucet both in the kitchen and in the bathroom with your own hands. After all, a person usually does everything for himself several times more carefully than for a stranger, even for a certain fee (this is about the issue of unskilled craftsmen). If all the elements are of high quality, and the replacement is carried out according to all the rules, the mixer will not cause any trouble to the owner of the apartment or private house for a long time.
PHOTO: santehtop.ru Kitchen faucets may differ in appearance...
PHOTO: bestremonts.ucoz.ru...but their connection will be almost identical
We hope that the information we provide today will be useful to the reader when carrying out plumbing work. If you have any questions, please post them in the discussions below. Homius will be happy to answer them as quickly as possible. There you can leave your comment on the article, express your personal opinion about it, or share your experience in replacing or installing faucets.
Watch this video on YouTube
Previous RepairTypes of beacons for floor screed: nuances and installation methods Next RepairFrom cold to heat: how to insulate an apartment with your own hands
Preparing for work
Before you begin directly repairing/replacing the mixer, you must turn off the water in the riser. Otherwise, problems with the tap will be aggravated by flooding of the apartment (not only your own, but also the neighbors below). Only after turning off the water can further work begin.
Water supply risers
To carry out repair work, you will need the following:
- some kind of vessel (to collect water);
- rags;
- Adjustable wrench;
- sponge;
- silicone seals;
- cleaning agent;
- screwdrivers;
- wrench;
- fluoroplastic sealing tape;
- rubber gaskets (new);
- pliers.
PTFE tape
All these tools/materials are quite enough to deal with a leaking plumbing faucet yourself.
On a note! If the mixer was purchased recently and you even saved the packaging, then you may find the manufacturer’s instructions and even a repair kit in it. In this case, the work will go much faster.
Repairing a two-valve tap - top tips
How to fix this type of faucet? It is necessary to disassemble and replace worn elements - the valve axle and/or gasket.
The sequence of work in this case will be as follows:
- The water is completely shut off, after which the valve flywheel is moved to the operating position so that excess pressure does not act on the parts.
- Next, you need to disassemble the structure - to do this, remove the decorative caps and remove the screw that secures the flywheel. To do this you will need a screwdriver. Next, the old crane axle box is replaced with a new one of a suitable size, and the structure is put back together.
- If the gasket is worn out, it is simply removed and a new one, lubricated with plumbing grease, is installed in its place.
Often valve mixers need to be repaired because the seal has leaked. Then it needs to be disassembled using the same algorithm and the worn packing replaced.
And sometimes, in order to adjust the valve tap, it is enough to just tighten the stuffing box, as shown in the video:
Advice! Replacement of the packing is only necessary when the bushing is tightly tightened and there is still a leak. The following are used as packing (for old faucets):
- Rubber tube of appropriate dimensions;
- Burlap threads;
- Twine impregnated with drying oil.
If you see that the threads on the parts have worn out, then this indicates that it is time to update the plumbing.
Prevention
Repairing a mixer may not always give good results; in some cases, a complete replacement of the device is required. Experts advise adhering to a few simple rules, with which the equipment will serve for a long time:
- If possible, install filters for rough water purification to prevent the entry of debris and other dirt from the water supply;
- if you install a filter to remove salts, the parts will be protected from lime, so you can forget about leaks and repairs for a long time;
- The highest quality and most durable faucets are considered to be brass, while low-quality faucets are made of silumin. Often, cheap faucets are produced by Chinese and Turkish manufacturers;
- single-lever designs are more modern and convenient, they are easier to repair.
- To clean the body and other parts, it is better to use cream-like substances or gels that are suitable for the metal of the mixer. Do not use brushes or alkaline cleaning products;
- to preserve chromium, all traces of detergents must be removed immediately with plain water;
- Gaskets and other parts need to be changed once every 2-3 years, possibly more often. This preventative measure is much cheaper than replacing the entire faucet;
- The valves must be opened and closed completely, but without effort.
Studio apartment 28 sq. m - Interior design (photo). Interior of a kitchen combined with a living room.
Knowing what to do when a kitchen faucet leaks, you can replace parts or the entire faucet yourself. Often the described schemes are suitable for all appliances, including those in the bathroom. Before carrying out work, it is important to determine the cause of the leak, and when choosing new faucets, you should buy only high-quality products and not give preference to cheap products.
Other breakdowns and troubleshooting
Malfunctions of household faucets often include damage to flexible connections, leakage of fittings, cracks and even ruptures of the vinyl tube. Often, the forces applied to the faucet cause the screws attaching to the sink to become loose. In both cases, if the faucet in the kitchen sink is leaking, urgent repairs are required.
Everything is complicated by the fact that such breakdowns are not always immediately noticeable. It may take a long time before the leak is discovered. Sometimes at the “signal” of the neighbors below.
This kind of kitchen faucet repair is also easy to do yourself. Flexible leads of the required length and fitting configuration are available in an assortment at specialized trading enterprises. They are easy to purchase and replace yourself.
To avoid unpleasant and costly consequences, you need to follow simple rules of prevention.
For example, if you install coarse and fine water filters, the formation of deposits on the faucet parts will be reduced . This will extend its service life and provide the family with environmentally friendly drinking water.
Periodically you need to check the reliability of the mixer and, if necessary, tighten all threaded connections. Avoid exposure of the mixer to any foreign objects that could cause mechanical damage. Rotate the tap valves or the rotary lever with smooth, effortless movements.