In a gardening partnership (or dacha cooperative), public main pipelines are under the responsibility of all its members. Therefore, the organization takes on the responsibility for supplying each site with water.
And then the owner of the site should take care of the installation of a personal irrigation pipeline. This is not a very difficult task, and anyone can master it. The order of laying pipes on the site depends on the irrigation method. Read about this in the chapter “Irrigation methods”. This chapter provides general recommendations.
Metal water pipe
The best water supply for a personal plot, without a doubt, is a water supply system made of plastic or stainless steel pipes. And although such a water supply system is not cheap, it quickly pays for itself, because there is no need for annual repair work.
However, not all gardeners have the funds to install new, good pipes on their site. Often, whatever is at hand comes into play. Usually these are old pipes, sometimes with clamps that were used by the previous owner of the site.
When installing a pipeline from old pipes, some difficulties may arise. The first is the difficulty in disassembling gas connections. Often they have accumulated rust or have many years of paint on them. In this case, you need to use heat. A gas burner or blowtorch is usually used for heating. It is desirable that the seal burns out on all sides, so if possible, rotate the pipe while heating. Then you should make several blows with a hammer on the fitting and on the pipe, thus getting rid of scale and burnt particles of the seal.
When the water supply system is assembled, it is necessary to take measures to protect it from various factors: temperature changes, precipitation, corrosion. The best option would be to install the assembled pipeline on metal supports with some lifting it above the ground.
In winter, water should be drained from the system to avoid pipe ruptures. To make this easier, all water supply branches should be sloping in the direction of the outlet valves.
If ordinary metal pipes are used for laying, they should be coated with paint. This simple procedure will extend the service life of the water supply several times. Pipes on a personal plot are painted exclusively with oil paints, having first cleaned their surface of rust.
When using galvanized pipes for water supply, paint only those places where there is no zinc coating (for example, threads). Metal water pipes have a long service life, which with proper care increases even more.
Features of a country water supply system
When creating a water supply system at your dacha with your own hands, you need to decide which parts of the site need to be distributed. The fact that water must be delivered to the house is, of course, understandable.
But in addition to distributing water throughout the house, it is necessary to remove pipes at key places on the site in order to install taps on them. If necessary, connect a hose to them and move it where needed.
If you already have planting beds, you can easily determine where to apply water. It is better to make several watering points: long hoses are inconvenient and difficult to carry.
.
When installing a country water supply system, do not forget to install taps. The tap in the system should be at the exit from the house and before the first branch. It is advisable to install taps further along the water supply in such a way that if problems arise, the emergency section can be turned off.
Even if summer plumbing is installed, it is necessary to drain the water from the pipes so that they do not burst when frozen. To do this, install the drain valve at the lowest point. Now you can always turn off the faucet in your home and drain all the water, protecting your plumbing system from winter damage.
Water pipe made from rubber hoses
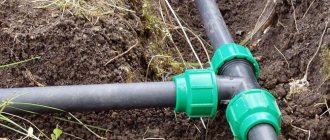
Unlike metal pipelines, which are more expensive and more difficult to install, a “soft” pipeline will not require large material costs and special tools. Instead of pipes in this pipeline, you can use ordinary rubber hoses, but it is preferable to choose reinforced ones, as they can withstand high water pressure.
The hoses are connected to each other using fittings (tubes, tees, bends, clamps)
Rubber water supply connection: 1 - valve; 2 - adapter; 3 - tee; 4 - clamp; 5 - hose
To protect the rubber water supply from the harmful effects of sunlight, and therefore extend its service life, it is better to bury it in the ground to a depth of 20-30 cm.
It is advisable to use such a water supply only during the irrigation season, and in winter, disassemble it and store it in a room with a temperature not lower than 0 ° C. The most suitable place for this is a country cellar.
Required Tools
To carry out work on arranging the water supply of a private home, you will need the following list of tools:
- shovel;
- adjustable and gas wrenches;
- welding machine for polypropylene pipes;
- roulette;
- pipe cutter;
- knife;
- hacksaw saw;
- silicone and sealant and a gun for them.
For electrical work you will need:
- screwdriver;
- tester;
- wire cutters and other electrician tools.
Since drilling a well yourself is highly not recommended, tools for performing this work are also not indicated on this list.
Drainage of the site
In soils with excess moisture, plants cannot gain a foothold and penetrate to nutrients, since the depth of roots is limited to a few centimeters of the surface layer. In this case, when developing a land plot, it is necessary to carry out drainage - draining the soil using trenches or pipes.
The installation of a drainage system is a labor-intensive and complex process, and it also requires considerable costs.
First, you need to use special instruments to determine the topography and groundwater level. If the soil on the site is clayey and the groundwater level is high, drainage is simply necessary. Effective drainage of the site is impossible without a deep (at least 1 m) street ditch. Water should be discharged towards the slope of the terrain. Such a ditch significantly reduces the groundwater level in the surrounding area. There are no particular problems with draining areas with a clearly defined slope towards or away from the street. In this case, to retain melt and storm water and direct it in the right direction, drainage ditches are dug.
If the site has a slope towards the street, it is necessary to dig a transverse ditch in front of the blind area of the house (to hold back the flow of water from the garden) and a longitudinal ditch (to discharge water into the street ditch).
If the site has a slope in the direction from the street, dig a transverse ditch along the fence, and a longitudinal one - to the garden. Therefore, the beds must be laid out across the direction of the slope.
Remember that drainage ditches protect the soil from waterlogging only during heavy rainfall and melting snow.
A drainage system on a flat site can be created as follows: In the lowest place of the site along the fence, a ditch should be dug 2 m long, at least 1 m deep and 50 cm wide. Low-lying areas on the site should be filled with the dug earth. The ditch is filled with construction debris, stones and household waste. When it is filled to the fertile layer, they dig another ditch with the same dimensions as the first. The dug soil is used to cover a ditch filled with waste, and also to fill the lowlands with it.
Soil drainage can also be done using a drainage well. It is constructed if there is no drainage system connected to the general drainage system.
Water flow diagram: a - slope of the terrain in the direction of the street:
1 - drainage ditch; 2 - fence; 3 - street ditch; 4 - drains; 5 - collector; 6 - slope of the terrain in the direction from the street: 1 - drainage ditch; 2 - vegetable garden beds; 3 - drain; 4 - pool-reservoir; 5 - collector
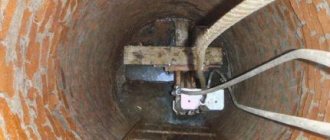
A drainage well is made as follows. First, they dig a hole at least 2 m deep. Its diameter is 1-2 m (depending on the size of the area to be drained). The resulting walls are covered with bricks, which do not need to be held together with mortar. In this case, water will seep through them. Then the drainage well is filled with broken bricks or rubble stones, and covered with a layer of peat and earth on top to prevent silting.
Drainage well. Pipe laying diagram
Pottery drainage. This is a system of long plastic or short clay pipe sections. They are laid end to end and backfilled in trenches that serve to collect and drain water. The pipes of the central branch of the system going to the drainage well are 10 cm in diameter, and the side ones are 7.5 cm. They connect to the central branch at an angle of 60°. To prevent the joints from becoming clogged, they are covered with ceramic tiles.
Trenches for pottery drainage should be 0.5-1 m deep and 0.3 m wide. When digging them, the top and subsoil layers of the earth are placed separately. A layer of coarse gravel (5 cm) is laid at the bottom of the trench, and pipes are placed on top of it, which are covered with gravel on top. A top layer of soil is placed on top of the gravel.
How to lay side drainage pipes depends on the type of soil. If the soil is clayey, the distance between the pipes should be shorter than on sandy soils (4.5 and 12 m, respectively).
Brick drainage. This drying method is usually used in small areas. A trench is dug along the length of the site, which is directed to the drainage well. It is filled halfway with rubble stone or broken brick, and a layer of gravel and topsoil are laid on top.
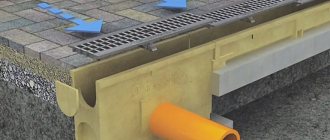
Drainage of hard artificial surfaces. Garden plots can become impassable as a result of heavy rain if there is no drainage. To ensure water flow, when concreting or asphalting any territorial area, it is necessary to provide a slight slope. It will ensure the outflow of water into a drainage ditch or drainage well. You can also install a hidden drain, for example in a patio or under a walkway. To do this, the halves of ceramic pipes are laid with a slight overlap of the ends in the center of the area, naturally giving a slope towards the east. To ensure water drainage, a 1.5 cm spruce is left in the center.
Drainage of a plot of land can also be carried out using combined techniques. For example, using the drainage network and raising the ground level on the site by adding imported soil. Regular application of rotted leaves, compost or peat helps to increase the moisture capacity of the soil without making it waterlogged. You can also plant moisture-loving plants and trees in an area with high soil moisture!
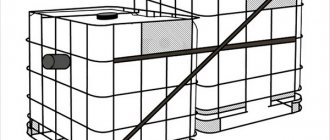
Reservoirs
You can make a simple pond on your personal plot, the construction of which will not be difficult. For its construction you will not need expensive materials, you will only need to stock up on sand or clay, roofing felt or plastic film, as well as small crushed stone.
The construction of a reservoir begins by digging a pit with sloping banks with a diameter of 1 m or more and a depth of 50-70 cm. Crumpled clay should be laid on its bottom in a layer of 15 cm, then it should be smoothed with water and allowed to dry. Then a second layer (15 cm) of clay is laid, covered with a layer of fine gravel on top, and then compacted.
There are other ways to construct an artificial reservoir, for example: using roofing material or plastic film. They are spread in several layers on sand (10 cm) and fine crushed stone is poured on top in a layer of 10 cm. If this body of water is small, you can install a drip next to it, which will undoubtedly give it a decorative look.
Dropper next to a pond
The dripper is made from a water pipe with a tap; with the help of which the flow of water into the reservoir will be regulated.
If space allows, you can also arrange a decorative pond at your dacha. It won't be difficult to do it. To build such a pond, you will need the following: waterproof materials (for example, clay or concrete with an appropriate additive that will increase the water resistance of concrete), drainage pipes and pebbles.
So, the area for the pond has been allocated and its shape has been chosen. The construction of a pond should begin by removing the top fertile layer of soil in accordance with its future shape. After this, it is necessary to make a depression in the ground (it should be deep enough for the bowl), adding a bottom thickness of about 10 cm to the required depth).
The resulting bottom of the future pond should be coated with waterproof material. If clay is used, it must be laid in two layers, carefully compacting it. If concrete is used and the area of the pond exceeds 3-4 square meters. m, it must be reinforced {put several steel rods or wire mesh in it). Concrete, like clay, is laid in two layers,
When constructing a decorative pond, you will need drainage pipes. They are placed in clay or concrete.
When the bottom of the pond is ready, it is necessary to distribute a layer of pebbles on it, slightly pressing it into the freshly laid layer of clay or concrete.
Filling the pond with water can be done either through a ditch extending from the watercourse (if there is one) or through water pipes. But with any filling method, it is better if the pond is flowing. In this case, the water exchange will be constant.
The piping that drains water from the pond is most easily made from hard plastic pipes with a diameter of approximately 30 mm. Such a pipeline will last a very long time and will not require constant repairs.
Before connecting, plastic pipes should be cut using a saw. The pipes can then be joined together either by gluing them together or by heating them over an open fire. It is also necessary to arrange a release valve. This is done so that the pipe hole is slightly expanded (like a funnel). It is then plugged with a rubber stopper.
You can plant moisture-loving plants around the perimeter of the pond. To do this, you need to dig a hole around the pond and fill it with fertile soil.
Useful tips
And some recommendations from experts:
- Before purchasing pumping equipment, it is necessary to carry out calculations for consumers . That is, calculate the optimal ratio performance and total consumption .
- preliminary piping scheme , which takes into account all consumers , regardless of their seasonal or off-season use.
- It is necessary to correctly connect the pump to the power supply network . There are many nuances here, so a professional electrician .
- The owner of the dacha must first decide whether to buy all materials and equipment separately or purchase a ready-made pumping station . It cannot be said that one of the proposed options is better than the other. Therefore, it is better to consult with specialists who will study the features of the dacha and the source of water intake.
Well drilling
Using drilling, you can accurately determine the depth and thickness of the aquifer. The speed of passage of the drill depends on the hardness of the rocks being passed through. The breeds are:
- soft (chalk, sand, clay, mixture of sand and gravel);
- medium hardness (limestones, shales, sandstones);
- hard (hard limestone, sandstone).
When carrying out drilling work, it is advisable to use the services of specialists. But, if you nevertheless decide to drill a well without outside help, you should take this event very seriously.
The well should be located perpendicular to the direction of groundwater flow. To make it easier to drill a well with a spoon drill in dry and dense soils, 1-2 liters of water should be periodically poured into it. If the rock is viscous and dense, the spoon drill is replaced with a coil drill, but after drilling with a coil is completed, you should definitely drill the hole again with a spoon drill.
For different rocks, either rotary drilling or percussion drilling on rods and ropes is used. Naturally, different drilling tips are needed.
The industry produces the BN-3 drilling and pumping unit, which is equipped with a set of equipment for drilling wells and installing piston pumps in them.
This installation is operated by two people. Drilling speed - 2 m per hour.
Drilling a well (up to 30 m deep, 105 mm in diameter) is done with two bolts: first a short one, then a long one. First, deepen the soil to 1 m, and then place a stand in the resulting depression. To provide stability, it must be secured in a metal base plate, which should be located above the recess.
A roller, as well as a flywheel with a cable drum, are mounted on a reinforced stand.
The cable must be connected to the striker.
Then the striker, raised by a cable, is sharply dropped, driving the bolt into the ground. The soil caught in the bolt is lifted to the surface, after which drilling continues.
With the appearance of an aquifer, the well should be drilled further using a bailer, clearing the lower part of the well from gravel, sand, etc.
After treating the well with a bailer, they begin to install casing pipes. Typically, steel coupling or electric-welded pipes are used. Their total length is 21 m with the length of individual links being 1-2-4 m.
Then proceed to install the pump. Its suction part is lowered into the aquifer, and a hose piston pump is placed above it. Pump flow 1-1.5 cubic meters. m per hour, water lift height - up to 40 m, electric motor power - 1 kW; If there is no electricity, a manual rocker should be used.
The well is usually equipped with a filter to protect it from the ingress of soil particles from the aquifer. The type and design of the filter is selected depending on the aquifer.
SES requirements for water
In order for no one to pick on us, we need to know the water requirements.
After manufacturing and supplying water to the room, it is necessary to take samples and take them for testing:
- According to the platinum-cable scale, we should not have colorlessness of more than 30 percent;
- There should be no foreign odors or other colors;
- The percentage of nitrates should be no more than ten;
- There should not be more than 10 bacterial bacillus per liter of liquid.
Wells
Even if your personal plot has a centralized water supply system, a well will still not be superfluous. It can be shaft or tubular, depending on the depth of the aquifer, as well as the material capabilities of the one who decided to acquire it.
To determine which type of well is most suitable for your site, you need to find out at what depth the aquifer lies.
When constructing a well on a personal plot, its location must be taken into account. Under no circumstances should it be located near garbage pits, toilets, sewers, or buildings for livestock. According to sanitary requirements, the distance between them and the well should not be less than 30-40 m.
You also need to remember that in order to maintain the well in proper condition, it must be regularly and promptly cleaned and the necessary repairs carried out.
The most suitable period for digging a well is early autumn. This is precisely the time when the groundwater level is lowest;
Selecting a water supply source
In the process of designing a country water supply system, you need to choose the optimal source of water. Check out the available options and choose the one that best suits your case.
Centralized water supply
Centralized water supply
The simplest and most convenient option. It is important that the pressure in the system is sufficient to deliver water to the building. Otherwise, you will need to additionally buy a pump or consider other methods of water supply.
Water will be supplied to the building through a system of pipes and fittings.
In this case, to install a water supply system, you usually do not need to buy any additional devices - you simply need to dig a trench, lay down the water supply elements and cut into the central main line.
Centralized water supply at the dacha
If you are unable to connect to a central line, consider the following options.
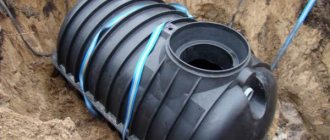
Mine well
Mine well
The method is suitable for areas with an underground aquifer depth of at least 8-10 m.
The well shaft is equipped with the efforts of 2-3 people - doing it alone is too long and difficult.
Digging a well
The main advantage of the option under consideration is the extreme simplicity of the system - you can maintain and repair it on your own. Maintaining such a well in good condition does not require significant costs.
The main disadvantage is the strictly limited water supply. Not every individual well can provide as much water as is necessary to satisfy all the needs of the family.
Water supply device from a well
This is what a well looks like with a pipe connected and a submersible pump running
Before choosing this option, calculate the amount of water you need and determine how much water the well can produce.
The installation of a water supply system based on a shaft well requires the use of a surface pump. The equipment is relatively inexpensive and easy to maintain.
Surface pump for country water supply from a well
Surface pump connection
Prices for a linear series of pumping stations
Pumping stations
Well
If the underground aquifer lies deeper than 8-10 m, you will have to drill a well. The pleasure is not cheap - drillers charge quite a significant amount of money for their work.
Water supply diagram from a well
But, having spent money once on installing a well, you will provide your dacha with clean water in the required volumes. If you want to save money, you can try to negotiate with your neighbors and make one well for several houses.
How to install water supply from a well
To install a water supply system in this case, you will need a special borehole or submersible pump. Such equipment is much more expensive than its surface counterparts, but in terms of efficiency in providing clean water, it has no equal.
The nuances of installing water supply from a well
Mine wells
Mine wells are constructed when the depth of the aquifer is small - up to 20 m. Centrifugal or vibration-type electric pumps are used to pump water out of mine wells. It also wouldn’t hurt to arrange a crane that can be used if the pump breaks down.
The well frame (cross section 1 X 1 m, 1.25 X 1.25 m, 1.5 X 1.5 m), depending on the depth, is made from logs with a diameter of 12-18 cm and buried 1.5-2 cm into the aquifer m. For the above-water part of the shaft well, pine is suitable, and for the lower part - oak, elm, alder, which do not affect the taste and smell of water. The crowns are pre-made with the obligatory adjustment of the logs and trimming to the plane of the inner side. They are fitted into a groove horizontally, connected vertically with inserted oak tenons, and in the corners - into an “oblique paw”.
Assembling the frame is the initial stage of well construction. After this, the mine and clay castle are marked. Then the soil is removed to a depth of 1-1.5 m, the assembled frame is placed in the shaft, a tripod with a pulley is installed and a waterproof clay castle is made, having a depth and width of about 1 m. The clay should be compacted.
Next, they dig a shaft, gradually removing soil from all sides to the thickness of the crown and bringing in logs for new crowns. They are pressed together with temporary staples.
To prevent the walls of the shaft well from warping and tearing, every 5 crowns, two parallel lower logs are made 20 cm longer on each side. The ends of such logs are placed in nests made in the walls of the shaft.
Brief overview of materials and necessary devices
The summer water supply system consists of the following elements:
- pipes;
- taps;
- fitting;
- pump equipment;
- filters.
For comparison, when building a winter one, pressure regulation devices (hydraulic accumulator, pressure gauge, pressure switch), automatic protection, and water heater are required.
There are many options for automated systems that allow you to regulate and control drip or greenhouse irrigation.
Scheme of automatic watering in a greenhouse, assembled from flexible hoses. The pumping equipment that supplies water from the storage tank is powered by solar panels.
For deepening into the ground, ordinary water pipes made of plastic, polypropylene or polyethylene with a diameter of 20 mm to 25 mm are more suitable. Polypropylene products with reinforced layers, for example, German Banninger pipes for hot water supply, which have a characteristic green color, are especially durable.
However, for small, few-branched circuits, medium-strength white PVC pipes are suitable.
It is better not to place hoses in the ground, but to use them on the surface. If you nevertheless decide to build a permanent water supply system exclusively from hoses, then choose products with thick walls, reinforced with nylon fibers. Their service life is usually at least 15 years.
Fittings (tees, couplings, clamps, plugs) must be suitable in diameter, and ideally also in material. Prefabricated structures usually include the required number of connecting and fixing elements to ensure tightness
The only energy-dependent element of the system is a surface or submersible pump. It should be selected based on data about the water source and the characteristics of the equipment itself. For example, the best option for a pond is a drainage pump, for a well – a deep one, and for a well, an inexpensive submersible model such as “Baby” or “Rucheek” is sufficient.
Concrete wells
In order to make a well from monolithic concrete, you must first dig a shaft. Then two formworks are installed in it: one along the walls of the shaft, the other at some distance from the first. Concrete is poured into the gap formed between the formworks. It must be left in the formwork until completely dry.
Cement is made using 400-grade Portland arch cement, sand, aggregate (gravel or crushed stone) and water. The ratio of parts should be as follows: 1: 2:3: 0.5.
First, cement must be mixed with sand in a mortar box, then you need to add water and use a shovel to mix everything thoroughly. The filler is moistened with water and added to the resulting solution.
Concrete is laid in layers of 15 cm and compacted until laitance appears. In order for the concrete to harden well, it is necessary to lay it for 7 days with damp sawdust or burlap, which must be moistened with water several times during the day.
Shallow tube well
A well of this type is used in areas where the groundwater level is not too deep - up to 9 m.
Such a well is much cheaper than a mine well, and it is much easier to build. Its undoubted advantage is that the water in it does not stagnate or become polluted. Casing pipes intended to strengthen the walls of the well do not need to be inserted into a shallow tube well.
A column with a piston pump, a water-lifting steel gas pipe (diameter 30-50 mm) and a filter are the components of a shallow tube well.
The pump can be made from a seamless metal pipe (diameter 90 mm) with a length of 45 cm. You will also need: a bracket for attaching the pipe, 3 steel pipes, a handle, 4 flanges, rubber for valves and gaskets between the flanges, a rod made of steel or brass , having a diameter of 16 mm and a length of 80 cm, as well as fasteners.
A piston pump can lift water from a depth of 5-6 m and deliver it to a height of 4-5 m. It operates as follows.
When the rod moves upward, the upper rubber valve is pressed against the cylinder body, while the lower one opens and allows water to pass through. When the rod moves down, the lower valve adheres to the flange, closing the hole for water to exit through the pipe, while at the upper valve the edges of the rubber gasket are bent to the washer. Water passes through the holes in the washer.
The next upward movement of the piston causes the lower valve to open, while the upper one is adjacent to the cylinder walls. As a result, water enters the water-lifting pipe, and a new portion of it is supplied from below into the cylinder. When testing the pump, be sure to fill the cylinder with water.
The pump is fastened to the pipe flange with bolts (12 mm), the piston parts on the rod with nuts, and the metal rod with a bolt (6 mm).
The pipe for lifting water consists of pipe sections 1.5 m long with threads. The pipes are connected using couplings.
An important part of a tube well is the filter.
Its function is to ensure the flow of water without impurities of small soil particles, so it is placed in a layer of aquiferous sand or gravel.
Good filter performance largely depends on the mesh. For example, a mesh with small holes must often be removed from the well in order to clean it, since such a mesh becomes clogged with sand very quickly.
There are several types of meshes used in filters. They differ in the way of weaving: simple square, keeper, galloon. In gravel and coarse sands, filters with square and keeper weave meshes are used. And in fine- and medium-grained sands, braided meshes are used.
If the filter is installed correctly in the well, it should allow sand to pass through only during test pumping. Moreover, the turbidity of the water should gradually decrease, and in the future there should be no sand in the water at all. The presence of sand in the water indicates that the mesh has very large holes.
Sometimes, to protect the filter from damage, a stainless metal tube with holes for water passage is put on the mesh. This may be necessary when the tube well is not lowered into a pre-prepared well, but is driven into dense soil. If the filter becomes clogged with sand during operation, it must be removed and cleaned. When cleaning, the pipe column must be rotated from left to right using a clamping clamp and lifted up by the handles.
Filter: 1 - coupling; 2 - wire; 3 - mesh; 4 - tip
Small tube wells are usually constructed by driving in soft soils where there are no pebbles, crushed stone, etc. If you decide to use this method, it is better to do it in the spring, since it is during this period that the soil is well moistened, which means it can be easily driven.
Also, in order to moisten the soil, you can pre-water the driving area with a large amount of water. But only in the dry season, when the water level is minimal, can a possible change in the water level in a tube well be correctly taken into account.
So, the place for the well is prepared. Now you need to dig a pit measuring 0.8 x 0.8 x 1.0 m. A small pit is made at the bottom of the pit. Next, the water pipe is connected to the filter, and then a metal pipe weighing 2-3 times more than the mass of the pipe together with the filter is put on it.
Then a metal clamp is secured to the pipe with bolts at a distance of 1 m from the filter. The second clamp with two blocks is mounted at a distance of 2 m from the filter. A pipe is installed vertically in the center of the pit.
After this, the pit is covered with soil, which should be compacted. Then the ends of the rope, thrown over the blocks, are attached to the woman and the driving begins directly. The woman is lifted up by a rope and thrown down. Under the influence of her weight, the woman hits the clamp and buries the pipe into the ground. As the pipe deepens, the clamps gradually move upward.
Only when the filter is in the aquifer does the plugging stop. Then you should connect the pump to the end of the pipe remaining on the soil surface. And only after this, a test pumping of water is carried out in order to clean the filter from sand.
Deep tube well
It is not easy to build this well without certain skills and values.
Such wells are usually used when the depth of the aquifer is more than 20 m. A tube well is a borehole, the walls of which are secured with water supply casing pipes. Their length is 4-6 m. The pipes are connected using couplings.
If the depth of the well is large, several pipes are lowered into it, the diameter of which is directly dependent on the depth and thickness of the aquifer, and the diameter of the filter and pump.
Percussion drilling, which is typically used in medium to hard rocks, can be done with either a rod or a wireline. Rope drilling is preferred if the well depth is large.
First, you need to dig a shaft, over which a tripod is installed and a bolt (drilling tool) is suspended on a steel cable thrown over the block.
Holding the drilling tool vertically, lower it to the bottom of the shaft. The striker is aimed at the plug mounted inside the bolt. Under the weight of its weight, the striker hits the cork with force, thereby forcing the tip of the bolt to crash into the ground. After making 5-10 blows, you need to clean the tip from the soil. To do this, the bolt must be raised to the surface.
Having reached the water-bearing sands, you need to lower water casing pipes into the well. Further drilling continues using a bailer.
When the aquifer thickness is sufficient, drilling of the well is stopped. The thickness of the aquifer can be determined by a sharp increase in the water level in the well.
If the aquifer has low thickness, then it is passed through with a bailer. The casing pipes are lowered to the waterproof layer. To reach a thicker aquifer, a smaller diameter bolt is used for further drilling. The shaft, after drilling is completed, is filled with soil and compacted. Now you can begin installing the pump in the well. But before this, you should attach a suction tube (3-4 m long) with a filter to the bottom of the pump cylinder. Next, in order to close the gap between the walls of the casing pipe and the filter, you need to wind hemp under the filter coupling. A clay castle and a blind area are built around the tube well.
We do our own water supply
Some people think that this is a rather difficult question. In fact, she is not.
If the water supply source has already been created by you or the former owners, all that remains is to install the pipeline, pump and other equipment. You can do all this completely with your own hands and there is nothing to be afraid of.
Water supply pipe layout diagrams
After a water well has been constructed, a diagram of the water supply elements is developed in one of two options:
- Serial connection of pipes.
- Collector distribution of water supply elements.
Sequential
The first option is suitable for a small house.
The principle of its operation is as follows:
- Water flows sequentially into the house through the main pipeline.
- A tee with an outlet is installed in the desired direction at the points of water consumption.
The disadvantage of this option is that when several water consumers use water, the pressure drops sharply at the most distant point. Therefore, such a scheme for supplying water from a well to a house is not acceptable for a residential country house and cottage, but is well suited for country housing.
Collector
Collective pipe distribution is suitable for a country house where people permanently live. With this connection, separate pipes are diverted individually from the main collector to any water intake point in the house.
Minor pressure losses are possible. Although the cost of a manifold connection is higher, it is compensated by the quality, convenience and reliability of the plumbing system.
Casing
It is better to use steel casing pipes for wells, especially deep ones, as they are not only more reliable than others, but are also easier to connect. The casing pipe consists of individual links. Their length is 2-4 m. Threaded couplings or welding are used to connect steel links.
Which method of connecting the links to choose depends on the diameter of the pipe. Thus, it is easier to connect pipes with an internal diameter of 50 mm with couplings, and pipes with a diameter of 100 mm or more - by welding.
To connect casing pipe links using welding, it is necessary to cut the pipe into individual links (2^3 m long) with an oxygen cutter. The cutting line should be made with a toe. This is necessary in order to facilitate centering during welding, and also to ensure that the joint does not have large gaps. Each cut must be marked with paint.
Centering of the links before welding is carried out using a jig made of two corners or three steel plates, which should be welded to the rods. This will give strength to the connecting seam.
If there is no welding or a non-steel casing pipe is used, the links can be connected with bolted steel plates. The width of the overlays is 15-30 mm, the length is 100-200 mm, the thickness is 6-9 mm. Narrow edges of the overlays should be cut at an angle of 30°. This is necessary so that the tool does not cling to the internal gaskets, and the external gaskets prevent the pipe from passing through the ground.
On the internal linings for fastening, pe-\u003e-£4hi is cut, but the connection of a steel or cast iron casing pipe can be made without internal linings. To do this, you need to cut a thread directly in the wall.