Today on our agenda is the assembly, installation and connection of the toilet to the sewerage system and water supply. How easy it is, and most importantly, to install your new push correctly (jargon translates as toilet, toilet), we’ll look at it step by step, so you can install it yourself, without turning to a specialist, with your own hands. Well, most importantly, you will save 20 evergreens by installing a toilet yourself. Set your hands and get ready! Most of the work when installing and assembling a toilet is done once. So let's strain our brains and remember
..
First, let's watch a training video that will clearly show you from beginning to end how to assemble, install and connect a toilet. Let's enhance the perception of the material by visual viewing.))
Video - Assembling and installing a toilet on tiles.
Before we start installing and connecting the toilet, we need to mark the room. Do you agree that pulling an already assembled toilet is not very convenient, but moving the flush bowl is much easier? Let's start posting.
Marking the premises for installation and preparatory work.
We take the toilet flush bowl and place it in the center of the toilet. We sit down on it - this is important and close the doors behind us. We begin to fuss, get up, bend over while sitting on the toilet to the left and to the right. If there is a wall in the way, door handles, or the toilet plays on the tiles, we position it more conveniently, well, in general, so that in future use it will not cause you any inconvenience. Let's not forget to look at the general view from the side, how it will look once installed. If there is a gap in the toilet bowl on the tiles, there is not much you can do about it. We can only hope that by tightening the bolts securing the toilet to the floor, this will go away. But you can play it safe, make a backing of thick rubber or plastic, which is placed at the bottom of the toilet bowl, so that it is not visible from the outside; the rubber can be cut off, but with plastic there will be a lot of hemorrhoids.
We were happy with the location of the toilet in the toilet, which means we can outline the base of the bowl with a marker and put dots at the mounting points.
When I mark a push, I always use a marker. Since, to a large extent, the installation of the toilet takes place on tiles, and the pencil is constantly jammed. Graphite, to a large extent, does not make the exact mark I need, and since attaching the toilet bowl is the second most important job, in my opinion, there should be no mistakes at all.
We outlined the base of the toilet bowl and the fastenings with a marker, now we need to drill the tiles according to the fastening marks. Let's drill.
- Floor tiles are difficult to drill, so don’t worry if it takes you 15 minutes to drill one hole for fastening. We drill with a drill or hammer drill without impact, using a twelfth drill.
It is better to immediately change the standard toilet fasteners that come with it by purchasing a new one in the store. Since the plug included in the kit is 12, and the bolt itself is 10. We drilled with a 12-gauge drill. In general, the paradox is that the bolt fits into the plug very tightly, due to the fact that the plug with a hole of the same diameter, when the bolt is tightened, halfway through the plug, it all simply begins to turn. Even if you drill a hole in the tile with an 11th drill bit, the plug simply won’t fit in there. Buy new and don't worry. It's time to install the toilet bowl onto the holes in the tile. umnyestroiteli.ru
Installing a toilet bowl on tiles with your own hands.
We immediately insert plugs (quick installation “B.M”) into the holes we made in the tiles, which we purchased in the store. Now, thanks to the fact that we have outlined the sole of the toilet bowl, we simply install the toilet according to the resulting contours. And without lengthy searches for a plug bolt. Everything will be as it should be.
Before screwing the bolts into the mounting holes of the toilet, do not forget to put special nylon engravers or “under-corks” on them, as I call them.
We take a medium-sized adjustable wrench and try it on according to the size of the bolt, twisting our fingers and starting to screw in the bolt. Sometimes you need to get the bolts to start screwing in by tapping something on top. So, feel free to tap with the same key, just take good aim. The mounting ears of the toilet bowl consist of the same material as the bowl itself, and are not reinforced. If you accidentally knock it off, you won't be able to install the toilet properly.
Tighten the bolts until they stop with a slight tension. This should be enough. After some time, they will still need to be tightened further.
Again, when tightening the bolts, the main thing is not to overdo it, so as not to damage it.
So we have fixed the toilet bowl, now we will close the upper part of the bolts with lids and apply silicone or sealant along the contour of the sole, between the tile and the sole. The installation of the toilet is not yet complete, because there is still assembly and connection to water and sewer ahead.
Toilet assembly;
Each toilet is assembled differently. This does not mean that assembling a toilet is a purely individual approach as for different products. There is a general technology, purely theory, about how and what should be inside the toilet, but you will do the assembly practice yourself. Since your toilet should have come with instructions specifically for your push, written in a bunch of languages. The instructions for assembling the internal mechanisms and screwing the tank are laid out clearly and without any problems, an assembly diagram is attached and there is a layout of parts, which item should be located where. You are unlikely to find anything more detailed, and in general, when you assemble something, you really want an intelligent person who knows how this or that device is assembled to constantly pull your hand and show you where and what is installed. So, don't blame me.
We need to connect the toilet bowl and the tank together.
First of all, we insert the gasket into the hole in the toilet bowl where the tank should be located, this creates a gasket between the tank and the toilet bowl. In the photo on the right, you can clearly see the pins, all the gaskets and mounting parts. We find the fastening pins, there should be two of them, look inside the toilet and insert them all the way. They must connect and secure the tank to the bowl. Using special clamps that screw onto the clamping pins, we press one against the other and twist until it stops. In the photo below you can see this.
Next, all that remains is to assemble the flush part of the toilet bowl
. I don’t even know how to show the assembly of the toilet flush part without diagrams. But first, I want to show you what a toilet cistern consists of. Precisely the components. It's in the photo, so click it and it will enlarge.
Well, now the actual scheme itself.
I personally see all these diagrams according to which the toilet is assembled, I fall into a stupor. For those like me, I would like to suggest watching another video in which Nikolai Pavlov explains in detail how the toilet tank is assembled, mounted to the bowl, and completely assembles the flush mechanism, the drain part of the tank.
Video - Assembling the drain part of the tank and installing it on the bowl.
All that's left to do is connect the water supply hose to the toilet
. To do this, on both sides of the flush barrel, at the top, they came up with two holes that will allow, depending on which side of the toilet the hose fits, to place it on the desired side.
Set for work
The home craftsman will need the following tools:
- impact drill or hammer drill;
- construction knife;
- screwdrivers;
- adjustable wrench;
- sandpaper;
- roulette;
- marker, pencil.
The type of fasteners depends on the type of toilet:
- floor: dowels;
- suspended: anchor bolts.
Video - Assembling and installing a toilet on tiles.
Before we start installing and connecting the toilet, we need to mark the room. Do you agree that pulling an already assembled toilet is not very convenient, but moving the flush bowl is much easier? Let's start posting.
Marking the premises for installation and preparatory work.
We take the toilet flush bowl and place it in the center of the toilet. We sit down on it - this is important and close the doors behind us. We begin to fuss, get up, bend over while sitting on the toilet to the left and to the right. If there is a wall in the way, door handles, or the toilet plays on the tiles, we position it more conveniently, well, in general, so that in future use it will not cause you any inconvenience. Let's not forget to look at the general view from the side, how it will look once installed. If there is a gap in the toilet bowl on the tiles, there is not much you can do about it. We can only hope that by tightening the bolts securing the toilet to the floor, this will go away. But you can play it safe, make a backing of thick rubber or plastic, which is placed at the bottom of the toilet bowl, so that it is not visible from the outside; the rubber can be cut off, but with plastic there will be a lot of hemorrhoids.
We were happy with the location of the toilet in the toilet, which means we can outline the base of the bowl with a marker and put dots at the mounting points.
When I mark a push, I always use a marker. Since, to a large extent, the installation of the toilet takes place on tiles, and the pencil is constantly jammed. Graphite, to a large extent, does not make the exact mark I need, and since attaching the toilet bowl is the second most important job, in my opinion, there should be no mistakes at all.
We outlined the base of the toilet bowl and the fastenings with a marker, now we need to drill the tiles according to the fastening marks. Let's drill.
- Floor tiles are difficult to drill, so don’t worry if it takes you 15 minutes to drill one hole for fastening. We drill with a drill or hammer drill without impact, using a twelfth drill.
It is better to immediately change the standard toilet fasteners that come with it by purchasing a new one in the store. Since the plug included in the kit is 12, and the bolt itself is 10. We drilled with a 12-gauge drill. In general, the paradox is that the bolt fits into the plug very tightly, due to the fact that the plug with a hole of the same diameter, when the bolt is tightened, halfway through the plug, it all simply begins to turn. Even if you drill a hole in the tile with an 11th drill bit, the plug simply won’t fit in there. Buy new and don't worry. It's time to install the toilet bowl onto the holes in the tile. umnyestroiteli.ru
Installing a toilet bowl on tiles with your own hands.
We immediately insert plugs (quick installation “B.M”) into the holes we made in the tiles, which we purchased in the store. Now, thanks to the fact that we have outlined the sole of the toilet bowl, we simply install the toilet according to the resulting contours. And without lengthy searches for a plug bolt. Everything will be as it should be.
Before screwing the bolts into the mounting holes of the toilet, do not forget to put special nylon engravers or “under-corks” on them, as I call them.
We take a medium-sized adjustable wrench and try it on according to the size of the bolt, twisting our fingers and starting to screw in the bolt. Sometimes you need to get the bolts to start screwing in by tapping something on top. So, feel free to tap with the same key, just take good aim. The mounting ears of the toilet bowl consist of the same material as the bowl itself, and are not reinforced. If you accidentally knock it off, you won't be able to install the toilet properly.
Tighten the bolts until they stop with a slight tension. This should be enough. After some time, they will still need to be tightened further.
Again, when tightening the bolts, the main thing is not to overdo it, so as not to damage it.
So we have fixed the toilet bowl, now we will close the upper part of the bolts with lids and apply silicone or sealant along the contour of the sole, between the tile and the sole. The installation of the toilet is not yet complete, because there is still assembly and connection to water and sewer ahead.
Toilet assembly;
Each toilet is assembled differently. This does not mean that assembling a toilet is a purely individual approach as for different products. There is a general technology, purely theory, about how and what should be inside the toilet, but you will do the assembly practice yourself. Since your toilet should have come with instructions specifically for your push, written in a bunch of languages. The instructions for assembling the internal mechanisms and screwing the tank are laid out clearly and without any problems, an assembly diagram is attached and there is a layout of parts, which item should be located where. You are unlikely to find anything more detailed, and in general, when you assemble something, you really want an intelligent person who knows how this or that device is assembled to constantly pull your hand and show you where and what is installed. So, don't blame me.
We need to connect the toilet bowl and the tank together.
First of all, we insert the gasket into the hole in the toilet bowl where the tank should be located, this creates a gasket between the tank and the toilet bowl. In the photo on the right, you can clearly see the pins, all the gaskets and mounting parts. We find the fastening pins, there should be two of them, look inside the toilet and insert them all the way. They must connect and secure the tank to the bowl. Using special clamps that screw onto the clamping pins, we press one against the other and twist until it stops. In the photo below you can see this.
Next, all that remains is to assemble the flush part of the toilet bowl
. I don’t even know how to show the assembly of the toilet flush part without diagrams. But first, I want to show you what a toilet cistern consists of. Precisely the components. It's in the photo, so click it and it will enlarge.
Well, now the actual scheme itself.
I personally see all these diagrams according to which the toilet is assembled, I fall into a stupor. For those like me, I would like to suggest watching another video in which Nikolai Pavlov explains in detail how the toilet tank is assembled, mounted to the bowl, and completely assembles the flush mechanism, the drain part of the tank.
Video - Assembling the drain part of the tank and installing it on the bowl.
All that's left to do is connect the water supply hose to the toilet
. To do this, on both sides of the flush barrel, at the top, they came up with two holes that will allow, depending on which side of the toilet the hose fits, to place it on the desired side.
We fix it on the floor
Next, the bowl is attached to the floor in one of three ways: using dowels, fixing it with epoxy or taffeta.
Using dowels
Sequencing:
- as already mentioned, before connecting the toilet to the sewer, dowel sleeves are placed in the holes;
- place a sheet of rubber under the toilet and trace the sole with a marker, then mark the position of the mounting holes;
- cut out of rubber according to the markings a gasket with holes for fasteners;
- lifting the toilet, place a gasket under it and screw the product with dowels;
- close the mounting holes with plugs.
Without a gasket, if there are uneven surfaces on the floor, the ceramics will crack when the fasteners are tightened. If the floor is perfectly flat, no gasket is installed.
Regardless of the gasket, do not overtighten the fasteners.
Installation with epoxy glue
The method allows you to do without drilling the floor, it works like this:
- the sole of the toilet bowl and the floor at the place of its installation are treated with a grinder with a grinding disc or sandpaper in order to increase the surface roughness;
- wipe off dust from both surfaces with a damp cloth, dry and degrease;
- prepare epoxy glue and apply it to the floor inside the drawn contour;
- install the toilet on the glue, inserting the outlet into the socket;
- wipe off excess glue;
- seal the junction of the outlet and the socket.
Installation on taffeta
The method is used when the screed has not yet been laid on the floor.
Taffeta is a board with the same outline as the sole of the toilet. Its side edges are made slightly converging upward, and thin holes are drilled for fasteners. Installation procedure:
- taffeta is laid on the floor where the toilet is installed;
- pour the screed - it will fix the taffeta;
- lay the finished floor covering;
- Place the toilet on the taffeta and screw it to it with self-tapping screws.
Design options for modern models
The range of plumbing fixtures on the market is varied. Any owner has the opportunity to choose presentable and functional equipment to suit his own taste and budget.
In addition to traditional floor-standing models, manufacturers offer a wide selection of wall-hung and built-in devices. The drain tank in them can be attached to the wall or connected to the base of the plumbing fixtures.
The latest toilet models also differ in the design of key components.
The output discharge is:
The type of outlet drain should be taken into account when choosing a model. If your plans do not include altering the sewer pipe supply, then in the installed model the drain should be arranged according to the same principle as in the dismantled one.
Inconsistent drains and plumbing supply, provided that it is not a toilet with an outlet, are almost impossible to combine as tightly and efficiently as possible.
Fixation of plumbing fixtures to the floor is carried out using specially made two or four fastening points. But you can also find models in which the corners included with the product are used for fastening to the floor.
Getting ready for installation
The base for installing the toilet must be level. There are several options for the development of events, namely:
- if the floor is tiled and does not have differences in level, we do not carry out any preliminary measures to level the base;
- If the floor is tiled and is not level, we install the toilet using choppers. To do this, holes are drilled in the floor, the choppers are driven into them at a level, and then the toilet is attached to the choppers using screws;
- if it is planned to replace the tiles, dismantle the old cladding and fill in a new screed if the old one has differences in level;
- if the toilet is installed in a new house or apartment without any finishing, fill in the screed and lay the tiles.
We pay attention to the pipes. We clean the sewer from debris and various deposits, install a tap on the water supply (if it was missing before) to shut off the water supply to the tank.
General recommendations for installing toilets
A new plumbing fixture can be placed in the place of the old one, or you can choose another “corner” for it, making a small redevelopment in the bathroom.
Preparation of tools and materials
To connect the tank to the water supply you will need a flexible hose. It usually comes included. For connection to the sewer - a rigid drain pipe or a bendable corrugated cuff.
To assemble the structure and connect to communications you will need:
- hammer drill or impact drill;
- a set of screwdrivers with flat and Phillips blades;
- set of wrenches;
- building level;
- a simple pencil or marker;
- stationery knife;
- roulette;
- chisel;
- hammer.
If the installation of plumbing fixtures will be carried out on tiles, then it is also necessary to prepare a “ballerina” or a spear-shaped drill for working on tiles. To make holes for installing fasteners, you will also need an 8 or 10 mm drill.
Auxiliary materials will also be required:
- metallized tape;
- silicone sealant;
- FUM tape;
- polyethylene film;
- moisture-absorbing piece of fabric;
- container for collecting liquid.
Depending on the type of model being connected and the installation method, cement mortar may also be required.
Removing an old toilet
Removing an old toilet is one of the most time-consuming operations.
The work is carried out in several stages:
- Turn off the tap.
- Disconnect the hose going to the tank from the water supply and drain the water from it.
- The empty tank is removed from its mounts.
- Unscrew the nuts located on the back of the toilet and disconnect it from the sewer. To loosen the drain, the toilet needs to be rocked from side to side.
- Drain the remaining water from the toilet by tilting the bowl forward.
- The sewer hole closer to heaven is cleared of dirt and temporarily blocked with a rag gag or a wooden plug of suitable diameter.
The easiest way to remove the bolts is to hold the head with an open-end wrench and unscrew the nut with an adjustable wrench. If the threaded connections are heavily slagged with salt deposits or rusted.
To make the task easier, use universal lubricant “WD-40”, which can loosen deposits in a matter of minutes. In the absence of one, you can use vinegar or kerosene.
If rotten taffeta or any other support is found under the dismantled toilet, it must be removed. This can be done with a hammer drill, nail puller or chisel.
In older houses, drains on sewer pipes are often secured with cement coating. The easiest way to knock down dried mortar is with a chisel, pricking it in several places. Read on for detailed instructions on dismantling an old toilet.
Sequence of assembly of the structure
For safety reasons during transportation and to further save space, plumbing fixtures arrive in stores disassembled. To enable self-assembly, each product comes with illustrated instructions.
The general outline of the structure assembly is as follows:
- A drain mechanism is installed in the tank, which is included with the device in an already assembled form. When installing the mechanism, it is important to examine the contacting surfaces. If burrs are found, remove them.
- A sealing rubber washer is placed on the mechanism. The device is immersed in the tank and secured with a nut.
- A tank equipped with a drain mechanism is attached to the shelf of the bowl. The elements are fixed using nuts and bolts, after placing washers and rubberized seals on the fasteners.
When installing the tank fittings, the plastic nuts of the fill valve and drain mechanism are tightened by hand without applying excessive force. During the tightening process, it is necessary to hold the mechanism itself, thereby protecting the gaskets from turning and damage.
The base for installing the plumbing fixture must be level. If the floor surface or base of the toilet is uneven, rubber or plastic pads must be placed under the sole during installation before final tightening. The position of the device is leveled using a building level.
Chopiks can also be used for this purpose. Holes are made in the floor for their installation. The chopsticks are set according to the level, deepening to the required depth. The toilet is secured with screws.
The base of the bowl is placed on the prepared base. Marks are made at the fastening points, which act as a guide for drilling mounting holes. Dowels are driven into the mounting holes. The fasteners inserted through the sealing nuts are tightened and closed with plugs.
Connection to the sewer
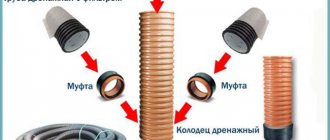
The most cost-effective and easiest to implement option for connecting to a sewer is using a corrugated or eccentric cuff. This connection method saves in cases where it is difficult to determine the exact distance from the sewer pipe outlet to the toilet outlet, or when the plumbing fixtures are installed in a place that is inconvenient from an installation point of view.
Remove the wooden cap from the neck of the sewer outlet and remove the rag plug. The bell is cleaned of accumulations of dirt, rust and solution residues. One end of the cuff is inserted into the neck of the sewer outlet. The seam is sealed by covering it with 2-3 layers of the compound. The other end of the cuff is attached to the outlet.
If the installation has to be done in a cast iron socket, then the cuff is inserted with the petal part into an adapter measuring 123 x 110 mm. The free end of the adapter is buried in the cast iron socket, covering the joints of the elements with plumbing sealant.
To connect the outlet of a plumbing fixture, the free end of the cuff is inserted into the protrusion and turned until it stops so that the holes in the trim completely coincide.
The connection is sealed and tested experimentally by pouring 8-10 liters of water into the toilet. If a leak is detected, the connection is resealed and checked. If no leaks are found, you can begin fixing the toilet.
To create a more reliable connection, it is better to connect the outlet through a drain pipe. In addition, when using a drain pipe, the plumbing fixture acquires a more presentable appearance.
When working with vent pipes, you should remember that undercutting is contraindicated for them, and their sealed structure cannot be changed during the installation process. We also suggest that you read our other article, which describes in detail the diagrams for connecting a toilet to a sewer.
Connection to water supply
At the final stage of installation, a connection to the water supply system is made. The water supply is made from the top or bottom of the tank, using the flexible hose that comes with the kit. One end of it is screwed to the outlet of the tank, and the other to the water pipe.
The lateral supply can be made from the right or left side of the tank. Therefore, at the stage of purchasing a product, you should choose the method of supplying water, focusing on how the pipes are laid in the bathroom.
How to install a wall-hung toilet with installation
To install wall-hung toilets, the outlet of the sewer pipe must be located near the wall. The specific distance from the wall is indicated by the manufacturer, but it should be small - about 13-15 cm from the far edge. If the exit is from the floor, there is a solution - a special lining, with the help of which the drain is moved closer to the wall.
Installation of a wall-hung toilet begins with attaching stops to the wall installation frame. They are attached in two at the top and bottom. With their help, the distance to the wall is adjusted, the frame is raised and launched.
Install the top stops
The upper stops have the form of rods and are adjusted using a socket wrench and a screwdriver. The lower stops are more like plates; they are also adjusted with a socket wrench but with the head positioned on the side.
Bottom stops and height adjustment
The assembled frame is placed against the wall, its center is positioned above the middle of the sewer outlet. The mark on the frame rises or falls to the height required by the manufacturer (there is a mark on the frame, also indicated in the passport, usually 1 meter).
Adjust in height and away from the wall
Using a bubble level, the horizontal and vertical installation of the installation for a wall-hung toilet is checked.
Checking horizontality
By adjusting the height of the stops, an equal distance from the wall, specified by the manufacturer, is set. How to conveniently do this, look at the photo.
The specified distance to the wall is set
The exposed frame must be fixed to the wall. Mark them in appropriate places with a pencil or marker and drill holes. Plastic dowel bodies are installed in them. Most of the wall-hung toilets are imported, and they recommend sealing the dowel bodies with sealant. Some of the sealant is squeezed into the drilled hole and a dowel is inserted. Then, before installing the fastener itself, the sealant is applied to the plastic housing.
Connecting elements - pipes, couplings - can be installed in a fixed installation. They all come included and simply snap into place.
Installation of pipes and couplings
Installation of pipes from the tank and sewerage
Next, metal rods are installed on which the toilet bowl will be supported. They are screwed into the corresponding sockets, and silicone seals are put on top (in the bottom photo these are two rods above the sewer outlet).
Toilet holders are installed, the sewer pipe is fixed
The sewer pipe extends to the required distance and is fixed in the specified position using a bracket. It covers the pipe from above and is inserted into the groove until it clicks.
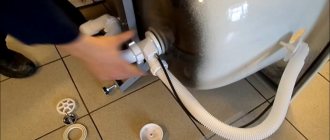
Next, water is connected to the tank. Open the tank lid (it has latches), remove the plug on the side surface. Right or left - depends on where your water supply is. A corrugated pipe is inserted into the opened hole, a mating part is inserted from the inside, everything is connected using a union nut. It is necessary to tighten without using excessive force - it is plastic.
Connecting the installation to the water supply
A tee is installed inside the tank, and a pipe (usually plastic) is connected to the desired outlet. This is done with the help of an adapter and an American one.
Connecting a water pipe
The hose from the tank is connected to the special inlet of the tee. It is flexible, in a metal braid. Tightened with a union nut.
Connect the hose from the tank
Replace the cover. In principle, the installation for the toilet is installed. Now we need to close it. To do this, make a false wall from moisture-resistant plasterboard. It is recommended to use two sheets, but one is also possible. Drywall is attached to the installation frame and to the mounted profiles.
Attaching the false wall to the installation frame is mandatory
Next, the wall is finished, after which the toilet bowl is hung and a decorative flush panel with buttons is installed.
The plugs are cut off
The toilet is placed on pins, its outlet goes into a plastic socket. The connection is sealed, no additional measures are required. This completes the installation of the toilet.
Result of work
Connection options for plumbing fixtures
As already noted, there is a wide variety of plumbing fixtures on sale, which can have one of three types of connection to the sewer: with horizontal, vertical and oblique outlet. Each of them has its own characteristics.
Option #1 – with vertical outlet
Such models are popular in European countries. Their design is such that the siphon located in the bowl and the outlet pipe “look” down.
To connect a plumbing fixture with a vertical outlet, perform the following steps:
- A screw flange equipped with a locking device is installed at the exit point of the drain pipe.
- A sewer pipe is placed in the center of the flange, clamping it as it turns.
- The toilet is “mounted” on the flange, securely securing the outlet pipe.
The connecting parts of the flange and the vertical outlet of the toilet are standard. There shouldn't be any difficulties connecting them.
The installation and connection process is presented in the following selection:
The screw flange collar must fit tightly into the outlet socket and must be turned during installation to ensure complete articulation. The sealing ring located between the flange and the toilet flush will ensure the reliability and good tightness of the clamp. Step-by-step instructions for installing a toilet with a vertical outlet can be found in this material.
Option #2 – with horizontal outlet
Plumbing fixtures with horizontal outlet have become one of the most popular in our country. The relevance of installing such equipment is explained by the specifics of the wiring of the sewerage system in Russian apartments.
The horizontal outlet is located at the back of the bowl or base and is directed backwards. Models with this design are installed end-to-end with the wall, connecting to any type of sewer riser location.
The connection is made using pipes of the appropriate size. The connection is sealed by placing a sealing rubber inside the pipe.
Direct connection is made only if the sewer system is made of plastic. To connect to cast iron pipes, the circumference of which rarely has an ideal shape, cuffs and eccentrics are used.
Option #3 – with oblique release
The socket in models with an oblique outlet is located at an angle of 45° relative to the floor surface. Models with an inclined outlet are superior to their counterparts in that they are less likely to become clogged, since this design makes it possible to create less resistance when moving solid sewage.
Connecting a device with an oblique outlet to the sewerage system can be done in one of three ways:
- By direct connection through the sewer branch socket. They are chosen when there is no need to move the plumbing fixture, and the direction of all elements clearly coincides. The toilet outlet is treated with soapy water and buried in a socket equipped with a cuff.
- Connection via eccentric. A socket with a center offset of 5 cm, equipped with a sealing gasket, is mounted in the sewer outlet and by rotating the toilet is shifted to the right or left side.
- By installing a corrugated outlet. The use of corrugation makes it possible to deploy the relative oblique sewer outlet device even at an angle of 90°.
A flexible outlet, although convenient, is far from the best means for connecting toilets with an oblique outlet. It should be used only in extreme cases, when other methods are not possible.
To find out in more detail how to install a toilet with an oblique outlet, follow the link.
Types of toilets
In this article, we will consider not the features of flushing or the shape of the bowl, but those design features that determine the list of installation work.
By installation method
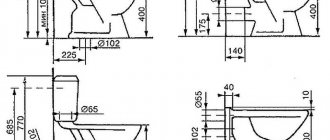
The toilet itself consists of a plumbing bowl and a flush cistern. The bowl can be floor-mounted or suspended. If the bowl is suspended, then the tank is hidden - built into the wall. In the case of a floor-standing bowl, there are three options for mounting the tank: on a special shelf on the bowl (compact), separate, connected using a flexible hose, in an installation (hidden in the wall of the frame).
Typical sizes of toilets of different designs
The advantage of a floor-standing toilet with a regular flush cistern is its ease of installation. It can be installed without starting repairs. The disadvantage is that compared to a suspended one, it takes up more space and looks heavier. Accordingly, installation of wall-hung models is complicated—it is necessary to secure the supporting structure—the installation—in the wall. Perhaps this is only during renovation.
Release to sewer
The choice of toilet for discharge into the sewer depends on the location of the sewer pipe. They happen:
- with horizontal outlet;
- oblique release;
- vertical.
Types of toilet outlets
If the pipe is in the floor, a vertical outlet will be optimal. If the outlet is in the floor, but is close to the wall, it is most convenient to have an oblique toilet. The horizontal version is universal. Using a corrugated pipe, it can be connected to both the wall and the floor.
Installation features of compact models
The technology for correct installation of floor-standing toilets of compact models includes seven main stages:
- The toilet bowl is moved as tightly as possible to the drain hole and checked whether the outlet coincides with the sewer pipe.
- If there are small displacements, the device is connected to the sewerage outlet using a corrugated pipe.
- The plumbing fixture with the connected corrugated pipe is moved towards the wall, making sure that strong creases and bends do not form on the pipe.
- The ends of the connecting element are covered with a thin layer of silicone sealant.
- Having adjusted the position of the device, use a pencil to mark the outline of the boundaries of the base of the device and the points where it is planned to drill holes for deepening the dowels.
- The toilet is moved to the side. At the designated points, holes are made with a diamond drill with a diameter equal to the size of the dowels used.
- Plastic plugs are inserted into the holes. The toilet is “reinstalled” in its original place. Bolts are screwed into the prepared holes.
Tip: to make it easier to put the corrugated pipe on the outlet, its end must be coated with liquid soap on the inner walls.
To ensure the tightest possible fit of the toilet sole to the floor covering, silicone is applied along the intended installation counter of the device. The toilet itself is then placed in its original place, guided by the intended contour.
To fix the plumbing fixture, washers and screws threaded through the holes in the heel are tightened extremely carefully. Under no circumstances should they be driven in!
Wall mount
A toilet that appears to be attached to the wall is called a wall-hung toilet. In fact, it is attached to a steel frame - an installation, after which the space where it is placed is covered with a false wall (plasterboard partition). The flush cistern is installed inside the installation, so that in the end only the toilet remains visible, as if screwed to the wall.
Installation of a monoblock toilet
Models in the “monoblock” category are supplied to the market assembled. They do not require adjustment of the drain mechanism, since all fittings are already adjusted at the factory.
Otherwise, the installation technology for monoblock models does not differ from the installation of compact toilets. Connecting to communications and fixing the device itself is carried out in an identical way.
Important point! If the holes in the toilet bowl are made at an angle relative to the floor surface, then they must also be drilled at an angle. We also recommend reading the article on choosing monoblock toilets.
Assembling a plastic toilet seat
Next you need to assemble a plastic seat or toilet seat. Ours does not have a microlift and has a basic structure. Here is a photo of the kit.
To begin with, we take silicone inserts and install them in special places. We connect the lid and the “seat” itself. After we insert the metal fasteners, we put on decorative washers with silicone spacers.
Next you need to put on all the inserts that are attached to the lid and the toilet seat, these are small round ones for the lid and long and elongated ones for the “seat”.
Then we install the assembled plastic seat into special holes in the bottom of the toilet. And tighten it with the already familiar plastic nuts. This completes the fastening of the toilet seat.
Installation of suspended structures
The installation of suspended models should be carried out as part of a major overhaul before finishing work begins. To properly install a wall-hung toilet, it must be attached only to a solid wall made of solid brick or concrete, which can withstand considerable loads.
When choosing a place to install a suspended structure, you should take into account that the shorter the pipe section connecting the plumbing fixture to the sewer, the easier it will be to clean it in case of blockage.
Work on installing the suspended structure is carried out in the following sequence:
- Marking. When choosing a location, it is important to consider the location of the outlet in order to obtain the optimal pipe slope.
- Sewage and water supply. A sewer pipe D 110 mm is installed at the placement point.
- Frame installation. A rigid frame is assembled, adjusting its position using adjustable legs and fixing it with dowels and anchor bolts.
- Installation of a toilet bowl. It is placed at a height of 40 cm from the floor level.
- Water supply to the tank and connection of the outlet to the sewer outlet. A rigid pipe is used to supply water, and a corrugated pipe is used to connect the outlet.
Then the niche is sealed. You can line the niche with any finishing material, not forgetting to leave an inspection window to allow access to the tank in case of carrying out preventive measures or eliminating an emergency situation.
Before installing the frame, it is important to level all planes using a building level. The frame itself is attached to the wall using support brackets, and to the floor using anchor bolts.
Connecting water and completing installation
Then proceed like this:
- water supply is supplied to the tank located inside the installation. Since access to communications will be difficult, it is not recommended to use flexible liner due to its fragility. It is more correct to make a polypropylene pipeline, metal-plastic with press fittings (threaded ones need to be tightened over time) or copper;
- the pipe is connected to the threaded fitting of the tap in the tank;
- Unlike flexible hoses, the pipe connection must be sealed. It is more convenient for a beginner to do this with FUM tape or Tangit-Unilok linen thread. Experienced craftsmen use tow or plumbing flax, but if you overdo it with such material due to inexperience, the screw-on fitting may burst after the seal is impregnated with water.
Check:
- place the bowl on the studs and connect it to the drain hole and the tank - so far without fastening or sealing;
- supply water to the tank, while monitoring for leaks in the water supply;
- by pressing a button they flush water into the toilet, checking the sewage system for leaks.
After checking, the bowl is removed and leaks are repaired, if any are identified, then:
- wrap the installation with the supplied heat insulator. It serves to prevent moisture condensation on the surface and reduce the noise of rushing water;
- The installation is covered with moisture-resistant plasterboard. Before starting work, protective sleeves are put on the studs to prevent contamination of the threads. A template for cutting openings and holes in the gypsum boards is supplied with the installation;
- After installation, the plasterboard partition is covered with ceramic tiles or other facing material.
Lastly, install the bowl:
- cut the pipes from the cistern and those leading to the sewer so that they protrude outward by 50 mm;
- put a special trapezoidal gasket on the studs and pipes;
- fix the bowl on the studs and connect it to the pipes;
- install a set of rubber gaskets and plastic inserts;
- screw the bowl with nuts;
- trim the protruding edges of the gasket.
The installation is complete, you can perform final checks and use the device. The height of the toilet bowl is adjustable within 40-43 cm - to do this, change the position of the studs and special pins. The standard height is 40 cm.
Materials and tools
Everything you need for work can be found in almost every home:
- wrenches and screwdrivers;
- pliers;
- knife;
- marker;
- electric drill with a hammer drill and a drill for drilling concrete.
You also need to prepare some materials:
- silicone sealant;
- thin sheet of technical rubber;
- sealant for pipe threaded connections - tow, flax, fluoroplastic tape (FUM) or Tanget Unilock thread.
If the sewer pipe to which the toilet is supposed to be connected is made of cast iron, you will additionally need tarred tow, red lead diluted with drying oil and cement mortar.
Basic information
Design features of the toilet - compact.
This toilet model is considered the most common. The plumbing is represented by a cistern, which is attached to the shelf of the toilet bowl and merges with it into a single structure. The shelf is a special protrusion on top of the toilet itself.
The assembly process is the simplest; for a beginner in plumbing, it will not be difficult to attach the tank to the toilet.
Attention! The compact toilet is considered the easiest type of toilet model to install. The models have an affordable price and a large selection of shapes and colors.
Modern toilet models are not inferior in beauty and functional properties to modernized plumbing designs.
This type is considered the most economical; all elements necessary for installation are sold in one set with the toilet. Before purchasing, you should check the availability of all components.
Important! Before you buy new plumbing fixtures, you should make sure that this solution is necessary. Perhaps you just need to repair the drain tank.
Sanita Best Luxe toilet: main characteristics, reviews
This model features a hidden mount and a universal drain design. Swedish fittings allow you to save water when draining: you can drain 3 liters, or you can drain 6 liters. The seat has an antibacterial coating. Can be equipped with a “microlift”.
Model Best Luxe
Pros of the Sanita Best Luxe toilet:
- attractive design;
- good guarantee;
- high-quality anti-splash system.
Disadvantages of the Sanita Best Luxe toilet:
- relatively high cost;
- weak pressure during flushing - it’s not always possible to wash away even paper.
Advice. When installing the product, some toilet owners recommend carefully checking the factory settings of the fittings or carefully doing it yourself, according to the instructions. Sometimes, to improve flushing, it is enough to set the minimum water discharge speed and connect the sewer pipe to the toilet at an angle of about 25 degrees.