Modern roofs are not a complete structural covering until water is drained from the roof to a specially designated area. If this problem is not solved, then the uncontrolled discharge of water during rain or melting snow will cause irreparable damage to the enclosing wall structures and completely destroy the blind area around the house.
The problem of water collection can be solved by installing an organized drainage system. The system collects and directs rain and melt moisture. The drainage route can be installed on roofs with any type of covering, from simple slate to complex tile structures.
Key points when designing gutters
A thorough study of the topic will help you correctly install a device that removes moisture. The whole process is divided into several stages:
- Calculation of the total roof area with planning of the main points of installation of drainage systems;
- Materials counting;
- Selecting parts for making a drain (it is better to give preference to one brand).
With proper design, the drain copes with loads with a bang. Experts say that special attention is paid to installation taking into account the manufacturer’s recommendations. Regardless of the roof or the design of the drainage system, the rules are almost the same for everyone.
The material also plays a role, but only the durability of the structure depends on it, not performance.
The most common products are made of metal. Plastic drainage lasts less, but is cheaper and much lighter in weight.
Materials for gutters
Until recently, the only material used to make gutters was galvanized steel. Strong and durable, it has two drawbacks - the complexity of manufacturing shaped parts and their installation.
Therefore, today on the market galvanization is increasingly being replaced by plastic. This material is lightweight, resistant to corrosion and does not require painting. A set of shaped plastic for drainage is manufactured using low-cost extrusion and stamping methods, so its cost practically does not exceed the price of a set of steel pipes, funnels and gutters.
A significant disadvantage of all plastic structures is increased fragility under load in the cold. Therefore, electrical heating of gutters and gutters made of polymer materials is an important condition that guarantees their durability and reliable operation. If you do not plan to install electric heating, then it makes sense to buy an external plastic drain only for areas with little winter precipitation.
Manufacturers have simplified the problem of selecting pipe cross-sections as much as possible for consumers.
When purchasing a drainage system, you can use the following approximate calculation scale:
- — for a roof slope with an area of up to 50 m², the diameter of the drainpipes is 80 mm,
- - with a slope area from 50 to 125 m² - 90 mm,
- - for a slope with an area of more than 125 m² - 100 mm.
Complete set of spillways
Complete set of the drainage system
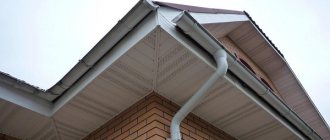
The method of installing the drainage system largely depends on the configuration. The drainage system consists of two main parts. Gutters (trays) are fixed to the roof eaves; their purpose is to collect liquid from the slopes. The second element is the pipes into which water flows from the trays, which is discharged into the sewer system naturally. Also required:
- Funnels;
- Brackets;
- Clamps;
- Plugs;
- Bends.
The drainage system includes nets to protect against contamination, tips, corners and elbows, extensions, and studs. Manufacturers rarely change designs slightly, but they usually look the same.
How to choose the right drainage system
Calculation of roof area
It will not be possible to buy any drainage system. An incorrectly made do-it-yourself drain will quickly have its drawbacks. When purchasing, it is important to take into account the area of the roof slopes. The higher this indicator, the larger diameter pipes and gutters will be needed.
First of all, you need to calculate the roof area: E=(A+B/2)*C. By A we mean the length of the edge of the slope, by B we mean the height, and by C we mean the length. All indicators are indicated in meters.
If the length of the roof overhang is less than ten meters, one drain is enough. In other cases, two drainage outlets will be required at the corners of the building. In this case, it is necessary to maintain the distance between the spillways - the maximum is 24 meters. Gutters, suspended or wall-mounted, must have a longitudinal slope of up to 1% towards the funnels.
Types of drainage systems
The main function is to remove excess moisture flowing from the roof. Consist of pipes and hanging gutters. The designs differ in the methods of installation of drainpipes, composition, and shape of the trays.
External gutter installation is suitable for houses with pitched roofs. The tray is installed under the lower edge of the slope. To avoid clogging of the funnels, it is advisable to use a filter. In turn, they are attached to the wall with brackets. The advantages are simplicity, ease of maintenance, and low cost. The main advantage is that it is possible to install a drain on the roof after the construction of the building. There are also disadvantages: it does not withstand wind and snow well, and it does not always look aesthetically pleasing.
Internal drainage is suitable for buildings with a flat roof. The corrugated sheet is mounted at a slight angle towards collecting moisture. The funnel for collecting liquid is connected by pipes that carry water into the drainage. The design does not damage the facades and is protected from ice or snow in winter - these are the main advantages. There are many more disadvantages: it is only suitable for flat roofs, it is expensive, and it is problematic to install a drain on your own. Internal drainage should be provided at the building planning stage.
Selecting a drainage system by material
So, having decided on the roof area, we move on to the materials. Both the owner’s preferences and the design of the building, as well as the most important indicators, play a role. These include:
- The climate of the region, namely the amount of precipitation;
- Dimensions and configuration of the roof, slope angle;
- Age of the building, number of floors, strength of the load-bearing wall.
Previously, galvanization was used to create a drainage system. Gradually it was replaced by metals with various coatings and even plastic. Such a structure looks more attractive and remains in good condition for a long time. And the cost of PVC drainage systems is much more affordable than that of galvanized steel products.
Metal drainage systems
Metal drain
Perhaps metal combines the best qualities: cost and reliability. At the same time, the products have a fairly long service life. They are not damaged by either the scorching sun or persistent frosts. Metal elements are protected with a polymer coating, which comes in different colors, so it is possible to choose a product of any shade to match the design of the house. Disadvantage - the polymer is easily scratched, which leads to rust and reduced drainage functions. The thin coating is often damaged during installation (especially if you make your own drain).
Galvanized drainage structures are a cheap option. Among the advantages are durability, strength, and the ability to independently adjust the parts to your parameters. The brackets bend well, but are easily damaged. The disadvantages include the lack of aesthetic appearance, although many do not pay attention to this.
Metal drainage systems are not recommended for installation in regions with high humidity. A metal drainage system is definitely not suitable for houses near the sea - salt water will quickly damage the structure. This can happen in cities with industrial production.
Metal parts often have an impressive weight. If the building is dilapidated or has weak load-bearing walls, it is better to opt for a lightweight structure. You also need to think about sound insulation - when it rains, the installation “hums”, and the sound will be clearly audible even indoors.
For those who care about the style of the building, various alloys are suitable. They combine excellent appearance, long service life, and ease of installation. The only drawback is the inflated price, but the work is carried out even after construction.
Plastic element sets
PVC drainage system
The PVC drainage system is durable and easy to install. Easily tolerates both heat and cold. Impact resistant, not damaged by ultraviolet light or rust. PVC brackets provide reliable fastening, but they have disadvantages. When installing a plastic drainage system, it will not be possible to adjust the shape of the part. And the exorbitant cost of good quality plastic is also a disadvantage.
Selection of drains by parameters
After the calculations, you can proceed to the selection of drains. Previously, the formula E=(A+B/2)*C was given, but you can use E1=A*C. The letter A also denotes the length of the horizontal projection of the edge of the slope, and C the length. For buildings with a slope of up to ten degrees, this formula should be used.
| Slope area (m2) | Tray width (mm) | Pipe diameter (mm) |
| Less than 50 | 100 | 75 |
| From 50 to 100 | 125 | 87-100 |
| From 100 | 150-200 | 120-150 |
The drainage capacity depends on the diameter. You should look at the marking, which is indicated as 100/75 or 140/120. However, parameters can vary greatly between different manufacturers, which is why it is recommended to purchase all elements of the system from one company. It is acceptable to join materials with adapters, although this increases the risk of leakage.
Types of drainage systems
Gutters vary in diameter of the passage . This parameter is designed so that during heavy rainfall there is no release of water beyond the gutter. In order not to hang large gutters on the facade of the house, vertical drain pipes are installed every 8 m, which unload the flow of water in the gutter and make it possible to reduce its nominal diameter.
The choice of working diameter in each individual case is determined depending on the size of the roof. Small areas from 15 to 75 m2 will require a gutter diameter of 9 cm, while drain pipes will be 7.5 cm. If the area of the roof slope is more than 100 m2, then gutters with a diameter of 10 to 15 cm are installed, and drain pipes are installed from 9 to 12 cm .
Differences in gutters by shape
Depending on the shape of the gutter, which is visible in the section, there are:
- semicircular;
- elliptical;
- rectangular;
- square;
- trapezoidal.
A semicircular drain is used to drain water from any roof structure. Their vertical edges are stiffening ribs and the gutters are characterized by strength and reliability against the weight of water and mechanical loads.
Pipes in the form of a cut ellipse differ from other shapes in that they hold a larger volume of water without splashing, therefore they are used for roofs with a large slope and a large area. They also have a sufficient margin of safety.
Gutters with sharp edges of triangular, square and rectangular shapes are selected by designers to create a finished look for the façade ensemble. Such products are rarely installed just like that. Gutters can be damaged during snowfall or snow slides from the roof. Their installation requires reinforced mounting elements, and snow guards are installed on the roof.
Whatever shape the gutters are installed, drain pipes are placed under them in accordance with the configuration. Semicircular and oval ones discharge water into round pipes, while square and rectangular ones have square drains.
Calculation of the required number of elements
For each building it is necessary to calculate the number of elements individually. Most modern houses are built according to unique designs - roof designs are very different. However, you can use a calculation template that will help you do the calculations yourself.
As an example, let’s calculate a drain for a roof with two slopes equal to twelve meters. You can set your own parameters to this value.
Calculation of gutters
Trays are sold by the meter - you need as much as the length of the cornices. It is often recommended to take into account thermal expansion compensation, but this is not necessary.
Calculation of corner gutters
Corner gutter elements are required if the drainage pipe runs along the facade of the building. The number of parts depends on the number of external and internal corners of the house. However, they must be taken into account, otherwise fastening the gutter will be difficult. With a cornice length of twelve meters, three elements are used to connect the structure.
Calculation of funnels, plugs and connectors
You need to buy two funnels and four plugs for one drainage tray. To calculate the number of brackets, divide the length of the cornice into segments of fifty cm. Don’t forget to retreat five cm on each side! The funnels are secured with holders.
The riser branches are constructed from two upper and lower bends. Pipe sections for connection will be required if the width of the cornice is more than 25 cm. Calculation and cutting are carried out when installing the storm drain on the roof, so it is impossible to calculate in advance. If the specified parameter is less, then it is permissible to simply join the knees.
In addition, pipes are used to remove moisture from the gutters. It is important to retreat from the surface of the earth up to forty centimeters. The risers are secured with two mandatory brackets. The first of them is mounted next to the lower elbow, and the second - with the drain riser. If necessary, do more, retreating one and a half meters.
For a house with a mansard roof, the drainage elements are calculated in a similar way. A similar principle also works with multi-tiered structures - you just need to carry out calculations separately for all slopes.
It is much more difficult to make calculations for a half-hip and hip roof. To create a drainage system, use at least 4 corners and 2 compensating connectors.
Even at the time of design and calculation of components, it is necessary to select the diameter of the cornice. It is important that the water does not accumulate, otherwise it will overflow. Precise selection of pipe diameter will avoid a bulky design. This is not only a matter of appearance, but also the cost of materials and installation.
Following technical recommendations, drainage from one square meter should take up about 1.5 cm2 of the cross-section of the drainage pipe. The figure was taken for a reason - this is an indicator for most Russian cities. You can calculate the required standard size yourself:
- Calculate the roof area treated with 1 funnel;
- Divide by one and a half - this will be the calculated value of the pipe cross-section;
- Round up to select the size of the gutters.
The area of slopes in typical buildings rarely reaches 70-80 m2. Many people don’t even do calculations, but use ready-made diagrams.
Installation instructions for the drainage system
All manufacturers have different installation technology, albeit slightly. A striking example is PVC gutters, the parts of which are fixed with glue.
Attaching the brackets
Brackets for drainage
Both metal and PVC brackets can be used. Metal is recommended for attaching the cornice to the rafters, as it can take on any shape. Step-by-step instruction:
- Attach the drain, retreating fifteen cm from the end. The gap between the front board and the fasteners should remain at least 2 cm.
- Stretch the rope between the two brackets. Install the remaining parts every 60 cm. Roof drains are installed at an angle. For free movement of liquid, 4 mm per 1 meter will be enough.
Plastic brackets are used to attach the drainage system to a frontal board installed vertically. Fix the brackets in the already familiar way, first mounting two at the edges, and then all the rest in increments of no more than 50 cm. The slope must also be observed. Fixation is carried out with self-tapping screws (SV).
Attaching brackets to sheathing
Installing brackets on the sheathing
You will need parts with a long leg. It is bent back to the required length, and then fixed with self-tapping screws - there are special holes for them. There are 2 important conditions that must not be violated. The first is the step between the brackets, up to 60 cm, and the second is the distance from the middle of the hook to the edge of the roof overhang. Its value reaches 40 mm, which allows moisture to flow into the middle of the tray.
Attaching to rafter legs
Bracket for attaching gutters to rafters
This is an ideal solution for those who do not know how to install gutters if the roof is already covered. The fasteners on the long leg are located at right angles. The convenient tilt of the part allows for faster and more convenient installation of the holders.
Fastening to the front board
Installing gutter brackets on the front board
To install the gutter system bracket, use short parts without a leg, but with a stand. It also has holes through which installation takes place.
Manufacturers never tire of surprising us with new models of brackets, but their main difference is the method of attaching gutters. One that is gaining popularity is a protruding strip that has a groove along its entire length. It is fixed on the wall, after which tray holders are inserted into the holes.
Other options
Installing gutter brackets to the roof overhang
It is not always possible to secure the parts to the front board or other parts of the roof. There is a way out of the situation - installing a roof drainage system to the eaves sheathing. Parts with a long leg are suitable, which can take any shape during installation work.
Installation of gutters
Installation of gutters
The drain is considered a gravity system, which means it should be installed at an angle of 3 to 7 degrees. All that is required when installing gutters is to secure one side bracket closer to the roof strip and the other lower. This has already been discussed earlier.
Next, the trays are placed on the holders and secured with clamps. Laying should be done with an overlap to avoid water leakage. Joints are often treated with sealant or rubber bands are used.
Funnel fastening
Drainage funnels
It is possible to connect the drainage gutters with funnels, which are responsible for delivering water to the pipes. A hole of the required diameter is cut out in a solid tray using a bimetallic crown, the burrs are processed and the edge of the gutter is put on. The drain is located at the lowest point, fixed with PVC or metal brackets.
Installation of metal mesh
Mesh on the
drains Debris (like leaves from trees) often gets into the eaves, which causes blockages. To avoid this, it is recommended to cover the trays with a grid or install them at least on funnels.
Installation of gutter couplings
Plastic elements of drainage structures change under the influence of environmental factors. For this reason, they are not connected tightly - there must be a limiter on the reverse side of the coupling. The edge of the coupling is hooked onto the rear edge of the gutter, and the front edge is pulled in until it clicks. For strength, it is advisable to secure the couplings with brackets.
Gutter corner installation
The brackets should be mounted as close to the corners as possible. First, the edge of one gutter is fixed into the corner element, and then the other. A characteristic sound should be heard. For an angle of 90 degrees or more, make a hole in one tray, install another in it and close it with a plug.
Attaching the plug
Gutter Cap
One side of the eaves is often covered with a cap. Inside it there are antennae that firmly fix the part on the tray.
Installation of pipe elbow
Drain elbow
The pipe elbow is mounted in the direction in which the liquid will flow. The angle of inclination should be different from the vertical position.
Pipe installation
Drainage pipe
Install the upper part into the socket of the elbow, securing the fastening of the drainpipes to the wall with clamps. They are placed at a distance of up to 180 cm from each other. The pipes must run perfectly vertically, so it doesn’t hurt to check that the brackets and gutters are installed correctly.
Vertical drainage systems have several angles for connecting to the drain, and their number depends on the characteristics of the house. Installation is carried out as follows:
- Measure the distance from the drain to the wall of the house. Select 2 angles, measuring the length of the coupling. The missing centimeters should be increased with a straight pipe.
- Attach the upper elbow to the funnel with glue, insert the subsequent ones. You can't screw a clamp on the top, so glue is the only option.
- Mark the places where pipe clamps are required. You can use a level to mark the points for each fastener. Another way is to mark a vertical line along the height of the entire house. Next, you need to drill holes for the plastic dowels, and then secure the base of the clamp.
- When installing drainpipes in corners, they must be secured with clamps. There should be 2 pieces on each side near each coupling.
The final stage of work is gluing the elbow for water supply. For example, it can go into a container to collect rain moisture.
Installation of clamps
The upper clamp is mounted after the drainpipe elbow. Part of the clamp opens (just bend it) and is inserted into the pipe until a click is heard. After fixing, it is necessary to secure the clamp with screws.
Pipe coupling installation
Very often pipes are increased in length. A coupling is suitable for this - a clamp is installed under each.
Drain installation
The installation is almost complete - all that remains is to install the drainage system. It is made at the bottom of the pipe, secured with self-tapping screws.
Drainage of water to the blind area requires the pipe (lower part) to be positioned at an angle of 45 degrees. If there is a storm drain, everything is much simpler. The drainage system is simply discharged into the well.
Installation of a metal drainage system
The structure is installed similarly to the plastic one. There are only slight differences in the installation of a metal drainage system. For work, use metal scissors, since the grinder will destroy the protective layer, which will cause rust. The service life will be noticeably reduced. For fastening, metal brackets are chosen. Drainage joints are reinforced with additional fasteners.
Structural elements of the drainage system
To assemble the drain, standard elements are adopted that serve specific purposes:
- Gutters of various configurations are designed to collect moisture falling from the roof slope. It has a variety of shapes, diameters, and is made from materials with specified characteristics. After the gutter, the water enters a vertical drain pipe, which removes it to a specific location.
- Connecting elements and inserts for gutters are needed when installing a system longer than 2.5 meters (this is the length of the unified profile). For a sealed installation, rubber gaskets are provided that seal the joint and compensate for the expansion and contraction of the gutter itself during hot and frosty days.
- The angle of the gutter ensures that the drainage route rotates around the roof of the house. Angles are provided as standard at 90º, but are available at 120º and 45º.
- The mounting brackets are designed to install the gutter into the installation position. They are hooks of various lengths and are used depending on the circumstances.
- The funnel is placed at the intersection of the gutter with the drain pipe; through it, the water is given a vertical direction. If you choose the right diameter and shape of the funnel, you will not need to additionally seal the joints.
- To stop the drainage, special plugs are placed on opposite sides of the gutter at its edges.
- The drain pipe is placed under the funnel and securely fixed to the wall, serving to further move the water mass to the selected location.
- The pipe elbow is used to surround the protruding part of the façade with a pipe and change its direction. The drain elbow is installed at the bottom to transfer water to the storm drain.
- Brackets for the pipe are attached to the wall and securely fix the drainage route.
- Sometimes a protective mesh is placed on the gutter to protect it from contamination.
Features of installing a PVC drainage system
So, installation of gutters requires compliance with the rules. I would like to focus on:
- The slope of the cornice is up to five mm per meter of cornice, otherwise the device will become clogged;
- The correct position of the gutters is 2 cm below the roof (you need to mentally draw a line, as if continuing the roof);
- The bracket spacing should be no more than 50 cm;
- Connection of couplings - unreliable fastened parts will lead to leakage.
The drainage system is intended only to collect moisture. Ice coming off the roof must not fall into the gutters! The structure will one day not withstand the load if it is made incorrectly.
Gutter: plastic or iron
To understand which drain is better - plastic or metal, you need to compare the pros and cons. They differ not only in price and appearance, but also in service life.
pros
The main advantage of metal structures is durability. A drainage system made of galvanized steel, an alloy of aluminum and zinc or titanium is eternal. The drainage system is not afraid of either the sun or the heat. The parts bend easily, adapting to any roof shape.
The advantages of PVC include its aesthetic appearance and the ability to choose a variety of colors. The drainage system made of plastic is resistant to moisture - it is not damaged by rust. Strong parts are difficult to break accidentally during installation, although there is a possibility of damaging the protective coating. The PVC drainage system is lightweight, which means it is suitable even for dilapidated houses.
Minuses
The big disadvantage of any metal structure is that it can be “defeated” by rust. A few scratches, which often appear during installation, are enough to shorten the service life of the product. In addition, they are heavy and sometimes bulky. It is not always possible to find a suitable design solution.
Plastic ones have slightly fewer disadvantages. The main thing can be considered intolerance to frost - most PVC structures are designed for regions where the temperature does not drop below -15 degrees. With sudden changes in temperature, pipes simply crack. In addition, there is always a risk of gutters breaking when snow or ice melts.
Material for making gutters
Depending on the material, drainage systems are subject to classification:
- gutters are made of galvanized steel;
- steel products coated with polymers;
- waste profile made of polyvinyl chloride;
- copper systems;
- zinc gutters.
Galvanized gutters
These types of systems are the most economical to manufacture; their installation is not difficult. Since galvanized steel is lightweight , installation of gutters does not require a large number of brackets. The disadvantage of this type of material is their inability to resist corrosion. Over time, galvanized gutters darken, and rusty smudges appear here and there, which spoils the appearance of the façade of the house. The service life of a galvanized profile is determined to be 10 years, and after this time the system must be rebuilt.
Gutters made of polymer-coated steel
The advantages in the form of lightness and the ability to drain a significant amount of water remain the same as those of a galvanized profile; the advantage is a longer service life, which is estimated at up to 50 years. A durable film made of modern polymers reliably protects the metal from corrosion, and the gutters resist aggressive environmental influences. Another advantage is the color painting of drains; the customer has the opportunity to choose the shade he likes to match the color of the facade of his house.
The disadvantages of this profile include noise effects when raindrops hit the surface of the drain; the flow of water passing through it will make quite a loud noise.
Plastic gutters
When producing plastic masses, various additives are added to them, which significantly increase their resistance to corrosion from moisture and sunlight. The service life is also determined at 50 years; the consumer chooses a color from a variety of colors. The plastic flows uniformly throughout the entire mass, so even significant scratches are invisible against the background of the colored profile.
If we talk about noise, it is significantly reduced due to the characteristic dull sound of plastic. The disadvantages include the emerging fragility of gutters as a result of exposure to frost. The plastic system looks great on roofs with complex configurations.
Copper roof water collection systems
The aesthetic appearance makes you admire the facade of the building with laid copper gutters. It goes well with roofs of similar color, matching texture, metal tiles, and profiled decking. During the first years of operation, the installed drain becomes covered with patina - a touch of antiquity. This coating protects the metal from corrosion and prevents the destruction of the surface. The disadvantage of the material is that installing such gutters is quite troublesome; maintaining them requires constant cleaning of debris and sand.
Zinc gutters
Gutter made from zinc-based compounds , like copper, is an expensive system; it looks great with any roof covering. The gutters have an even, constant color; after the first year they become covered with a patina, which serves as protection against adverse effects on the profile.
The disadvantages include the fragility of the metal when the temperature drops to -7ºС. With some metals, for example, copper and iron, zinc reacts galvanically, which means it is not recommended to install such products next to each other, as this will lead to damage to the material.
Heating cable in a drainage system
Heating cable for drainage
Heating cable can solve the problem of destruction of plastic drainage systems. It can also be used for metal, because the heating function is not only about protecting PVC gutters from freezing. The cable prevents water and snow from accumulating in the tray, forming icicles.
The heat-generating cord is installed after installing the roof drainage system. The work does not require any skills - the cable is simply laid inside the gutter and secured with clamps. It is connected to the power supply and thermostat, which is responsible for the temperature of the cord under the influence of sensors.
Basic mistakes in installing roof gutters
Inexperienced roofing specialists often make mistakes that lead to deterioration in the functioning of the drainage system. Basic:
- Few brackets. The structure must be reliably protected from bending, which occurs during heavy rain or snow. Metal parts allow distances between each other up to 60 cm, and plastic parts - up to 50.
- Incorrect coupling connection. If the connection of the parts is too loose, it will lead to leakage. However, you should not be zealous - you can damage the metal. It is better to use couplings with limiters.
- Inappropriate slope of gutters. If the slope is more than 5 mm per 1 meter, then water from the roof will not fall into the tray. If it is less, moisture accumulates and the device becomes clogged.
- The gutter is laid close or, conversely, far away. It is worth attaching something flat to the roof, extending it by 2-2.5 cm. A cornice should be laid at this distance - it will collect water, but it will not be damaged by falling snow.
When creating a drain, everything is important. From material selection to installation. In the worst case scenario, after a few seasons the pipes will crack or become warped and the gutters will become clogged. You will have to spend a lot of effort and money to eliminate the consequences of errors.
Installation technology
The system elements are installed simultaneously with the installation of other structural parts of the roof. There are specific installation features for different types of drains, but all have common technological aspects:
- the gutter holders are placed so that there is a gradual slope towards the flow of water; the slope should be about 3–4 mm per linear meter;
- if you mount the gutter close to the wall, then mold will form on the surface due to the wet surface; soffits for roof ventilation cannot be blocked;
- vertical pipes are fixed every 2 meters; if the wind constantly blows on the wall, the distance is revised to one meter;
- the lower edge of the vertical pipe ends at 20 cm above the ground;
- horizontal gutters made of plastic are fixed at a distance of 20 cm, on metal ones the step is increased to 50–70 cm.