18.06.2021
Draining
Editorial staff of the “New Place” website
Share
From this article you will learn
:
- Types of water drainage systems in a private house
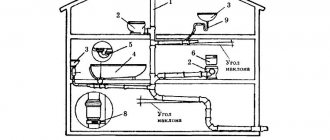
- Sewage diagram for draining water in a private house
- Step-by-step instructions for installing a water drain in a private house with your own hands
- Secrets of preserving water drainage in a private house in winter
There can be no talk of any comfort for human living if the issue of wastewater drainage is not resolved. Draining water in a private house is a problem for many owners of small country cottages or dachas, which is very important to be able to solve and do it correctly.
In our article we will look at the principles by which sewerage should be installed, how to install it yourself, and also talk about proper preservation of the house for the winter. To do everything right, read on.
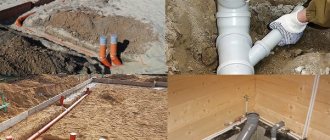
Installation of drain structures
On personal plots, a special pit is built using building materials.
When it is planned to use the dacha only on warm days, and there is no expectation of drainage from the water supply at the dacha, a regular drainage well is made. In a water collection pit with a volume of 1 cubic meter, sewage decomposes quickly and does not pose a threat to the environment. For non-professionals, it is enough to dig a small pit, add sand, gravel, broken brick, and after rough cleaning, the wastewater dissolves in the soil. A fundamental drainage system requires a thorough analysis of the territory, and not all summer residents know how to make a drainage using building materials and tools. Water from the house is directed outside through holes in the wall or foundation to a septic tank. The pipes are laid in special trenches and brought to the place where the pit will be built. For arbitrary drainage of water, it is necessary to take into account the angle of inclination of the ditch: as a rule, it is 2 or 3 cm per 1 linear meter of the entire structure. Typically, elbows and plastic pipes are used.
The use of septic tanks from barrels
It is advisable to build a septic tank at the dacha with your own hands from barrels in the following cases:
- as a temporary structure during the construction phase of a house before the sewer system is installed,
- with a minimum amount of waste, typical for periodic visits to a suburban area without permanent residence.
Such requirements are due to the small volume of tanks. The capacity of large barrels is usually 250 liters
Therefore, the volume of a septic tank from three tanks will be 750 liters. At the same time, according to the terms of sanitary standards, the septic tank must accommodate three daily “portions”.
It is advisable to build a septic tank from plastic barrels with your own hands as a separate treatment facility, for example, for a shower or bath
.
The advantages of such designs are:
- low cost (used containers are often used),
- simplicity of design and installation,
- less excavation work due to the small volume of tanks.
Selection of material and pit size
Any design for draining water consists of a special recess, similar to a well.
It is located away from buildings (at least 5 m), and if the volume of the tank is impressive, then the waste system can serve for a long time without additional treatment, and the ground level should not be too high. The pit is sheathed with materials:
- brick, stone;
- cinder blocks;
- concrete, reinforced concrete rings;
- using improvised means (barrels, car tires, slate).
A drainage well near a wooden house is now rarely constructed. Even with special treatment, it is not durable. Cinder blocks are an alternative replacement for brick. It is easy to install iron barrels, but they quickly corrode, and after 2-3 seasons the owners will be forced to change them. The cesspool is made at a distance of 30 m from wells or boreholes so that the system lasts a long time and harmful substances do not enter natural sources.
After the location is determined, the size of the well is calculated. The estimated volume of wastewater from the water supply system is increased by 3 times, markings are made, but the diameter of the pit is slightly increased for convenience compared to preliminary calculations. When choosing a sealed, drainage pit, its depth is taken into account so that the well is not destroyed by groundwater. In practice, there is no ideal technical solution, and owners of country houses try to build simple structures with minimal costs.
It will be useful to read:
Features of laying a sewer pipeline
The process of laying a pipe from a house to a septic tank or cesspool only looks so simple. In fact, it is quite complex. There are important rules for sewerage supply that must be taken into account during design and installation.
For example, most people install a sewer system under the foundation. This is relevant and can be done this way, but only in cases where the foundation is not too deep and the septic tank or pit is not too far from the house.
This applies if the hole is deep enough. The cesspool works effectively at depths that are below the sewer pipe. When drain levels rise, sewage can fill the drain pipe and cause a blockage.
Deeply located sewers can significantly reduce the risk of freezing. Snow in winter is also insulation. If you combine snow with a half-meter layer of soil, this will reliably protect the system from freezing.
If the foundation is deep, then it is not very rational, and sometimes even impossible, to lay a sewer underneath it. Here it is better to leave holes for the pipes even at the stage of pouring the base.
If for some reason it is not possible to use a cesspool, then the hole in the base of the house should be made as close to the edge of the ground as possible. To eliminate the risk of freezing, insulating materials can be used.
Brick cesspool at the dacha
A householder’s arsenal always has available tools at hand, but if someone has not yet had time to purchase the necessary gardening and construction equipment and protective equipment, then the following will be useful for the work:
- shovels, trowels;
- limiters;
- ropes, ladder;
- container for solution, buckets;
- drainage: cement, sand, gravel, water;
- slab (reinforced concrete).
Before starting work, the top layer of soil is removed, it is scattered over the site, and a pit of a predetermined size is dug at the selected location. Experienced summer residents always laid brick on the side walls on a light foundation, and left gaps between the bricks for filtering. Durable natural stone is often used in construction. The bottom of the pit is filled with construction waste and gravel. The gap between the ground and the walls is usually left 20-25 cm. For safety reasons, install a slab with a hatch and a small hole for ventilation. The entire structure is covered with a lid that can withstand more than 100 kg, so that the flow of water from the system is reliably protected from accidents.
General information
List of documents
The following documents must be provided to the SES:
- a diagram showing the location of the pit on the territory of the house.
-a design for construction that meets existing standards and requirements.
As soon as the work on arranging the pit is completed, or after some time they may come with an inspection. The documents for the pit and the actual building must agree regarding the distance of the structure from other points on the site. For example, houses, wells.
Attention! Inspectors do not come to check on their own; as a rule, neighbors call them.
You should not start construction without the appropriate permission; the procedure is inexpensive. It will be cheaper than the fine if construction standards are not met.
Types of cesspools
The type of pit affects the distance standards from various buildings. The tightness of the structure determines the different types of pits:
1. an ordinary pit representing a foundation pit, wastewater flows into it. The structure is not airtight; waste seeps through the ground through the bottom and walls. The distance from any buildings on the site should be as large as possible.
2. a pit with rigid walls. There is less absorption of wastewater into the soil, so the structure is not so dangerous. The drainage only goes through the bottom into the soil. The bottom should have a filter pad made of sand and gravel. The distance from the living space or well should also be maximum.
3. The container is made of plastic, the sealed pit is considered environmentally friendly. Effluent does not seep into the ground. The pit should be pumped out from time to time for cleaning. Can be positioned as close as possible to the well.
Attention! Any type of drainage pit can only be equipped with a design that is approved by special control authorities.
Shower drain
Not everyone thinks about how to properly organize waste water drainage after a shower. Some splash water over the site, others build an outflow into the sewer, and some are content with a grate through which the used water seeps into the soil. But there are other solutions: they allow you to organize comfortable living and recreation without harming the environment and the health of residents.
A metal tray is installed under the shower. It must be installed correctly, then the galvanized sheet prevents the soil under the structure from being washed away. When the bowl is installed directly on the ground, a recess is dug under it, a compact hole is obtained, where a drainage pad is laid or concreted. A pipe running through the trench is connected to a sump, and the water is discharged into the ditch.
Sometimes a place for soapy water is built, it is located close to the cabin, and not under it. They dig a hole, strengthen the bottom and walls with brick or concrete. This design prevents the ground from being washed away.
It will be useful to read:
A reliable device is considered to be the installation of a septic tank located a few meters from the structure. It is installed nearby to extend the life of the drainage device, or it is gradually filled with soapy water, and the structure quickly becomes unusable, especially when a large volume is supposed to be drained. A drainage septic tank is installed next to the drain from the shower stall, and the drain is placed with a slope towards the trench or container.
Undermining under a concrete foundation
If the septic tank is located close to the house (within five meters), and the thickness of the foundation does not exceed one meter, the simplest option for installing a sewer system is to create a tunnel in the place where the pipeline intersects with the base of the house.
The trench is not very deep, which reduces the complexity of such an operation.
Before starting to lay under the foundation, marking work is carried out. The point where the pipe coincides with the future sewer passage is marked.
When performing such work, the thickness of the walls, which is the reference point, must be taken into account. If this rule is not followed, the trenches may not line up. Their connection will not occur in a specific place. We'll have to start all over again. This will cause additional financial costs.
When the trench is ready, a sewer pipe is laid in it, maintaining the required slope.
If the pipeline is shallow, the sewer passage must be insulated to prevent freezing of the channel and the formation of ice. It can cause blockage of the entire space.
Backfilling of the trench is carried out carefully, in small portions of soil. Thus, the removed pipe is not allowed to move, and its slope is not allowed to change
An additional pipe is passed directly under the foundation, the diameter of which is much larger than the sewer pipe. The length of this segment is made equal to the width of the foundation of the house. It plays the role of a sleeve in which the main pipeline is laid.
This device protects the sewer system in case of unexpected subsidence of the foundation. When repair work is carried out, it is much easier to replace the damaged area.
Drainage well
It’s not difficult to make a shower drain mechanism yourself by using a 200-liter barrel (or an old one).
Holes are made across its entire surface. They are arranged in a checkerboard pattern, observing safety rules (wear goggles and gloves). Before burying it, part of the barrel is cut into “petals” at the base, the resulting parts are bent outward, and then installed in the ground, where the filter layer is laid. The container is wrapped in geotextile, moisture penetrates well through it. The drain pipe is inserted through a round hole made at the bottom of the barrel. This principle has been used for water drainage for a long time, and it is still used today. Tractor or car tires help make the foundation pit strong. Bricks and ceramic tiles are laid between them, and the outside is covered with drainage material (crushed stone, sand, pebbles). Filter holes are made on the sides of the tires, and the pipe is inserted into the slot of one of the tires located in the middle.
Sometimes, due to rough introduction into the natural processes of nature, it is easy to upset its fragile balance. Special requirements are put forward when fecal sewerage is built independently, because human waste is more dangerous than drainage from a water supply or shower.
How to make a hole in a concrete base
Any base, especially a slab base, is made of hard materials. During the drilling process, cracks may occur. Professionals often argue among themselves about how best to lay sewer holes in the foundation and have not come to a consensus.
For example, there were no technological spaces for the drain pipe in the base. How to do this yourself?
During the process of punching, various hard and rigid objects may be encountered along the way. Stones are easily destroyed with a jackhammer, reinforcement is easily drilled with a hammer drill. If there is no puncher, then punching should be done with a punch. Dust must be removed.
The simplest drainage system for a summer residence.
Simple drainage sewer system for a summer residence
It is not enough to supply water to the house; after use it needs to be disposed of somewhere. It’s hard to carry it out with buckets, and it’s somehow pointless: the water comes into the house on its own, and then you have to carry it out on your own two feet. You need at least basic sewerage for your home or cottage. The option of simply removing the pipe from the house and draining the water onto the ground or a small hole will not suit everyone. It doesn't look very good, and an unpleasant smell from this puddle or hole is almost guaranteed. What to do? So, we will need: an old metal or plastic barrel, a certain amount of sewer pipes (at least 6 meters, preferably 110mm PVC), a tee, an outlet, about 0.5 cubic meters of medium-fraction crushed stone, a shovel and several hours of our precious time. We choose a place for our drainage well. Preferably, no closer than 5 meters from the house, no closer than 20-25 meters from the well or borehole and below them along the groundwater flow. We dig a hole with a diameter larger than the diameter of the barrel by at least 0.5 m (the diameter of a standard barrel is 0.6 m, height 0.9 m, volume 0.2 cubic meters) and a depth of about 1.5 m (deeper is better). We make holes in the walls of the barrel, if it is metal, then with a grinder, if it is plastic, then with a wood saw with a fine tooth. We make a hole for the incoming sewer pipe in the wall, near the bottom of the barrel. We fill the bottom of the hole with at least 20 cm of crushed stone and place the barrel upside down, oriented the hole for the pipe towards the house. Now you need to dig a trench under the sewer pipe, bringing it to the place you need. The pipe must be laid with a slope of at least 3 mm per meter towards the barrel. It can be brought into the house either under the foundation or through a hole in it. There is no need to insulate the pipe; the water flowing through it will warm it up perfectly. Not far from the barrel, we place a tee with a small piece of pipe extending above the surface of the ground to circulate air inside the barrel and allow air to exit the sewer when it is filled from the house (so that the air from the barrel does not go into your house). We insert the pipe into the barrel through the hole made for this. We fill the gap between the barrel and the wall of the pit with crushed stone to the full height of the barrel. It is advisable to put some kind of non-rotting material at the bottom of the barrel (a piece of old slate is perfect). We fill both the trench and the hole with soil, compacting it thoroughly. We make a hole in the floor or wall of the house, finally introducing the sewer into the house. Further at your discretion. On a piece of pipe sticking out of the ground not far from a buried barrel, you can put a plastic mushroom, which is difficult, but can be found in stores. And now the nuances. This is an exclusively drainage sewer system for the home; it cannot cope with fecal waste, it cannot be cleaned or maintained in any way, and it is not intended for this. This sewer can be used for drains from the kitchen or bathhouse. Drainage wells from a septic tank have the same device. The microclimate for bacteria that process wastewater depends on the depth of the pit. Ideally, the depth of the pit should be: depth of soil freezing + height of the barrel + height of the crushed stone cushion (for the Leningrad region: 1.2 m + 0.9 m + 0.2 m = 2.3 m). But digging so deep is difficult and not necessary. The effluent also warms the barrel.
Laying a pipe under the base
Electricity can be supplied to the cottage from any location.
But sewerage is something else. This will not work here and you will have to resort to serious construction tasks. Steel or PVC materials are used to supply wastewater. To lay it, you should dig a ditch 2 m deep or less. Then this ditch must be brought under the supports of the house. The parameters of the ditch depend on the depth of soil freezing.
The pipeline itself must be installed under the base. For these purposes, you should punch a hole in the foundation. To ensure that everything turns out as beautifully and accurately as possible, you can use the advantages of a diamond tool. The pipe should be routed through a special casing.
How to organize the drainage of wastewater from a summer shower at the dacha?
How to properly organize the drainage of wastewater from a summer country shower? There are no plans to do laundry there, that is, there should be no waste that is hazardous to the environment.
This question naturally falls into two parts. Firstly, it is necessary to equip a liquid receiver where the wastewater will flow, and a system for pumping or cleaning it. Secondly, dirty water must be delivered there somehow.
Don't make a swamp
When deciding where to put water from the shower, first of all you need to remember that it cannot be drained into open reservoirs and public storm sewer networks in villages. Well, when discharging water within the site, the main thing is not to create a swamp from your own garden.
Well
You can, for example, send such water into a ground filtration well , the walls and bottom of which allow water to pass through - from there it will slowly seep into the ground. The most common option is to dig concrete rings into the ground with holes punched with a hammer drill, and instead of the bottom, pour a layer of crushed stone 20–30 cm thick. When calculating the volume of such a structure, it is important to take into account the volume of one-time water discharge and the filtration capacity of the soil. You can conduct an experiment: dig a test well, for example, 1 m deep and 50 cm in diameter, and by pouring measured portions of water into it, calculate how long it will take for the water to go away, and then recalculate for a “large” well.
If the soil on the site does not filter water well, you can make a sealed receiving well , from which a sewage disposal truck will pump out the wastewater.
Filter field
The second option for wastewater disposal is a filtration field . The simplest example is to distribute water along a series of grooves (for example, between beds), where it will be absorbed into the soil. The filtration field can also be made underground : lay drainage pipes (with holes) in crushed stone in underground trenches. In this case, it is also important to study the drainage capacity of the soil in order to avoid flooding.
Video description
How to lay a pipe in a trench with a slope, watch the video:
The assembled line is once again checked for compliance with the level along the entire length, if necessary, sand is tamped under it. After connecting to the internal wiring, it is checked for leaks by letting water in and observing whether a leak appears. If everything is in order, the pipe is first covered with a layer of sand 30 cm high, and only then the trench is backfilled with soil.
Gravity sewerage laid at shallow depths in regions with harsh winters requires insulation. For this purpose, special shells are produced from polystyrene foam and polyurethane foam. But you can also use other insulating materials that are not afraid of moisture.
The upper part of the septic tank also needs to be protected from freezing by making an earthen embankment around the neck, located above ground level. An insulated double lid wouldn't hurt either.
Simplest cleaning
If there is a lot of wastewater and you are afraid of rapid siltation of the filtration well or filtration field, it is better to supply wastewater to it after preliminary treatment . The easiest way to do this is with a sump tank - an open, wide container located between the water discharge points and the filtration system. The pipe draining water from the tank should be located 0.2–1 m above its bottom. In the sump, the water is aerated, which helps purify it, and solid waste falls to the bottom. Purified water goes further. Of course, the bottom of the sump will have to be cleaned periodically.
Installation of drain structures
On personal plots, a special pit is built using building materials. When it is planned to use the dacha only on warm days, and there is no expectation of drainage from the water supply at the dacha, a regular drainage well is made. In a water collection pit with a volume of 1 cubic meter, sewage decomposes quickly and does not pose a threat to the environment. For non-professionals, it is enough to dig a small pit, add sand, gravel, broken brick, and after rough cleaning, the wastewater dissolves in the soil.
A fundamental drainage system requires a thorough analysis of the territory, and not all summer residents know how to make a drainage using building materials and tools. Water from the house is directed outside through holes in the wall or foundation to a septic tank. The pipes are laid in special trenches and brought to the place where the pit will be built. For arbitrary drainage of water, it is necessary to take into account the angle of inclination of the ditch: as a rule, it is 2 or 3 cm per 1 linear meter of the entire structure. Typically, elbows and plastic pipes are used.
Types of devices for a country house
- Filtration septic tank with a compartment for settling the thick fraction. This is an advanced technology, the main operating principle of which is to separate sewage that enters the collector and divide it into fractions. As a result of passing through several filtration chambers, the liquid is purified to a state that is safe from the point of view of sanitary standards.
- Local treatment plant. In fact, these are mini-purification plants based on the use of bacteria to purify water.
- Using the container as a cesspool.
Country drainage can be separate and common
The first case is when wastewater from different plumbing fixtures enters different containers for sedimentation and filtration. In addition, separate delivery of water from street storm water collectors and the internal network is considered a separate form.
The general sewage collection and drainage system consists of laying a single pipeline both for indoor appliances and for collecting water outside.
Selection of material and pit size
Any design for draining water consists of a special recess, similar to a well.
It is located away from buildings (at least 5 m), and if the volume of the tank is impressive, then the waste system can serve for a long time without additional treatment, and the ground level should not be too high. The pit is sheathed with materials:
- brick, stone;
- cinder blocks;
- concrete, reinforced concrete rings;
- using improvised means (barrels, car tires, slate).
A drainage well near a wooden house is now rarely constructed. Even with special treatment, it is not durable. Cinder blocks are an alternative replacement for brick. It is easy to install iron barrels, but they quickly corrode, and after 2-3 seasons the owners will be forced to change them. The cesspool is made at a distance of 30 m from wells or boreholes so that the system lasts a long time and harmful substances do not enter natural sources.
After the location is determined, the size of the well is calculated. The estimated volume of wastewater from the water supply system is increased by 3 times, markings are made, but the diameter of the pit is slightly increased for convenience compared to preliminary calculations. When choosing a sealed, drainage pit, its depth is taken into account so that the well is not destroyed by groundwater. In practice, there is no ideal technical solution, and owners of country houses try to build simple structures with minimal costs.
It will be useful to read:
Some tips from the professionals
In order for the sewer system in a private house to work for its intended period, you must first install it correctly. This is 80 percent of success. But even after startup, it is necessary to properly monitor the system.
- Initially, correctly organize and calculate the volume of waste.
- Pump out the cesspool in a timely manner. And not only the liquid fraction, but also the sediment at the bottom of the wells.
- Make sure that no foreign objects get into the pipe that could cause a blockage. For example, small parts of children's toys, rags, etc.
- Conduct a timely external inspection of septic tanks and pits to check their tightness.
Brick cesspool at the dacha
A householder’s arsenal always has available tools at hand, but if someone has not yet had time to purchase the necessary gardening and construction equipment and protective equipment, then the following will be useful for the work:
- shovels, trowels;
- limiters;
- ropes, ladder;
- container for solution, buckets;
- drainage: cement, sand, gravel, water;
- slab (reinforced concrete).
Before starting work, the top layer of soil is removed, it is scattered over the site, and a pit of a predetermined size is dug at the selected location. Experienced summer residents always laid brick on the side walls on a light foundation, and left gaps between the bricks for filtering. Durable natural stone is often used in construction. The bottom of the pit is filled with construction waste and gravel. The gap between the ground and the walls is usually left 20-25 cm. For safety reasons, install a slab with a hatch and a small hole for ventilation. The entire structure is covered with a lid that can withstand more than 100 kg, so that the flow of water from the system is reliably protected from accidents.
Shower drain
Not everyone thinks about how to properly organize waste water drainage after a shower. Some splash water over the site, others build an outflow into the sewer, and some are content with a grate through which the used water seeps into the soil. But there are other solutions: they allow you to organize comfortable living and recreation without harming the environment and the health of residents.
A metal tray is installed under the shower. It must be installed correctly, then the galvanized sheet prevents the soil under the structure from being washed away. When the bowl is installed directly on the ground, a recess is dug under it, a compact hole is obtained, where a drainage pad is laid or concreted. A pipe running through the trench is connected to a sump, and the water is discharged into the ditch.
Location – sanitary restrictions
Some homeowners believe that they can do whatever they want on their property, and they are deeply mistaken. Sanitary services do not sleep - they require strict compliance with the rules and regulations in force in the state, regardless of the type of property.
The location of the drainage pit in a private house is also strictly regulated: the standards stipulate the minimum permissible distances from the wastewater storage tank to engineering structures, residential buildings and site boundaries:
The maximum depth of the drainage pit is also regulated: it should not exceed 3 m, if the groundwater level allows it. These restrictions are contained in SanPiN 42-128-4690-88 and SNiP 30-02-97.
Important: Homeowners should be aware that failure to comply with sanitary requirements may not only result in a fine; if harm is caused to the health of others, a criminal case may be filed.
In addition, when making a drainage hole at the dacha with your own hands, it must be located on the site in such a way that it is possible to organize unhindered access to it for special equipment at the time of pumping out.
Advice: Practice shows that it is better to place the drainage pit at a distance of at least 15 meters from the windows of residential premises.
Drainage well
It’s not difficult to make a shower drain mechanism yourself by using a 200-liter barrel (or an old one).
Holes are made across its entire surface. They are arranged in a checkerboard pattern, observing safety rules (wear goggles and gloves). Before burying it, part of the barrel is cut into “petals” at the base, the resulting parts are bent outward, and then installed in the ground, where the filter layer is laid. The container is wrapped in geotextile, moisture penetrates well through it. The drain pipe is inserted through a round hole made at the bottom of the barrel. This principle has been used for water drainage for a long time, and it is still used today. Tractor or car tires help make the foundation pit strong. Bricks and ceramic tiles are laid between them, and the outside is covered with drainage material (crushed stone, sand, pebbles). Filter holes are made on the sides of the tires, and the pipe is inserted into the slot of one of the tires located in the middle.
Sometimes, due to rough introduction into the natural processes of nature, it is easy to upset its fragile balance. Special requirements are put forward when fecal sewerage is built independently, because human waste is more dangerous than drainage from a water supply or shower.