During hot periods, a simple summer shower without any bells and whistles seems quite comfortable.
But as soon as the sunny weather changes to cloudy, water procedures turn into torture.
And in the off-season - in spring or autumn - only a trained “walrus” can force himself to go into such a bath.
What should the rest of the, so to speak, normal people do? There is only one way out - to provide heating. After reading this article, you can easily make a heated shower at your dacha with your own hands, in which you can wash comfortably in any weather.
Warm shower at the dacha with your own hands - design
At the design stage, the following questions should be considered:
- Tank volume: depends on the number of users. For a quick rinse, 1 person will need at least 15 liters of water.
- Volume of the drainage pit: the pit should be at least two and a half times larger than the tank.
- Frame and cladding material: the frame can be assembled from polypropylene pipes, rolled metal or wooden boards and beams. For cladding, any moisture-resistant sheet material is used: plastic panels, polycarbonate, special plywood. When choosing a material for the first layer of sheathing, there is no need to pursue aesthetics: for the purpose of insulation, the heated shower will be covered with foam plastic.
- Shower dimensions.
As experience has shown, the most comfortable are structures with dimensions of 1.9x1.6 m in plan (shower + changing room) and a height of slightly more than 2 m.
Preparatory stage
It’s easy to build a heated shower in the country. But first it is important to order a project that includes drawings and estimates. This will make it possible to calculate the amount of material, the volume of work to be done and the deadline for its completion. For such a structure there is no need to use too expensive materials. It is important that they are practical and durable. Construction of this type will require a poured foundation.
Choosing a location on the site
The following requirements apply to the shower area:
- the terrain should facilitate the drainage of wastewater (choose a location on a hill);
- the cabin should be well lit by the sun;
- The location of the bath should be protected from wind or draft.
Often a shower cabin is made as an extension to the south side of the house. A frame attached to the wall will be more durable, and the bath will be completely protected from the wind on at least one side.
How to make an outdoor shower with toilet: construction nuances
To save space on the site, as well as time and materials, many people want to build an outdoor shower together with a toilet. There are certain advantages to this - construction is fast, budget-friendly, the premises are located compactly and conveniently, but some nuances need to be taken into account.
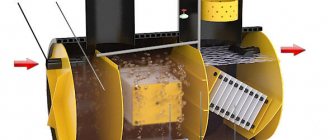
The first is the sewage system. It is not recommended to combine a septic tank for a toilet with draining water from a shower. The tank will fill up quickly, and you will have to pump out the wastewater much more often. Therefore, there must be a separation: a septic tank for the toilet, a drainage pit for the shower.
The second is the smell. To get rid of it, the partitions are made as airtight as possible, and each room has its own ventilation. You can combine a shower and toilet with a utility room for storing equipment, placing it in the center of the complex.
Third, the runoff can pose a hazard to drinking water wells. Therefore, the standards establish a minimum distance between objects of 20 m, and from a residential building 10-12 m.
Preparing the base
At the site of construction of the cabin, it is necessary to select all the fertile soil, reaching the underlying layer of soil - sandy loam or loam.
Next, a cushion is built in the resulting recess, consisting of a 15-centimeter layer of gravel and a layer of sand of the same thickness.
Next comes laying the foundation.
Country shower made of corrugated sheets
Another good material for covering a summer shower is corrugated sheeting. This material is characterized by high strength and durability combined with lightness. It is windproof. And when its walls warm up throughout the day, it will be comfortable to shower in. Both wooden beams and metal profiles can be used as a frame. Metal is, of course, more durable. Therefore, if you still need to purchase materials, give preference to it.
Making the frame is similar to the examples from points 5 and 6. The only difference is that you need to add more cross bars. This is necessary to securely fix the sheets and impart rigidity to the structure, since the corrugated sheet itself is considered a soft material. Fasten the sheets using self-tapping screws. Be sure to use spacers to avoid damaging the sheet. You can cut corrugated sheets with metal scissors or using a grinder and a toothed disc. It is not advisable to use other circles. During cutting, the polymer coating, which protects the coating from corrosion, may burn through. The roof is also covered with corrugated sheeting, and the tank is located under it. The gap between the walls and the tank will provide natural ventilation in the cabin and prevent the formation of mold and unpleasant odors. An unheated tank can be placed on top of the frame. Then there is no need to build a roof.
Laying the foundation
The building being erected will rest on a foundation of bored piles. Such supports are very easy to construct:
- Using a garden auger, you need to drill a well, the bottom of which is located 30 cm below the freezing depth of the soil. The diameter of the well should be 100 - 150 mm.
- At the bottom of the well, a 30-centimeter sand or gravel-sand cushion is made. It needs to be compacted, pouring generously with water.
- We lower a plastic pipe of the appropriate diameter into the well. It will simultaneously play the role of formwork and waterproofing for the concrete pile.
- Inside the pipe, it is necessary to secure a reinforcing frame made of 3 vertical rods with a diameter of 8 - 12 mm, equally spaced from each other, connected by crossbars made of rods with a diameter of 6 mm. All frame elements must be connected with annealed wire - welding is not allowed.
- All that remains is to fill the pile with concrete. At the final stage of pouring into concrete, you need to monolith the anchor bolt (in the center), on which the grillage beam will be placed.
Shower foundation
In soft soil, instead of bored piles, you can use driven piles made from a steel pipe with a diameter of 60 - 150 mm with a flattened end. In this case, the anchor bolt for fastening the grillage beam should be welded to the pile.
Installation of a heated summer shower
Laying the foundation
First you need to decide on the type of future shower. The construction of a lightweight frame structure will not be difficult. First, approximately 15-20 cm of soil is removed from the intended area, leveled and sprinkled with sand. To erect a capital structure, you will need to go down to half a meter. Laying the foundation includes the following steps:
- Marking the territory. Pegs are driven into the corners, a rope is pulled between the threads;
- Digging a hole. Depending on the type of building, to a depth of 15-50 cm;
- Constructing trenches for laying pipes or gutters to drain water to the drainage pit.
- Installation of pipes and gutters (don't forget to arrange a slope).
- Finally, if necessary, concrete work is carried out.
If the frame of the summer shower consists of natural wood, it is advisable to treat it with special water-repellent impregnations, drying oil or paint. In addition, it is advisable to raise the structure 20-30 cm from ground level. For this you can use a columnar foundation.
Cabin construction
This stage is largely determined by the type of structure. To erect a frame-type structure, first of all you will need to lay support posts; they must be as strong as possible, since they must withstand the weight of a filled storage tank. For the manufacture of supports the following can be used:
- Beam with a cross-section of at least 100×100 mm;
- Aluminum profile;
- Metal pillars.
If you plan to use timber, it should first be treated with a water-repellent agent, and the lower part, which will be in the ground, with bitumen mastic. The use of an aluminum profile is the most common option; it is a lightweight, durable material; installation of such a frame is not difficult.
The supports are mounted in the corners, as well as every one and a half meters. They are installed in pre-made holes (it is convenient to use a garden drill for this) with a depth of 60-80 cm and a size slightly larger than the racks themselves. If you plan to install a door, two supports are located from each other at a distance equal to its width. The door frame is attached to them. Afterwards, you can install horizontal jumpers of the frame; they must be in the lower and upper parts of the structure.
Tank installation
In order for the water in the tank to be heated from solar heat as efficiently as possible, it is recommended to paint the container black. In addition, since the heating element can quickly become unusable from working without water, its level must be controlled. To do this, a plumbing valve is installed on the tank. The tank can be installed on a prepared roof, on special holders or directly on a profile, in which case the frame must be precisely adjusted to the size of the tank. Water is added, the heating element is connected and the system is tested.
Finishing
The following materials can be used for wall decoration:
- Polycarbonate;
- Metal profiled sheet;
- Flat slate;
- Lining;
- Film;
- Tree;
- Moisture-resistant plywood;
- Brick.
The most commonly used metal is galvanized corrugated sheet or polycarbonate. These are lightweight, durable materials that are not afraid of any impact. Such a summer shower will be easy to install and unpretentious to use. Wood and wooden lining look very aesthetically pleasing, however, they require treatment with moisture-repellent agents. The racks can simply be covered with moisture-resistant material, for example, thick polyethylene film. This option is suitable for the warm season.
It is necessary to organize the floor of the cabin, it can be made of wood, in this case a regular flooring is installed, however, in cold times there will be an unpleasant feeling of draft. Another option is a concrete floor, in which case a screed is installed, and a wooden grate with a rubber mat is placed on top of it. The third option is to use a ready-made pallet (most often these are models with a low steel bowl). In the latter case, do not forget to install a drain hose. The pallet can be attached using regular mounting foam.
If you plan to use the shower in cool weather, the walls should be additionally insulated; for this you can use polystyrene sheets. Do not forget about organizing ventilation; for this, leave a gap in the upper part so that air can circulate freely.
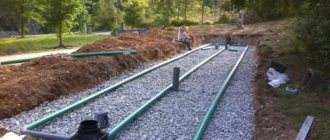
Drain arrangement
At a distance of no less than 3 m from the shower, you should dig a drainage hole about 2 m deep. It should be taken into account that the distance between it and the house or other building should be at least 5 m.
If the soil at the construction site does not absorb water well, you need to drill a well at the bottom of the drainage hole, whose base would reach a layer with good water absorption.
You need to install a polymer pipe into the finished well, so that about a meter section of it is outside.
Several holes should be drilled in the walls of the pipe at the upper end.
After which, the entire perforation, together with the end hole, is wrapped with geotextile.
There is a type of geotextile that resembles black isospan. In this case, it should not be used, since this material does not allow water to pass through well.
At the bottom of the pit and well, a backfill of crushed stone is made. Then a plastic barrel without a bottom or several used tires is placed in it. A hole should be made in the wall of this tank to which the pipe coming from the shower will be connected.
Next, you need to backfill the excavation, after which the pit is covered with boards or a plastic shield. The “lid” should have a vent with a short pipe and a cone-shaped guard.
Dacha owners still use their plots to a greater extent for growing vegetables and fruits rather than for recreation. On hot days after hard work you really want to freshen up, so a shower is a must. Do-it-yourself outdoor shower - let's look at how to build a frame structure.
Read how to organize a drainage pit from tires here. How durable is this system, what are its pros and cons.
On hot summer days at the dacha, it’s quite possible to take a cool shower, but if the weather suddenly turns bad or just gets cold in the evening, it’s not so pleasant to swim under ice-cold water. In this article https://aquacomm.ru/vodosnabzenie/zagorodnyie-doma-v/bak-dlya-letnego-dusha-s-podogrevom.html how to equip your shower with warm water using a heating tank.
Little tricks
A few little secrets and the drainage hole will serve for many years.
In order to extend the cleaning period of the structure, you can apply some nuances. For example, divide the plum. In this case, you will get a main drainage hole and another smaller one. What will it give? Liquid without solid particles will be drained into one structure, for example, a smaller one. This approach will make it possible to quickly absorb water into the ground, and mucus will not form on its walls.
The second option is to use biologically based products . The advantage of this product is bacteria that are able to process waste. The result is that water seeps into the ground faster and easier.
We must not forget about drainage and septic tanks. Their location should be close to the drainage pit, since if water gets on them it will lead to the appearance of:
- unpleasant odor;
- soil destruction;
- may lead to destruction of the foundation.
To avoid problems with runoff, it is better to place the structure on a hill .
Recent Entries
Chainsaw or electric saw - what to choose for the garden? 4 mistakes when growing tomatoes in pots that almost all housewives make Secrets of growing seedlings from the Japanese, who are very sensitive to the soil
Before you start building a shower with your own hands, you should familiarize yourself with heating options. In conventional buildings, as a rule, tubular electric heaters are used. There is only one disadvantage of such heaters - it is necessary to constantly monitor the heating process. When the water in the shower reaches a certain temperature, the electric heater must be turned off.
Construction of the frame
Grillage beams should be laid on the foundation piles, which will simultaneously play the role of the lower frame. Next, using corners and self-tapping screws, racks are attached to them, the upper ends of which are connected by beams of the upper frame.
If the frame is assembled from wood, all elements must be treated twice with a water-polymer composition, then with biocides. The last stage of preparation is treating the wood with hot bitumen.
Wood frame
It should be borne in mind that even with such precautions, increased humidity will soon lead to the appearance of fungus on the wood. To delay this moment, the wooden shower should be raised above the ground by 200 - 250 mm.
The frame is sheathed with moisture-resistant plywood or plastic, then the walls are covered with foam plastic, on top of which colored polycarbonate is fixed. At the top of one of the walls in the locker room and shower there should be an opening covered with transparent material.
It will be better if such a window in the shower stall is opening - this will make it possible to quickly dry it after water procedures.
Purchasing the necessary materials
In addition to making or purchasing a heating tank, you must purchase plastic water pipes D 50 mm. It is convenient to use a flexible silicone hose to supply water.
To set up a system of materials you will also need:
- gutter reinforced with metal mesh;
- ball valve;
- valve with float;
- divider
To make a foundation pour when constructing a cesspool, you will need cement marked M150 and higher. The drain can be covered with waterproofing roll materials or hydroglass insulation.
To make a wooden floor in the shower, it is best to use a tongue-and-groove board, treated with a water-polymer emulsion or oil white.
For the final finishing and arrangement of the bathroom, you will need paint for exterior and interior work, spacious shelves for bathroom accessories and hooks for clothes.
To erect the structure you will need the following tools:
- building level;
- roulette;
- corner;
- screwdriver;
- self-tapping screws
To pre-mark the area, you also need to stock up on a skein of twine and wooden pegs.
Features of the construction of the heating system, floor
To heat the washing room, you need to install an old thin-walled radiator connected to a closed circuit with heated water circulating through it.
The movement of water in the circuit is ensured by a circulation pump.
In the washing room, instead of the floor, you should install a commercial shower tray (low version).
It is installed inside a frame made of wooden beams.
The floor in the locker room is made in the form of a grid, which is assembled from beams with a cross-section of 40x40 mm or polypropylene pipes. In the latter option, the holes in the pipes should be filled with foam so that moisture does not accumulate in their cavities.
Tips for finishing
For interior decoration, choose facing materials that have increased moisture resistance: PVC film, linoleum, plastic. When choosing wooden cladding, the surface must be treated with drying oil and painted.
To make hygiene procedures more convenient and safe, a grid made of wooden boards is installed on the floor, on top of which a rubber mat is laid.
The grid is assembled from wooden slats measuring 30-50 mm. Wood preparation is the same. If you want to increase its resistance to shoe wear, treat the material with an acrylic compound used for repairing bathtubs.
It is advisable to separate the dressing room and the bathing compartment with a curtain made of waterproof textile fabric or polyvinyl chloride film
If desired, both the internal and external walls of the facing material can be painted and decorated with designs. The original design will allow you to turn the shower not only into a place for taking water procedures, but also into a decorative element of a suburban area.
Additional interesting options for arranging a garden shower are offered in these articles:
- Do-it-yourself summer polycarbonate shower: step-by-step design instructions
- Country toilet project with shower: choice of design + construction instructions
Installation of the barrel
A tank with an electric heater and thermostat can be installed on top of the cabin.
Such products are sold today in a wide range. But this option has significant disadvantages:
- A significant part of the heat is spent on “street heating”.
- All household members, regardless of preferences, will have to wash with water at the same temperature or wait until the water reaches a comfortable temperature after the previous user.
A more practical option is to attach an inexpensive boiler to the wall outside the shower, protecting it with a canopy. An ordinary barrel is placed on top, from which water is supplied through a tee to the mixer and to the boiler. The outlet from the boiler is connected to the second pipe of the mixer.
Before you start building a shower room in a country house, you need to study a lot of nuances, because when dealing with water, you need to be able to prevent possible leaks and damage to the foundation in advance. Do-it-yourself shower in a private house - recommendations on the order of construction work.
You will find tips on making a shower tray with your own hands in this article.
“Cake” of 8 layers
I leveled the surface of the slab at the base of the future shower tray by filling it with a self-leveling floor mixture, after which I secured sheets of insulation—extruded polystyrene foam—on it with tile adhesive. The thickness of all layers was selected in accordance with the design of the drain: its grate should ultimately be 1-2 mm below the surface of the pan.
Finally, I adjusted the drain of the shower tray to the level and laid a plaster mesh over the insulation, securing it with self-tapping screws. I installed the beacons and poured the cement screed (photo 2). After the cement had gained strength (after 3 days at a temperature of +20 °C), I once again coated all the corners and joints of the planes with fiber rubber for additional waterproofing, and after it had dried, I filled it with tile adhesive. At the exit from the shower stall, I installed a water barrier made of sand-lime bricks and plastered it with moisture-resistant cement plaster over the reinforcing mesh.
To make taking a shower truly comfortable, and to make splashes of water dry faster, I decided to make a heated tray. To do this, on top of its surface and throughout the entire area of the bathroom, I laid the electrical cable of the heated floor (photo 3) according to the diagram (its total power was about 1.5 kW) and filled it with a coarse self-leveling mixture (3). It is better to use a special leveler for heated floors - it has a higher thermal capacity and is less susceptible to thermal expansion.
Where to arrange
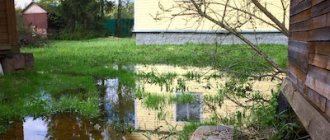
Before planning the construction of a structure, pay attention to the requirements for its location. It should be located in an open area so that the sun’s rays fall unhindered on the storage tank; if the latter is shaded, the water will take a very long time to heat up. In addition, access to electricity is necessary. Make sure that the selected area is not located in a low area, otherwise water will accumulate. It is advisable that this be a flat or slightly sloping place. In the latter case, the outflow of water will occur unhindered. Another advantage will be the close location to home. Firstly, you don’t have to pull the electrical cable far, and secondly, it’s very unpleasant to cross a large space in the cold after a shower.
Shower and changing room
Designing a cabin for a country shower
The width and depth of the shower stall should be at least 1 * 1 m, and the height should be 2 m and above. The space inside the finished structure should be enough to turn around, raise your arms and bend over without obstacles.
It should also be taken into account that there should be a place in the booth for a changing room, where water will not penetrate. For the locker room, it will be enough to allocate 60 cm. Thus, the optimal size of the shower will be 1.6 m * 1 m. The material for the frame can be a wooden beam. The standard diameter of racks for such a structure is 100*100 mm.
To impart stability, you can use different methods:
- Concrete every detail of the frame;
- Attach the lower corners of the structure to pegs driven deep into the ground.
When designing a shower stall, consider the design of the buildings in your yard. The shower room should not stand out from the general style.
Installation or how to do it yourself
Cut the timber to the length you need. Connect the side parts of the frame in the form of frames. Strengthen each frame in the middle with jumpers to prevent distortions. The lintels are made from the same timber and should be installed at an angle of 45 degrees.
If you decide to make a shower stall measuring 1.6 * 1 m, then the side parts will be 1 m, the back - 1.6 m, and the front - 1 m, since in the front part you need to leave a space for the door equal to 60 cm. It is not recommended to make a door less than 60 cm for convenient passage to the shower room. Then you should connect the frames.
Before fastening the frames together, make sure that their diagonals match. Having fastened the frames, reinforce them with jumpers at the top and bottom. This way you will get a solid frame that can be covered with polycarbonate or any suitable material. It will be interesting to know that along with a shower, you can also build a toilet, as well as a utility unit, but the contents of this link will help you figure out how to do this correctly.
Install the resulting structure above the prepared inclined platform for water drainage. Use a spirit level to level the shower stall frame horizontally and vertically . Stuff the strips on the bottom jumper. Leave a distance between them so that the water flows freely down onto the sloping platform.
For the shower door, make the frame in the same way: assemble a frame from 4 strips of timber and reinforce them with crosswise lintels to protect the door from distortions. The size of the frame should be approximately 1 cm smaller than the opening for unhindered opening of the doors.
Next, choose the material for your cubicle walls. The basis can be:
- slate,
- lining,
- moisture resistant OSB,
- cellophane,
- plastic,
- glass.
Please note that any of the materials listed must be opaque. Having chosen the base, cut the walls to the desired size and install them on the frame frames. The top and bottom of the booth do not need to be completely closed for good ventilation. The door must be cut separately. Place the doors on their hinges and line the door with cellophane to prevent water from getting onto the timber. But how to make a shower stall in a country house, so that it is not difficult and very simple, is indicated in the article.