Gutter systems made of polyvinyl chloride are much lighter and more practical than metal options. Plastic kits are much easier to work with. Despite the installation rules common to previous varieties, they do not require labor efforts commensurate in severity.
True, it is impossible to successfully install a roof drain with your own hands without taking into account the specific qualities of polymer products. Let's figure out what independent installers of PVC drainage systems should know and follow.
Types of drainage systems
The drainage system has two classification criteria that determine its installation technology:
According to the manufacturing method - homemade, industrial.
Handicraft production, i.e. homemade roof drain. This system is supported by facts such as the ability to make a beautiful and unusual drain with your own hands. Making a homemade system does not involve significant costs. In addition, it can be mounted according to a user-friendly scheme. An absolute drawback is the need for constant maintenance, since gutters are usually made of galvanized steel, which quickly rots. Among the shortcomings are the difficulty of joining individual elements and mediocre appearance.
Homemade drainage system
Factory production (factory). This method involves maintaining all standards and parameters. That is, if necessary, you can easily connect different elements from different supplies from the same manufacturer.
2. According to the material used – plastic, metal.
Free roof drainage is not the cheapest solution
Among some developers, there is an opinion that the cheapest thing to do is to do nothing - let the water flow freely from the roof directly onto the blind area and then onto the ground.
There is no need to make a special device for collecting and draining water from the roof of the house, provided:
- Increase the overhang of the roof edge from the wall to 0.6 m.
- Carry out enhanced waterproofing of the foundation and basement walls to a height of at least 0.5 m above the surface of the blind area;
- Cover the base to the specified height with a non-moisture-resistant material with high frost resistance (for example, clinker bricks or tiles, natural stone, base siding).
- Ensure that the blind area around the house and the surface of the site have a slope of several percent away from the house.
Calculate the cost of this additional work and you will see that it will be cheaper to install a gutter system to collect and drain water from the roof.
By arranging a free drain without the above measures, you risk significantly reducing the durability of the finishing of the walls of the house and the basement, and reducing the bearing capacity of the soil under the foundation due to their soaking.
In addition, unorganized water flows around the site reduce the comfort of using the territory. The blind area is often used as a pedestrian path. If there is a free drainage from the roof, such a path will become impassable during rain.
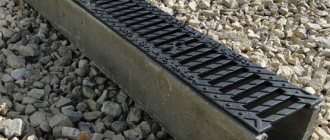
Free drainage is usually used in certain areas of the perimeter of the roof of a house and outbuildings. To collect water along the edge of the blind area, it is recommended to install a tray. The system for collecting water in a tray at the edge of the blind area is less sensitive to the effects of ice and snow, to clogging with debris, and is easier to clean than a drainage system with gutters on the roof.
Plastic drainage system
According to the installation method, there are adhesive systems (installation occurs using glue) and adhesive-free systems (installation using rubber seals).
Plastic drainage system
Advantages of plastic gutters:
- immunity to ultraviolet radiation. A high-quality plastic drainage system will not fade during its entire service life;
- not subject to corrosion;
- the adhesive system does not require maintenance, since the “cold welding” method is used, during which the elements are connected at the molecular level;
- strength;
- light weight;
- operating temperature -40°С +70°С;
- ease of installation;
- availability of different colors;
- A wide variety of components allows you to create a drainage system of the desired configuration, which makes it indispensable for installation on broken roofs.
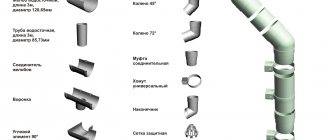
Plastic drainage system - elements and components
Designation of structural elements of PVC drainage system
Disadvantages of PVC gutters:
- plastic may break due to mechanical stress. Therefore, such systems cannot be installed on high-rise buildings. A plastic drainage system is installed only on a low-rise private house;
- unsuitable for repair. A destroyed element cannot be restored;
- a plastic drainage system with sealing rubber bands requires periodic replacement of seals, which entails disassembling/assembling elements;
- high coefficient of linear expansion.
What is 3D fencing and where is it used?
3D fences are fencing in the form of a metal mesh with its original V-shape bends. The unevenness of the surface adds volume and enhances the reliability of the structure.
In production
The fence consists of sections of mesh, gates and support posts. All elements of the 3D fence are made of durable metal, zinc coated and nanoceramics. Parts are coated with high quality paint.
This type of 3D fencing is popular in industrial and sensitive facilities, parking lots and sports fields. The security functions of a 3D fence system can be enhanced by adding barbed wire to the top of the mesh.
Owners of private houses, especially country houses, also often choose 3D fences due to ease of installation and other benefits.
Sports ground fencing
Metal drainage system
The drainage system made of metal profiles has several varieties: galvanized, copper, galvanized with a polymer coating (painted). The main difference between them: cost and duration of operation. The appearance is shown in the photo.
Metal drainage system
Advantages of metal gutters:
- strength;
- reliability;
- withstand significant snow loads and other environmental influences;
- do not support combustion;
- operating temperature -60°С +130°С;
- dimensional stability.
Disadvantages of metal gutters:
- high price;
- significant weight of the entire system;
- complexity of installation;
- small selection of colors;
- the appearance of rust when the protective layer is damaged (exception is a copper drainage system);
- a small number of elements makes it suitable only for installation on roofs with angles of 90°.
Metal drainage system - elements and components
Tin drainage system - designation of structural elements
It is difficult to answer unequivocally which drainage system is better, plastic or metal, it all depends on the specific operating conditions and other factors. In any case, the choice of a drainage system should be based on quality indicators, not price.
From the perspective of this classification, we will consider how to properly install a drainage system with your own hands.
The main advantages of Deke brand products
Among the main advantages of gutters from this manufacturer are:
- Durability - Deke gutters do not require special attention and can last for at least 25 years without loss of technical and operational data, which is confirmed by the manufacturer’s warranty.
- Practicality - the unique top coating of the products reliably protects the surface from fading throughout the entire service life.
- Versatility - the gutter has a symmetrical design with the possibility of universal use of end caps and corner connections. Fastening is carried out both to the frontal board and directly to the roof using special extensions.
- Resistance – the Deke drainage system perfectly resists atmospheric and climatic conditions and is not afraid of sudden temperature changes. Suitable for operation in the range of +50° - –50° and has weak adhesion to ice formations.
- Light weight - the weight of one linear meter of drainage is only 690 g, which makes it possible to use such systems on buildings of any type and purpose.
- Simplicity of installation - due to the technology of adhesive-free fixation and rubber seals, it is possible to achieve complete tightness of the system and significantly facilitate the process of connecting individual components into a single whole.
- ClearTube system - special longitudinal ribs are located inside the fittings and gutters, eliminating the adhesion of debris and leaves and minimizing the risk of clogging.
Reliable protection from heavy rainfall
The Deke drainage system is perfect for various types of buildings, regardless of the size and complexity of architectural solutions. At the same time, its installation can easily be done by hand, and the calculations are not particularly difficult even for an inexperienced user. If there are even minor doubts, it is better to trust the professionals, saving your time and money.
Installation of a drainage system - instructions
Like any construction process, the technology for installing gutters includes the selection of a system, material and calculations.
There are several options for drainage systems depending on their throughput. For example, 100/75, 125/90, 150/110. This marking shows the ratio of the diameter of the pipe and the gutter. The system of round section 125/100 and square section is clearly shown in the photo.
Round and square drainage system
Advice. Each manufacturer has its own sizes of gutters and pipes. Their configuration is also different. Therefore, do not even try to connect systems from different manufacturers.
Such a variety of systems is necessary so that each user can choose the one that suits his needs.
Choosing a drainage system
To choose the right water drainage system you need:
- find out the maximum precipitation level in your region;
- calculate the area of the slope (S). Not all of them, but the largest in size. It is its size that will determine the choice of gutter
S = (A+B/2) x C
Nuance. For flat roofs (slope angle does not exceed 10°), the formula takes the form S = A x C
Based on these measurements, select the desired system in the table.
Once the system is selected, you need to determine the type and calculate the amount of materials. To do this, we will prepare drawings or plane diagrams with dimensions. They will simplify the calculation and then installation of the drainage system.
Calculation of the drainage system
Let us illustrate with the example of a house how to calculate the amount of materials for installing a drainage system.
Calculation of gutters of the drainage system.
Gutter – semicircular (semicircular cross-section) and rectangular (rectangular cross-section).
Designed to collect precipitation (rain and melt water) from the roof.
Calculation of gutters of the drainage system The length of the gutter is 3-4 m. It is secured with hooks and brackets, which are installed in increments of 60-90 cm, ensuring a slope of the gutter of at least 1 cm for every 3-4 meters.
Their number in linear meters is equal to the perimeter of the roof base. That is, the length of all surfaces on which the gutter will be mounted. Gutter sizes - sold individually in 3 and 4 m.p.
For a house the size of our example, you will need 3-meter gutters - 10 pcs. 4 meter – 1 pc.
Nuance. Round all dimensions to the whole length of the gutter. The fewer connections, the simpler, more reliable and cheaper the installation will be.
Gutter angles (external (external) and internal, 90 and 135 degrees).
Calculation of gutter angles of a drainage systemAn corner gutter is designed to change the direction (distribution) of water flows. Installation method: mounted on the external and internal corners of the roof.
We will need 4 external corners and 2 internal ones, all with an angle of 90 degrees.
If a house or cottage has sharp or obtuse corners, you need to choose the system in which such corners exist.
Advice. Various angles can be made from a plastic gutter by cutting out part of the gutter and connecting the halves at the desired angle. The parts are connected using glue - cold welding.
Gutters, connectors, gutter caps.
For our example – 4 funnels, 2 plugs. There can be 5 or 17 connectors, depending on the installation features of a particular system. In most gutter systems, the corners are attached directly to the gutter. But in some - using a connector.
Calculation of funnels, connectors and gutter plugs of the drainage system In drainage systems where installation is carried out using glue, you need to use conventional connectors and compensation ones.
Compensation is installed when the roof length is more than 8 m.p. Its installation is carried out without the use of glue. This connector is designed to compensate for the linear expansion of the gutter during heating/cooling. For our example, 4 regular connectors and one expansion connector would be needed.
Advice. One funnel receives water from 10 m.p. gutters. If the wall is longer, you need to install two funnels. In our example, we did just that. In this case, the distance between two adjacent funnels cannot exceed 20 lm.
Gutter fastening hooks.
Calculation of hooks for hanging the gutter of the drainage system Hooks can be long or short. The first ones are designed to hang the gutter on the rafters and are attached before installing the roofing material. The second (short) ones are used to attach the gutter to the front board; therefore, installation on a finished roof is possible, i.e. covered with roofing material.
The gutter fastening hook is installed at intervals of 60 cm. At the same time, installation near corners, funnels, plugs and at joints is mandatory. In our example there are 68 hooks.
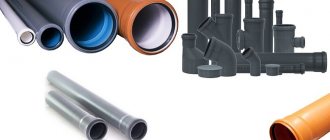
Drainpipes (for vertical drainage), pipe fastenings/brackets.
The pipe can be round or rectangular. Designed for vertical water flow.
The pipe bracket is designed for attaching the pipe to the wall. According to the installation method, they distinguish between “on stone” (for fixing on a brick, stone or concrete wall. Fixation using hardware) and “on wood” (for fixing on wooden walls (timber, logs, OSB). Fixation using self-tapping screws).
The number of pipes is determined by the number of funnels. In our example, there are 4 funnels, which means there are also 4 pipe installation locations. their length is equal to the total length of all walls along which installation is planned. Pipes are also sold in lengths of 3 and 4 m. You need to round up, since joints on the pipe are also undesirable. Those. if your house height is 3.5 m, you need to buy a 4 m pipe. 0.5 will go to waste or for other needs.
Installation of drainage system pipe fasteners Pipe fasteners are installed every meter. At the same time, their installation near the knees is mandatory.
Pipe elbow, drain (drain elbow).
Calculation of the number of elbows and drains of the drainage system If the design of the house is similar to that shown in the photo, then for each riser (we have 4 of them) you need two universal elbows (total and one drain (total 4).
Calculation of the distance between the drainage system elbow Distance L is measured as shown in the figure.
Material prepared for the website www.moydomik.net
Nuance. The construction of an attic makes some adjustments to the calculation of the drainage system. The height of the attic wall affects the number and installation of gutters. The diagrams below show what needs to be taken into account when calculating.
Calculation of the drainage system for the attic
Gutter fastening
When installing the gutter, fasteners in the form of hooks of different lengths are used. Using short hooks to secure the gutter to the roof. As for the long hooks, they are used to install the gutter on the rafters until the roof covering is installed.
Installation of hooks must be carried out with the obligatory observance of a distance between them of 60 cm. It is also necessary to adhere to the rule of mandatory installation of this type of fastening elements at the junction of the gutter, at the corners of the structure and where funnels and plugs are located. In our case, we will need to install 68 hooks.
Installation of a plastic (PVC) drainage system
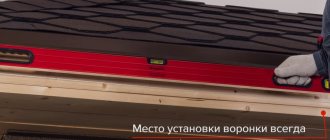
Installation of drainage funnels1. Installation of drainage funnels (roofing, storm drains, water inlet) on the roof.
Installation of brackets (hooks) of the drainage system2. Installation of brackets (hooks) of the drainage system.
Installation feature of the drainage system hooks The gutter fastening hooks closest to the funnel are installed at a distance of 2 cm from it. They serve as holders.
Advice. The angle of inclination relative to the funnel is 2° or 3-4 mm. by 1 m. It is convenient to check the slope using a nylon thread.
With a wall length of 10 to 20 meters, it is more advisable to install the gutter in the following ways:
- Simple slope (straight) - the funnel is installed at the end of the slope.
- Double slope: “from the middle” or “towards the middle”.
In the first case, the middle gutter is at the highest point, and the water moves to the funnels located at the corners of the building. In the second case, the two outer gutters are at the highest point and the water moves to the funnel located in the middle between them. If the length of the gutter exceeds 22 meters, three funnels or a more powerful system are installed.
Installation of gutter connector3. Installation of a regular and compensation gutter connector (if necessary).
Installing the gutter connector at the same distance between brackets Gutter connectors are installed between the brackets. At an equal distance from them.
Cutting the gutter into blanks4. Cut the gutter into pieces of the required length. It is advisable to clean the cut area.
Connection of gutters with a funnel5. Connection of gutters with a funnel. The gutter is placed on brackets adjacent to the funnel, taking into account the linear expansion of the plastic.
Drilling a hole in the gutter using a drill attachment The hole for the funnel can be drilled in the desired location of the gutter using a drill attachment - a crown.
Marking of drainage funnels Some manufacturers mark funnels in such a way as to simplify installation. That is, the temperature scale is indicated on the side of the funnel. After checking the temperature outside, the gutter is installed at the desired level.
Installing a funnel without glue In adhesive systems, the funnel is one of the elements for which no glue is used for installation.
If provided, a sealing rubber is installed at the junction of the gutter and funnel.
Installation of gutter connector6. Installation of gutter connector.
When laying the gutter, the connector must be coated with glue or the joint must be sealed with an elastic band.
The expansion connector is installed without the use of glue.
Nuance. To ensure that water flows in a given direction, it is better to make a “tear drop” at the end of the drain pipe.
Installation of corners and gutter plugs7. Installation of corners and plugs for the gutter is carried out according to the same scheme.
Installation of corners and gutter plugs using glue Both the corner and the plug are mounted using glue or sealing rubber bands.
Installation of drainpipe elbow8. Fastening clamps and installing drainpipes.
At the calculated distance, holes are drilled for fastening the clamp.
Pipe installation begins with installing an elbow (if necessary) or pipe into the funnel.
Installing a drainpipe elbow using glue Glue or rubber seal is required.
The connection of drainpipes is carried out without glue or sealants.
Nuance. The lower pipe fits into the upper pipe with a gap of 2 mm. (linear expansion compensation).
Installation of a drainpipe to the wall with a clamp. The pipe is attached to the wall with a clamp. Which is installed in pre-drilled holes.
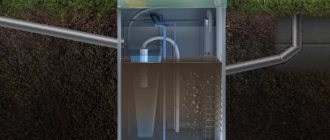
Installation of a system of drain splitters If necessary, a system of splitters (tees) is installed.
9. Installation of plastic drip.
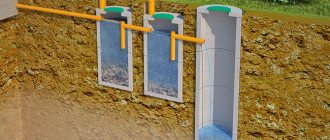
The ebb tide must be installed so that the water from it does not destroy the foundation of the house. For example, a low tide drains water into a drainage channel or directly into a drainage well.
Organizing water drainage into a drainage channel
Installation of a plastic drainage system - video
Advantages of using panels for facade finishing
Finishing buildings with siding panels, compared to other materials, has the following advantages:
- High resistance to negative external factors: precipitation, sudden temperature changes, some chemical compounds and ultraviolet radiation. The material retains its strength and decorative properties throughout the entire period of operation declared by the manufacturer.
Exterior view of a house covered with siding
- The design of the cladding and sheathing has minimal weight, which allows finishing of objects with shallow foundations without additional reinforcement of the supporting structure.
- There is no need to level the façade walls due to installation on the sheathing. This significantly reduces the work time, and also allows you to lay heat and waterproofing layers in the space between the wall and the siding.
- The cladding does not require any maintenance or care.
- High level of fire safety and resistance to minor mechanical stress.
- The presence of a wide range of decorative colors will allow you to easily choose the one you need and create a unique home design without spending money on purchasing and painting it in the desired color. Moreover, unique textured images with imitation of natural materials, distinguished by a clear and rich pattern, are also available.
- A simple installation technology that can be mastered by people who have not previously encountered construction work.
Installation of a metal drainage system
Step-by-step guide, instructions for installing gutters for a roof made of metal profiles with your own hands.
1. Installation of two extreme brackets.
They can be installed on the rafter system or on the cornice strip (frontal).
Installing the end brackets
Methods for installing drainage system brackets
How to attach the gutter holder
Advice. For normal outflow of water from the roof, the angle of inclination of the gutter towards the funnel should be 3-4 mm per 1.m.
The bracket is mounted using three self-tapping screws.
Installation of brackets (fixation methods)
When the wall length is more than 10 m, a simple (straight) slope is performed. If the length is more than 10 m - double.
Straight and double slope of gutters - diagram
2. Open the gutters.
The saw area is cleaned with a file.
Advice. The saw moves in the “away” direction.
3. Cutting a hole for the funnel.
Advice. The diameter of the hole should be slightly larger than the diameter of the funnel.
Cutting a hole for a drain funnel and rules for cutting a gutter
The funnel is cut out with metal scissors. Using an angle grinder can damage the protective coating of the drain.
4. Installation of elements
Installation of a metal drainage system is carried out similarly to the installation of a plastic system. The drainage gutters are secured to each other and to other elements with latches.
Sometimes the connector is not used, and the gutters are mounted together with latches.
The distance from the edge of the plug, as well as from the edge of the corners to the nearest bracket, should not exceed 20 cm.
5. Installation of drainpipes
The last stage of installing the drainage system.
Installation of a metal drainage system - video
Useful tips
Little tricks will allow you to organize the drainage of rainwater and melted snow more efficiently.
- The location of the vertical riser in buildings with a wall length of more than 15 m is more appropriate in the center. This will allow you to slope from the corner of the house to the middle.
- Special paint with protective properties in cylinders will extend the life of the metal in places where the protective coating is damaged and chipped.
- The use of mesh installed around the perimeter of the trays or in the funnel will prevent clogging of the drain.
- It is necessary to organize the drainage of water from the house using a stormwater system or a water collection tank.
- For areas with aggressive climatic conditions, it is important to use anti-icing devices.
Such subtleties will prevent the need to replace the drain earlier than the deadlines stated by the manufacturers.
Heating of drains and gutters
To eliminate the possibility of icing of the drainage system and its damage, as well as to prevent water from flowing under the roofing material, drainage heating is installed.
Heating of drains and gutters of the drainage system
The cable heating system for gutters and roofs allows you to maintain the temperature at a positive level.
Methods for heating a drainage system
Heating of the gutters and roof is carried out by installing an anti-icing and snow-melting system, i.e. electric heating - installation of a heating (heating) cable.
1. External heating . When the cable is installed on the lower part of the roof slope.
External heating of the drainage system
2. Heating inside the drain . In this case, the cable is mounted directly into the gutter and drain pipe.
Internal heating of the drainage system
Errors and consequences when installing a drainage system
- incorrect choice of system will reduce its throughput, which will lead to water overflowing from the gutter;
- savings on elements. For example, on leaf catcher grates, the drain may become clogged with leaves;
- The angle of inclination of the gutter is not maintained. Water will overflow from the gutter;
- Not enough funnels. Water will pour out of them and the gutters;
- The distance between the brackets is too large. Hello to the fact that the gutter will sag under the weight of snow and water;
- The distance between adjacent pipe clamps is too large. They may not withstand wind loads. For the same reason, the pipe is not installed on the corner of the house;
- the pipe is adjacent to the house. Moisture can cause the wall, base and foundation in this area to collapse.
All of the above can ultimately flood the foundation and destroy the structure. Not the most wonderful result of the work.
Leaf catcher grates for gutters
Installation of vertical drainage systems
The complexity of the work is that the vertical bends have several angles for connecting to the funnel. The number of different turns depends on the architectural features of the building.
Step 1. Measure the distance from the funnel to the wall of the house, select two corners and measure the length of the coupling sections. The missing distance should be increased with a piece of straight pipe. It is cut with a hacksaw or grinder; the edges must be cleaned of burrs.
Pre-assembly of parts without glue
Measurements
Step 2. Glue the top elbow to the funnel, the rest should only be inserted. The upper elbow is made non-separable for one reason - it is impossible to fasten the clamp in this place, the elbow is only supported by the funnel.
Applying glue
Connected elements
Step 3: Mark the locations where the pipe clamps will be attached. There are two ways to do this. The first is to mark a vertical line along the entire height of the house and drill holes for clamps on it at the required distance. The second is to use a level to mark the installation points of the elements one by one for each clamp, and maintain the vertical position with the level. Both methods have their advantages and disadvantages, make your decision on the spot based on your qualifications.
Marking the position of pipe clamps
Step 4. Drill a hole for the plastic dowel and secure the base of the clamp. Work carefully; if you use excessive force, the plastic may crack and you will have to replace the element with a new one.
Drilling a hole for a dowel
If the wall of the house has a layer of insulation made of foam plastic or mineral wool, then the length of the dowel should be increased so that there is a hole in the solid wall with a depth of at least 3 cm.
Step 5. Insert the pipe into the corner and secure its position with a clamp. Manufacturers recommend installing at least two clamps on one whole section of pipe; you will get two on each side near each coupling.
There are letter designations on the plastic clamps. The top clamp is screwed so that the arrow points to the letter “A” on the stand.
Position "A"
The lower clamp is fixed in position “B”, the arrow should point to this letter. The fact is that the clamp holders have different thicknesses of the thrust surfaces, the arrow points to a reinforced one, it is in this direction that the main forces will act.
Fastener installation process
Position "B"
If, due to the size of the building, it is necessary to connect two pipes, then a gap must be left in the coupling for their free movement. The gap width is at least two centimeters.
Gap width
The installation work ends with gluing the elbow to supply water to the blind area, to the receiver of the reclamation system or to a container for collecting rainwater. Then it is used for irrigation or other economic purposes.
Elbow for supplying water to the blind area