Do-it-yourself deep-well pump repair
If the deep pump stops working, it causes a lot of unpleasant moments for owners of wells and wells on their property. The main task of the units is to lift liquid upward to meet human needs. Modern devices are made to be quite reliable, their system rarely fails, but like all units they can fail. What are the causes of breakdowns of deep-well pumps, how to disassemble a deep-well pump and repair it is suggested to learn from the article.
Devices and main components
Currently in Russia you can find hydraulic equipment from manufacturers in Italy, the USA, Germany, France, Denmark: ZDS, PEDROLLO, CALPEDA, WILO, Busch, GRUNDFOS, Tapflo and others; Russian companies Gilex, Ampika, Pinsky OMZ, GMS Livgidromash.
Submersible pumps are designed to pump water from wells, wells or basements of buildings and, if necessary, supply it to a collapsible water supply network. At the same time, their working area is immersed in liquid, which is why they are called that.
There are several types of these devices:
- Centrifugal, in which the main element is an impeller (impeller) or a screw. Examples of them are “Vodomet”, “Aquarius”, “Whirlwind”, “Octopus”.
- Vibrating ones, which are headed by a piston. An example of them is the “Kid” pump.
- Vortex pumps are similar to centrifugal pumps, but are distinguished by a higher circular velocity of the fluid. An example is the “Vikhr” vortex pump.
Note: centrifugal units are divided into rod-type, when the hydraulic part and the electric motor are located in different places and are connected to each other by a rod, and rodless, when the electric motor is combined with hydraulics.
The main components of centrifugal apparatuses include:
- impeller or screw/auger;
- electric motor;
- barbell;
- stuffing boxes;
- couplings;
- bearings.
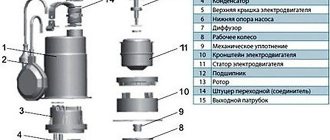
The main components of vibration devices include:
- working part body;
- drive unit;
- electric coil;
- piston;
- diaphragm;
- valve
- shock absorber;
- emphasis;
- coupling
Inspection of the pump mechanism
In addition to contamination, the main cause of breakdown of the pumping mechanism is long-term dry operation. Due to the lack of liquid, the centrifugal impeller blocks get very hot and sinter, so the only repair option is to replace them. The situation is similar with the auger and landing bushings. Also, with jammed impellers, the shaft can rotate in the mounting holes, and in powerful pumps, it can become deformed and even destroyed.
In screw pumps, screws and landing bushings are consumables; they are changed every 3-5 years depending on the intensity of use. The main reasons are the natural aging of elements and exposure to small abrasive particles.
Screw and bushing for screw pump
Let us draw your attention to the fact that the parts of the well pumps have a high precision of fit, thanks to which the cleaned mechanism is easily assembled and disassembled. If during assembly the parts do not fit into place freely, then the order of installation of the elements is incorrect
Different pump models have specific design differences, but basic recommendations for self-repair and disassembly for inspection purposes are always described in the user manual, which often includes an assembly diagram.
Submersible pumps have rightfully enjoyed enormous popularity among consumers for many years. And this is no coincidence, because this type of pump has many positive qualities that are simply irreplaceable when operating your own well or borehole. However, despite numerous advantages, submersible pumps have one significant disadvantage - they break down quite often, and the cause of the breakdown can be anything.
Often, the pump stops working normally due to problems with the winding or power magnet; the cause of the malfunction can also be a broken valve, broken rod or short circuit. Often, submersible vibration pumps stop functioning due to a rather minor breakdown, which you can fix yourself without resorting to the help of specialists. Therefore, any owner of such equipment simply needs to know how to repair a submersible pump with their own hands.
Breakdowns of the deep apparatus, causes and solutions
Let's consider possible breakdowns of centrifugal units
- It hums, but does not pump water (or flows weakly). Reason: wear/destruction or silting of the impeller; increasing the gap between the screw and the device body; clogging of the coarse filter with debris; spontaneous unwinding of the nut securing the impeller to the shaft of the working part; breakage of the key connecting the impeller to the unit shaft, drop in mains voltage. Solution: clean/replace the impeller/screw, restore the fastening of the wheel to the shaft, clean the filter from debris, install a current stabilizer.
- Knocks out plugs when turned on. Cause: short circuit of the stator winding or armature of the electric motor, breakdown of the power wire, jamming of the device by foreign particles between the impeller/screw and the housing, low voltage in the network. Solution: disconnect the electric motor from the hydraulic unit, check it for functionality, rotate the shaft , if necessary, clean the unit from blockages, check the serviceability of the electrical wire, find out if there is supply voltage, if necessary, install a stabilizer.
- The pump overheats and vibrates strongly. Reasons: foreign particles get between the impeller/screw and the housing, which leads to friction of these particles, causing the latter to heat up. Vibration of the device is possible due to partial destruction of the blades or wear of the bearings. Reasons for overheating of the electric motor: foreign particles entering the hydraulic part of the device and rubbing them against the body, which creates additional load on the engine, causing it to overheat; reduced supply voltage; liquid entering the motor due to seal failure; oil leak (dry running). The reason for vibration of the electric motor is wear of the bearings. Solution: cleaning the hydraulic unit, replacing the oil seals of the electric motor, bearings, installing a voltage stabilizer.
- Low fluid pressure, the pump barely pumps. Reasons: silting of the impeller/screw; increased clearance between the impeller/screw and the housing due to wear of the impeller/screw; filter clogged with debris; low voltage in the network. Solution: clean the filter, impeller/screw or replace the worn impeller; install stabilizer.
- Noises during operation. Causes: loosening of the nuts securing the impeller to the unit shaft, wear of the impeller key, bearings, coupling. Solution: check the fastening of the impeller on the shaft, replace the bearings and coupling.
- Mechanical defects. This type of malfunction of submersible hydraulic units includes defects in manufacturing, assembly and installation. They also include wear of the working body, bearings, and stuffing box seals. Defects in the manufacture of device parts, assembly and installation appear immediately. In this case, the device can be replaced by the seller. Worn parts are replaced.
- Voltage surges. During surges, cable damage occurs, the stator or armature winding burns out, and possibly both windings. Solution: use a voltage stabilizer for frequent current surges in the network.
- Siltation. The working part of the installation can become silted, that is, become covered in silt or sand. Moreover, if it does not work constantly, then silt or sand can cake/compact, thereby jamming the electric motor, which, the next time the unit is turned on, can lead to the plugs being knocked out or the electric motor burning out if they do not work. If the installation operates constantly, then silt or sand may stick to its working element, which will lead to a decrease in its performance. Solution: use a device with an upper suction pipe; promptly clean the location of the unit from silt or sand; Periodically remove the device, disconnecting it from the power supply, for cleaning.
- Cable rupture. Causes of mechanical damage: fracture, pinching, extreme cable tension. Solution: laying from the connection source to the pump through pipes, hose armor, cable channels for protection from mechanical damage; use sufficient length.
Typical breakdowns of pumps of different brands
Equipment from popular domestic and foreign brands has its own characteristic failures. Devices from the Danish manufacturer Grundfos , despite their reliability and durability, require regular replacement of mechanical seals . If this is not done in a timely manner, water will penetrate inside and damage the winding.
It is not advisable to service the unit at home. The specific design requires that repairs be carried out by an experienced specialist, ideally an employee of a company service center.
A pronounced hum and pressure that has dropped to a minimum indicate that the impeller in the pump has worn out or has moved along the axis. The device must be disassembled, cleaned of sand, damaged elements replaced and new seals installed.
Gilex units often leak fluid from the electric motor . It can be replaced, but only with a similar composition.
Some craftsmen believe that it is not necessary to buy an expensive substance. You can get by with glycerin or transformer oil. However, this is not the best advice. The equipment does not tolerate filling with alternative means very well and can completely fail after such an operation.
It is better not to repair the device yourself, but to entrust this task to qualified specialists. They are guaranteed to fill the engine with the original composition and do so in strict accordance with the manufacturer’s wishes. After servicing it will work just as well as on the first day of purchase.
Worn seals are indicated by a low oil level in the pump motor. It is better to replace them as quickly as possible. This will protect the motor from overheating
In the “Malysh” coils often fail . Dry work provokes this problem. A strong noise heard when turned on without pumping out water indicates a break in the central axis to which the membranes with the armature are attached. This breakdown is easy to detect after disassembling the unit.
Replacing an axle even at home is not difficult. But finding a part on sale is really a problem.
Aquarius pumps tend to overheat . This drawback is especially active when the equipment operates in shallow wells. Repairs are expensive and sometimes amount to about 50% of the original cost. In such cases, many users prefer to buy a new device, albeit from a different manufacturer.
The same problem is typical for the “Rucheek” . Despite the modern design and compliance with current European standards, they do not tolerate continuous operation .
The manufacturer says that the devices can continuously pump water for no longer than 7 hours. However, almost always such a load leads to overheating. To avoid problems, it is better to take breaks and let the equipment rest every 2-3 hours. In this way, the service life of the pump can be extended.
Do not start water pumping devices with the shut-off valve closed. In the future, this will lead to breakdown of pumping equipment. Before turning on, the valve must be opened
Vodomet pumping equipment is considered to be quite reliable and operationally stable. Most breakdowns here occur due to improper use. Also, when equipment comes into contact with contaminated water, it quickly becomes clogged with silt and sand. In this case, the pump part of the unit requires replacement.
When a problem cannot be solved at home, you should seek help from the professional technicians of a certified service center. They will quickly determine what happened to the equipment and restore its functionality. Or they will recommend purchasing and installing a new pump if the old one cannot be repaired or it is not economically viable.
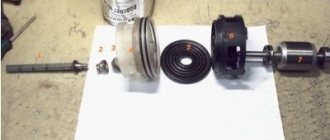
How to disassemble correctly
First, turn off the power, then dismantle, disconnect the pressure pipeline and disassemble it:
- remove the coarse filter;
- disconnect the motor part from the hydraulic part.
Disassembling the hydraulic unit:
- the hydraulic part is clamped with a vice onto the pressure pipe;
- the housing is unscrewed;
- All parts are removed from the shaft;
- if necessary, replace worn or broken ones;
- the parts are washed and then assembled onto the shaft.
Important: in order not to confuse the parts, they must be placed in the order of disassembly or put on any axis/rod without changing position.
Motor disassembly:
- it is installed with the lid facing up;
- unscrew the lid and remove the sealing gasket;
- oil is drained;
- using a press, the lower motor cover is pushed down, the locking ring is released, and then removed;
- with light blows of a mallet on the end of the shaft, the bottom cover with the rotor is knocked out;
- the engine rotor with bearings is removed;
- if replacement is necessary, remove the bearings from the shaft and the oil seal from the top cover of the motor;
- windings are checked; if necessary, the stator is sent for repair. Assembly is carried out in the reverse order.
Content
- Which pumps are most often installed in wells?
- When you urgently need to pick up and inspect the device
- Description of disassembly using the example of the Vodomet pump
- Some design features of various models
- Pump disassembly procedure
Downhole submersible pumps
Do-it-yourself repair of downhole equipment parts
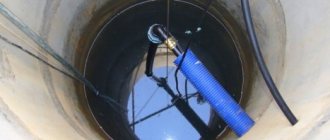
To repair downhole devices, they are first de-energized, then removed upward and disconnected from the pressure pipe.
Piston replacement:
- the tightening bolts are unscrewed;
- body is removed:
- the nuts are unscrewed from the rod;
- the valve is removed from the stem;
- a new one is installed;
- tighten the nuts securing the valve to the stem;
- the housing is put in place;
- both parts are bolted together.
Valve replacement:
- the tightening bolts are unscrewed;
- the housing of the hydraulic part is removed;
- the valve mount is unscrewed;
- the old one is removed;
- the new valve is screwed onto the body;
- the housing is installed in place;
- both parts are fastened with coupling bolts;
- The operation of the installation is checked in a container with water.
Coil replacement:
- unscrew the coupling bolts;
- remove the hydraulic housing;
- remove the piston assembly with the diaphragm, clutch, shock absorber and armature;
- heat the compound filling of the electromagnet with a burner or on a hot plate until it softens;
- remove the electromagnet from the motor housing;
- clean his nest;
- remove the coil from the core;
- disconnect the power cable;
- replace the coil;
- solder the power cable and insulate the soldering points with PVC pipes;
- install the coil on the core;
- place the coil with the core exactly in place in the engine compartment;
- fill the electromagnet with epoxy resin according to the instructions;
- after 15-30 minutes, add resin to the upper level of the core;
- Allow the resin to harden overnight;
- install the anchor assembly on the engine compartment;
- put the pump housing in place;
- install coupling bolts;
- Check the operation of the unit in a container with water.
Replacing the discharge pipe:
- to repair deep-well pumps, they need to be de-energized, raised to the surface, then disconnected the pressure pipe;
- unscrew the check valve;
- unscrew the discharge pipe;
- screw in the new discharge pipe, having previously wound the FUM tape or FUM thread onto the thread;
- screw on the check valve, winding the threads with FUM tape or FUM thread;
- connect the pressure pipe;
- lower the apparatus into the well;
- connect power supply.
Engine thermal insulation:
- to replace the thermal insulation of the engine, you need to disconnect the hydraulic and motor parts;
- remove the retaining ring;
- remove the seal and install a new one in its place;
- assemble the unit;
- connect the pressure pipeline;
- lower the unit into the well;
- connect power.
Fluid has leaked from the engine:
- disconnect the motor part;
- install the engine vertically, with the cover up, unscrew the motor cover;
- pour in environmentally friendly non-toxic oil (some experts recommend pouring Vaseline oil);
- check the integrity of the gasket; if necessary, replace;
- screw the top cover;
- connect the motor part to the hydraulic part;
- lower the device into the well;
- connect power.
Features of pumping drainage water
During spring floods, situations often arise involving flooding of basements, inspection pits and other structures located below the surface. Typically, such groundwater has practically no impurities, so pumping it out with vibration pumps is quite possible.
If it is necessary to work with contaminated water, it is necessary to use an additional filter, which will prevent possible damage to the pump. Such a filter has the shape of a cap that is put on the receiving part of the device; installation must be performed after preheating the filter; this will significantly simplify the installation process.
Increased service life
Motor inspection/revision
In order for the device to last longer, it needs to be inspected at least 2 times a year. To do this, check:
- oil level in motors of centrifugal and screw units;
- integrity of compound filling in vibration installations;
- degree of bearing wear;
- integrity of the power cable;
- hull integrity;
- cleanliness of the unit surface.
Pump inspection/revision
To do this, check:
- hull integrity;
- cleanliness of the unit surface;
- the amount of liquid pressure;
- filter cleanliness;
- absence of mechanical noise during operation of the installation;
- free rotation of the shaft.
Advice: do not forget to inspect the installation and electrical equipment at least 2 times a year, at the beginning of the summer season and at the end of it.
How much will it cost
The cost of repairing a well pump, as well as parts for their repair, may be different in each city. Let's give the average cost for each of the named units and components. The cost of repairing centrifugal, vortex and screw installations will cost from 2000 rubles and more.
Cost of replacement parts
For vibration pumps:
- piston - 34 rubles;
- valve – 33.60 rub.;
- repair kit (piston + valve) – 67.20 rubles;
For centrifugal and screw units:
- oil seal - 100 rubles;
- impeller - from 100 rubles;
- screw - from 550 rub.;
- pump shaft – from 260 rubles;
- starting capacitor - from 300 rubles;
- electric motor – 3500 rub.;
- mechanical seals – 2550 rub.
Thus, we can conclude: restoring the operation of the electric pump yourself will cost much less than purchasing a new unit or using services.