Drainage in a private home is one of the main components of a comfortable outdoor recreation.
It is worth saying that most of the land plots suffer from waterlogging, which leads to the destruction of the foundation of the building, and all the ensuing consequences.
If you notice excess moisture in your area, a DIY drainage pipe will come to the rescue.
Drain pipe
This device is a system of underground channels or pipelines that drain excess moisture, forming an artificially created watercourse in the soil.
Water, entering the created underground channels, is collected in special storage tanks and then removed outside the site.
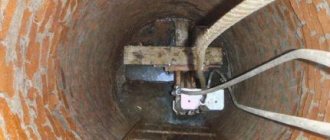
Underground channel system
How to make site drainage with your own hands from scrap materials
If you want to develop an area where groundwater is located too close, as a result of which the soil is excessively moist, you need to install a drainage system.
Then the plants will bear fruit and be pleasing to the eye, and the buildings will not collapse. In essence, the drainage system consists of specially equipped channels. Their task is to collect moisture and remove it outside the site. There are several types of drainage systems, differing in the method of arrangement: closed, backfill and open. Tubular drainage is found in the last two varieties. You can do it yourself.
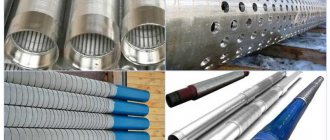
Tubular drainage is made from perforated or slotted pipes.
Which pipe to choose
In order for the drainage system to last a long time and solve the problem effectively, it is necessary to find out which soil predominates on the site: sandy, clayey, crushed stone, loamy (mixed). Having decided on the soil, you can choose pipes.
For sandy soil, you need to make drainage with pipes equipped with a filter made of non-woven fabric. For crushed stone, a filter is not needed. If the soil is clayey, you can do without a filter, but you need to sprinkle crushed stone around the pipe. Pipes equipped with geofabric filters are suitable for loam.
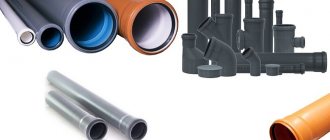
When laying drainage, structures made of various materials are used. These are plastic, asbestos cement, ceramics and pottery analogues. But now preference is given to plastic analogues from various derivatives:
- low-density polyethylene (HDPE);
- polypropylene (PP);
- polyvinyl chloride (PVC);
- high density polyethylene (HDPE).
When choosing, it is necessary to take into account the depth of the site’s drainage system. A two-layer pipe with perforation and a geotextile filter will withstand an eight-meter layer. HDPE pipes can be lowered to a depth of 3 meters.
Depending on the amount of groundwater, the diameter of the pipes is determined.
Advantages of plastic pipes
Laying tubular drainage is based on three pillars: the strength of the material from which the pipes are made; installation depth and interaction with the aggressive environment of groundwater. Plastic perforated pipes will cope with these tasks perfectly. Their advantages are that they:
- are characterized by high strength;
- not subject to corrosion;
- sediment does not linger on the smooth inner walls;
- the presence of filters prevents them from clogging from the outside;
- light weight makes installation easy, you can do it yourself;
- extended period of use;
- low price with good quality.
How to lay drainage with your own hands
It’s easy to lay tubular drainage with your own hands. You just need to follow a clear plan. First you need to make a drainage diagram for the area. To do this, you can monitor how water flows along the ground during rain. Ditches should be dug in these directions. It’s better to use a level or laser rangefinder. These devices will more accurately show the relief of the area.
With the diagram in hand, we perform the following work one by one:
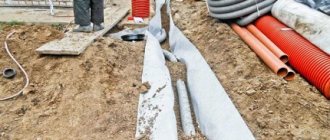
- digging trenches for drainage with your own hands. It's better to do it in the rain. This way you can immediately check the correctness of the laid route. If the water in the trench does not accumulate in puddles, you can proceed to the next stage;
- If the pipes are without filters and the soil is problematic, then we lay a geotextile fabric in the trench:
- lay the pipes at an angle;
- we direct the lower end into a well to collect water;
- pour crushed stone (not limestone) into the trench;
- we wrap everything with geotextiles;
- fill in crushed stone and a layer of sand;
- cover the structure with turf.
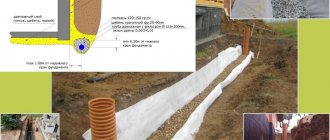
The minimum trench depth for plastic pipes is 80 cm. The slope of the pipes is at least 3°.
The shape of the trench for drainage of the site can be made rectangular or trapezoidal. If the drain pipe kit does not include connection fittings, you can use those designed for sewer pipes. The width of the trench should be equal to the outer diameter of the drainage pipe plus 40 cm.
What else can you assemble tubular drainage from?
If there are pipes left after laying the sewer system, you can safely use them to create a drainage system with your own hands. Using a drill, holes are made in them. Next you should proceed as when laying the drainage of the area with plastic pipes.
You can also make drainage with your own hands from another available material - asbestos cement. These pipes also need to be perforated. The holes are made at a distance of 10-20 cm, the cutting width is 3-7 mm. They are arranged in a checkerboard pattern. The laying mechanism is the same as with plastic pipes.
Asbestos cement pipes are connected with cylindrical pipes of the same material. The ends of the pipes are cut straight, strictly perpendicular to the longitudinal axis of the pipe. The coupling should be 6-8 mm larger than the outer diameter of the pipe.
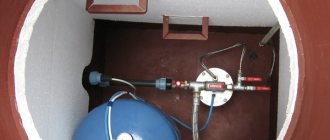
At the turns of the tubular drainage structure and on large flat sections, inspection wells are installed. They are needed to monitor the operation of the system.
Installation nuances
After all the preparations have been made, let’s take a closer look at how to equip a drainage system with your own hands. Installation of brackets is carried out with the obligatory creation of a slope towards the funnels, when, taking into account the linear meter, a vertical displacement of 5 mm is assumed. If there is a need to accelerate the flow of water, this slope can be increased to 10 mm.
If the length of the pediment does not exceed 10 m, a slope is made to one side. A larger value involves the installation of an additional funnel installed in the middle with a drain pipe connected to it to form a drain. But you can also make two slopes of the gutter going from the middle of the gable.
To install gutters you need:
- fix the first bracket at the point of maximum height of the sewerage system;
- fix the second one, taking into account the fact that it will be lower than the first one, thereby creating the required slope;
- Stretch twine between the installed brackets, which serves as a guide for marking the attachment points for other supporting parts of this type.
The described process of installing storm sewers looks quite simple from the point of view of its implementation, but there are certain nuances. To create a slope, they mainly focus on the horizontal, which is the front board, known as the wind board.
But is it always installed with strict horizontality? It is advisable to verify this, for example, using a hydraulic level or level. You can also use a simple option in the form of a bubble device, but only if its length is 1 m or more.
Cheap waste drainage
You can make your own site drainage from other available things:
- construction garbage;
- plastic bottles;
- tree or bush branches
- car wheels;
- Styrofoam;
- twisted branches tied in bunches (fascines).
Plastic bottles are widely used in everyday life; they are also suitable for arranging a site with a drainage system. This material is chosen for its long service life and high quality of the starting material - polyethylene. A drainage system made from bottles will last at least 50 years. It will not lose its shape and will not undergo decomposition processes, like branches or textile materials. The only negative: if the system is not insulated, it will freeze in winter and will not be suitable for use in the future.
The simplest drainage on the site
You can arrange surface drainage with your own hands. It's easy to do:
- we dig a trench 50 cm wide, 60 – 70 cm deep;
- we make the walls of the structure at an angle;
- we line them up according to the rainwater drainage pattern;
- water from the trench is collected in a special sump or in an artificial reservoir.
The disadvantages of this design are its fragility and bulkiness. Trenches “eat up” the area of the site. To make the system last longer, you can use ready-made concrete or plastic trays.
Trenches can be improved by lining them with beautiful pebbles. The number of ditches is calculated as follows: 1 m of drain per 10-20 m2 of allotment area. The order of the drains is as follows: first the main one is laid, then the secondary ones are brought at an angle to it. The distance between the secondary ones is determined depending on the quality of the soil. For clayey and loamy soils – 4-12 m; for sandy ones - 20-30 m.
Installation of PVC drain
There is nothing complicated in installing this design, but it is necessary to take into account some nuances:
- Determining the depth of the sewerage system depending on the roof area.
- Choosing one installation method or another.
- Marking the location of the drain:
- indicate how the system will be placed, taking into account the fact that it should receive the entire volume of precipitation collected from the roof;
- determine the location of funnels and corners;
- install the first bracket at the highest point in relation to the cone-shaped device;
- using twine and a level, determine a horizontal line passing through the point where the bracket is installed, and, starting from it, set the slope;
- install the last support part and connect it to the first using twine;
- install other brackets in 40 cm increments, adhering to the marked slope line.
- Gutter installation:
- prepare a narrow channel by making sections of it of the required length;
- connect the drainage components using appropriate elements or glue;
- install the gutter on the brackets, using the latches and avoiding the joints of both the channels themselves and the funnels falling on these supporting elements;
- install plugs.
- Installation of a sewerage system:
- connect the pipe to the gutter by diverting the drain;
- align the vertical of the cylindrical structure using a plumb line and a square;
- fix the pipes forming the sediment drainage structure in order to determine the installation locations of the clamps in 1 m increments, but with the obligatory location of the upper part on the line of the first joint;
- fix the connecting elements on the wall, taking into account that the sewer pipe after installation will be 2 cm away from the side structure of the house;
- mount the drain bell on the hatch, but without rigid fixation, so that you can control the drainage.
We tried to touch on all the nuances of installing rainwater drainage. Some work is quite difficult to do alone, so it is recommended to use a partner.
Drainage from scrap materials - cheap and cheerful
If a drainage system is required on the site, but there is no money to purchase materials, you can try an alternative option - to arrange the drainage of the site using improvised means.
The problem of flooding of the territory during the period of melting snow or heavy precipitation is familiar to many. If it is not resolved in a timely manner, there is a risk of facing very unpleasant consequences. The fact is that moisture undermines the foundation of a house and outbuildings and has a detrimental effect on the root systems of plants and urban crops.
Drainage made of polyethylene film
If you are wondering what material can be used for drainage, the answer is clear - one that allows water to pass through. Most often, the following materials are used to create a drainage system:
- plastic bottles;
- Styrofoam;
- branches;
- fascines;
- car wheel;
- construction garbage;
- stones;
- old things.
Note! Before choosing available materials for installing a drainage system on your site, you should make sure that during operation they will not rot or decompose, creating an unpleasant odor problem.
Conclusion
You can make drainage in your dacha for practically nothing, the main thing is to follow all the above recommendations and not forget about slopes for unhindered water flow. The video in this article will tell you some important aspects in even more detail, and if you have questions and clarifications on the topic, then write them in the comments under this review. Sometimes you have to save on purchasing expensive building materials, look for more affordable alternative options, or simply accept the lack comfort. If you want to organize a drainage system in your garden plot, you can make drainage from plastic bottles.
Plastic bottles for drainage
Do you have a lot of plastic bottles and don't know what to do with them? Do not rush to throw them away, as they may be useful for arranging a drainage system on the site. The bottles are made from high-quality, environmentally friendly polyethylene, which has a long service life.
Drainage from plastic bottles
The main advantages of using bottles for arranging drainage on the territory:
- Long period of operation. The container can lie in the ground for more than 50 years without decomposing or deforming.
- Availability. Sometimes owners simply do not throw away used bottles, but collect them somewhere in the basement or attic. Alternatively, you can buy containers on the market at a very reasonable price.
- Environmental Safety. There will be no unpleasant odor in the ditches where plastic bottles are placed, since there are no conditions for the development and reproduction of microorganisms (unlike drainage from wood and textiles).
- Easy to install. The main complex of work consists of carrying out earthworks. Then you can complete the entire installation yourself in a few hours.
Important! Drainage using plastic bottles should only be closed. When heated, polyethylene can release harmful substances, which can affect the health of home residents, so you need to ensure that the material is not exposed to direct sunlight or exposed to heating elements.
There are two options for arranging a drainage system using plastic bottles: mesh, “natural” drainage. In the first case, the bottom of the bottle is cut off, and the neck of the next one is inserted into it. After completing the excavation work, such a plastic mesh is simply laid in the trenches and sprinkled with a sand cushion, then with soil. This method can only be used in areas where the area is small and the amount of precipitation is insignificant.
“Natural” drainage is used much more often and is considered more effective and convenient. There is no need to pre-prepare the bottles. Before laying them in ditches, they are simply tightly covered with crusts.
When arranging the drainage of a site from scrap materials, in particular from plastic bottles, you should take care of high-quality insulation. If the system freezes during the cold season, in the spring when the snow melts it will not be able to perform its functions, so all work can then be considered in vain.
Several simple ways to organize watering
Several options for drip irrigation through bottles have been developed, which are successfully used in practice. All of them work quite effectively and allow you to forget about the problem of plant moisture for 2-3 days.
Underground root irrigation
To organize watering using this method, you will need a plastic container with a volume of 1.5–2 liters. You need to make several holes in it with an awl or a gypsy needle at a distance of 3–4 cm from the bottom. The number of holes depends on the type of soil, for example, for sandy soil two will be enough, but for loamy soil you will have to make at least four holes. To water moisture-loving plants, small holes are pierced across the entire surface of the bottle.
Dig the container between the plants upside down to a depth of approximately 10–12 cm, with the neck remaining above the ground. Pour water through it using a watering can and screw on the lid, in which you have previously made a hole for air to escape.
This is how plants are watered
Another option is to bury the bottle in the ground, neck down, after making several holes in it and screwing the cap tightly. The bottom of the container is cut off in such a way as to form a kind of lid that will prevent water evaporation. This method of irrigation is more convenient, since the tank is filled with water through a fairly wide hole.
If necessary, the drip irrigation time can be extended. To do this, use larger containers - five-liter plastic bottles. In this case, holes are pierced on one side of the container, and the lid is cut on the other. The bottle is placed in the ground horizontally with the holes down.
Surface irrigation scheme
Surface watering of plants
The containers do not need to be buried; they can simply be hung above the plants. To organize drip irrigation from plastic bottles using a surface method, you need to build strong supports above the bushes and attach containers to them. The bottle is hung with the lid down, having first pierced one or two holes in it, or vice versa, they make holes in the bottom and secure it with the neck up.
This method of irrigation is more convenient and of high quality, since the plants receive warm water heated by the sun.
In addition, the direction of the drops can be accurately determined; it is important that they fall only into the soil, without affecting the leaves of the plants. If you notice that the fertile layer of soil is being washed away, move the container to another location
You can see how to make drip irrigation from plastic bottles in the video.
An improved way to moisten the soil
To organize more effective drip irrigation, in addition to the bottle, you will need an empty ballpoint pen. You need to cut off the writing part from it and rinse it well. In the resulting tube, one end must be closed with a toothpick or a sharpened match, then, stepping back about 2 cm from the closed edge, pierce a small hole with a needle.
Now you need to make a hole for the rod in the bottle. If you install the container with the neck down, then pierce a hole at the level of the bottle hanger. If there is a bottom at the bottom, then make a hole, 10–15 cm away from it. Insert the rod with the closed end outward and compact it well with plasticine. Pour water into the container and place it near the plant as shown in the photo.
1 – water bottle, 2 – rod, 3 – closed end of the tube
With this method of drip irrigation, moisture goes directly to the roots of the plants. The watering speed is controlled by the width of the hole in the rod. Practice shows that when using two-liter containers, the soil will remain moist for five days, but provided that no more than 10 drops of water are poured out within five minutes.
Drip irrigation using plastic bottles is a realistic and inexpensive way to organize an effective irrigation system for garden plants. This is an ideal option for areas that do not have a constant water supply, and for summer residents who, when leaving for several days, can be sure that the planted crops will not die from lack of moisture.
Foam drainage
If you plan to arrange drainage from scrap materials, use polystyrene foam. You can assemble it, or you can buy it at a hardware store at a reasonable price. The material has long been known for its versatility. It is used to protect equipment from damage and to provide a drainage layer for indoor plants. Sometimes polystyrene foam is used to construct drainage systems in small areas.
Foam drainage
Work should begin with earthworks. Trenches are dug at a slope towards the location of a collection well, collector or artificial reservoir. A cushion of sand and crushed stone is placed in the dug trenches, then a layer of pre-crushed foam. The last step is laying the soil. To increase the efficiency of the drainage system, geotextiles can be placed in the ditches.
If the area is heavily flooded, groundwater is located high, which from time to time accumulates in the basement, it is quite difficult to solve the problem using improvised materials. In small areas with slightly elevated humidity levels, available materials perform their functions efficiently.
What do we get as a result and how does such a system work?
The bottles create an air cushion along which the water will roll into the groove with crushed stone and further along the slope to the place we need. They also serve as protection for this groove from the influence of the top layer of soil. It should be noted that the top layer of soil should be at least 15-20 cm, since if the layer is smaller, it will sag when walking on it.
Leave your tips and comments below. Subscribe to our newsletter. Good luck to you and good luck to your family!
Drainage from plastic bottles
The basic principles when inventing a drainage system that will be individual in design terms are the ability of the structure to accommodate the required amounts of water that can enter a given system and the correct selection of the configuration as a whole on the land plot. A variety of items will be useful for organizing drainage and water drainage lines. In capable hands they will be given the next life, but in everyday life they will be perceived as garbage. Such items can be plastic bottles, bricks, stones, pieces of old mortar and worn-out tires. Is it possible to make drainage from plastic bottles? There are a lot of plastic containers that lie abandoned or create a littered impression of the summer cottage and its surroundings. Preparation for work will consist of the following:
- It is necessary to study the soil topography; this is a fundamental factor in organizing the drainage system.
- Based on the studied topography, it is necessary to construct a water flow pattern so that it is similar to the principle of a river (bed with tributaries).
- Having outlined a plan on paper and the terrain, it becomes possible to begin working on the ground. It is necessary to maintain the depth of the ditch - approximately two lengths of the bayonet of a shovel.
Do not forget that it is recommended to preserve the fertile top layer by removing it and storing it temporarily in another place.
Plastic drainage, work is performed in the following sequence:
- After wrapping the corks, we place the bottles more tightly on the bottom.
- Bottles are poured so that the ditch is filled to half the depth.
- A layer of turf is laid on top of the soil layer.
- Perform compaction.
- Next, you need to pour a layer of soil and cover it with a layer of turf.
This design is durable and comfortable. The advantages are that polyethylene is not subject to rotting, which makes the system almost eternal, and also due to the ability to make a flower bed or path on top, allowing you to save precious area of the site.
Popular drainage schemes ↑
Drainage layouts on the site may be different. Most often, two structures are used to protect the territory from waterlogging: ring and fir-tree.
Ring design ↑
The ring scheme is used to protect building foundations from surface water. To prevent water from accumulating near the house after rainfall or melting snow, a trench is dug along the perimeter of the property in which drainage from bottles is installed.
The distance from the trench to the building depends on the size of the blind area and, as a rule, is about 1 m. The depth of the trench should not be too large. Firstly, plastic containers can become deformed under soil pressure, and secondly, to quickly remove precipitation, the drainage must be as close to the surface as possible.
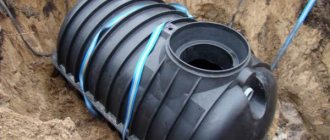
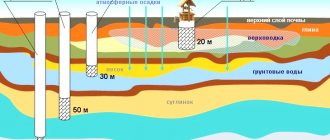
Important. To protect the building from the action of groundwater, drainage is located 30-50 cm below the foundation. For such purposes, you should use a specialized drainage pipe made of PVC or HDPE that can withstand heavy loads.
Christmas tree design ↑
In its shape, the structure resembles a Christmas tree (hence the name) or a river system with a main channel and several branches. The number of outlets depends on the area of the drained area. In this case, their slope should be directed towards the main highway, which in turn has a slope towards the drainage basin - a drainage well, ditch or pool.
This scheme is ideal for swampy areas, allowing you to drain a large area. Of course, in this case, a larger length of pipeline will be required, but if you make drainage from plastic bottles, the costs will be minimal.
Advice. The trenches in which the drainage system is located can be sprinkled with fertilizers. Thus, before entering the reservoir, the water will be saturated with useful substances and will be suitable for fertilizing the garden plot.
The method of constructing drainage from plastic bottles is very popular due to its accessibility. In many situations, this option will remove excess water from the surface of the site and make the area more suitable for plant life and construction projects. However, it is not advisable to use PET containers for the construction of a deep drainage system designed to protect the site from the action of groundwater. In this case, it is better to seek help from specialists who will develop an optimal pipeline layout and carry out installation using modern drainage structures.
stroy-aqua.com
Stone and fascine drainage
Polyethylene containers are not the only material from which drainage can be made. To produce fascines, you can use brushwood, which is excellent for this purpose. There are a sufficient number of materials in use that can replace crushed stone during installation. Replacement options, tested more than once:
- Fascines. Relatively long stems and brushwood, which are tied into bundles, the diameter is approximately 30 cm. It is better to knit every 50 cm, with a nylon cord or wire. Longer stems are placed in the center, and shorter ones are placed at the edges. After laying, moss is laid on top. The entrance to the trench is made with a socket made of boards.
- Stone drainage is made in a similar way. The fascines are replaced with crushed stone, which must first be sorted (large ones on the bottom, small ones on the walls of the ditch). The crushed stone is laid on top with moss, then everything is covered with a layer of inverted turf.
Drainage without crushed stone Making drainage without crushed stone is possible:
- Using a pottery pipe with a diameter of 5 cm or more. When using pottery pipes, the joints must be lined with moss or fibrous material, which will act as a filter. The pottery drainage is covered with inverted turf and covered with soil.
- Perch system. Uses wooden gutters to replace pottery pipe. The rest of the process is similar. It is imperative to remember that the installation must be carried out to the beginning of the drainage system from the mouth, that is, in the opposite direction to the flow of water.
- Casting made on the basis of poles. Called the wooden system, it requires coniferous trees with a diameter of 7–10 cm. They must be cleared of bark and sanded, after which they are placed in a ditch.
Therefore, we looked at three methods for constructing drainage without crushed stone.
Advantages and disadvantages
Advantages:
does not require much effort in operation, and the technology for manufacturing the system does not require special skills and knowledge;- saves money (available materials are used for production);
- allows you to reduce water supply fees;
- the water entering through the bottles evenly saturates the soil and maximally saturates the roots of the plants;
- rapid heating of bottled water creates comfortable conditions for most plants;
- The system is not labor-intensive to install or reinstall.
Flaws:
- such a system is not suitable for watering a large area, since it is not rational;
- drip irrigation cannot completely replace traditional watering (the system is used as a temporary measure for moistening);
- When using such irrigation in loams, the system quickly fails due to clogging.
There are some disadvantages to this method. Drip systems become clogged quickly, requiring frequent cleaning. This can be avoided by equipping plastic bottles with drainage. These can be nylon tights, which do not rot and allow liquid to pass through well.
Dehumidification using modern textile materials
Production of soft drainage from technological fabric materials. The modern design of the tecton is based on membrane properties, the essence is that moisture passes only in one direction, moisture does not pass in the opposite direction.
Geotextiles will be required for implementation. It forms a filtration layer that will prevent debris, soil and silt from entering the tide system. Such a drainage system is carried out as follows:
- A ditch is dug, the slope of which coincides with the direction of water drainage.
- It is necessary to lay the tecton on the bottom so that a U-shaped appearance is formed when viewed from across.
- Next is a layer of geotextile with a gap of 40 cm on both edges.
- The matter is filled with small stones or rubble.
- The edges of the geotextile are rolled up.
- The entire soft drainage structure is covered with sand.
The article discusses various methods of do-it-yourself drainage; you are left to choose the appropriate method of drainage system yourself.
Types of drainage systems
Open drainage
There are two types of drainage system:
- Open
- Closed
The first type is used to remove surface water that forms after snow melts or rainfall. Typically, open drainage looks like this: grooves 0.7 m deep and 0.5 m wide are dug throughout the area with a certain slope. Often plastic or concrete trays are placed in the recesses, covered with a grid on top. A layer of sand about 10 cm thick is poured onto the bottom of the ditches and compacted thoroughly.
The second type of drainage, closed, is used to drain groundwater. Below the freezing level of the soil, ditches are dug with a slope, at the bottom of which pipes are laid to drain water into a drainage well.
In addition to using piping in a closed drainage system, backfill material can be used using broken stone or brick placed inside the trench. This method is inexpensive, but ineffective, since it quickly leads to silting of ditches. An alternative and effective way to create a drainage system from the soil is drainage with crushed stone without pipes, or so-called soft drainage.
Drainage in a summer cottage is the easiest way to solve the problem
If your site is located in a lowland or the groundwater level is very high, then without constructing at least the simplest drainage system it will not be possible to get rid of dampness. Of course, if you do everything using technology, the costs will be very high, but there are simpler options that will cost you pennies. At the same time, their effectiveness has been tested for decades, and you can be sure that your work will not be in vain and your dacha will become dry.
The larger the problem, the more extensive the drainage system will be required.