By understanding the technology for installing a toilet, you can save on plumbing services and get the job done to the highest possible quality. The toilet can be installed in the traditional way or using a more modern method - with installation. In the second case, the cistern will be hidden in the wall, which will have a positive effect on the interior of the room.
DIY toilet installation
You are provided with instructions for completing each of the listed installation options.
Types of toilets
Types of toilets
Drain system
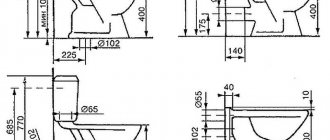
| Types of toilets | H | h | h1 | L | l | l1 | B | b |
| With a solid cast shelf, mm | 370 and 400 | 320 and 350 | 150 | Not less than 605 (by agreement between the consumer and the manufacturer, it is allowed to manufacture toilets with a length of 575 mm) | 330 | 435 | 340 and 360 | 260 |
| Without solid cast shelf, mm | 370 and 400 | 320 and 350 | 150 | 460 | 330 | 435 | 340 and 360 | 260 |
| Children's | 335 | 285 | 130 | 405 | 280 | 380 | 290 | 210 |
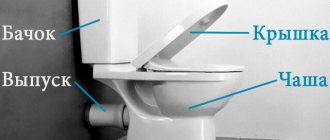
Toilet with solid cast shelf
Set for work
- Hammer.
- Roulette.
- Adjustable wrench.
- Fan pipe.
- Flexible hose.
- FUM tape.
- Fasteners.
- Sealant.
In the case of installing a toilet on an installation, the listed list will be expanded with the corresponding set. Everything you need can be purchased at any plumbing store.
Design options for modern models
The range of plumbing fixtures on the market is varied. Any owner has the opportunity to choose presentable and functional equipment to suit his own taste and budget.
In addition to traditional floor-standing models, manufacturers offer a wide selection of wall-hung and built-in devices. The drain tank in them can be attached to the wall or connected to the base of the plumbing fixtures.
The design of the bowl of floor-standing and hanging models can be anything, for example, a dish-shaped, funnel-shaped or even a visor modification
The latest toilet models also differ in the design of key components.
The output discharge is:
- horizontal;
- vertical;
- oblique.
The type of outlet drain should be taken into account when choosing a model. If your plans do not include altering the sewer pipe supply, then in the installed model the drain should be arranged according to the same principle as in the dismantled one.
Inconsistent drains and plumbing supply, provided that it is not a toilet with an outlet, are almost impossible to combine as tightly and efficiently as possible.
Fixation of plumbing fixtures to the floor is carried out using specially made two or four fastening points. But you can also find models in which the corners included with the product are used for fastening to the floor.
Install the toilet seat
YouTube channel “Good-natured Plumber”
Assemble the lid fittings. If there are “left” and “right” marks on the mounts, do not confuse them. Insert the rubber bushings into the holes, install the eccentrics on top and adjust the distance between them to the width of the toilet seat holes.
YouTube channel “Good-natured Plumber”
Tighten the mounting bolts with plastic washers from below. Place the decorative pads on the rubber part of the eccentrics and install the cover on them until it clicks.
General recommendations for installing toilets
A new plumbing fixture can be placed in the place of the old one, or you can choose another “corner” for it, making a small redevelopment in the bathroom.
Preparation of tools and materials
To connect the tank to the water supply you will need a flexible hose. It usually comes included. For connection to the sewer - a rigid drain pipe or a bendable corrugated cuff.
It is impossible to do a high-quality installation of a toilet with your own hands without a minimum set of necessary tools that any owner has in his home.
To assemble the structure and connect to communications you will need:
- hammer drill or impact drill;
- a set of screwdrivers with flat and Phillips blades;
- set of wrenches;
- building level;
- a simple pencil or marker;
- stationery knife;
- roulette;
- chisel;
- hammer.
If the installation of plumbing fixtures will be carried out on tiles, then it is also necessary to prepare a “ballerina” or a spear-shaped drill for working on tiles. To make holes for installing fasteners, you will also need an 8 or 10 mm drill.
If you plan to connect the toilet to a cast iron socket, you need to prepare a rubber adapter sleeve measuring 123 x 100 millimeters
Auxiliary materials will also be required:
- metallized tape;
- silicone sealant;
- FUM tape;
- polyethylene film;
- moisture-absorbing piece of fabric;
- container for collecting liquid.
Depending on the type of model being connected and the installation method, cement mortar may also be required.
Removing an old toilet
Removing an old toilet is one of the most time-consuming operations.
The work is carried out in several stages:
- Turn off the tap.
- Disconnect the hose going to the tank from the water supply and drain the water from it.
- The empty tank is removed from its mounts.
- Unscrew the nuts located on the back of the toilet and disconnect it from the sewer. To loosen the drain, the toilet needs to be rocked from side to side.
- Drain the remaining water from the toilet by tilting the bowl forward.
- The sewer hole closer to heaven is cleared of dirt and temporarily blocked with a rag gag or a wooden plug of suitable diameter.
The easiest way to remove the bolts is to hold the head with an open-end wrench and unscrew the nut with an adjustable wrench. If the threaded connections are heavily slagged with salt deposits or rusted.
To make the task easier, use universal lubricant “WD-40”, which can loosen deposits in a matter of minutes. In the absence of one, you can use vinegar or kerosene.
The sewer hole must be closed so that toxic hot gases do not spread beyond the pipeline
If rotten taffeta or any other support is found under the dismantled toilet, it must be removed. This can be done with a hammer drill, nail puller or chisel.
In older houses, drains on sewer pipes are often secured with cement coating. The easiest way to knock down dried mortar is with a chisel, pricking it in several places. Read on for detailed instructions on dismantling an old toilet.
Image gallery
Photo from
Old toilet installed on tiles
Attaching the toilet to the base through taffeta
Connection to the sewerage system with a corrugated pipe
Connecting plumbing to cast iron sewer
Sequence of assembly of the structure
For safety reasons during transportation and to further save space, plumbing fixtures arrive in stores disassembled. To enable self-assembly, each product comes with illustrated instructions.
When assembling the structure, key attention should be paid to the correct installation of the float, the main task of which is to regulate the pressure and volume of water filling the tank
The general outline of the structure assembly is as follows:
- A drain mechanism is installed in the tank, which is included with the device in an already assembled form. When installing the mechanism, it is important to examine the contacting surfaces. If burrs are found, remove them.
- A sealing rubber washer is placed on the mechanism. The device is immersed in the tank and secured with a nut.
- A tank equipped with a drain mechanism is attached to the shelf of the bowl. The elements are fixed using nuts and bolts, after placing washers and rubberized seals on the fasteners.
When installing the tank fittings, the plastic nuts of the fill valve and drain mechanism are tightened by hand without applying excessive force. During the tightening process, it is necessary to hold the mechanism itself, thereby protecting the gaskets from turning and damage.
The base for installing the plumbing fixture must be level. If the floor surface or base of the toilet is uneven, rubber or plastic pads must be placed under the sole during installation before final tightening. The position of the device is leveled using a building level.
To level the position of the structure being installed, you can dismantle the old cladding and pour a cement screed 25-40 mm thick
Chopiks can also be used for this purpose. Holes are made in the floor for their installation. The chopsticks are set according to the level, deepening to the required depth. The toilet is secured with screws.
The base of the bowl is placed on the prepared base. Marks are made at the fastening points, which act as a guide for drilling mounting holes. Dowels are driven into the mounting holes. The fasteners inserted through the sealing nuts are tightened and closed with plugs.
Connection to the sewer
The most cost-effective and easiest to implement option for connecting to a sewer is using a corrugated or eccentric cuff. This connection method saves in cases where it is difficult to determine the exact distance from the sewer pipe outlet to the toilet outlet, or when the plumbing fixtures are installed in a place that is inconvenient from an installation point of view.
Corrugated pipes bend perfectly and stretch over the entire length of the product, and eccentric cuffs can easily compensate for the angle of deviation from the alignment of joined pipes
Remove the wooden cap from the neck of the sewer outlet and remove the rag plug. The bell is cleaned of accumulations of dirt, rust and solution residues. One end of the cuff is inserted into the neck of the sewer outlet. The seam is sealed by covering it with 2-3 layers of the compound. The other end of the cuff is attached to the outlet.
If the installation has to be done in a cast iron socket, then the cuff is inserted with the petal part into an adapter measuring 123 x 110 mm. The free end of the adapter is buried in the cast iron socket, covering the joints of the elements with plumbing sealant.
To connect the outlet of a plumbing fixture, the free end of the cuff is inserted into the protrusion and turned until it stops so that the holes in the trim completely coincide.
When carrying out work, you should place the gasket that comes with the equipment or a piece of soft cloth under the landing heel.
The connection is sealed and tested experimentally by pouring 8-10 liters of water into the toilet. If a leak is detected, the connection is resealed and checked. If no leaks are found, you can begin fixing the toilet.
To create a more reliable connection, it is better to connect the outlet through a drain pipe. In addition, when using a drain pipe, the plumbing fixture acquires a more presentable appearance.
Plumbing fixtures are connected to the communication through a socket, using adapters beveled at an angle of 30-40° and sealing collars
When working with vent pipes, you should remember that undercutting is contraindicated for them, and their sealed structure cannot be changed during the installation process. We also suggest that you read our other article, which describes in detail the diagrams for connecting a toilet to a sewer.
Connection to water supply
At the final stage of installation, a connection to the water supply system is made. The water supply is made from the top or bottom of the tank, using the flexible hose that comes with the kit. One end of it is screwed to the outlet of the tank, and the other to the water pipe.
Image gallery
Photo from
Fixing the compact toilet cistern
Bottom connection to waste container
Lateral water supply connection
Adjusting the water level using fittings
The lateral supply can be made from the right or left side of the tank. Therefore, at the stage of purchasing a product, you should choose the method of supplying water, focusing on how the pipes are laid in the bathroom.
It is better to give preference to devices with bottom supply. In them, water enters the tank from below, due to which the noise level during collection is significantly lower.
When installing a flexible hose for water supply, the nuts are first “fastened” by hand and then tightened with a wrench, remembering to use silicone or rubber washers for sealing
When purchasing a flexible hose, when choosing the length of the product, you need to focus on the distance from the connection point on the water pipe to the connection point of the toilet filler mechanism. For reliability, add a margin of 15-20 cm to the obtained value.
The thread at the joints can be either external or internal. Its size is 1/2 or 3/8. For docking, adapters and FUM tape may be required.
To make it possible to shut off the water between the water supply and the tank in case of an unforeseen or emergency situation, install a shut-off valve
Connect to the sewer
YouTube channel Cersanit
Remove the bag or rag from the sewer outlet. Lubricate the O-ring in the socket with soap or detergent and insert the pipe into it, and then the toilet flush into it. Install the corrugation or eccentric collar in the same way.
YouTube channel “Good-natured Plumber”
On an old cast-iron sewer, first insert a special adapter collar with a diameter of 123 × 110 mm into the socket that has been cleaned and lubricated with sealant. For reliability, you can additionally coat the joint of the plastic pipe with the cuff with silicone.
Installation features of compact models
The technology for correct installation of floor-standing toilets of compact models includes seven main stages:
- The toilet bowl is moved as tightly as possible to the drain hole and checked whether the outlet coincides with the sewer pipe.
- If there are small displacements, the device is connected to the sewerage outlet using a corrugated pipe.
- The plumbing fixture with the connected corrugated pipe is moved towards the wall, making sure that strong creases and bends do not form on the pipe.
- The ends of the connecting element are covered with a thin layer of silicone sealant.
- Having adjusted the position of the device, use a pencil to mark the outline of the boundaries of the base of the device and the points where it is planned to drill holes for deepening the dowels.
- The toilet is moved to the side. At the designated points, holes are made with a diamond drill with a diameter equal to the size of the dowels used.
- Plastic plugs are inserted into the holes. The toilet is “reinstalled” in its original place. Bolts are screwed into the prepared holes.
Tip: to make it easier to put the corrugated pipe on the outlet, its end must be coated with liquid soap on the inner walls.
If holes have to be made in tiles to minimize damage to the surface, first slowly drill the top layer by hand, and only then turn on the hammer drill with impact drill mode
To ensure the tightest possible fit of the toilet sole to the floor covering, silicone is applied along the intended installation counter of the device. The toilet itself is then placed in its original place, guided by the intended contour.
To fix the plumbing fixture, washers and screws threaded through the holes in the heel are tightened extremely carefully. Under no circumstances should they be driven in!
Place the tank on the bowl
YouTube channel Cersanit
Place the largest rubber gasket on the toilet shelf and place the tank on top, aligning the mounting holes. Place cone washers on the bolts with the narrow part facing down and insert the fasteners into the holes.
YouTube channel Cersanit
Install plastic and metal washers from below, and then tighten the nuts evenly by hand so that the tank fits without distortion. Place the lid on the tank, insert and tighten the drain button by hand.
Installation of a monoblock toilet
Models in the “monoblock” category are supplied to the market assembled. They do not require adjustment of the drain mechanism, since all fittings are already adjusted at the factory.
Otherwise, the installation technology for monoblock models does not differ from the installation of compact toilets. Connecting to communications and fixing the device itself is carried out in an identical way.
Fastening to the base of a monoblock-type plumbing fixture is carried out by tightening elongated screws, and if it does not have fastening “ears” - by cementing
Important point! If the holes in the toilet bowl are made at an angle relative to the floor surface, then they must also be drilled at an angle. We also recommend reading the article on choosing monoblock toilets.
Basics of proper planning of space in the toilet
To make the layout of the space in the restroom as comfortable as possible, it is important to adhere to some rules:
- The distance from the side wall, washbasin or bathtub to the toilet must be at least 25 cm.
- The distance in front of the toilet should be about 60 cm.
The layout will be affected by the size of the new plumbing, mounting options, drainage method and height of the toilet. Knowing how to properly install a toilet, you can begin to select and plan the placement of the rest of the plumbing in the restroom.
Installation of suspended structures
The installation of suspended models should be carried out as part of a major overhaul before finishing work begins. To properly install a wall-hung toilet, it must be attached only to a solid wall made of solid brick or concrete, which can withstand considerable loads.
Image gallery
Photo from
Step 1: Marking the installation projection on the floor
Step 2: Marking the Frame Mounting Points on the Wall
Step 3: Mounting the installation to the wall
Step 4: Installing the tank, fittings and pipes
When choosing a place to install a suspended structure, you should take into account that the shorter the pipe section connecting the plumbing fixture to the sewer, the easier it will be to clean it in case of blockage.
Work on installing the suspended structure is carried out in the following sequence:
- Marking. When choosing a location, it is important to consider the location of the outlet in order to obtain the optimal pipe slope.
- Sewage and water supply. A sewer pipe D 110 mm is installed at the placement point.
- Frame installation. A rigid frame is assembled, adjusting its position using adjustable legs and fixing it with dowels and anchor bolts.
- Installation of a toilet bowl. It is placed at a height of 40 cm from the floor level.
- Water supply to the tank and connection of the outlet to the sewer outlet. A rigid pipe is used to supply water, and a corrugated pipe is used to connect the outlet.
Then the niche is sealed. You can line the niche with any finishing material, not forgetting to leave an inspection window to allow access to the tank in case of carrying out preventive measures or eliminating an emergency situation.
Before installing the frame, it is important to level all planes using a building level. The frame itself is attached to the wall using support brackets, and to the floor using anchor bolts.
Assemble the tank fittings
YouTube channel “The Good-Natured Plumber”
Unpack the toilet and carefully read the instructions. Lay out all the parts on cardboard from the box to avoid scratching the tiles on the floor. Place conical gaskets onto the threads of the drain and fill valves with the narrow part towards the holes.
YouTube channel Cersanit
Place the valves in place and tighten the plastic nuts by hand, and then another quarter turn using a wrench. Make sure that the drain valve does not touch the walls of the tank (otherwise the float will become stuck and will not shut off the water when filling). To do this, check its movement by hand or turn the tank over.
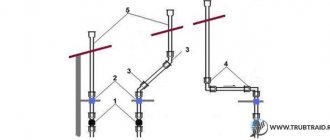
Kinds
For sewerage, you can use drain pipes made of cast iron or plastic.
Cast iron is compatible exclusively with cast iron, but plastic is much more versatile, so plastic is recommended when repairing and replacing broken parts. Metal products are now rarely used also because they are not flexible enough and their range is too scarce. Most often, installation is carried out in a sewer line with a diameter of 110 mm. Professionals believe that fan lines made of dissimilar materials are not very durable. Ideally, all sewer parts should be selected from the same substance. If such a solution is not possible, then it is worth consulting with qualified engineers how this or that combination of materials used will behave. The fan pipe can have almost any geometry - it is permissible to run it vertically or horizontally. There are even some options that are mounted at an angle.
The exit from any vent system must be located outside the residential building, otherwise no efforts will help cope with the harmful odors that appear.
When installing both cast iron and plastic pipelines, the same products are used as for waste channels:
- fitting;
- pipes;
- bends;
- rubber cuffs;
- transition blocks;
- clamps (with their help the pipeline is attached to walls and other surfaces).
Dismantling
Unscrew the mounting bolts
Disassembly diagram
With the old Soviet fastening method, you must first remove the bolts. They can be unscrewed or simply broken. Most often, they are no longer susceptible to the influence of the tool, so it is easier to break off the heads. Then you will have to break out the toilet itself. It is very firmly mounted into the sewer pipe, because in those days they made it to last for centuries. Having completed dismantling, you need to clear the work area for installation of a new unit. If the model is relatively new, then you won’t have to break anything. You need to unscrew the bolts, which most likely are not too rusty yet. Next, you need to disconnect the plastic pipe from the sewer system.
Tools for work
As a rule, the flooring in the toilet room is decorated with ceramic tiles, and modern toilet models have 4 holes in the base through which bolts are attached. Therefore, for installation you will need the following set of tools and materials:
- drill
- drill bit with pobedite tip
- hammer
- wrench suitable for mounting bolts
- marker
- plastic bushings
- connecting corrugation or plastic corners
So, friends, before you start directly installing the product, you need to buy it. How to choose a good and high-quality toilet - read here.
Material used for manufacturing
When choosing a sanitary product, you should pay attention to the material used for its manufacture. Porcelain and earthenware are widely used. These ceramic materials differ in the firing method. Thus, earthenware has greater porosity, due to which dirt is absorbed and, as a result, the color of the product changes during use.
Stainless steel models are usually used in public places and have shockproof and vandal-proof properties.
The plastic version is lightweight and does not require special care, but is not durable and is more fragile compared to analogues.
The most expensive models made of glass and precious metals help add sophistication and individuality. Glass products can only be found from certain manufacturers. Plumbing equipment made from precious metals is manufactured to order.
FAQ
Is it possible to install a second toilet in the bathroom if there is a separate toilet?
Can. It must be connected using a tee to a single sewer pipe. But installation will require approval.
The house is undergoing major renovations and the sewer riser is being replaced, and the toilet is disconnected accordingly, and after replacing the riser, they demand money to reconnect the toilet. It is legal?
If such work is not included in the estimate, it is legal.
When removing the toilet during the overhaul, it was broken. The contractor does not refuse to buy a new one, but my toilet was imported and cost 10,000 rubles. Do I have the right to demand a replacement for a similar one?
Yes. According to Article 15 of the Civil Code of the Russian Federation, you must be supplied with a similar model.
I'm going to move the toilet within the existing bathroom to another location. Do you need approval from regulatory organizations?
When there are no changes to the room itself, moving or rotating the toilet is considered not a redevelopment, but a reconstruction. These works require approval, since the result will be a difference between the actual layout and the BTI plan. In most cases, reconstruction can be carried out based on a sketch. However, everything depends on the position of the coordinating organization. She has the right to demand the completion of a full-fledged project.
System health check
Regardless of what type of toilet you installed, before you start using it, you need to check the functionality of the system. This is not difficult to do: you need to turn on the water and wait until the tank is filled. After this, the water is drained and all connections between the toilet and the water supply and sewer system are inspected.
If there are no leaks, then everything is fine. If leaks are found in some connections, it is necessary to check and correct the seals and perform a control drain of water again. It is also necessary to check the reliability of the toilet; it must be firmly secured.
Selection rules
When purchasing a toilet, it is important to consider that there are products that differ radically in parameters. You can’t just come to a retail outlet and buy a model you like in appearance. You can get a plumbing fixture that will look good on the display, but will not fit into the bathroom at all. It is quite possible that such a toilet will not be able to be connected to the existing sewer system.
To choose a high-quality plumbing fixture that suits specific parameters, it is important to consider the following parameters:
- Toilet height . This criterion is often ignored by buyers, although it is extremely important. The height must be selected so that all family members can comfortably use the model.
- Tank design . It is important to carefully consider the location of the cistern and the type of connection to the bowl. Water consumption depends on this.
- Bowl shape . This characteristic directly affects the quality of rinsing.
- Bowl material . There are a lot of varieties on the plumbing market: earthenware, porcelain, stone, metal, plastic. Each has its own pros, cons and nuances of care.
- Release type . This is the most important parameter. If the old toilet has an oblique or vertical outlet, then it is better to select a new one with a similar type of outlet. If you ignore this advice, you may end up with some problems during installation, and it may happen that part of the sewer system will need to be replaced. And this will entail additional expenses.
- Type of fastening to the floor . Bowls can be attached to 4 or 2 points. To minimize manipulations when replacing, it is better to choose a model similar to the old one.
Before choosing equipment, pay attention to the method of supplying water to the tank. If the old liner was on flexible hoses, you will need to buy a new one of the appropriate length.
What to choose?
According to their technical data and indicators, ventilation systems are divided into ventilation systems:
- Supply type - air is taken and purified from the street and supplied to residential premises.
- Exhaust type - waste air is taken from the premises and discharged outdoors. The inflow is carried out through additional channels due to the difference in pressure.
- Recovery type - at a time when part of the air from the premises is returned again in order to prevent enormous heat losses.
- directed type - at a time when circulation and exchange takes place between all rooms, and not each individually.
According to the installation method they can be:
- duct;
- ductless.
According to the method of moving air masses:
- natural circulation - volumes are replaced due to the action of physical laws;
- forced - fans come into play, which are built into the channels themselves or into separate blocks;
- mixed - combines the two previous options.