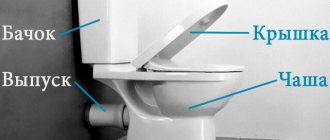
Any plumbing equipment may fail during operation for one reason or another, and the toilet is no exception. The bowl itself is durable unless you break it, but problems arise from time to time with the tank and its internal mechanism.
- When does a cistern need to be replaced?
- Do-it-yourself dismantling of the old tank
- How to remove old bolts with your own hands
- Self-installation of a new toilet cistern
- Do-it-yourself reinstallation of the internal mechanism
- Adjusting the float position
- A guide to replacing the cistern with your own hands: advice from professionals
When is it necessary to replace a toilet tank?
Replacing a toilet cistern yourself is a completely doable task, so it is not necessary to involve professionals. There are many reasons why there is a need to replace the tank. Among them are the following:
- mechanical damage to sanitaryware (breaking, cracking, etc.);
- the formation of plaque on couplings, joints and other internal parts of the tank;
- covering the inside of the tank with a thick coating of limestone.
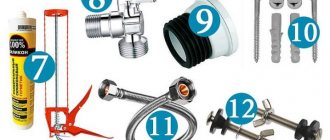
There are other reasons, but in all cases the step-by-step guide for replacing plumbing fixtures is approximately the same. To work, you will need a new tank, supply fittings, gaskets, bolts, sealant, and fittings.
Rules for caring for plumbing fixtures
In order for your plumbing fixtures to serve for a long time and not fail at the most inopportune moment, it is important to take care of proper care of them. Products made from sanitary ceramics require regular cleaning, and this should be done using special chemicals. They contain caustic alkali, which destroys accumulated organic deposits and removes rust. The cleaning product can be easily purchased at any hardware store.
However, it is not recommended to clean sanitary ceramics with products based on soda and other abrasive substances. They scratch the surface, which leads to the formation of tiny scratches on it. Dirt and rust accumulate in them quite quickly, so repeated cleanings will have to be carried out more often. Over time, it will no longer be possible to clean the plumbing fixtures.
Problems with the toilet flush mechanism often arise due to clogging by impurities present in tap water. To prevent contamination, it is recommended to install a coarse filter at the entrance of the water supply system to the apartment. This will significantly increase the trouble-free service life of all home plumbing fixtures.
Leave a request for a technician to visit you within the Moscow Ring Road for free
How to dismantle the tank yourself
Let's find out how to replace a toilet flush tank? It all starts with its dismantling. First of all, turn off the water supply through the flexible hose - there should be a shut-off valve for this. Turn it clockwise and drain the water from the tank, and then make sure that it does not fill, that is, the tap is holding. Unscrew the drain button counterclockwise and then remove the cap.
Remove any remaining water from the bottom of the tank with a sponge or soft cloth, and then unscrew the supply hose. In older models of plumbing, it is supplied to the side wall, and on new tanks the supply is most often from the bottom, although there are exceptions.
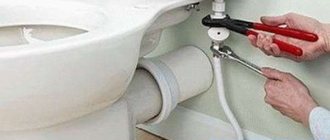
The tank is held on the toilet by two bolts that need to be unscrewed with a wrench. Some modern models use plastic fasteners instead of metal ones - they are easier to unscrew. You also need to remove the rubber gaskets and then remove the bolts from inside the tank, after which it can be dismantled. Proceed carefully, especially if the old toilet tank has cracks that could cause it to fall apart in your hands.
Conclusions and useful video on the topic
All problems associated with the tank and how to fix them are demonstrated in the following video:
Instruction before performing work related to repairing household appliances with your own hands is voluntary. However, extra information never hurts in any endeavor. The more information there is about a specific object, the simpler and easier it is to perform all actions.
Disassembling modern toilets, despite the simplicity of the steps, also does not exclude reference to the instructions.
Would you like to tell us about how you repaired a flush cistern yourself? Do you have information worth sharing with site visitors? Please leave comments in the block below.
We remove the rusted bolts to remove the drain tank
Many people, wondering how to replace the drain tank with their own hands, are not aware of one difficulty that they may encounter - unscrewing the old bolts. If they are metal, they are almost certainly rusty and won't just come off. It is possible that you simply cannot turn the head of the bolt, which is located inside the tank. In this case, you will have to resort to tricks.
For example, you can use WD-40 liquid or regular kerosene, pour it over the fasteners and leave for 10-15 minutes, and then try to remove the bolt. If it doesn't help, repeat the procedure. If after several times you still cannot unscrew the anchors, you will have to carefully cut them off with a hacksaw or grinder.
Why is it necessary to dismantle the cover?
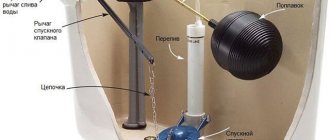
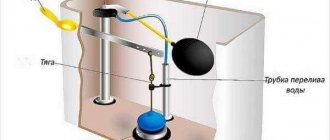
It's simple: inside there are constructive mechanisms for draining and collecting water. The container is filled to a certain level, after which a special valve is activated, which acts as a shut-off device. After pressing the button, the lever is activated and the locking device is raised, allowing water to flow into the toilet.
The principle of operation of the mechanism is simple, and the adjustment depends on the dimensions of the drain tank. Mechanisms are usually made of plastic, individual parts are made of rubber, therefore they do not have a long service life and soon fail. Consumables require replacement, therefore, if you notice problems with the plumbing, immediately begin restoration: adjusting the device or completely replacing it. If you had to resort to internal intervention, then the reason may lie in:
- continuous flow of water into the toilet;
- lack of water drainage;
- insufficient amount of water for one flush;
- water leaking out from under the tank.
How to replace a toilet tank yourself
When replacing a new or old style toilet cistern at home, you need to install the new element without haste and very carefully. It is important to ensure that the hole in the bottom of the bowl lines up with the hole in the stock on the back of the bowl. First you need to place plastic washers with rubber gaskets on the mounting bolts, after which a rubber gasket is also put on the drain and a tank is placed on top. For reliability, you can coat all rubber bands with silicone sealant. Make sure that all the holes line up perfectly, after which you can insert the mounting bolts and start screwing the nuts - you need to do this gradually: first left, then right. This will avoid distortion. The main thing is not to overdo it so that the bottom of the tank does not burst.
If you buy a new tank, the fittings should be installed in it from the factory, so you will not have to install them, which will simplify your task. All you have to do is connect the flexible supply hose from the side or bottom, but don't forget to use a gasket. Then open the tap to fill the tank. Do not rush to drain the water, but first make sure there are no leaks - water should not ooze or drip anywhere.
If everything is in order, all you have to do is cover the tank with a lid and tighten the drain button, and then check how the drain works.
Specific malfunctions of two-button models
To implement the principle of full/partial drainage, the fittings in two-button tank models are equipped with a diaphragm valve. When you press the economical drain button, the lever prevents the valve cover from moving to the bottom position , which ensures partial emptying of the tank.
The main malfunctions of two-button tanks are:
- Constant flow of water . Occurs as a result of wear of the locking membrane. To fix this problem, you need to replace the membrane itself.
- Recession of control buttons in the drain tank , which is the most common defect, usually appearing after a certain period of operation of the equipment due to wear. To avoid this situation, do not use excessive force when pressing the buttons. You can fix the problem by removing the lid from the tank and returning the buttons to their normal position.
- When the buttons are activated, nothing happens, that is, the water remains in the container . The cause of this problem is usually the breakdown of the elements of the lever mechanism or their separation. How to repair a flush tank with a button in this case? You can correct the situation by securing the hooks in the correct position or replacing broken parts.
Replacing the internal mechanism
If you decide to change the tank yourself, leaving the old mechanism, you will have to reinstall it. In older toilet models, the fittings are more difficult to attach, but there are no fundamental differences. You need to act according to the following algorithm:
- First, a bracket with a rod and a bulb is attached to the bottom of an old tank using metal fasteners. If the plumbing is new, the drain system is attached with one nut in the center.
- Use caution when working with plastic fasteners. If you use too much force, you may damage them.
- Attach the water supply pipe. In Soviet systems, a spoke with a float element is attached to it, and in new ones the pipe is combined with a system that controls the water level. The water intake pipe and the float are connected into a common mechanism.
- The tank with the installed flush system is mounted on the toilet.
In older models, a large shock-absorbing rubber pad with an oblong shape is placed between the stock and the tank. It covers both holes: drain and overflow. When installing modern flush fittings into an old compact toilet, the overflow hole is closed with a plug. In modern compacts, the shock-absorbing pad is ring-shaped.
Plumbing classification
Understanding the product specifications will help you choose a toilet tank. The product range within the segment is divided into groups and subgroups:
By location
Depending on where the toilet tank is located, the models are:
- Monoblock - with the body of the tank and toilet bowl fused together. It is not possible to replace the top of a monoblock toilet.
- Separate - the toilet bowl and cistern are independent parts.
By fastening method
- mounted,
- attached,
- built-in (with installation).
By drain mechanism
- pneumatic,
- lever,
- push-button,
- stock
By filling method, draining
- float valves - with a valve in the form of a piston or membrane;
- side ones - with a special camera in the role of a machine gun, shaped like a glass.
By material
Basically, the products of manufacturing plants specializing in the production of sanitary ware and accessories are produced on the basis of sanitary ware. Metal and plastic samples are less common.
Important nuances when replacing the flush tank yourself
The step-by-step instructions for replacing a toilet cistern at home are quite simple, but in order for everything to go smoothly, we advise you to follow certain recommendations:
- Before buying a tank, find out the brand of the toilet or measure it. Otherwise, the new element may not fit into your toilet.
- It is better to contact trusted stores where experienced consultants work. They will select the optimal tank model and recommend the necessary components.
- The kit must contain all mounting bolts - pay attention to this. Otherwise, immediately purchase them separately.
- If water is supplied to the tank through a pipe, it is better to replace it with a flexible hose. It is more convenient and reliable.
- At the ends of the flexible hose, the nuts have internal threads, and if a water socket also comes out of the wall with internal threads, you will have to use an adapter.
- When purchasing a tank, evaluate the material of the fittings. If the parts are made of cheap and fragile plastic, they will quickly wear out and become unusable.
Now you know how to install a toilet flush tank at home and what you will need for this. Our guide will allow you to save money on the services of professional plumbers.
If you don’t want to waste your free time on a tedious process, you can always order a replacement toilet cistern from our company. San Remo employs plumbers with many years of experience - they will arrive on time and carry out the work carefully, competently and inexpensively.
Steps to take when removing the two-button cover
In order to remove the cover on a model with two buttons, you need to push one of them down. There is a small indentation on the inner surface of the second key. You need to pry the part behind this slot with a screwdriver or any other sharp object and remove the button body. In the same way, you need to remove the remaining key. You now have access to the spline where the cover is secured. The screw must be unscrewed carefully, being careful not to strip the thread.
Having pulled out both keys, unscrew the slotted screw that secures the cover
As with the one-button mechanism, the lid must be slightly lifted and carefully rotated until it is perpendicular to the toilet cistern. The latch that secures the lid is removed in the same way as in the first case, opening the clothespin in opposite directions while rotating it. Once clicked, the cover can be removed.
Selecting the right tool
To achieve the desired result as quickly as possible, without damaging other parts, be sure to use the appropriate tool to unscrew rusty fasteners. It’s better to prepare it in advance so that you can try several options at once:
- open-end and ring wrenches;
- socket wrench or socket head;
- nut remover;
- nails or awls of different diameters, hard brushes for removing rust;
- hammer and chisel.
By selecting the right tool, the problem will be quickly solved.
Chisel
Here we are not talking about simply cutting off a rusty nut or the head of a tight bolt. With a chisel and one sharp blow of a hammer, you can tear stubborn fasteners out of the tenacious embrace of rust. To do this, you need to point the chisel closer to the edge of the bolt or nut at an angle in the direction opposite to the thread, and then strike sharply and firmly with a hammer. Using this technology, experienced craftsmen masterfully remove any, sometimes even the most hopeless, nut or bolt with one blow. Of course, you still need to grow to such professionalism, but the method works.