To repair a cistern, in most cases, you need to replace the membrane. To do this, drain the water from the tank so that there is no leakage. Unscrew the nut connecting the drain tank to the flush pipe. Loosen the siphon nut, which is located at the base of the tank. Disconnect the siphon from the water release lever and remove it. After this, we replace the membrane and assemble the drain tank in the reverse order.
What to do if the toilet tank is leaking? A device malfunction may be caused by damage to one of the design components. In most cases, operation is disrupted due to a malfunction of the siphon, fasteners, locking mechanism, rubber bulb or gasket.
Sometimes a toilet leaks due to physical damage to the tank or bowl of the plumbing fixture.
Such malfunctions can bring a lot of trouble to apartment residents, so it is recommended not to delay repairs.
You can carry out the repair procedure yourself. In this article we will analyze in detail the reasons causing this malfunction and methods for eliminating them.
Why the tank leaks - the main reasons
If you are wondering why the toilet tank is leaking, then the problem has already occurred. Now it remains to find out the reason why this may happen. The most common is ordinary overflow, in which excess liquid is washed away. There are several main factors that in most cases lead to disruption:
- deterioration of the elastic properties of the rubber gasket. Over time, this material wears out, as a result of which the water flow cannot be tightly blocked and the plumbing leaks. The deformed part allows water to pass through perfectly;
- The rubber gasket has not lost its elasticity or deformed, but it does not fit very tightly into the outlet hole located next to the valve mechanism. Due to loose pressing of the part, the toilet cistern leaks;
- The valve train pin has suffered corrosive deformation or physical damage. This part keeps the float in the required position, but during prolonged use the element wears out;
- the valve body was damaged - another cause of leakage. However, the cracks that cause the toilet cistern to leak occur only on plastic products. If parts made of brass are installed, such problems will not arise, because... brass components are known for increased strength.
Other common reasons for a leaking toilet tank include:
- damage to bolts and other fasteners connecting the flush tank and toilet. After a long period of use, metal elements often corrode, and plastic elements often break;
- if there is a leak from under the toilet tank when flushing, then the problem may be in the bulb, which has lost its elasticity over time. After prolonged use, this part loses its original properties, as a result of which the ability to acquire the required shape is lost.;
- displacement of the lever fixing the position of the float. This can occur due to prolonged use as a result of which the float loses its tightness. Therefore, liquid may enter the float. Sometimes low quality components also cause a similar malfunction and plumbing leaks;
- breakdown of the siphon or tank hoses;
- Water may leak between the tank and the toilet due to a leak in the connection. As a rule, this occurs when the shape of a seal made of rubber changes;
- the shut-off valve mechanism is damaged;
- cracks appeared.
The main signs that the toilet tank is leaking include:
- frequent or constant sound of pouring liquid;
- the appearance of traces of limestone in places where liquid exits;
- the surface of the bowl, which is located closer to the tank, is constantly wet from the inside, even if the plumbing has not been used for a long time;
- When draining, water flows slowly;
- water consumption increases;
- Condensation occurs on the pipeline and drain tank.
The appearance of even one of the above problems indicates that the toilet tank is leaking. In this case, repair work is required. We invite you to familiarize yourself with the structure of the toilet cistern, common faults and their repair.
Other types of damage
Among the others, we can highlight the deformation of the pear saddle and the failure of the float chamber rocker arm.
If all possible failures have been checked, but the tank does not hold water, and it begins to leak immediately after the start of the fill and throughout the entire waiting period, then you will need to check the bolted connection of the exhaust valve seat.
The seat mounting bolts are faulty
This reinforcement (if it is not made of bronze) quickly becomes thinner in an aggressive environment. To replace you need:
- Shut off the water supply, remove the lid from the tank and remove excess moisture.
- Disconnect the water supply hose.
- Try to unscrew the mounting bolts, but if they are very rusty, you will have to carefully cut them off with a grinder.
- Sealant is coated with the installation sites of the rubber ring and gasket under the bolt heads.
- The tank is put in place, the correct position of the gasket is checked and evenly, without distortion, they begin to tighten it with wing nuts. There is no need to tighten the nuts completely; it is better to do this after the water has started.
- Having tightened the bolts, the tank is connected to the water supply system and the tightness of the connection is checked.
Required tools and materials
If your plumbing is leaking, you must turn off the water before making any repairs. Due to the fact that the liquid is supplied to the system under pressure, in the process of troubleshooting we can flood the premises. For repairs you will need the following tools:
- sealant suitable for plumbing fixtures;
- sandpaper;
- screwdriver;
- burlap, twine or tow;
- hammer;
- knife;
- pliers;
- If it is necessary to replace a component, a working part of a certain type will be required.
When the necessary tools have been collected, you can begin to carry out repair work.
Minor faults in the cistern
The most unexpected problems can arise with plumbing fixtures. Some of them do not affect the comfort of use, but cause minor troubles.
For example, the tank may simply make too much noise when filling and disturb nighttime sleep. If the toilet is noisy, you can install a muffler (flexible plastic tube) or a stabilizing float valve with a special chamber.
If you have already had to start repairing a tank, try to immediately think about how you want to improve its operation and perform all the necessary manipulations in one go.
Whatever the reasons why the toilet tank was leaking water, after repair it is imperative to correctly adjust the operation of the float and overflow system.
This will help prevent future leaks.
How to fix a toilet cistern leak
Once the reason why the toilet is leaking has been found, repair and restoration work can begin. It should be noted that fixing the problem is slightly different in individual cases; the procedure largely depends on the shape of the model.
A quick and 100% way to eliminate a leaking toilet cistern
All of the action algorithms listed below are given for the case if a classically shaped tank is leaking.
Occurs due to overflow
What to do if water flows in the toilet due to overflow? First of all, you need to check which element malfunction caused the system to malfunction. You can determine this yourself by performing a simple test:
- Remove the toilet lid.
- Raise the float a little and hold it.
- If the tank does not leak when raised a few centimeters, then the float lever is faulty. Its placement does not help block the water. To fix the problem, you need to bend the lever a little and fix it in a position that can stop the flow of water and stop the leak.
- If the toilet still leaks even after raising the float, the valve should be thoroughly inspected. The pin intended for fixing the part must not be deformed, there must be no traces of corrosion or other damage on it, it is also recommended to check that the pin has not moved. Normally, a pin is placed inside the valve and stops the float arm. If this is the problem, it is often replaced with large diameter copper wire.
- If there is no damage to the stud, it is advisable to check the hole where this element goes. Sometimes water leaks from the tank into the toilet when the hole is deformed. In this case, a new valve mechanism is installed.
- Check the gasket. To do this, it should be gently but firmly pressed against the valve. If the toilet no longer leaks, it is necessary to adjust its pressure. If this is not possible, it will need to be replaced.
The above steps in 80% of cases will help determine the cause of the malfunction and eliminate it. However, if they did not help, then you will need to look for damage in other system components.
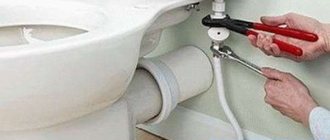
Leaks at the junction of the tank and toilet
The reason that water is leaking from under the toilet may be damage to the bolts that secure the tank to the toilet. A similar malfunction can occur with fasteners made of any material: both plastic and metal. What to do if the toilet tank is leaking due to bolted connections?
It is necessary to carry out a careful visual inspection of all components, which will require a complete disassembly of the drain tank (since in some cases the breakdown is not visible until the tank is assembled).
There is a possibility that only one part is damaged, so only that one will need to be replaced. However, in most cases, several elements will need to be replaced; it is advisable to purchase a full set of plumbing spare parts.
Parsing steps:
- Make sure that the water riser is closed.
- Drain all liquid from the tank.
- Remove the flexible wiring through which water enters the tank.
- Unscrew the fasteners. Sometimes, after prolonged use, the surface of the bolts rusts; this corrosive layer can be removed using a hacksaw.
- Move the tank aside.
- The shelf located on the cuff is removed.
- It is necessary to drain the remaining liquid.
- Any traces of corrosion found must be removed.
Assembly is carried out in reverse order. Rubber gaskets are changed, new fasteners are installed. It is important to avoid distortions during the fastening of bolts. You also need to remember that when tightening it is necessary to apply little force, because... too much pressure can damage the earthenware.
Leak due to defective hoses
The pipe that connects the water supply and the tank is quite durable. The weak point is the area where the flexible hose connects to the float system. A clear sign of a breakdown is that the plumbing is leaking at the place where the hose is attached.
Quite often, the cause of such a malfunction is a weak connection of fasteners. This is not difficult to fix: you just need to securely fasten the nuts and tighten the fasteners. In some cases, it is also necessary to replace the gasket if it has lost its elasticity and ceased to perform its functions.
Do-it-yourself reliable hose for the toilet tank. Reliable do-it-yourself toilet tank hose.
However, it should be noted that if there are components made of plastic, tightening the fasteners must be done with the utmost care. Inaccurate movement or too much force will cause damage. Also in this case it is better not to use metal tools, because... this may contribute to thread failure.
If the toilet bowl leaks, it will need to be replaced. A corrugated pipe is inexpensive, so if a resident of the house discovers that it is leaking, it needs to be replaced as quickly as possible.
Leaks due to rubber bulb
HOW TO FIX A TOILET FLOWER LEAK IN 5 MINUTES
Deformation of the bulb is a fairly common reason for water leaking from the tank into the toilet. This happens especially often after many years of use, during which the rubber has lost its elasticity.
The solution to this problem is quite simple; it is considered the least resource-intensive of all recovery methods.
What to do if the toilet tank is leaking due to a broken bulb? Repairing an old broken part is not recommended. It is best to buy a new one from a plumbing supply store.
When purchasing, it is recommended to choose the softest and most elastic pear, then this element will be able to function without problems for a long period.
The component is attached using threads. To remove the element from the tank, you need to turn it clockwise. During installation, the bulb is secured when turned in the other direction.
If for some reason it is not possible to purchase a new spare part, it can be temporarily replaced with a small weight (you can use a heavy nut) that hangs on the rod.
Plumbing leaks due to misaligned float
The toilet is leaking, what should I do? Option 1 - the float is broken
A misalignment of the float lever can cause a malfunction. This can happen due to external influences or prolonged use of plumbing fixtures. What to do if the toilet is leaking due to misalignment?
The first thing you should check is the float. If there is no visible damage, it will need to be replaced. It is recommended to save on this part and purchase a higher quality one, this will avoid the occurrence of leaks in the future.
If a visual inspection reveals a small hole in a component, it can be eliminated in the following ways:
- seal with polyethylene;
- use a lighter to heat a small piece of plastic and seal the hole tightly with the molten material.
However, it should be noted that such methods are only a temporary solution to the problem. Ultimately, you will still need to purchase a new component.
Leaking due to siphon
WE REPAIR THE DRAIN TANK. REPAIR THE WATER DRAIN UNIT.
The siphon membrane prevents water from leaking even when there is no drain. Over time, this component of the system wears out and must be replaced.
To do this, it is recommended to buy a new part that ideally matches the size and shape of the plumbing model. If you select it incorrectly, the deficiency will not be eliminated.
Algorithm for eliminating the problem:
- Instead of a tank lid, a crossbar connected to a float is installed.
- The water is washed off.
- The nut is unscrewed, through which the pipe is connected to the tank.
- The siphon nut is slightly unscrewed.
- The siphon is removed.
- Then the non-functioning membrane is removed and a new one is installed.
- Install the system in the reverse order.
Violations of the tightness of joints
If the seal breaks, the result is depressurization of the connections. What to do if the toilet is leaking for this reason? You will need to place a new gasket between the toilet bowl and the tank. Let's look at the steps:
- Remove any remaining liquid using a soft sponge.
- The drain nut located under the valve is slightly unscrewed.
- All fastening elements of the tank are removed and it is dismantled.
- The locknut holding the drain is removed, then it is removed.
- A new rubber gasket is installed. This element prevents plumbing from leaking, so it must be selected carefully. When selecting, it is recommended to know the appropriate dimensions and shape. If you select the wrong part (too large or small), the plumbing fixture will continue to leak.
- The drain is secured with locknuts.
- The tank is returned to its place and secured with screws.
Is the toilet leaking? Fix it yourself! Easy!✓ Transparent tank.
Shut-off valve problem
If water is constantly flowing in the toilet, there is a high probability of failure of the valve mechanism. There is no need to waste effort on disassembling and repairing it, because... in most cases these actions do not bring the expected results. The best solution would be to replace the drain assembly or the entire tank.
Is your toilet tank leaking?
Instructions:
- Wash off all liquid.
- Remove the top cover and remove any remaining moisture.
- Remove the mounting screws.
- Remove the tank.
- Remove the seal.
- Unscrew the locknuts securing the drain assembly.
- Remove the previous mechanism.
- Install a new valve.
- Fix the drain in reverse order, install the gasket and install the toilet tank.
It is advisable to buy a mechanism of the same brand as the drain tank. It is best if it is exactly the same model as the one that was in the plumbing before it started leaking. It is worth noting that when installing a new system, it is necessary to use new nuts and install a seal.
Leaking due to cracks
Has your toilet tank burst? no problem, we'll fix it.
Sometimes plumbing fixtures may develop cracks and other physical damage. You can fix this problem yourself at home. The procedure requires only standard tools and sealant intended for plumbing.
Instructions:
- Drain all liquid.
- Carefully remove the tank.
- Dry it from the inside, removing residual moisture.
- Cover all cracks with sealant.
- Place the tank in place.
If the toilet is leaking from below and a crack is found in the bowl itself, it can also be sealed with plumbing sealants. However, such a solution to the problem cannot be long-term; it will certainly be necessary to replace the damaged structural element.
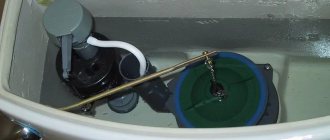
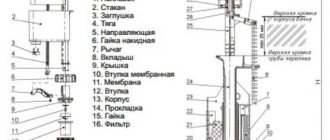
Flush design device
If previously the tank body was made of cast iron, today ceramics, earthenware or special plastic are used. All the main elements of the tank are connected to each other.
There are only three key mechanisms: inlet, adjustable float, flush and overflow systems:
- The inlet or fill valve stops the flow of water into the tank after it is filled. The required water level is “measured” by the float.
- Locking or drain mechanism . This is the flapper/valve that opens during flushing.
Modern models have buttons for this. They can be single or double to adjust the amount of water flushed. Old Soviet toilets use a chain, lever or rope that is attached to a lever with a bulb. These elements are connected by traction. And the pear is at the bottom of the tank.
The standard tank design is quite simple. In some models, the flushing mechanism consists of a siphon. Its membrane is the weak link and often fails, as do the spokes connecting the flush and the float
The toilet float regulates the operation of the locking mechanism and controls the level of water drawn in, the design of which depends on the type of water supply to the tank (bottom or side).
There are several types of floats, but each one has air inside:
- The first, hollow, is made of rubber. It is located at the bottom of the reservoir and functions as a rocker arm.
- The second, plastic, glass-like float. Located at the top of the tank. When the tank is filled with water, it rises up and works almost silently. The latter type is used only in older models; the first type is installed in modern toilets.
The overflow system protects the entire toilet room from flooding if the filling mechanism does not work for some reason. When more than normal water gets into the tank, it is the flush tank fittings that drain it into the toilet. If you find a leak, then do not panic, but remove the toilet lid and figure out what the problem is.
What to do if a toilet tank with a button starts to leak
How to fix a water leak from a toilet tank, HOW TO REALLY SAVE SUPER WATER!
In such a case, you should first check the status of the switch. If a malfunction occurs in the return spring mechanism, the drain button may remain in the tank, which will lead to a permanent open position of the lid.
How to fix a leaking toilet tank with a button:
- Remove the top panel.
- Remove the switch that is stuck.
- Replace the return spring.
- Center the seating point, which is located directly under the hole in the cover.
- Reassemble the system in reverse order.
Conclusions and useful tips on the topic
Restoring the tank to normal operation is not as difficult as it might seem at first glance. There are no particularly complex elements in the design; most breakdowns can be quickly eliminated with improvised means. To avoid repeated problems, it is important to use high-quality spare parts for the toilet cistern and promptly identify possible vulnerabilities.
Like any other mechanisms, the shut-off valves of the drain tank wear out over time, but they can be restored without any problems. If a problem occurs, carefully inspect the mechanism and identify the damaged component. After replacing it, the toilet will again be ready for trouble-free operation.
To other materials:
- Do-it-yourself toilet cistern repair
- How to disassemble a toilet cistern
Preventive measures
To prevent a situation where a toilet tank leaks with or without a button, you should regularly carry out certain preventive procedures, as well as follow the operating rules.
Prevention may include the following:
- minimize the likelihood of mechanical deformation of the toilet;
- minimize sudden temperature changes;
- clean the toilet bowl and cistern every six months;
- regularly check the condition of plumbing components, fittings and other parts so that they cannot leak;
- avoid condensation.
Thus, if the plumbing is leaking, you can simply carry out the repair yourself, without turning to a master plumber. First of all, you need to determine what is the reason that the tank is leaking.
It is important to remember that timely preventive procedures will increase the service life of plumbing and sewerage systems in general. If a malfunction is detected, it is recommended to fix minor problems first and then proceed to major damage.
Float problems
If water does not linger in the toilet tank and constantly flows out through the overflow tube, it is highly likely that the problem is related to a malfunction of the float or its lever. Most often the following breakdowns occur:
- Float misalignment. During intensive use, the float mechanism becomes loose and develops backlash in the connections, which causes it to become unbalanced. To eliminate this defect, you must first return the float to its correct position - here everything depends on the design features of a particular tank. And then you need to re-adjust the loose fasteners.
- Float depressurization. If a hollow plastic float is used in the flush tank, over time serious problems with its sealing may arise: water will begin to enter the tank, disrupting the functioning of the device. As a simple temporary repair, two measures can be taken: either wrap the float in a strong plastic bag, or seal the holes with plastic. But keep in mind that such assistance will allow the device to serve for another couple of months, and then it will still have to be replaced with a new one.
Toilet cistern design - Lever deformation. Long-term use can damage not only the float itself, but also its lever. Most often it bends - in this case it needs to be straightened and fixed in a strictly horizontal position.
Advice. For proper operation, the float lever should be located approximately 20 mm below the hole from which water is supplied to the tank.
Popular models and manufacturers
Valve from Ani Plast
On the modern plumbing equipment market you can find various options for floats for the toilet cistern. The most common manufacturers include: Ani Plast, Alcaplast, Wirquin, InkoEr.
The Ani Plast company produces toilet floats with bottom and side connections, made of plastic and metal: 1/2” ANI WC5050, 1/2” ANI WC5550. Alcaplast products are distinguished by models with a stop button and brass connections, which guarantees a long service life of the float mechanisms: 1/2 “A18, A-2000, 3/8” with side connections and a built-in filter.
Wirquin produces floating devices using innovative technologies that have unique bracket designs, adjustable drain and water level, telescopic overflow: ONE 3/6 L, Quick Fit, MW2 with two flush modes. The Russian company InkoEr produces filling and drain valves with bottom and side connections with a backpressure function: NprN, NprM, Bm, SB1-A, SB2-A, SBkpm-B.
Toilet floats offered by domestic or foreign manufacturers differ in the material of manufacture, equipment and additional devices that simplify the use of the toilet.
Many models are made of plastic mechanisms with brass or copper elements. Some products are made exclusively from metal, which is a significant advantage over plastic ones due to its reliability and durability.
Choosing a suitable design
If the float breaks down and it is impractical to repair it, you must purchase a new device similar to the previous one. It is recommended to select an analog model for purchase, even if the broken one has an outdated configuration.
If a spherical element breaks, it is removed and purchased separately from the entire system. This makes it easy to replace and install the plastic ball. The new device is selected in accordance with the pressure in the water pipe and the quality of the material for its manufacture.
The float valve for the toilet is divided into several types according to the pressure indicator:
- at low pressure with the presence of a special supply amplifier;
- at a pressure of average filling speed and power;
- with strong water pressure in the water supply;
- stabilizer valve - with different water pressure, the device will stabilize the power without reducing the service life of the mechanisms.
It is important to take into account the load capacity of the float, so at high pressure the indicator should be correspondingly high. Ignoring this requirement, even a high-quality valve will let water through due to mismatched parameters.
If a wall-hung design with a double flush button is installed, it is recommended to choose a model for medium pressure power. Then a stable supply of large or small quantities of water can be ensured.
Conclusion
We get so used to how the toilet works that we begin to notice problems when they have already occurred. The constant “stream” in the toilet bowl or the lack of water in the container begins to irritate.
Today we described in detail how to deal with such troubles. There is nothing difficult in this work; you can easily cope with it yourself. The video in this article will give you the opportunity to find additional information on the above topic.
Did you like the article? Subscribe to our Yandex.Zen channel
Unpleasant consequences of a “leaking” tank
Unfortunately, the problem of a toilet float leaking water is quite common in all types of homes. The result is a continuous flow of water into the tank. This, in turn, leads to quite unpleasant consequences:
- Uneconomical water consumption. Firstly, water is a precious resource in our world, which is becoming increasingly scarce. Secondly, in residential buildings and private houses, water meters are installed almost everywhere, which, naturally, record disproportionately high water consumption. Thirdly, the resulting water bills are simply fantastic.
- Threat of flooding in the bathroom. Potentially, this is a very serious problem that can lead not just to unpleasant, but to catastrophic consequences. Because as a result of a flooded bathroom, not only the floor covering of the room, but also the neighbor’s ceiling can be damaged. Both are fraught with serious problems. In the first case, you will have to do an unscheduled bathroom renovation; in the second - to resolve the issue of flooding with neighbors (financially, of course).
Tank device
- Unpleasant noise in the bathroom. Considering the rather “modest” sound insulation in most multi-storey buildings (sometimes private ones), the noise of constantly flowing water in the daytime can strain the ears, and at night it can become an irritating factor, which will undoubtedly affect the mood of the residents.