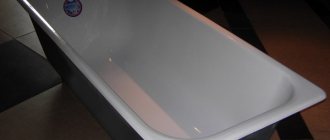
The unpresentable appearance of old plumbing is not a reason to part with it, especially when there is an alternative. Complete restoration of the enamel of a cast iron bathtub is an effective and inexpensive way to restore your Jacuzzi to its former attractiveness. Any plumbing fixtures lose their attractive whiteness over time. You don’t want to get into such a bathtub, with a rough surface, and it’s a shame to show it to guests and it’s a pity to throw it out. In addition, a bathtub with numerous cracks turns from a bastion of cleanliness into a breeding ground for bacteria, mold and mildew. Is it worth it to once again strain the immune system when the unfavorable environmental situation is already creating a lot of problems for it? The best way out of this situation is to restore the enamel of the old bathtub.
Restoring old enamel
As a rule, bathtub restoration is started for several reasons.
- Temporary housing. When the apartment is rented or, on the contrary, rented out, there is no point in spending money on expensive plumbing fixtures.
- Financial question. The old bathtub has already lost its marketable appearance, and buying a new one is not in the immediate plans.
- Features of the layout. Dismantling and removal of the old cast iron bowl is impossible. You can, of course, break it, but it’s a shame.
Restoring a cast iron bathtub is usually done in one of three ways: coating the bathtub with enamel, liquid acrylic, or installing an acrylic liner. There is, however, another rather extravagant solution for updating a cast-iron bathtub - covering it with mosaics. But this option, rather, relates to decoration; it is quite troublesome and impractical.
Important! Restoration of bathtubs is recommended to be carried out after completion of renovation work in the room, so as not to damage the new layer.
How much will it cost to restore a bathtub?
In conclusion, we will conduct a comparative analysis of the cost of restoring a bathtub, based on the methods discussed above.
Bathtub enameling
The cost of high-quality enamel “Reaflex 50” produced in Finland is 550 rubles per 1 kg. The Russian restoration kit “Svetlana” costs 750 rubles. As a result, you will have to pay 1300 rubles.
Self-leveling restoration
If you buy a kit for restoring a bathtub with liquid acrylic, for example Plastall, it will cost about 2,000 rubles. By the way, it has everything you need for independent work, even a CD with a video lesson.
Acrylic liner
The cost of the liner itself and polymer glue ranges from 2800 to 3000 rubles.
The best option is the self-leveling restoration method, in which you will get a beautiful and durable coating for little money. Moreover, any of these methods is several times cheaper than purchasing and installing a new bathtub.
Preparatory work
Before you update an old cast-iron bathtub at home, you need to prepare the enamel surface for restoration. Preparation is carried out in several stages: rust removal, grinding, degreasing. Each of them ends with a thorough washing of the surface with hot water.
- Removing rust. Acids, which are part of most products, when interacting with metal oxides, transform them into colorless salts. Treatment begins with gentle solutions of oxalic or acetic acid. Wash off the solution after 30-40 minutes. If after this there is still rust, you can clean it mechanically.
- Grinding. After removing the rust, sand the bath using a grinder, drill or sandpaper.
- Deep chips and cracks are repaired with auto putty. These areas are additionally sanded.
- Degreasing. Use baking soda or special cleaning products that are thoroughly washed off with hot water only.
When the bath is dry, remove the drain and overflow. Place a container under the bottom drain into which the enamel will drain. Fine dust and sand are collected with a vacuum cleaner. Surfaces adjacent to the bathtub are covered with construction tape. Coating a bathtub with epoxy or acrylic enamel involves applying a primer. Use the building composition specified by the paint manufacturer.
Preparatory work
We do preventative enamel whitening and polishing
If the enamel of a cast iron or steel bathtub does not have large visible cracks, chips, and is simply darkened or yellowed, we restore its whiteness and smoothness by polishing and bleaching. The procedure is not very complicated and is safe for the enamel: the enamel of a good bath can be polished several times.
Bath enamel (by the way, just like tooth enamel) changes its color because microcracks appear on its surface - dirt and other deposits accumulate in them. We will fight them.
We buy a cleaning bleach for the bath at the hardware store - you will find a dozen items in any market. You can also use folk remedies: vinegar, chlorine bleach, car cleaner.
You will also need a rotary or vibration type grinder - it doesn’t matter. Rent it from friends or buy it - it’s a useful thing and will come in handy around the house.
- Wash the bath thoroughly with detergent and cleaning powder, remove all dirt with a sponge or stiff brush
- Apply bleach to the clean surface of the bathtub. Do exactly as the instructions say
- After the time specified in the instructions, rinse off the bleach with plenty of water. If an acid is used as a bleach, add soda to the water: the alkali neutralizes the acid (chemistry, grade 7)
- If darkening or yellowness remains somewhere, repeat the treatment in these places
- Once the tub is dry, begin polishing with a sander. Start with coarse sandpaper, then medium sandpaper, and finish with polishing paste. Ideal for car polishing products
Before polishing, try bleaching and polishing some of the most dirty areas. If everything turned out well, great. If visible cracks remain, it means that the enamel coating has worn out and the bathtub enamel needs to be restored or even replaced.
Polishing will last for a year or two, no more: the enamel layer becomes thinner, but the temperature and mechanical effects on it remain the same. Then - only treatment.
How much does this procedure cost?
Sanding machine - from 500 to 2500 rubles, bleaching agent - about 500 rubles, sandpaper - about 200 rubles per package.
Total: 1200 - 1500 rubles (if you buy the cheapest grinding machine).
The time limit can be completed in one day. The bathroom can be used that same evening.
Enamel application technique
A diluted epoxy mixture is flammable and toxic, so coating a bathtub with such enamel requires the use of personal protective equipment (respirator, rubber gloves). Apply the material with a terry roller or natural brush. The enamel begins from the sides to the bottom, trying to apply a layer of paint evenly and as thinly as possible. When the sides of the bowl are already painted, the bottom is also painted. In areas where the enamel layer is thicker than necessary, it must be smeared by pointing the brush towards the bottom. Painting a bathroom with epoxy enamel requires applying at least 3 layers. 15 minutes after applying the last layer, the painted surface is checked for smudges. And if there are any, they are smeared with a brush, but from the bottom up. Low-quality paint for a cast-iron bathtub may leak for a long time, so periodically it is necessary to check that the enamel coating of the bathtub is even. The enamel dries completely after 1-2 days, but it is recommended to use the bath only after 5 days. After drying, the surface is polished with a piece of flannel with a small amount of polishing paste.
Bathtub enamel
Important! During the period of drying of the enamel, it is necessary to provide suitable conditions in the room. When air humidity is high, spots or cracks may appear on the fresh coating. And the presence of sand or dust will significantly reduce the service life of the coating.
Advantages:
- Enameling a cast iron bathtub with your own hands is inexpensive.
- Minimum dismantling work.
Flaws:
- After some time, the enamel acquires a yellow tint.
- The service life of paints is up to 5 years.
- After recovery, you can use the bath after a week.
- Irregularities in the factory coating are not hidden by a layer of enamel.
Liquid acrylic
Features of using acrylic insert
It has the following advantages:
- can be used to update different types of bathtubs having different shapes, sizes and materials of manufacture;
- the resulting coating does not turn yellow during operation and is resistant to rust and dirt settling;
- the cost of this product is low;
- After the work has been completed, you can use the bathroom literally the next day;
- the liner has excellent thermal insulation and sound insulation parameters;
- The new coating can be cleaned easily and using various detergents;
- there is no need to dismantle the old product or subject it to complex and expensive overhauls;
- A high-quality acrylic inlay will last more than 20 years.
The negative parameters of this method include the fact that for bathtubs of non-standard sizes you will have to order a liner, so it will have a higher cost.
Restoration with liquid acrylic “fill bath”
Restoring enamel with liquid acrylic has nothing in common with enameling, except for the surface preparation stages. As a result of the work carried out, the composition applied to the old enamel will harden, forming a kind of acrylic liner for the bathroom.
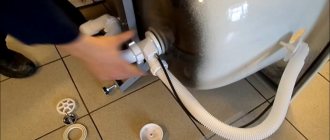
Surface preparation is carried out in the sequence described above. To prevent chips or cracks from appearing on the restored surface, they are puttied immediately before priming. Use fiberglass automotive putty. Apply the material to the damaged areas with a rubber spatula. During the process of applying acrylic, water may drip from the tap, and this will end the restoration of a cast-iron bathtub with your own hands. To avoid problems, the tap is wrapped in a towel and wrapped in a plastic bag.
Liquid acrylic application technology
When the bath is prepared, open the bucket with acrylic and remove the remaining material from its inner walls with a rubber spatula. The components of the composition are thoroughly mixed using a special drill attachment (whisk). The drain is covered with a plastic cup. A bucket of acrylic is placed on the bottom of the bath. The finished mixture is poured into a small container. Often, ordinary plastic cups with a volume of 0.5 liters are used.
Application of liquid acrylic
The restoration of a cast iron bathtub begins with the sides, all the acrylic is poured around the perimeter of the bowl. Then, using a spatula, spread with light movements along the edges and in the corners. When the mixture drains to the bottom, unfilled areas remain on the walls of the bath. Acrylic is lifted to them with a spatula, moving from bottom to top. Do-it-yourself bathtub restoration should be done quickly.
If the bottom of the bathtub is not completely filled, I pull acrylic from the area around the drain to it with a spatula. When the entire surface of the cast iron bowl is evenly filled, remove the plastic cup that covered the drain, and the remaining mixture flows into the substituted container. It will take an average of 24 hours for the material to dry completely. Much depends on the temperature and percentage composition of the hardener. But it is recommended to use the bath only after 2-3 days.
Advice! The resulting sagging should not be corrected immediately; after the acrylic enamel dries, they will disappear.
The color of the acrylic must match the previous shade of the enamel, otherwise stains may appear on the restored surface. To change the color of the mixture, when stirring, add a special tinting paste, the portion of which should not exceed 3% of the total mass.
Advantages
- Short drying time.
- Durable coating.
- Does not turn yellow over time.
- The wet surface of acrylic is not slippery.
- Service life 5-10 years
Flaws
- The application technology is quite complex and requires some experience.
Bath after restoration with liquid acrylic
Re-enamelling
Restoring cast iron bathtubs by applying a new enamel coating allows you to do the work yourself, since this does not require special skills and experience. In addition to the possibility of independent restoration, the use of enamel compositions has the following advantages:
- The cheapest option for updating coverage.
- Suitable for steel and cast iron products.
- There is no need to dismantle the drain and overflow.
The disadvantages of this method include the toxicity of the compositions: it is recommended to work in a respirator. Re-enamelling has a short service life of about 5 years, but the coating is sensitive to impact and prone to yellowing. In addition, the paint is not able to fill large sinks or chips of old enamel.
Note! Bath enamels are available in two types. The composition for professional use has a liquid consistency and is applied in 3–5 layers. Enamels for household use are thicker and are applied in two layers; they are suitable for self-application at home.
The restoration kit for applying new enamel includes two products: a primer and enamel with a hardener. All components are supplied in separate containers, the capacity of which is designed to repair one bathtub.
In fact, enamel coating an old bathtub is simply painting it with a special compound. The procedure and technology for performing enamel restoration is as follows.
Preparation
To ensure that the paint has sufficient adhesion to the old coating, the inner surface of the bathtub is cleaned with fine sandpaper. This roughens the surface while removing dirt and grease deposits. Dust generated during the grinding process is removed from the bowl using a vacuum cleaner. In this case, it is recommended to leave the body of the vacuum cleaner with the motor behind the door so that the flow of escaping air does not raise dust.
Advice! After sanding the bathtub and removing debris, take a break for 20–30 minutes so that the dust particles finally settle, after which the bathtub is rinsed with water and wiped dry with a napkin.
After the dust settles, the bath is rinsed with water.
Padding
The next step is applying a primer. Before this, carefully cover the drain and overflow holes with masking tape, and also protect the lining along the edge of the bathtub.
Then a hardener is added to the mixed primer and the composition is thoroughly mixed.
Note! At room temperature, the lifetime of the primer mixed with the hardener is 45 minutes, during which time you need to have time to completely prime the bath.
Part of the primer is poured onto the bottom of the bath, after which it is evenly rolled out over the entire bowl with a roller. When the poured composition is used up, more is added. The primer is applied in a thin layer to avoid drips and gaps. If necessary, while the primer is moving, you can go through a second pass. Upon completion of priming, the protective masking tape is immediately removed so that it does not stick.
Applying enamel
Start painting the bathtub with enamel after 12–24 hours (depending on the air temperature and the manufacturer’s recommendations).
Before applying the enamel coating, the following activities are carried out:
- The primed surface is sanded with fine sandpaper.
- Sanding dust is removed.
- The bath is washed with water and wiped dry with a rag.
- Drain holes and edges of the cladding are sealed with tape.
The enamel is then mixed with a hardener. The viability of the composition is also 45 minutes. Painting is carried out according to a similar scheme: the enamel is poured onto the bottom of the bathtub, after which it is rolled out over the entire surface in a thin layer, without gaps or sagging. After painting, the protective tape is immediately removed.
You can use the updated bathroom no earlier than specified by the manufacturer (from 3 to 7 days). If you use the bath earlier than the specified period, this will negatively affect the quality and strength of the enamel layer. After the enamel has dried, wipe the bath with a soft, soapy cloth, and then rinse with water.
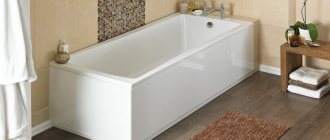
Acrylic liner “bath in bath”
Several names of the method reflect one essence. During the process of restoring a bathtub, a new plastic bowl is glued to its inner surface, identically repeating the shape of the old one. The acrylic insert into the bathtub is manufactured in a factory in accordance with current standards. The back side of the bowl can be additionally reinforced with fiberglass. Interestingly, this recovery technology was developed more than 40 years ago and has remained virtually unchanged since then. A good quality acrylic insert should have a thickness of at least 6 mm.
Acrylic bath liner
Preparing and restoring bathtubs using this method is easy to do with your own hands. In this case, cleaning and grinding of the enamel is not required. They only recommend filling up chips and cracks, if any. Old elements are removed: drain, overflow and plumbing. After that, remove the sides adjacent to the bathtub. The ceramic elements are cut off from the rest of the tiles with a diamond disc and carefully dismantled.
When is it time to renovate your bathtub?
A cast iron bathtub is the standard of quality, strength, and reliability in the plumbing world. It’s not for nothing that they recommend installing products made from this alloy in apartments. Many houses built back in the Soviet Union had just such bathtubs installed. Moreover, such baths are still used today. Also, a cast iron product is comfortable to use: it does not create noise, unlike, for example, a thin-walled iron bathtub. And it’s nice to wash in it - the bath retains the heat of the water poured into it much longer than others.
Cast iron bath retains heat longer
Unfortunately, even seemingly eternal things wear out over time. And a cast iron bath is no exception. In this case, it is not the structure itself that deteriorates, but the coating – the enamel, with which the structure was coated at the factory. And this special paint, applied using a special technology, begins to lose its appearance, and its performance characteristics deteriorate.
On a note! During production, cast iron bathtubs are coated with enamel after strong heating. It is due to this that it is possible to obtain high-quality adhesion of the base to the coating.
Cast iron bathtub is strong and durable
Signs that it's time to update your bath are listed below.
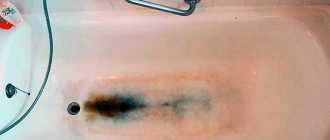
- Roughness of the internal surface . It is much more pleasant to step on smooth enamel than on pumice-like enamel.
- Cleaning the bathtub is becoming increasingly difficult . The reason is the same rough surface on which an ordinary sponge no longer glides easily and pleasantly. It takes a lot of effort to clean a bathtub.
- Dirt and rust quickly and strongly eat into the enamel due to loss of smoothness . In some cases, contamination cannot be removed completely.
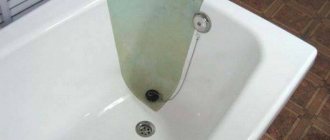
- The appearance of chips and cracks on the enamel surface.
It’s definitely time to restore this bathtub
Attention! Enamel chips are dangerous for the entire structure. The fact is that enamel paint protects cast iron from exposure to water and aggressive chemicals for cleaning plumbing fixtures. Rust forms quite quickly in places where there are chips and gradually begins to spread throughout the entire structure right under the enamel.
Chip on a cast iron bathtub
It is these signs that inform the owner of the bath that it is time for her to “rest.” But don’t rush to dismantle it and throw it away - the bathtub can be revived! And for this there are three fairly simple and, at the same time, relatively inexpensive methods - using an acrylic liner, the “fill-in bath” technique and updating the enamel.
Why is it worth restoring?
There are a number of arguments in favor of carrying out the process of restoring a cast iron bathtub and avoiding the need to replace it:
- No matter how hard manufacturers try to keep up with the times, no new technologies can yet surpass the quality of a classic cast-iron bathtub.
- Buying a new bathtub involves significant financial costs.
- Delivery of a new bathtub, including its lifting to the desired floor of an apartment building, is also quite expensive.
- The replacement process is quite dirty and labor-intensive.
- The old bathtub will also have to be removed from the house, which will be inconvenient.
- After installation, you will definitely have to do some renovations in the bathroom, even if you were planning to solely replace the bathtub.
- If you are replacing a bathtub with a similar cast-iron one, then it is worth considering that the service life of modern models is no more than 15 years, which is significantly less than that of old domestic ones.
How to restore a bathtub with enamel
This method is chosen most often. To achieve an ideal result, the following sequential actions are implemented:
the enamel itself is selected, and high-quality material should be purchased, so you should not skimp on this element, and the most optimal are Finnish enamels, which have excellent parameters; two sets of enamel are purchased at once, since one will not be enough to completely cover the product; if, simultaneously with the restoration, the appearance of the bathtub and the entire room is changed, then a color scheme is purchased that provides the enamel with a certain unique shade; Before applying the material, all surfaces of the bath are degreased using suitable products; the walls are treated with a grinding machine, abrasive or sandpaper, which ensures the formation of a rough surface that ensures excellent adhesion of the new coating to the base; if there are cracks or crevices, they are slightly expanded with the same tools, after which a cord brush is passed over all surfaces; another degreasing process is performed; the bathtub is completely and thoroughly washed; work continues only after the structure has completely dried, and this process can occur naturally or is accelerated by a construction hairdryer; various additional fasteners and elements, such as drains or gaskets, are removed from the bathtub; dust generated during operation is removed with a vacuum cleaner; rags or sheets of paper are placed under the bathtub so that excess enamel does not flow onto the floor; enamel is diluted in the prepared container; the solution is applied in a thin layer using a brush to the product from its edges to the bottom, and it is constantly leveled by alternating movements horizontally and vertically; subsequent layers are applied before the previous ones dry; it is important to achieve uniform coverage, so the same amount of attention is paid to all elements and details of the structure; At the end of the work, the drips are removed.
You will be able to use the updated bathroom in 4 days. Thus, renewing the coating of a sanitary ware using enamel is a fairly simple and quick process that can be easily implemented by anyone. It will not require significant expenses and excessive physical effort, therefore it is considered an economical and convenient way to update.