Attaching the tank to the toilet is a simple process, but it is important to carefully follow the installation instructions. The installation procedure differs depending on the type of waste container. Compact models are the easiest to install; even a beginner in construction work can do it.
Before starting installation, you need to prepare equipment and tools, then prepare the location. If necessary, you must first remove the old tank and clean the surface.
What is necessary?
Of course, you can’t do without the necessary tools and equipment, so first of all you need to prepare them. What exactly is useful is determined by the type of design and certain characteristics.
You need to pay attention to some nuances.
- How is the tank attached to the toilet? This can be a monolithic installation together with a toilet, or a wall-hung structure, or a model where the tank is mounted in a hidden niche.
- How is water supply connected to the tank? It can come from below or from the side. In the first case, the typical reason for the lower supply will be the need to line the pipes. This installation is not very simple. But summing up from the outside is both simpler and more familiar.
- What kind of reinforcement structure is used. That is, it comes with a lever or a drain button.
For installation you need:
- shut-off valve (it is placed on the water supply system, allowing you to shut off the water flowing from the water supply system to the tank);
- rubber, copper and steel liners mounted to the inlet pipe;
- drain fittings responsible for collecting/discharging water;
- silicone sealant or tape sealant used for auxiliary sealing;
- agent against corrosive deformation of metal elements of the installation.
In most cases, fastening involves using bolts and nuts that are included in the plumbing kit itself (i.e., you do not need to buy anything additional).
The following tools need to be selected: a drill, drills for metal and tiles, a marking marker, a hammer (for dowels), a wrench, a level, a core, a rubber spatula that will remove excess sealant. To attach the tank to the compact toilet, you need an open-end and socket-type wrench. To connect the bypass pipe, you should find an adjustable wrench with a diameter corresponding to the cross-section of the coupling.
How to assemble a tank with a button?
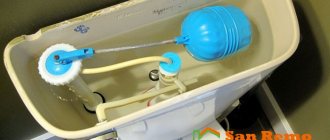
The fittings of the compact model are inlet and outlet valves. The inlet is called a float; this part, which is connected to the water supply, is designed to collect liquid and adjust its level.
Installation takes place in several steps.
- Before installation, a cleaning filter must first be installed in the internal cavity of the mechanism at the external outlet. Even before installation, it is important to record its presence in the kit.
- The device is attached to the bottom wall of the tank; do not forget to put a gasket on the inside for sealing (this is mandatory!). Fixation from the outside is carried out using the nut from the kit.
- The outer set has a thread; after attaching the tank itself, a flexible water supply hose is connected to it.
The outlet valve (or drain siphon) can be single-level or two-level. In the case of a single-level design, all the water from the tank is released into the toilet. And with a design with two levels, the owner himself decides whether to drain all the liquid or only part of it.
The installation is similar to the intake system. The lower part is made in the form of a bowl, which must be placed in the drain hole of the tank. And here, too, you need to remember about the silicone gasket and the locking nut. Once the bottom piece is secured, a simple twist and click adds the main piston system. After installing the cover, the push-button assembly is mounted.
Once again, it is worth noting: before installation, you need to make sure that the manufacturer has completed all the parts. But it happens that the owner is not satisfied with the quality of the parts from the kit, then he makes a replacement himself. Instead of rubber gaskets, for example, you can use high-quality silicone ones. Bolts can also be replaced with stainless steel parts. But such measures, of course, are carried out even before installation. New parts must be checked against the main components of the mechanism.
Types of drain mechanisms
A simple version of the drain mechanism can be called the old “pear” model. Its shape resembles a plunger. Water constantly presses on the drain siphon, tightly blocking the hole at the bottom of the tank.
The most common are systems with one button, as well as dual-mode mechanisms. The double button allows for two operating modes:
- normal - draining the entire volume of the tank;
- half - draining part of the water.
These mechanisms are economical and consume significantly less water per day. However, there is also a drawback - the complexity of the design. Such a mechanism will be capricious to maintain. Spare parts will be more expensive than elements for one button. Also, many owners emphasize the frequent occurrence of malfunctions.
Installation procedure
The specific instructions for attaching the tank to the toilet depend on what type of device you purchased.
The following types of drain containers are available on the modern plumbing equipment market:
- mounted separately from the toilet bowl,
- mounted on a bowl, for which the latter is equipped with a special shelf,
- built into the wall.
Let's consider any option in more detail.
Method 1. Mounted cistern
This method of placement is seen quite rarely and is even less used in private buildings. However, be aware of it.
The toilet tank is fastened as follows:
1. A special flush pipe, the diameter of which is 32 mm, is connected to the bottom of the drain tank. There is a special hole for this purpose.
2. Then marking is done. The tank is placed against the wall at such a height that the lower end of the pipe is opposite the inlet pipe of the toilet bowl located on the floor. After this, markings are applied to the surface of the wall using a marker or pencil.
3. The holes for the brackets are drilled. If the walls of the toilet are cement or tiled, you need to use a hammer drill with a special drill. This will make your work easier and speed up the process, and the resulting hole will be neater.
4. Select the correct tool diameter. It must exactly match the dimensions of the dowels or anchor bolts used.
5. Then the brackets are screwed to the wall, and a water storage tank is attached to them.
Method 2. Built-in tank
This refers to a structure installed on the shelf of the toilet bowl.
In this case, the flush cistern is attached to the toilet in the following sequence:
1. A rubber gasket is installed on the bowl. In most cases, it is already coated with a special adhesive that holds it in place. If this is not true, it is necessary to additionally use a special sealing sanitary gel.
Advice! Coat the gasket on both sides, since one is attached to the toilet shelf, and the other is adjacent to the flush tank. In addition, it is possible to additionally use a special rubber ring that seals the drain hole at the bottom of the container.
2. To secure the tank to the toilet bowl, special bolts with cone-shaped rubber gaskets are used. They are inserted into the holes provided for this purpose and screwed in well with nuts from below. Do not use too much force to tighten the nuts. This can lead to breakage of the tank or bowl, since ceramics do not withstand strong external influences well.
Upon completion of installation, the rubber parts provide the most airtight connection, which will not allow leaks after filling the container with water.
3. In order to prevent water from flowing out of other holes (for example, for the water supply pipe), it is necessary to use special rubber plugs. Before installation, it is also recommended to lubricate them with gel to obtain the tightest possible connection.
4. The next stage is the installation of drain fittings and connection of the water supply. During these operations, it is necessary to ensure that all gaskets, membranes and seals are in place.
It is recommended to wrap polymer tape on the external thread of the inlet pipe to protect against leaks.
5. The last stage is testing. It is necessary to unscrew the shut-off valve that cuts off the water supply to the tank and fill the container with water. To adjust the liquid level, a float mounted on a rocker arm or screw is used.
Advice! Plumbing gel takes some time to polymerize. Based on this, it is recommended to carry out testing 1-2 hours after the completion of the installation procedure.
Method 3. Hidden tank
A drainage container hidden in the wall is quite an expensive, but very aesthetic and popular option for arranging a toilet room. In addition to everything else, the hidden placement of the tank allows you to save space in the restroom and protect the structure from accidental damage.
On the outside, the built-in cistern differs from classic models:
- it is made from durable polymers and has fairly thick walls,
- the shape of the hidden tank is more extended upward and to the sides, so that it takes up less space in the wall,
- the shutter button is located not on the cover, but on the front surface of the device,
- For fastening, a special installation is used, which is included in the delivery set.
The work order is as follows:
- A steel frame is installed in a place pre-designated for installation, which will serve to secure both the flush cistern and the toilet itself. When installing it, it is necessary to perfectly maintain the horizontal and vertical, otherwise troubles will arise when you begin to attach additional fittings.
- A tank is installed on the frame and water is supplied to it. For this, it is better to use solid tubes, which provide great reliability. Since after tiling the hidden tank is finished, repairs will be problematic.
- As in previous cases, it is better to connect the supply pipe through a shut-off valve.
- Upon completion of the installation of the tank, the sewage system is installed, the steel frame is sheathed with pages of waterproof plasterboard, which is lined with the selected decorative material.
- The last stage is the installation of a button for the toilet, which controls the flush fittings. It is better to use a separate drain, which allows you to save water from the tap.
Setting up the cistern fittings yourself: Step-by-step instructions + Video
Setting up the cistern fittings is the main task after installing the toilet.
The cistern fittings are a system that provides regulation of its filling and flushing. There are a huge variety of toilets on the modern market, but the cistern drain fittings are not so diverse. Geberit and Alcaplast are the most common models. Any of the tank models (with a lever, with one button, with two buttons, with a chain) requires correct installation. The installation principles are the same.
Construction and adjustment of the compact
When the toilet tank can no longer be repaired, it is replaced. A step-by-step replacement of the toilet tank can be performed by following the following algorithm:
- shut off the flow of cold water;
- disconnect the old tank from the water pipe;
- using an adjustable wrench or wrench, remove the mounting bolts to dismantle the tank;
- clean the container mounting area from traces of rust, dirt and lime;
- install a new tank in accordance with the above recommendations;
- connect the equipment to the water supply;
- adjust the water level;
- install the lid and drain button;
- carry out a test set and drain the water.
- cistern container with lid;
- system for filling water into a container;
- shut-off device or water drainage system;
- control button or lever;
- toilet.
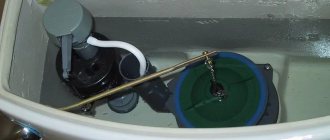
The tank in the compact is installed on a special shelf, which is located behind the bowl. Typically, adjustment of the fittings of such a toilet is carried out after the cistern bowl is installed, but before its lid is installed. Before starting work, it is recommended to carefully study the manufacturer's instructions. Usually there is detailed information about the procedure for performing the work.
Compact toilets are popular because they are convenient and take up little space. The tank of such a device is installed on a shelf directly behind the bowl
The overflow pipe of the device usually indicates the water level that is considered normal for that particular model. You need to find this designation, which is often made in the form of a strip or bead. Usually, if, when filling the tank, the maximum water level is below this mark, poor-quality flushing of sewage is observed.
Read more: How to work with press fittings for metal-plastic pipes
To change the situation, you need to move the “glass” on the intake valve to a higher position. To do this, loosen the clamps holding this element located under the float. After the required level has been set, you need to check the result of the work, i.e. fill the tank and drain the water.
On the top of the toilet tank inlet valve overflow pipe there is a mark in the form of a dash or collar for adjusting the water level
When installing tank fittings, it should be remembered that all moving parts of the valves must be separated by a distance, at least small. If the valves come into contact during operation, this can disrupt the normal operation of the system, leading to its imbalance and breakdown. It is also unacceptable for the moving elements of the fittings to come into contact with the walls of the tank.
We open the previously shut off water, fill it into the tank and see if the water splashes during the fill. If this does not happen, close the tank with a lid.
An important stage in installing the tank is installing the lid with a push-button regulator. Before screwing it in, there should be a distance of no more than seven millimeters and no less than three between the cover and this unit. If these conditions are met, the cover will be fastened securely enough.
Before you start screwing the flush button, the instructions recommend making a couple of turns in the opposite direction, i.e. counterclock-wise.
To save water, modern tanks have a double flush button, which allows you to empty only part of the tank if desired.
This will center the thread position. After this, screwing the button assembly is carried out clockwise. You need to rotate it by hand until it stops; additional tools are usually not needed. Upon completion of installation, you should drain the water again to make sure that the button and all fittings are configured correctly and installed correctly.
Compacts are produced with both bottom and side water supply. With fittings designed for bottom water supply, a problem such as clogging of the filter installed at the water supply to the container may arise. After flushing, i.e. During the process of filling the tank, a characteristic, rather loud and unpleasant whistle is heard.
This situation most often indicates that the filter is clogged and needs to be washed. The debris accumulated inside reduces the clearance for water, which enters the tank with high pressure and accompanied by sound effects. In addition, due to this malfunction, the tank fills much more slowly than usual.
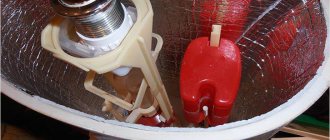
There is a filter located under the inlet valve float, a clogged filter that can cause the tank to malfunction. To wash the filter you need to remove it
To correct this plumbing problem, you need to flush this filter. To do this, turn off the water supply to the tank and press the flush button/lever. After this, remove the hose through which water flows to free access to the device. Now the filter just needs to be removed from the intake valve body, washed and installed back. The system is then reassembled in reverse order.
It looks simple in theory, but in reality there can be some complications. For example, you need to unscrew the plastic nut that secures the inlet valve. If this element does not have edges, the task may seem difficult.
You should not use an adjustable wrench in this situation, as excessive force may damage the fastener. It’s not always possible to just do it with your hands, especially if the plastic has become “burnt” as a result of prolonged use.
To ensure that the sediment that forms when low-quality tap water is supplied to the device does not cause a leak due to loose seals and failure of fittings, the tank and devices must be periodically cleaned
Experts recommend using other means; pliers with a large space between the “lips” may be a suitable option. Pliers can also be useful when removing the filter from the housing, since it usually fits tightly and will require additional effort for removal.
Where the quality of tap water remains consistently low (that is, almost everywhere), not only the filter, but also other elements can become clogged. The membrane bushing is at risk, as well as all the holes through which water enters.
If washing only the filter was not effective enough, it makes sense to rinse the entire device and clean all the channels. In this case, you will have to completely dismantle the inlet valve to provide access to the holes.
Unfortunately, washing the filter, and even the entire valve and ducts, does not always help. Low quality intake valves can completely fail within one and a half to two years after the start of operation. In this case, you will have to completely replace the valve with a new model. In such a situation, it is recommended to choose a higher quality filter.
The shut-off and inlet valves of modern toilets are usually provided with detailed instructions, with the help of which these mechanisms are not difficult to assemble, install and adjust
The additional costs will pay off, since there will be several times fewer problems with setup, flushing and repairs. Another way to prolong the operation of the tank fittings and prevent problems: install an additional mechanical filter on the water pipe in front of the toilet or even at the entrance of the system to the apartment.
If the compact has problems with the shut-off valve, i.e. Since water constantly leaks into the toilet, the easiest way to fix the problem is to completely replace the device with a new one, exactly the same. To do this, you need to turn off the water and simply remove the valve from the tank.
The new one is installed in its place, fixing it in the holders of the receiving part. It is recommended to adjust the length of the valve in advance so that there are no problems with installing the flush button.
If it is necessary to replace the old storage tank with a new one, you need to:
- shut off the flow of water into the container by setting the valve to the “closed” position;
- Next, you need to drain the liquid from the bowl;
- if you want to use the old fittings in a new bowl, carefully remove the filling device;
- then you need to unscrew the fastening bolts connecting the container to the toilet seat and remove it;
- remove the drain device by unscrewing the connections attaching the bulb seat to the bowl;
- Before installing a new tank, you need to clean the surface of the toilet seat from rust and mineral/bacteriological deposits.
As can be seen from the above, there is nothing particularly difficult about installing a toilet tank yourself, attaching and adjusting the fittings. These operations are within the power of any person.
Some difficulties may arise only when servicing installed containers, since many operations have to be carried out through a small technological opening in the absence of visual contact.
Preparation for repair
Before you can repair the toilet cistern, you need to open it. It is only accessible from the top if you remove the cover. In many modifications it is attached using a ring around the button. This ring must be pressed and turned counterclockwise. After prolonged use, the ring may not turn. Then a few drops of oil are applied to the attachment point. After the ring has turned, unscrew it, and then release the button from the plastic clothespins and remove the cover.
Models are equipped with one or two buttons. In the second case, one of them is intended for a small flush, and the other for a large one. To dismantle the cover, press one button and remove both of them one by one through the technological groove. Then unscrew the fastening screw and remove the cover.
Fastener selection
All fasteners and gaskets are usually included in the package.
If they are missing, fasteners are selected in compliance with the following rules:
- To fasten the tank to the toilet, use bolts with a smooth part at the top of the rod.
- Metal fasteners must be made of stainless steel, non-ferrous metals or have an anti-corrosion coating. Regular steel will quickly become rusty. The composition can be easily checked with a magnet.
- All fastener elements must be cast from the same metal of good quality, otherwise electrochemical corrosion will occur upon contact with water.
- High-quality plastic fasteners for the tank are not inferior in strength and reliability to metal ones.
- To fasten compact models, a cone-shaped gasket is used. This shape ensures that the gasket fits securely to the smooth top of the bolt shaft and provides a tight seal. As a last resort, you can use a regular gasket, but only complete with a bolt and a pressed washer.
- Silicone gaskets are better than rubber ones.
High-quality bolts with nuts, washers and gaskets allow you to secure the plumbing fixtures so that there are no leaks.
Conclusions and useful video on the topic
A few tips from experienced professional plumbers will help you avoid serious mistakes and complete your installation faster.
If done correctly, installing a plumbing fixture yourself should not cause any particular difficulties. The main thing is not to rush to put it into operation immediately, allowing time for the silicone to solidify thoroughly.
Setting up the tank fittings is not difficult. It is important to study the instructions and understand the general principles of operation of the inlet and locking mechanisms. Attention to detail and accuracy will help to complete all the work correctly.
Sources:
- https://TrubaNet.ru/kanalizacionnye-truby/kreplenie-bachka-k-unitazu-instrukciya.html
- https://dekoriko.ru/unitaz/kreplenie-bachka/
- https://partner-tomsk.ru/santehnika/kanalizatsiya/kreplenie-bachka-k-unitazu-3-metoda-montazha-bez-oshibok
- https://ManRem.ru/kreplenie-bachka-unitazu-instruktsii-sovety-provedeniyu-rabot/
- https://UnitazVdome.ru
- 1
Dismantling old elements
Before connecting the toilet to the sewer pipe, the installation site should be cleared of elements of the previous structures. The procedure is carried out using a hammer, screwdriver and pry bar.
In most cases, the outlet of old products is built into a cast iron structure (“elbow”), which requires breaking the pipe with a hammer. When performing this procedure, be sure to wear safety glasses. Otherwise, sharp ceramic shards will get into your eyes, causing injury.
After the old plumbing fixture is dismantled, you need to knock on all sides of the cast iron pipe, then begin to remove the cement layer and other deposits from the walls.
To remove small parts, a screwdriver and a hammer are enough, but for large elements you will need to use a pry bar. When tapping with a hammer, it is important not to overdo it, because... strong impacts will lead to the splitting of the cast iron socket.
In this case, you will need to break the floor to get to the sewer riser. Then you will need to connect the new outlet to the riser.
When the main deposits have been removed, you can begin the final stage of cleaning the pipeline. To do this, you need to coat them with a special chemical for cleaning the toilet, and then scrape off the residue using a wire brush.
Finish cleaning with a rag. The first 5-6 cm of the cast iron socket must be completely smooth from the inside, because the absence of leaks in the future and the tightness of the joint depend on this. The entire procedure must be carried out wearing protective gloves.