Before learning how to attach sinks to the bathroom wall, you should learn about the types and differences of this type of plumbing. This knowledge will help you make the right choice of products for each bathroom and choose the optimal fixation method. Sinks differ in structural and design features, material of manufacture and fixing devices.
Attaching the sink to the wall in the bathroom
Tools and materials
For self-installation, the following tools are used:
- hammer;
- screwdriver;
- building level;
- drill and bit;
- spanners;
- gas key;
- marker;
- sealing tape;
- fasteners (anchor screws, consoles).
Necessary tools for installing a sink
Consoles come in two types - specialized and standard. The second ones are ordinary brackets, covered with a layer of paint on top. Suitable for conventional sinks. Specialized ones are coated with non-oxidizing metal. They perform a protective function against corrosion. They have an unusual shape, due to which they perfectly dilute the interior.
When choosing brackets, you should pay attention to the weight that they can support. This characteristic is indicated in the description of the fastener.
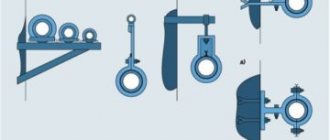
There are several types of brackets:
- t-shaped;
- g-shaped;
- frame;
- girth.
Mounting brackets for wall-hung sinks
The most reliable is the girth. It is a metal frame. It is attached to the wall, then the sink is inserted into it. The frame allows you to change the size of the mount. This console has sector, rectangular or arc parts.
The T- and L-shaped brackets are small in size compared to the previous ones. But they also securely fix the sink to the wall surface. In some cases, they are welded from a square pipe.
What does the market offer?
Each type of installation has its own specifics and requires certain knowledge of installing and connecting the sink to the overall system. The variety of designs on the market is amazing:
- sink on the cabinet;
- bowl on the shelf;
- “tulip” model;
- installation on a pedestal;
- wall mounting on brackets.
But still, the most popular mounting method is still mounting the sink on the wall.
It is necessary to select a sink model in which the connections for hot and cold water and the drainage outlet are identical to the location of these communications in the room.
Faucet and washbasin assembly technology
Before starting work, old equipment is dismantled. For this:
- water is blocked;
- the mixer is disconnected and removed;
- the siphon is removed and the water is drained from it;
- the holes in the pipes are blocked with a plug;
- The old sink is removed.
Assembling the faucet
After dismantling the old equipment, the sink is fixed to the wall:
- trying on the sink;
- marking is carried out;
- holes are made for fasteners;
- a sink is installed;
- The mixer is being assembled;
- communications are connected (water supply and sewerage).
Installing a washbasin bowl
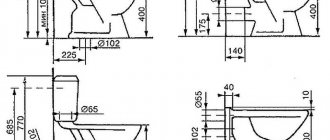
The sink is placed on the surface and tried on. It is placed at a height convenient for use. The best option would be a mark of 0.8 m from the floor level. And from the wall to the edge of the sink there should be at least 0.9 m. Marks are placed at a given height.
Before connecting communications, the reliability of the fastenings is checked. Connecting the mixer consists of the following steps:
- applying a special chemical solution to the contact point between the faucet and the sink;
- assembling all elements into one unit using tabs and seals;
- connection to flexible pipeline hoses using union nuts and adapters. In this case, the hoses are pushed into a special opening in the sink, and after fastening, the mixer is put in place;
- fixing the device from below with a lining and a pressure washer.
The mixer should take a stable shape after installation. The axes of the device entering the couplings must be joined. It should be remembered that the sink is already attached together with the mixer, which will greatly facilitate installation. But first, markings are made for attaching the sink with or without brackets.
Installation dimensions
Some features of fixing load-bearing frames for sinks to the wall
You should be careful with supporting frames; in most cases, their attachment points are open. In addition, if two holes are needed for sinks, then the supporting frames have at least four, and this complicates the marking.
Bracket mounting diagram
Sink bracket
How are the frames attached to the wall?
Step 1. Inspect the surfaces. Now pay attention not only to the quality of the tiles, but also to the evenness of the wall. Check the plane of the wall with a rack and check the verticality and horizontality with a level. Pay special attention to the places where the sides of the frames will rest. If you make a mistake, the entire sink will have a slope, which is considered a clear sign of a defect.
Step 2. Place the frame against the wall and mark the exact position of the holes. If the holes in the sink are specially enlarged for final adjustment of the position, then on the frame there is no such possibility. This means that all measurements should be carried out with double care.
Step 3. Drill holes for dowels. Frames are most often installed on these hardware. Insert plastic elements into them.
Step 4. Place the frame in place, check its position for clearance between the vertical posts and the wall. Do the same control on the horizontal part of the frame. First, insert the two upper metal nails into the plastic elements and secure them a little. Then insert the two bottom ones. This method allows you to correct small errors made during taking dimensions or drilling holes. The fact is that at first the dowels can be installed at an angle, the main thing is that they fit into the holes of the frames. Then, during dense hammering, the hardware is firmly fixed, and the tilt of the heads is almost imperceptible.
Step 5. Check the strength of the fixation with force, everything is normal - you can continue installing the sink.
Sink 500x360x170, mounted on brackets
Washbasin on brackets, bottom view
Sanita washbasin on brackets
Video - Installing a sink on brackets
Connection to water supply and sewer systems
When connecting the mixer to the water supply, you must ensure that the hoses do not get twisted. Flexible hoses are connected to the water supply as follows: to the right - cold, to the left - hot. The connection is made with nuts and tightened with an adjustable wrench.
Connection to the sewerage system is carried out in stages:
- attaching the siphon to the washbasin;
- screwing a corrugated or rigid pipe to a siphon;
- inserting a pipe into a sewer drain. If necessary, use an adapter if the 2 pipes to be connected have different diameters.
After installation, check the siphon for leaks.
After connection, the system is checked for leaks. When installing, do not overtighten the connections, as this can damage the sealing gaskets. You need to check the system for reliability: tug on all attached parts. They should not creak or twitch.
Determining the optimal installation location
One option is to install a new sink in the same place where the old plumbing was located. But this is not always possible, since the cabinet box most often does not fit into the previously allocated space. And moving the location of plumbing fixtures during repairs is not uncommon. Therefore, it is best to think through the location of all plumbing fixtures, as well as pieces of furniture, at the renovation design stage. To do this, the bathroom is conditionally zoned into several areas, in each of which a device is installed (bathtub or shower, toilet, sink, washing machine).
Based on the planned location of the plumbing, water supply and sewerage pipes are laid, because the optimal supply points are different for each plumbing fixture. When supplying hot and cold water, the location of the fittings for connecting flexible hoses must be calculated so that they are located between the shelves. This will ensure convenient connection and replacement of hoses during operation.
As for the siphon and connecting the corrugated sewer pipe, you often have to cut holes in the shelves to connect it. It is for this reason that it is better to calculate everything in advance and bring the sewer pipe to the level of the connection points to the water supply.
To avoid having to cut holes in the shelves of the cabinet, all supply points must be brought out in advance to a place convenient for connection.
Advantages of wall mounting
You should choose a wall mount due to the following advantages:
- reliability - this is ensured by the fact that brackets or consoles made of enameled steel are quite durable materials. They secure the device with high quality;
- ease of maintenance - after installing the sink, constant access to communications is provided. This makes it possible to clean the siphon or remove any part and attach it back;
- additional space - free space appears under the sink, which allows you to place various drawers for household items, a basket for dirty laundry or other items. This often helps out in cramped bathroom conditions;
- minimalism in the interior - creating a wall-mounted structure allows you to get rid of various cabinets and shelves. Due to the variety of shapes and materials of shells, such a design will seem to float in the air.
Mounting the sink directly to the wall in the bathroom is a good solution. Mounting is quite simple, and the cost of fasteners is affordable. Such designs do not clutter up the space and allow you to use the space under the sink.
How to choose a bracket
To ensure that the plumbing fixtures are held securely, it is important to choose the right brackets. First of all, you need to take into account the design of the washbasin and the brackets themselves. The places where these products adhere to the sink must coincide.
As a rule, sets for fastening sinks are produced with standard holes and already come with bolts.
- Expensive designer sink models are often immediately equipped with wall mounting.
- This is done for the reason that such products have a non-standard shape or size.
- Since the humidity in the bathroom is always high, you should consider how metal products will be protected from corrosion.
- Cast iron, chrome and bronze are least susceptible to moisture. However, it is also desirable to protect cast iron products from corrosion.
The simplest brackets most often come without additional coatings, or simply painted. Such products are the least durable. It is better to choose models coated with enamel. The products can be painted yourself.
Types of shells by shape
Depending on the size of the bathroom, the appropriate size of the washbasin is selected. There are several types of shells:
- tulip;
- sink console;
- built-in
Built-in
Sink tulip
Console sink
The tulip sink is a structure consisting of a bowl and a stand. The stand is designed to hide the siphon and pipes. This option fits harmoniously into the interior of the room, but is installed in spacious rooms. Fastening is carried out simultaneously to the wall surface and to the floor.
The console sink is attached to the wall surface with brackets. This option allows you to visually expand the space, because the device takes up little space. In small rooms, it is practiced to mount a corner product, which also fits compactly into cramped conditions. The disadvantage is the visible drainage system. But the problem can be solved by installing special overlays.
Built-in options are mounted in a cabinet or table in the bathroom. At the bottom, a convenient cabinet is formed that hides communications and provides space for storing household supplies. Overhead washbasins that are installed on the countertop are popular. They have the shape of a bowl and unusually complement the bathroom interior. But this installation option takes up a lot of space in the bathroom, so many people opt for a wall mount.
Secrets of the master
In order to efficiently install a sink on a wall, it is worth learning some of the nuances of this process, without which the installed structure will not be as reliable and stable. These are tips from the best installation specialists:
- The wall structure has a significant disadvantage - it is visually open pipelines and fittings. The excellent aesthetics of the bowl is achieved thanks to a cabinet that matches the design, which will cover all these connections and the siphon. An additional advantage of this installation is a good place to store various necessary accessories.
- In practice, the entire set of fastening equipment should be included with the product. Check this issue yourself, because often: either the manufacturer forgets to complete the sink with fasteners, or their quality itself is not particularly high.
- To avoid moisture vapors from entering the space between the bowl and the wall, it is necessary to use a high-quality sealant, for example, silicone.
Upon completion of installation work, check the system drainage for leaks by filling the siphon with water. If you find a leak, make a tighter twist and an additional sealing layer.
- Install the bowl only after completing all finishing work. Be very careful when installing fasteners.
- The surface of the wall on which you mount the bowl must be strong and stable, otherwise use a supporting frame.
- If after installation the sink does not “move”, this is a clear indicator that the bowl installation procedure was successful.
A well-executed installation procedure is synonymous with excellent functionality and durability of the product. In view of this, before installation work, seek the support of an experienced specialist.
What elements does the cabinet consist of?
The process of assembling a sink cabinet is considered not the most labor-intensive of the many options. Especially if you have a ready-made sketch with all the markings
When assembling a product, it is important to understand its structure as a whole and the design features of individual parts. The cabinet's components are:
- the frame is constructed from wooden blocks;
- the tabletop (upper surface of the product) is constructed both from GC panels and from wood, stone, glass and other materials;
- the end walls can be either plasterboard or lighter plywood, which is not particularly important from the point of view of load perception (they are not load-bearing elements);
- additional parts of the structure - shelves, drawers, hanging components - are made from a material that is most capable of absorbing the functional load (glass, plywood, drywall).
The following assembly tools are required:
- electric jigsaw;
- hammer;
- drill;
- hacksaw;
- screwdriver;
- pliers;
- sandpaper;
- screwdriver;
- pencil and tape measure;
- chisel.
Construction - frame
If you find that the bathroom walls are quite weak for installing a vanity, try an interesting way to mount the sink.
A device resembling a frame and consisting of profiles attached to the floor and walls will help to cope with this complexity. It can be adjusted in height, so the sink will be located the way you want. In addition, all unsightly pipes will be hidden inside this structure.
Installing it is quite simple. The frame is positioned, secured, and the pins are screwed in at the designated level to secure the product itself. The frame is sewn up with finishing material consisting of layers of plaster and paper. Then they are lined with any decorative material of your choice.
In order to reduce noise when operating the washbasin, a rubber washer is placed on the rod located between the wall and the bowl. Then, using pins, the wall-hung sink is installed.
The installation, properly assembled, is able to withstand a fairly large load, and, as an option, it can include space with additional shelves. Beautiful, convenient, economical.
Sink in the kitchen
This plumbing attribute is simply necessary in your kitchen. You can install it in various ways. It all depends on the type of product, the material used, the design, style of the kitchen furniture and the overall interior of the room.
Based on specific parameters, various methods of attaching a sink in the kitchen are determined. Let's look at some of them.
Niche preparation
Installing a wall-hung toilet involves using a niche to place the frame. As already mentioned, a certain strength of the walls is required for fastening. The installation design can withstand a weight of up to 400 kg, part of the load from which is transferred to the wall. This issue must be approached with special care.
In order to place the installation, you need to prepare a niche. It should be as follows:
- Height – 1 m;
- Width – 0.6 m;
- Depth - up to 0.2 m.
In some cases, creating such depth is problematic. In such cases, it is necessary to go deeper into the possible value, and hide the remaining elements with plasterboard panels.
By hiding the main part of the device, certain opportunities for decorating and improving the interior open up. It’s not worth just placing the installation near the wall and sheathing it with plasterboard, because... placing a toilet with a conventional layout will be cheaper and easier. In addition, it will take up less space.
Installation process
Sometimes the cost of installing a vanity cabinet can be too high. However, if you have minimal skill in handling tools, then all this can easily be done with your own hands. The main thing is to correctly connect the sink to the sewer and water supply.
Before you begin assembly, you should prepare everything you need:
- washbasin cabinet;
- sink;
- screws and screwdriver;
- impact drill;
- metal corners;
- siphon and mixer;
- metal-plastic pipes;
- silicone sealant.
How to assemble a cabinet
There is nothing unusual or complicated in assembling the cabinet. It is enough to check the completeness of the package and carefully study the instructions that come with the kit. Assembly must be carried out strictly according to the instructions. The main task is to ensure that all structural elements are properly fixed.
How to attach a sink
The greatest difficulty in assembly is installing the sink on the cabinet. Initially, you should install the mixer - make sure that it does not dangle or rotate. The faucet needs to be connected to the water supply.
It is better not to use standard bends from the kit. They are braided with metal, which rusts over time and leaks form. It is better to use bends made of metal-plastic. Next, you need to install a siphon and screw it to the drain hole of the sink.
We install the assembled structure on the cabinet and move it close to the wall in the right place. We mark on the wall the places where the fasteners will be located. The holes for the mounting bolts are located on the back of the sink. After moving the cabinet away from the wall, you should make holes in the right places.
After the dowels are installed, the cabinet is put in place and the sink is secured with bolts. The outlets are connected to the water supply and sewerage systems. It is better to treat the joints with silicone sealant to prevent leakage.
Final work
Once all work is completed, all that remains is to check the correct connection. Turn on the water and see if there are any leaks. And finally, all that remains is to remove the dirt remaining after installation. Now all the work is completed and you can use it!
Stages of installation work
The water is turned off, both cold and hot. Then you need to decide what place in the interior of the room is allocated for the bowl, taking into account the supply of cold and hot water to the mixer. After this, the sink prepared for installation is tried on on site, and its position is finally selected.
Correctly determine the size of the bowl and the height of its installation. It is necessary to choose a model so that it does not occupy extra square meters of the room, but, at the same time, has sufficient dimensions to cover the water jet spray sector. These can be standard 50-65 cm wide models. The most “ergonomic” installation height is 0.8 m from the floor. It is preferable to leave the distance in front of the washbasin within 0.8-0.9 m.
Photo guide for installing a washbasin on the wall - in principle, everything is clear without further ado
At the selected height, armed with a ruler, pencil and level, the central horizontal line along which installation work will be carried out is indicated. This will be the upper limit of the installation of the plumbing fixture.
It is very important to know the thickness of the side walls of the bowl. They must withstand the support of the brackets. The measured thickness is laid down from the previously made horizontal line on both sides of the sink and is recorded with a mark
The measured thickness is laid down from the previously made horizontal line on both sides of the sink and is recorded with a mark.
The resulting marks are connected by a horizontal line indicating the installation height of the brackets.
Next we work with the bowl: turn it over and fix the brackets on the sides. It is better to do this work together: one person manipulates the sink, aligning it horizontally; the other makes the necessary marks.
Having placed the bowl horizontally, use a marker to mark the places for installing fasteners through the recesses on the back side. In this case, you need to make sure that all the lines and places for the brackets match. According to these designations, holes are drilled with a drill with a diameter slightly smaller than the diameter of the mounting screws or dowel screws.
Plastic or nylon bushings (you can use plugs) are driven into the drilled places, and screws are screwed into them. Support brackets are attached to them, on which, in turn, the sink bowl is installed. The places for its further fastening to the wall are marked with a marker, drilled, and the bowl is placed in its place.
The final step is to connect the siphon, the outlet end of which is inserted into the sewer socket; installing a mixer and connecting the water supply.
Having slightly “rigged” the fasteners, the sink is finally leveled horizontally, after which the final reliable fixation of all fasteners is carried out.
Let's consider their types
Individual supports that are developed for mounting a bowl of a certain model. These are design works and often have an unusual configuration. Such plumbing fixtures are supplied with brackets in the form of specially shaped pins. Such fastenings are additionally treated with special compounds that carry a decorative load.
Wall-mounted sinks are fixed with cast iron and steel brackets coated with an anti-corrosion compound.
Racks are also available in various configurations (T or G), and are also made in the form of frames with a movable unit that allows you to adjust the installation. They are characterized by increased safety and stability.
The volume of the bowl affects the size of the mount. The length of the anchor is of great importance, since the depth of its insertion into the wall is at least thirty millimeters. The recommended mounting bracket size ranges from fifty to one hundred and twenty millimeters.
Installation installation
Let's look at how to install a toilet installation. The entire installation process consists of systematically carrying out the following main stages:
- preparation for installation;
- installation fastening;
- device connection.
Preparatory stage
The first stage of equipment installation - preparation - includes:
- preparing the tools necessary for work;
- choosing a location for installing the structure.
It is more advisable to install the toilet in the place:
- equipped with water supply and sewer pipes. If the installation of the toilet is carried out far from communications, then it is necessary to carry out additional work to lengthen the pipelines, which will lead to an increase in time and money costs;
- where the toilet will not be in the way. In apartments, special niches are most often provided, allowing you to save a small space in the toilet room. If the toilet is located in a country house, then a place is selected that is remote from the kitchen and living quarters.
To complete the work you will need the following tools:
- tape measure, building level, marker for measuring work;
- drill, hammer drill and set of drills for preparing mounting holes;
- wrenches for assembling the structure and its fastening.
Tools required for installation installation
At the preparation stage, it is important to check the presence of all fasteners included in the installation kit, water and sewer lines, as well as the sealing rings necessary for connecting communications.
Device installation
Do-it-yourself installation is done according to the following scheme:
- assembly of the frame structure. If a block installation is being mounted, this step is skipped. When assembling the device, it is recommended to strictly adhere to the attached diagram and securely fix all fasteners;
Instructions for assembling the device
marking places on the wall and floor for fixing bolts
When carrying out work, it is important to take into account the size of the decorative decoration of the room;
Determining where the frame is attached to the wall and floor
- drilling holes and inserting dowels for further fastening of the installation;
Preparing holes for fastening the structure
fastening the installation frame
When installing the equipment, it is important to observe the following parameters: the toilet fastening elements located on the installation frame must be at a distance corresponding to a similar parameter on the toilet itself; the outlet of the sewer pipe should be located at a height of 23 cm - 25 cm from the floor; the optimal height for a wall-hung toilet is 40 cm - 48 cm from floor tiles or other finishing coating;
Recommended distances when installing the installation
The most important step when installing the frame is its alignment in the horizontal and vertical directions. The frame is adjusted using special screws provided by the design of the equipment.
- installation of a drain tank. When fixing the toilet cistern, it is necessary to take into account the height of the flush button. The most universal distance is approximately 1 m from the floor of the toilet room. This parameter is considered optimal for using the toilet by both children and adults;
Installation of a flush cistern for a wall-hung toilet
- installation of toilet fixtures.
Installation of fasteners for the toilet
Connecting the installation
Water supply to the drain tank can be done:
- side;
- above.
The choice of water connection method depends on the design of the tank used. To supply water, it is recommended to use rigid plastic pipes rather than flexible hoses, since the service life of the pipes is much longer than the life of the hoses.
For strength, the junction of the pipe and the tank is sealed with a gasket and treated with sealant.
Connecting the cistern to the water supply
The toilet and sewer pipe can be connected:
- by cutting into a pipe. This connection is considered the most optimal, but it cannot always be done in practice, since it is quite difficult to combine the toilet drain and the pipe;
- using a plastic adapter;
- using corrugated pipe.
If a direct connection is not possible, it is recommended to use plastic adapters, since the service life of a corrugated pipe is shorter.
The complete process of installing and connecting the installation can be seen in the video.
After installation and full connection of all devices, you can begin to finalize the niche and attach the toilet.
Overlay design
One of the most common sinks is the countertop sink. Even a non-specialist can install it. The product is mounted on a special surface that does not have a back wall or a cover.
In this case, preference is given to L-shaped fasteners with an oblique slot on one part. To install such a sink, four similar fasteners are used.