Groundwater has a negative impact on underground structures. Most of all, it “gets” from foundations and basements. The former are gradually eroded and lose the necessary strength, the latter remain flooded and unsuitable for use.
In order for the country estate not to suffer, it is enough to build drainage. But first you should familiarize yourself with the principles of its structure. Right?
Do-it-yourselfers and zealous owners who want to make effective drainage of the foundation of their house with their own hands will find a lot of really useful information on our website. With our help, installing an underground water drainage system will become a simple, easy-to-implement task.
The article describes in detail the types of drainage systems designed to protect the foundation. The rules for their design are given and the requirements of the regulations are taken into account. Photographs and videos are used as visual aids.
Preparatory work
Before laying drainage, dig around the foundation of the house.
Proper drainage of the foundation of the house will help protect the structure from dampness. This work can be done comprehensively in several stages:
- At the very beginning, the base needs to be dug up, and the excess soil carefully placed nearby for reuse.
- If the house is not new, the soil is carefully cleaned from the tiled structures and the old waterproofing is removed.
- The base is thoroughly dried in open air; during wet weather, gas burners can be used for this purpose.
- Waterproofing the foundation.
Features of waterproofing device
Be sure to waterproof the basement and basement
Before draining groundwater, it is necessary to waterproof the walls and floor of the basement, basement and foundation base. Here are some important points to consider:
- the coating used for these purposes must be complete without gaps or cracks;
- on the side that experiences greater moisture pressure, additional protection is applied with insulating material;
- It is necessary to have a blind area around the house, choose the correct width and degree of inclination. It will allow water to be removed from the building not only by drainage, but also by installing a storage pit. If there is a blind area, puddles will not form. It protects the foundation and soil from water penetration.
The blind area is important in protecting the building from moisture.
Carrying out the necessary calculations
Creating such a complex system requires preliminary calculations, as well as the creation of a specific diagram. Only with the correct calculation of all indicators can you be sure that the drainage system, the design of which can be quite complex, will cope with the task.
The main calculations include the following:
- Depth of location. Regardless of what material is used to create the system, its depth should be 30 centimeters or half a meter below the base cushion. Only in this case will proper drainage of water from the foundation occur, even with a strong increase in the groundwater level. If the grounding depth is insignificant, then the drainage pipes and well will not cope with water drainage and the basement may be flooded.
- The slope allows water to be collected by gravity in the drainage well. In order for water to constantly flow to the specified collection point, a drop should be made towards this well, which should be 2 centimeters per meter. Only in this case can the possibility of water accumulation in a certain place be eliminated.
- In order to correctly create a system, you must first determine its upper and lower points. The top point can be the corner of the house, and the bottom is a well that will receive drainage.
Taking into account these features of creating such a system, we can answer the question of how to drain water from the foundation.
Organization of waterproofing for different types of foundation
Arrangements for protecting a constructed building from moisture vary depending on the type of foundation. The most common types are slab, pile, column, strip and monolithic foundations.
Plates
Here it is best to wrap the foundation with rolled roofing felt. When any irregularities are detected.
They must be removed using a leveling screed.
Then a water-repellent material and insulation are placed on the concrete slabs and the surface is leveled again.
Pile and column types
It is not easy to waterproof concrete piles and pillars. It is provided by adding water-repellent additives to concrete. Wooden structures are treated with special liquids that prevent rotting and moisture absorption.
Strip and monolithic foundations
Most often, monolithic structures are insulated with hot bitumen mastic.
To properly waterproof these types of foundations, the following several methods are used. They are varied and quite effective.
- Treat the foundation with a special mastic, only the surface must be dry and smooth. This method is not entirely reliable, so to strengthen the composition it is necessary to cover it with insulation or build a brick wall.
- Just as in the first case, you need to carry out all the manipulations using hot bitumen mastic, and stick roofing material on top in 2 layers with an overlap of about 15 cm.
- Using a special sprayer, a water-repellent composition is applied to the dry foundation. It is advisable to use geotextiles on top, then the waterproofing will last a long time.
- Another reliable and high-quality method is penetrating waterproofing. It contains quartz sand, cement and special additives. This mass has penetrating properties.
Moisture and precipitation occur almost everywhere, so a waterproofing system is important in the process of protecting a structure from their penetration.
Components of storm drains and their types
All elements of storm drainage in a private house must be connected into a system. Here's what it might consist of:
Well. It must be large in volume. How big depends on the amount of rainfall, the size of the roof and the area from which the water is collected. Most often it is made from concrete rings. It differs from the water one only by the need to make a bottom. To do this, you can put a ring with a bottom down (there are factory ones), or you can fill the slab yourself. Another option is plastic wells for rainwater drainage. They are buried to the required depth, anchored (chained) to poured concrete platforms so that they do not “float up”. The good thing about this solution is that there is no need to worry about the tightness of the seams - such vessels are completely sealed.
Hatch over the storm well. It is best to take a ring and a separate hatch (plastic, rubber or metal - your choice). In this case, you can dig in the rings so that the upper edge of the installed lid is 15-20 cm below the ground level. To install the hatch, you will have to lay out a brick or fill the neck with concrete, but the lawn planted on top will feel good and will not differ in color from the rest of the planting. If you take a ready-made lid with a hatch, you can add only 4-5 cm of soil
On such a layer of soil, the lawn will differ in both color and density, drawing attention to what is underneath it. Point storm water inlets
These are relatively small containers that are installed in places where precipitation accumulates.
Point storm water inlets. These are relatively small containers that are installed in places where precipitation accumulates.
They are placed under drainpipes, at the lowest points of the site. Stormwater inlet bodies can be plastic or concrete. Concrete is used when constructing deep storm drains. They are placed one on one, achieving the required height. Although today there are already built-on plastic storm water inlets.
Linear storm water inlets or drainage channels. These are plastic or concrete gutters. These devices are installed in areas of the highest rainfall - along roof overhangs, if a drainage system is not installed, along pedestrian paths. Can be installed under gutters as gutters. This option is good if pipes for drainage of water have not been laid. In this case, the receivers are placed outside the blind area, and the second end of the tray is connected to it. This is a way to make a storm drain without destroying the blind area.
Sand traps. Special devices in which sand is deposited. They usually install plastic cases - they are inexpensive but reliable. They are installed at some distance from each other on long sections of the pipeline. Sand and other heavy inclusions are deposited in them. These devices need to be cleaned periodically, but this is much more convenient than cleaning the entire system.
Lattices. In order for water to drain away better, the holes in the grate should be large. They are:
Pipes. For storm drainage, it is best to install polyethylene pipes for outdoor use (red color). Their smooth walls do not allow sediment to accumulate, and they also have greater conductivity than pipes of the same diameter made of other materials. Cast iron and asbestos pipes are also used. A little about the diameter of stormwater pipes. It depends on the amount of precipitation and the branching of the system. But the minimum diameter is 150 mm, and better yet, more. The pipes are laid with a slope of at least 3% (3 cm per meter) towards the storm water inlets, and then towards the well.
Inspection wells. These are small plastic or concrete wells that are placed along a long section of the pipeline, in places where the system branches. Pipes are cleaned through them, if necessary.
On extended sections, inspection points are needed to clear possible blockages in pipes
The storm sewer system in a private house does not always contain all these devices, but from them you can build a system of any configuration and complexity.
Drainage system
Carry out work in dry weather.
Water is removed from the foundation by organizing drainage around the house. Before implementing it, you need to know some features of the work:
- installation work is carried out in summer in dry, warm weather;
- to build a foundation drainage with your own hands, it will take 2 to 3 months;
- After preparing the ditches, it is advisable to build a canopy over them to protect from rain;
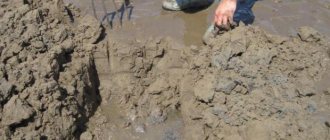
- if the soil is in a loose state, then the walls of the ditch must be thoroughly strengthened;
- from the appropriate authority you need to obtain information about the condition of the soil, as well as conduct a small experiment to determine where moisture is most collected;
- Having learned comprehensive information, you can draw a drainage diagram for the building, calculate how much material will be needed and the cost of the structure.
Types of drainage
Ring drainage
Before choosing a method to drain water from the foundation, you need to know what types of foundation drainage systems there are and choose the appropriate one.
According to the design of the building, three types are distinguished:
- wall-mounted – constructed in a building with a basement or basement;
- ring - suitable for buildings without a cellar, basement or basement;
- slab - used under the foundation slab.
Conclusion
Self-manufacturing of a drainage system is beneficial only in the case of deep ring drainage, manufactured along the outer perimeter of a ready-made foundation, since work on its implementation does not require the use of special equipment. In the case of reservoir drainage, all work is much more complicated and requires the specialist to have certain skills, as well as the presence of special tools, such as a level and a vibrating machine.
Wall drainage
Wall structures will protect the basement from flooding.
Today this design is widely known and used everywhere. Typically, foundation wall drainage is installed at the construction stage, before the walls are erected. It is possible after construction, but its cost will increase in this case.
It is necessary when there is a possibility of basement flooding. Sometimes waterproofing can protect against groundwater, but most often owners are satisfied with the design of wall drainage. Its specificity is its proximity to home.
Wall drainage is created along the perimeter of the base; inspection wells are installed in the corners. The required number of pipes to be laid, which are located at an angle, is calculated.
Geotextiles
Wall foundation drainage has the following features:
- First, the foundation walls are protected with a waterproofing material, such as liquid rubber.
- Along the top of the wall, a profiled membrane is glued overlapping with special glue to prevent water seepage.
- The lower edge of the membrane must be laid on the soil and pipes covered with geotextiles must be installed.
- The area around the building drainage should be filled with sand and gravel.
- Pipes can be taken of different diameters, from 5 to 20 cm, everything is determined by the depth of the flood waters. They are laid at a slope of 1-2% towards the drainage well.
- To clean the drainage system, vertical pipes with plugs, the same height as the blind area, are placed in the corners. Cleaning is carried out by running a stream of tap water into the device. To learn how to install wall drainage, watch this video:
For clay soil, geotextile fabric is necessary. If the soil is made of crushed stone or sand, then you can do without such material.
How to protect your basement or basement from water and dampness
Water is constantly present in the soil.
The groundwater level, the amount of perched water, and soil moisture on the site vary with the seasons of the year and depend on the structure and properties of the soil, the amount of precipitation, the terrain and the type of coverage on the site.
If the house is located on a slope,
then, as a rule, it is necessary to drain water flowing down the slope away from the house. Water flows down the slope both on the surface and along underground horizons.
To protect the basement from water, two lines of defense are arranged:
- A ring drain around the house, at the level of the base of the foundation, which intercepts and removes from the basement walls most of the water tending to flood the basement.
- Waterproofing of basement walls and floors, designed primarily to protect against capillary soil moisture.
Only waterproofing the basement, without drainage, leads to the fact that water still finds a hole.
If not immediately, then in a few years. A damp basement is money down the drain.
If you decide to make a basement or ground floor in your house, then I recommend making wall drainage.
, you will not regret.
Wall drainage is done simultaneously with the construction of the foundation.
Its cost is minimal
compared to the cost of protecting an already flooded or damp basement from water.
If you want to take a risk, save on a drainage system
and abandon its device, then conduct thorough research. Assess seasonal fluctuations in groundwater levels at the site. Does perched water appear in spring? Find out from your neighbors if they have drainage and if their basement is flooded.
The lack of drainage, as a rule, will require strengthening the waterproofing of the foundation and increasing the cost of its installation.
The design of the wall drainage is adapted solely to protect the basement
or the ground floor from the water. If it is necessary to solve other problems, for example, lower the groundwater level throughout the entire area or reduce the saturation of water in heaving soil at the base of the foundation, then other types of drainage are used.
The installation of wall drainage around the basement is, as a rule, mandatory:
- With a constant or seasonal rise in the groundwater level above the base of the foundation.
- If perched water appears on the site in the spring.
| A drainage device is required if the seasonal level of groundwater (GWL) or perched water is higher than the base of the foundation. |
- For a house located on a slope, on the side of water flowing down the slope.
- If there is a waterproof layer of soil on the site.
The last condition is caused by this. To reduce the forces of frost heaving, the soil cushion of the foundation and the cavity of the foundation pit are usually covered with permeable soil. If the soil on the site is impermeable, then surface water will seep into the permeable foundation backfill and accumulate there.
Where to direct water from the roof
Water flowing from the roof through drainpipes should not seep into the ground next to the walls of the house.
You can find a description of the design of a drainage system that directs water from the roof into wall drainage pipes. Wall drainage pipes in this case have a dual purpose - they serve both to collect groundwater around the foundation and to transport water from the roof.
Using leaky wall drainage pipes to also move water from the roof is quite risky, and usually ends up flooding the basement during heavy rain.
It is best to install a separate drainage system to drain water from the roof and surface runoff from areas on the site.
Sectional view of wall drainage around the foundation of a house
| Section of wall drainage around the foundation of the house. (click on the picture to enlarge) |
Ring drainage
To find a way out of the situation of how to drain water from the foundation of a house that does not have a basement or basement, you can turn to the foundation ring drainage system.
To do this, a closed set of trenches with a depth exceeding the level of the foundation by half a meter is erected around the structure.
When constructing such a structure, you need to pay attention to the following:
- drainage around the foundation should be located at least 50 cm below it;
- here a pipe slope of about 1% towards the water collection tank is also required. To do this, the distance between the boundaries of the building’s drainage is calculated and the required indicator is determined;
- the gap between the house and the drainage trench should be from 5 to 8 m.
Ring drainage diagram
Tips for garage workers
People's inventors create systems for collecting rainwater from garages and dachas, using the simplest means at hand.
Men, for example, like to work in the garage without being distracted by small things. And in order not to fool around with water delivery, some craftsmen install a system for collecting water literally at their fingertips. Water flows from the roof through a gutter and enters the premises through plastic pipes.
The pipes are equipped with a regular filter for cleaning, such as is used at home in front of drinking water taps. And after it, the purified water enters a hermetically sealed storage container.
To prevent overflow, the barrel is additionally equipped with pipes that allow excess water to flow out into the street.
The process of constructing a ring drainage
Sand is poured into the bottom of the trench.
To make it easier to create drainage for the foundation, markings can be made. For this purpose, various pegs are used, which can be easily removed.
You can arrange ring drainage as follows:
- At a distance of 5 m from the house, you need to dig a deep ditch larger than the height and width of the house foundation in order to fit a pipe with a diameter of 11 cm. There should still be 10 cm indentations from the pipe on each side.
- Sand in a layer of up to 100 mm is placed at the bottom with a slope towards the reservoir. This way the water can drain on its own.
- The drainage pipe is placed in the trench, on geotextiles, its ends are fixed to the walls of the ditch. The pipe is laid in a trench, covered with gravel to a depth of 50 cm, then wrapped in material twice. The seams of the structure are fastened and covered with sand or gravel.
- The pipes are connected, but not at a right angle, so that silt does not accumulate.
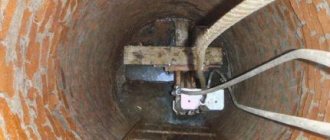
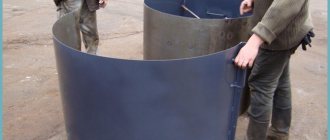
- To construct an inspection well, a hole is dug and a container with a hole for water drainage is placed. Here you also need to place geotextiles on the bottom to prevent pebbles from getting in.
- If the soil is heavy and does not allow water to pass through well, a solid pipe can be used for drainage.
- If there is a large accumulation of water in the reservoir, it can be pumped out and watered for garden plants.
What types of gutters are there?
The path adjacent to the house must have a slope of at least 2° from the wall of the building. In fact, thanks to this slope, water should not accumulate on the surface of the blind area.
But, if you do not install a drainage system, then all the water flowing from the path will seep under the ground and penetrate into the foundation, basement or basement.
The drain must ensure that water is drained away from the building. You can use the following as a drain:
Finished gutters
Typically, such structures are used when laying tiles (paving, clinker, ceramic) or for soft blind areas (crushed stone, gravel). These products are individual elements of short length, which are made in the shape of a semicircular recess. They are laid out along or across the blind area.
If the gutters lead directly to a centralized sewer system or a special drainage tank, then it is desirable that they be of a closed type, that is, a grate should be installed on top. This will prevent leaves, debris and dirt from getting into the drain, eliminating the need for regular cleaning.
Metal gutters are durable, fireproof, resistant to temperature changes, and inexpensive. But their disadvantage is their heavy weight and possible manifestations of corrosion. Also, during heavy rain, a drum effect occurs - drops of water noisily hit a metal surface.
Concrete gutters are resistant to corrosion, temperature changes, and rotting. The material is strong and durable. Although it is heavy in weight, this is a plus, because such a gutter will not budge, even in heavy rain. Minus – high price;
Creating recesses for drainage
When pouring concrete, you can immediately leave a small depression along the edges of the blind area to drain water. Or you can use a hammer drill to knock out a groove in already hardened concrete and place a drain structure there. The advantage of this method: low cost.
However, it doesn't always look beautiful. Even sometimes, just by appearance, it becomes clear that the drainage system was not initially thought out and the owner does not have the funds to create a normal drainage system.
If there is a limitation on funds, then a sewer or asbestos pipe (Ø 25 cm) can be used as a groove for draining water. It is divided in half or mounted entirely (if one end of it is connected directly to the drainpipe coming from the roof).
Reservoir method of water drainage
Drainage under the foundation slab is necessary to ensure that the properties of the structure are maintained when in contact with water. This means removing water and preventing its effects on the foundation of the house. For more information about drainage work on the site, watch this video:
Drainage under the foundation slab can be done in various ways. One of the popular ones is the layer type. Its essence is as follows:
- A ditch is dug 1 m deep than the size of the building.
- A slight slope is established from the center to the sides.
- Geotextiles are laid, then a 10 cm layer of sand and a 30 cm layer of crushed stone are alternated to level the bottom of the pit.
Reservoir drainage is used in the presence of various aquifers, pressurized groundwater, the location of the basement below the aquifer and the appearance of capillary penetration of liquid.
How to make drainage around a house with high levels of waterlogging
For heavily waterlogged soil, the drainage described above will not be enough. To separate excess moisture, waterproofing is first installed along the outer edge of the ditch. The simplest option to create such an artificial watershed is to cover the outer wall of the ditch with a waterproof membrane or several layers of roofing felt. The depth of the ditch in this case must exceed the level of the waterproof clay horizon or be below the base of the foundation.
For complete protection, the drainage must complete a perimeter around the foundation. The drainage point is installed in the place where the pipes are most buried. As already mentioned, a storage tank can serve to collect both groundwater and precipitation. In this case, the joint use of drainage and drainage pipes is unacceptable, and the groundwater discharge point should be located below the connection point for the rain drain.
Drainage for strip foundation
Drainage arrangement
Drainage is arranged for this type of foundation due to the high presence of groundwater, highly moist soil or the risk of flooding of the site. Properly arranged drainage of the strip foundation of a house will help to avoid deformation of the concrete strip during thawing or freezing of the soil. Here it is also necessary not to forget about a properly executed blind area so that moisture cannot easily penetrate to the base.
The production of drainage for a shallow foundation should be carried out at a depth of about 80 cm. Drainage is constructed along the perimeter of the tape at a short distance from it. The pipeline is laid at a depth of at least 1 m, 20-30 cm below the sand layer. The peculiarity of the work here is that the volume of excavation work is very large. Watch all about strip base drainage in this video:
To choose the right type of drainage, you need to know the characteristics of the soil. Only in this case will it effectively and reliably perform the function of drainage.
How to lay pipes
To lay the pipe, in accordance with the plan, trenches are dug about 50 cm wide and 50-70 cm deep.
The ditches must have a slope, which is calculated using a level.
- The bottom of the ditch is compacted.
- Then the biological fabric is laid, with a reserve for each side, so that it can later be used to wrap the pipes with an overlap.
When laying a drainage pipe, it is advisable to wrap it along its entire length with a special water-permeable winding. This will prevent debris from entering the pipe and clogging the perforated holes.
Next, the drainage system is covered with a layer of coarse crushed stone. This is the basis of drainage - through the voids between the crushed stone, moisture will seep into the pipe. The crushed stone layer is not compacted.
All this is wrapped in a layer of biological tissue. If the pipe is located at a depth of no more than 30 cm from the surface, an installation layer of sand is poured on top, onto which paving can be done.
If deeper than 30 cm, the system is covered with a fertile layer of soil. Under no circumstances should the drain be filled with clay or sandy loam, which do not allow moisture to pass through and can reduce the functionality of the drain to zero.