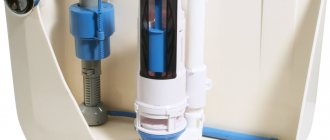
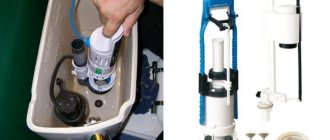
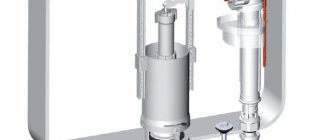
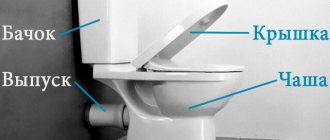
It is clear that it is not always possible to fulfill both of these conditions in private houses, villages, and holiday villages (perhaps this is why water intake fittings with a rod valve were used in Soviet toilets). In addition, the reliability of operation of membrane fittings is also influenced by the quality of workmanship and the quality of materials used to manufacture the fittings. Therefore, fittings with a diaphragm valve have to be repaired every few years, but more often they simply need to be replaced, like a used razor; you cannot cut a new membrane from an old tire for such fittings. We'll have to figure out what kind of fittings this is and how it works.
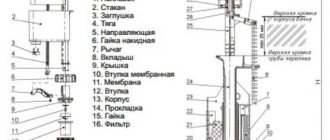
For owners of Jika toilets, as well as toilets equipped with Slovenian-made inlet fittings, I can offer the following diagrams for installing inlet fittings with a diaphragm valve:
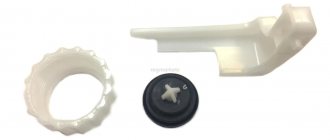
Well, for everyone else, I present the following, in my opinion, a more visual model of the operation of inlet fittings with a diaphragm valve. But first it’s better to look at the membrane and see what it is. After watching the video, it will be a little easier to understand what we are talking about:
Instructions - how to fix a stuck toilet button
To eliminate the cause of the malfunction you must:
- Remove the reservoir cap. In most cases, it does not have additional fasteners and is held directly by the plastic housing of the flush button, which must be unscrewed (counterclockwise). To unscrew the toilet cistern flush button, you do not need a special key - this is done by hand.
- Carry out an inspection. Having gained access to the “filling” of the tank, you should carefully inspect the drain mechanism drive for damage and distortions. Often the problem with a button sticking occurs due to accidental displacement of the pressing rod. Excessive force when pressing the button can also provoke a shift in the adjustment mechanism.
- Adjust the drain mechanism. If the cistern button has failed, the height of the drainage device (flush valve) may need to be adjusted. Many modern models of push-button toilets use a two-level flush system - in this case, it is necessary to adjust the low and full flush. To do this, you need to move the lock on the rod several positions up or down (this is determined logically depending on the specific model of the valve).
- Often the cause of drain failure is rust and other mechanical suspensions, which are deposited over time on the working parts of the fittings, complicating its normal functioning. In this case, the problem is eliminated by simply cleaning the working units from these deposits.
Removable toilet flush buttons
If the malfunction is caused by mechanical damage (breakage) of parts of the drain fittings, the simplest and surest solution would be to completely replace the fittings (it is unlikely that it will be possible to glue plastic parts together).
The main thing is to choose the right method of supplying water (bottom supply or side supply). If any questions arise during the replacement process, then just refer to the instructions that are included in each kit. You should not buy cheap Chinese drain mechanisms; a high-quality set costs from 600 rubles.
VIDEO INSTRUCTION
The answer to a frequently asked question: why are there two buttons on the toilet cistern?
The toilet flush cistern is one of the most active consumers of water in the house. When you press the button each time, all the water accumulated in the tank goes down the drain.
In order to save money, manufacturers of plumbing equipment have developed two-button drain fittings, which are designed to minimize water consumption. This system involves two drainage options: small and large.
When you press one (small) button, part of the water from the tank is drained (the volume of water supply is adjustable), when you press the second button, all the water is released.
Types of drain mechanisms
Today you can find two types of drainage devices on sale:
- Single-mode;
- Dual-mode.
In the first case, draining is carried out by emptying the entire tank; the second has two buttons in its design - they are responsible for pouring out a certain amount of water. This volume can be adjusted; in addition, the use of such systems is completely justified, since water is seriously saved here.
Although the type of drain mechanism may be different, it operates on the same principle. A little differently, the impulse of movement occurs to the valve, which either opens or closes the hole through which the water leaves.
The principle of its operation depends on how this valve is designed. Sometimes this valve is placed at the end of tubular drains that act as an overflow. In other cases, a similar structure opens and closes thanks to special chains made of metal or plastic. The last type of design is far from the most successful, since such a system often fails.
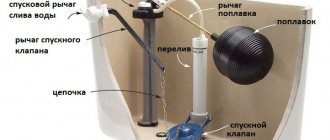
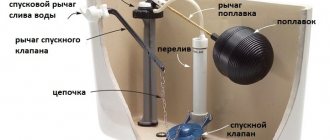
Depending on who the manufacturer of this device is, the design can have quite significant differences. However, all these systems can be divided into two key components:
- Water drainage system;
- Water collection system.
Due to the water collection system, the tank is filled. It can be either side or bottom. If the design has a bottom feed, then they are very convenient for several reasons. First of all, the main positive side is the almost silent operation, but the design of this system is very complex.
It includes the following elements:
- Vertical rod float;
- Traction;
- Buoy.
The water supply shutoff unit begins to operate due to the traction, which is connected to the buoy into one common structure, which at the same time represents a water level limiter.
If water is supplied from the side, then this design will be more reliable, but when filling the tank it will make quite a lot of noise. Here the operating principle of the entire system will be much simpler. The tank contains a special membrane, thanks to which water flows into and stops the tank, as well as a small float connected to the supply tap using a lever.
When the tank is filled, the float rises and the lever begins to move, gradually cutting off the water supply when the required volume of water is collected.
Drain water from the tank from above or from the side. The side design is used mainly for hanging tanks, which are almost never used today. Most modern products use a drainage system with an upper water drainage principle.
As a rule, the trigger structure is a bulb made of rubber or rubberized plastic. This equipment is not too expensive, but at the same time very reliable.
In order for water to pass from the flush cistern directly into the toilet, a rod or a special button is placed on the lid, which will move the lever. As mentioned earlier, modern systems for draining water in tanks can have one or two operating modes.
The second type has two buttons, which release either half of the tank or the full one. This option is most suitable for people for whom saving water is not just empty words.
Adjusting fittings in drain tanks
First, let's look at how to adjust the water volume in a one-button flush system.
- First, turn off the water supply with the tap.
- Drain the liquid from the container.
- We remove the button from the seat, for which we simply unscrew it like a bolt.
- Remove the lid of the drain tank.
- We adjust the float, which is located on the right in the tank. It is connected to a small foot that changes the flow of liquid. This diaphragm valve contains a screw that adjusts the position of the rack to change the liquid level. If this bolt is unscrewed, the water level in the tank will increase and, conversely, if the adjusting screw is tightened several turns, less water will accumulate in the tank.
- After adjustment, do not forget to tighten the fastening nut. Adjustment can also be made using a plastic nut mounted on some models of drain tanks. The optimal and economical option would be to configure the mechanism when the liquid does not reach the overflow hole by 2-3 cm.
After adjustment, you need to check the filling level of the tank, to do this, open the water and wait until its flow due to the valve stops, while not allowing the water to overflow.
After making sure that the adjustment is correct, put the cover back in place and put the button back, tightening it by hand.
Adjusting the two-level drain
Such systems require adjustment of the maximum and minimum volume of water for the required drainage.
- unscrew the button to reset the liquid (unscrew it by the rim of the button);
- remove the lid from the tank;
- To supply the required amount of water in the float device, you need to unscrew or tighten the screw and move it up or down in relation to the overflow pipe - accordingly, the water level in the tank will be higher or lower.
Adjustment of the complete discharge of water is achieved through a damper: to increase the volume of water in the tank, the damper must be lowered, and vice versa, in order to lower the liquid level, the damper must be raised. Thus, the one-time discharge of water into the toilet increases or decreases.
Adjustment of old models
As a result, it is worth talking about setting up traditional mechanisms with water supply from the side of the tank. The design of the old type drain tank provides only adjustment of the shut-off valve. Its operation directly depends on the location of the float, which is raised or lowered.
This goal is easily achieved by bending a brass or steel rod into the desired position. If the rocker arm is plastic, then the water level in the toilet tank is regulated by moving the float along the guide rod, thereby changing the geometry of the lever.
Setting the overflow in old-style products was not provided, and if such a problem arose, it was necessary to change the entire mechanism, but this happened very rarely.
It is worth paying tribute to such flush tanks - they were very reliable, because some products lasted for half a century.
What causes blockages and how to avoid the consequences
Unfortunately, it is not uncommon for toilets to flush more than just what they are intended for. Some people manage to wash off floor rags, fruit cores, personal hygiene products and even diapers.
Such objects, with a high degree of probability, can lead to a blockage of the sewer pipe and, as a result, flooding of everyone along the riser due to the blockage. And if the blockage occurs, say, on the tenth floor, there is a risk of flooding of the riser from the 10th to the 1st floors.
Even if you don’t flush anything unnecessary down the toilet yourself, your neighbors may do it. If a blockage occurs, it is quite possible that your toilet will cause flooding of the lower floors along the riser.
This situation can be avoided by installing a non-return valve for the sewer system.
How does a diaphragm valve work?
The main phases of the device’s operation are presented below.
First phase
- In the first phase the valve is open. Throughout it, water enters the tank. The membrane, obeying the direction of fluid flow, moves away. Therefore, water can fill the tank without obstruction.
- At first, the liquid flows only into the preliminary section.
- To ensure that it gets directly into the tank, there is a special hole in this compartment. The process is similar to that in tanks equipped with rod valves, but there is a membrane stretched over a piston.
- There is a gap in it; a plastic rod is passed through it. In addition, it has a clearance with a cross-section of 1 mm. Thanks to it, the water partially flows into the filling section.
- While the float is in the lowered state, a small hole is formed in the piston, having a diameter of only 0.5 millimeters. Through it, a small amount of liquid flows into the tank.
- Thanks to a similar principle of operation of the diaphragm valve, uniform pressure is created in the preliminary and filling sections and in the part of the tank behind them. This contains the fundamental difference between the analogue and such a mechanism with a rod valve.
Second phase
- At this stage, water enters the storage tank, and at the same time the ball float floats to the top.
- During the process, the level of the rod with the rubber seal also increases.
- The seal plugs the hole.
- When the rod subsequently moves, the piston and membrane are pressed against the saddle. This seals the filling section.
Based on the fact that the water pressure in the filling part of the tank is related to the pressure of the pop-up float, the membrane is pressed very well against the saddle. This prevents the flow of water into the storage tank.
Third stage
- The third stage is draining the water at the end of using the toilet.
- At that moment, when the liquid descends from the tank and flows into the toilet bowl, the pressing effect of the float on the rod disappears.
- The slot in the piston is now not blocked by the rod. Based on this, the pressure in the filling section quickly decreases significantly.
- The pressure remains only from the water supply, and it acts on the piston with the membrane, moving them to the side.
- That is why the drain mechanism again enters the first stage.
Setting up plumbing toilet cisterns
The completion of the assembly of plumbing does not mean the end of all work on its installation. Often the toilet cistern fittings need to be adjusted, after which the filling, overflow and flushing functions must be performed flawlessly. Also, sometimes it is necessary to adjust mechanisms during their long-term operation or replacement.
Adjusting the cistern with a button
What should you pay attention to when setting up modern “push-button” plumbing?
Figure No. 2
- The height of the flush valve is set (Figure 2). Its design must correspond to the dimensions of the storage container under the lid, taking into account the button (1). Disconnect the rod (2) from the latch of the overflow tube. Release the rack clamps (3) on both sides. Move the racks (5) in the required vertical direction, guided by the scale marked on them. Secure the clamps and rod in the new position.
- The height of fixation of the overflow tube is adjustable. There are two requirements for this parameter: the surface of the water in the toilet tank should be 15-20 mm below the overflow edge, but at the same time, the fully pressed button should not touch the top of the tube. To do this: Set the size of the gap between the edge of the overflow and the top (4) of the rack (5), (Figure 2). To perform this operation, you will have to release the rod (2) and the pressure ring or clamp on the tube. Lower or raise it to the required height. Fix overflow and draft.
- The functionality of the filling fittings is configured in accordance with the requirements of the previous paragraph regarding the filling volume. In order for the inlet valve to ensure the optimal water level in the cistern, the position of its float must be set. If you need to set an early cut-off of the supply, then the float is lowered lower or fixed higher if the volume of liquid is insufficient. Changing its position is carried out by rearranging the rod similar to the rod on the drain valve.
Adjusting the two-level drain
In modern push-button toilet sets, it is not uncommon to have a two-level water discharge. Such models require small and full drain settings.
Adjustment of two-button drain mechanism.
We regulate the discharge of the entire volume of liquid by using a damper, increasing this parameter, moving it down and, decreasing, moving it up. The partial discharge of water is set by a small flush float, which, after opening the lock, we move down or up, respectively increasing or decreasing the flow rate.
You can learn more about adjusting the two-button release mechanism from the video:
Adjustment of old models
In conclusion, it is worth mentioning the adjustment of “classic” systems with lateral water supply. The design of an old-style toilet cistern involves only adjusting the inlet valve.
Its work depends on the position of the float, which is lowered or raised. For this purpose, if the rocker arm is brass (steel), then it is simply bent into the desired position, and if it is plastic, then the geometry of the lever changes after loosening and then tightening the mounting screw.
Adjustment of the overflow and exhaust valve is not provided in such models, and problems arising with them, as a rule, lead to repair work or complete replacement of the mechanisms.
Adjustment and repair capabilities
During the operation of the toilet, various minor problems arise from time to time. You should not immediately run to the store and buy new filling for the tank, since some problems can be solved in no more than half an hour. In this case, it is not necessary to invite a specialist and pay him money, but just try to do it yourself.
A quick and 100% way to eliminate a leaking toilet cistern
Watch this video on YouTube
How to adjust the water level in the tank
In devices with a bottom water supply, it is always better to adjust the water level after installing the toilet, since they are all adjusted at the factory to the maximum level, which may turn out to be redundant and uneconomical. To adjust the level in the drain tank, it is enough:
- Drain the water from the tank and also turn off the water supply.
- Unscrew the button.
- Remove the cover.
- Adjust the height of the float using a special screw located at the top of the float mechanism.
- Close the tank with a lid and install the button.
There are cases when, after installing a toilet, water constantly flows from the tank. This indicates that the water level in the tank is high enough and water flows through the overflow system. In this case, it is necessary to reduce the water level by lowering the float using the technology described above.
Setting up the fittings in the cistern
Watch this video on YouTube
If the float mechanism consists of a curved lever, then the water level is adjusted by bending this lever, which is even simpler
It is important to understand that the lower the float in the tank, the less water it will hold.
By bending the float lever we change the water level
Toilet cistern leaks
Water leaks in the toilet are possible even if the water level is normal, but then you will have to look for other reasons. Water may leak if:
- The sealing rubber of the drain valve has silted up, so it will have to be cleaned. To do this you will have to:
- Turn off the water supply and drain the water from the tank.
- Remove the water drainage mechanism.
- Remove the bleed valve and carefully inspect the gasket. If necessary, it is cleaned or sanded with fine sandpaper.
- Place the mechanism back into the drain tank, turn on the water and test the device. If this does not help, you will have to replace the gasket.
How to fix a water leak from a toilet tank, HOW TO REALLY SAVE SUPER WATER!
Watch this video on YouTube
The release mechanism was demolished during operation. This is easy to check; just press the mechanism with your hand. If the water stops flowing, that means it is so. In this case, you can make the glass heavier by adding a little weight to the bottom of the glass. Adding a weighting agent
In any case, you will have to disassemble the mechanism, and then reassemble and check it. If these little tricks do not help, then it is better to buy a new drain mechanism and replace the old one with it. In fact, this is the best option.
Leaking in the toilet drain hole
Watch this video on YouTube
Water does not fill into the tank
There is also a problem that water does not fill into the tank at all, or it does, but rather slowly. If the water pressure is normal, then the reason is obvious - the filter, tube or valve is clogged. The way out of this situation is quite simple and boils down to cleaning the filter, tube or inlet valve. To do this, you will have to completely remove the water supply mechanism, and then reassemble everything as it was.
You can see how to do this correctly in the video.
What to do if water does not fill into the tank
Watch this video on YouTube
Problems in the mechanism and their elimination
What problems may arise during the operation of the drain mechanism? For example, water may not be filling into the tank, or the water may no longer be shut off. The reason for this phenomenon most likely lies in the fact that one of the holes is clogged. Another reason for such problems is the failure of one of the two most important parts of the mechanism - the rod or the membrane.
In any case, you will have to disassemble the device and check all the elements. They will also be thoroughly rinsed and cleaned. But it happens that the cause of malfunctions is a banal low pressure in the water supply system, or its surges within one day. In this case, the device may simply not work.
If the pressure drops too much, water will stop flowing into the tank altogether. If water must come from a suspended structure, then if the pressure is below normal, the water will not even be able to reach the filling chamber. The float will float, but it will not block the water. To cope with this situation, you may even have to enlarge the water inlets by drilling them out a couple of millimeters.
In general, the smaller these holes, the greater the pressure should be in the system. This must be taken into account if you are installing a drain mechanism, for example, in a country house. If you know for sure that you regularly experience pressure surges during the day, for example, if the water pressure in your house is maintained by pumps that are turned off at night, then it is best to pay attention to fittings with a rod valve.
That's all, we looked at the design of the toilet cistern flush valve, as well as the reasons why it may fail. Now it won’t be difficult for you to understand everything and troubleshoot problems.
Assembly of cisterns
The further comfortable operation of the plumbing will largely depend on how to assemble the tank and then adjust it. Naturally, each type of equipment has its own installation secrets, which are quite accessible to the home craftsman.
Figure No. 1
The sequence of assembling a tank with a top button (Figure 1) is as follows:
- We fix the outlet valve (5) in the large central drain hole of the storage tank. You can install the entire mechanism or only its lower part. At this stage, as at all subsequent ones, it is necessary to control the tightness of the gaskets, securely fixing them with threaded elements to obtain tight connections.
- If you are assembling a model that includes fittings for a toilet cistern with a bottom connection, you should also secure the inlet valve (2) with a float (3) in the corresponding hole in the plumbing product.
- Insert an elastic gasket (6) between the toilet bowl and the flush container. It must be carefully centered, and then tighten both halves of the plumbing into one with screws (7).
- In a model with side water supply, we fix the inlet valve.
Diagram of the inlet fittings of the drain tank with a side connection.
- We connect the external water supply to the fitting (4).
- We install its upper part (without the button) on the exhaust valve.
- We open the water supply, check the tightness of the connections, the operation of the filling and draining mechanisms, and, if necessary, adjust their functionality.
- Now the lid for the toilet tank is put in place, into which we attach the button (1).
Lever flush tanks are found today, although not often, but are sometimes still used as reliable, time-tested devices. Therefore, questions may arise regarding their installation. Although they are made from different materials: plastic, ceramic or cast iron, their assembly is very similar.
- First of all, we fix the lower siphon part of the drainage mechanism inside the container.
- A lever mechanism and fittings for a toilet cistern with side inlet are installed.
- We hang the storage tank on the wall behind the toilet coaxially with the bowl and connect the external water supply through a flexible hose.
- On a cast iron structure, we connect the flush pipe through the corresponding threaded fitting, and on a plastic one, we use a crimp coupling with an annular sealing insert.
- We connect the toilet with the flush pipe using a rubber cuff, which is fixed on both sides with clamps.
There are lever ceramic compact products installed in the saddle of the toilet bowl. In this case, the assembly of the structure is carried out in the same way as in the push-button model, using tightening screws and an elastic gasket.
Installation of valves for a toilet with bottom supply
The list of components and parts of the valve device for a toilet cistern with a bottom connection includes:
- float;
- craving;
- rocker arm;
- rocker axis;
- float stand;
- stand extension;
- return element;
- pusher;
- membrane;
- two-piece body with nozzle and thread;
- filter;
- conical gasket;
- swashplate;
- nut for fitting.
The extension is used to extend the float stand when installing a filler valve with a bottom connection, if the toilet tank is very high and it is necessary to raise the filling level. The return element changes the movement of the incoming water flow from top to bottom, thereby reducing noise.
The mechanism of some models, mounted in a drain tank with a bottom connection, is equipped, in addition to a shut-off valve, with a check valve. This additional unit prevents the contents from being discharged back into the water supply when the water supply is temporarily interrupted.
Classification
Intake mechanisms can be divided into groups according to three criteria:
- material composition,
- location,
- type of construction.
By material
- Brass or bronze. Products made from these alloys are practical, durable, reliable and completely resistant to corrosion. But such metal valves are quite expensive.
- Plastic. Plastic products are very popular because, along with their long service life, they are quite inexpensive.
By location
- With bottom eyeliner. Valves with this connection are located at the bottom of the tank. With this method, water intake occurs completely silently. Also, the lower location allows you to hide the inlet hose and free up the space in the toilet room from unnecessary fittings.
- With side eyeliner. Valves with this connection are located, respectively, on the right or left side of the tank. This design is the simplest, which has a positive effect on its service life.
You need to select inlet units depending on the design of the toilet cistern. Also, when choosing, you must adhere to the following rules:
- The product package must include the valve itself, the float, O-rings and a fixing nut.
- O-rings must be elastic, correct in shape and free from defects.
- The plastic element must not have visible scratches or nicks.
- The movement of the float should occur smoothly, without sudden jumps.
By type of design
Once upon a time, valves were ball valves; the device looked like a ball, which was used in all tanks. The modern device is called an inlet device, since it has no resemblance to the design of ball mechanisms, but is used together with a float. There are several types of float devices for the toilet tank:
- Croydon valves consist of a shell, a float with a lever and a piston with a seat. In this mechanism, the movement of the lever is perpendicular to the action of the piston. This system is used in old tanks and has a fairly low price.
- The piston ones are equipped with a forked pin with a lever axis. Here, the water is adjusted by horizontally lifting the lever, which moves the piston, at the end of which there is a special seal that comes into contact with the seat and blocks the flow of liquid. This is a fairly common model and is included in the middle price category.
- Diaphragm valves have a rubber or silicone membrane instead of a gasket, which moves when the piston moves. This is the latest device, which is used only in the latest models of toilets. The advantages of this valve include fast water intake, instant shut-off of liquid intake and, depending on the quality of the fittings, silent filling of the tank. Among the disadvantages, one should take into account the presence of a constant water pressure in the system (0.05-0.1 MPa) and the purity of the liquid, since if the membrane is damaged, it is impossible to replace it on your own. In this case, you will have to purchase the entire intake mechanism.
Types of float valves
Float valves are used to inlet and outlet water. They have their own varieties, such as:
- Croydon valve;
- Valve with piston;
- Valve with membrane.
The first has a shell, a lever axis on a float, a seat and a piston. The lever moves the piston perpendicularly. Typically, such valves are equipped with old drain tanks, which are no longer used in many places.
The piston-type tank inlet valve device has a lever axis. It is secured in a forked cotter pin. When the lever moves horizontally, it moves the piston, which from time to time touches the seat, which helps regulate the flow of water into the tank.
The piston has a seal at the end. When it comes into contact with the seat, the seal blocks the flow of water. This type of valve is quite widespread.
The third type of valve has a membrane in its design instead of a gasket. It can be made of silicone or rubber. As the piston moves, the membrane also moves. Thus, it can block the incoming water flow at the right time. This type of valve is the newest and most modern. All latest models of drain tanks are equipped with it. Therefore, further we will consider its mechanism and design in more detail.
Installation of cistern fittings
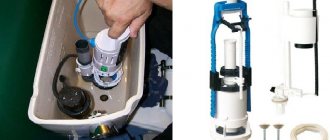
The fittings for the toilet cistern consist of the following components:
- angled drain hole;
- an overflow tube installed on the side of the drain hole;
- valve covers with rubber;
- tank filling mechanism;
- drain button mechanism.
Before setting up the toilet fittings, let's consider its main components.
Tank filling mechanism
This device ensures that the toilet tank is filled with water to a certain level. This mechanism includes:
- float device;
- stop valve.
A float attached to a metal or plastic lever lowers or rises as the water level in the tank changes. When the tank is filled with water, the float rises, reaching the maximum level. The lever connected to it closes the shut-off valve, and water does not flow into the tank from the water supply system. When the water is drained, the float lowers and the lever allows water from the pipe to enter the toilet tank.
Water drainage mechanism (drain mechanism)
The device of the outlet valve of a modern toilet cistern
The flush mechanism is designed to allow water from the tank to directly enter the toilet. Components of the release mechanism:
- drain siphon;
- release lever (handle).
The siphon hermetically closes the drain hole, preventing water leakage. There are several types of siphons. The simplest type of drain siphon is the familiar “pear” - a rubber cylinder similar in shape to a plunger. The device for flushing water into the toilet (raising the “pear”) most often consists of either a lever located on the side of the tank or a handle on the lid, which must be pulled up to flush the water. A more modern version of the drain device is a button, which is located on the front wall of the tank. This mechanism is most often installed on tanks that are built into the wall.
What it is?
A sewer check valve is, first of all, protecting your home from sewage eruptions due to blockages from the sewer. And as a result, eliminating the risk of becoming the culprit of a global flood on the riser below.
A sewer check valve is a kind of insert into the sewer pipe connected to the toilet, which works on the principle of a nipple.
By the way, a check valve can protect not only from the risk of being flooded, but also from unpleasant odors, insects and animals moving through the sewer.
How does a diaphragm valve work?
The main phases of operation of the device are presented below.
First phase
The valve is in the open position - water is drawn in.
- In the first phase the valve is open. During this, water enters the tank. The membrane, obeying the direction of fluid flow, moves away. Therefore, water can fill the tank without obstruction.
- At first, the liquid flows only into the preliminary section.
- So that it gets directly into the tank, there is a special hole in this compartment. The process is similar to that in tanks equipped with rod valves, but there is a membrane stretched over a piston.
- There is a gap in it, and a plastic rod is passed through it. It also has a clearance of 1 mm. Thanks to it, the water partially flows into the filling section.
- When the float is in the lowered state, a small hole is formed in the piston, having a diameter of only 0.5 millimeters. Through it, a small volume of liquid flows into the tank.
- Thanks to a similar principle of operation of the diaphragm valve, the same pressure is created in the preliminary and filling sections and in the part of the tank behind them. This is the fundamental difference between such a mechanism and an analogue with a rod valve.
Second phase
As the water rises, it raises the float.
- At this stage, water enters the storage tank, and at the same time the ball float floats to the top.
- During the process, the level of the rod with the rubber seal also increases.
- The seal plugs the hole.
- When the rod subsequently moves, the piston and membrane are pressed against the saddle. This seals the filling section.
Based on the fact that the water pressure in the filling part of the tank is related to the pressure of the pop-up float, the membrane is pressed very tightly against the saddle. This prevents the flow of water into the storage tank.
Third stage
Closed valve.
- The third stage is draining the water after using the toilet.
- At the moment when the liquid drains from the tank and flows into the toilet bowl, the pressure of the float on the rod disappears.
- The slot in the piston is not blocked by the rod at this time. Based on this, the pressure in the filling section decreases sharply.
- The pressure remains only from the water supply, and it acts on the piston with the membrane, moving them to the side.
- Thanks to this, the drain mechanism again enters the first stage.
Types of float valves
Float valves for toilets are divided according to the type of locking mechanism into the following types:
In a piston device, a floating float, when rising, presses on a piston moving towards the flow of water until it rests against the saddle. Piston locking mechanisms are already outdated; they do not have any unique design features.
The disadvantages of such devices include noise during filling and the constant sound of falling drops due to the loss of tight pressure to the inlet over time.
The membrane locking mechanism is activated by the action of the pusher on the rubber or silicone membrane. Among the advantages of membrane devices are fast water collection, less noise, and constant flow intensity. Disadvantage: good constant water pressure is required.
Modern diaphragm valves
Most modern inlet valves for the flush tank are diaphragm devices. After draining, the membrane with the pusher moves away under the pressure of the incoming flow, allowing water to flow into the tank.
The inlet valve of a membrane-type toilet is structurally different in that during the filling process, part of the water penetrates behind the membrane, creating equal pressure on both sides. After the float rises to the limiting level, the pusher pressure is added to the water pressure and the membrane hermetically seals the inlet nozzle.
Main problems with drain fittings
From time to time, small malfunctions arise in the operation of the toilet flushing system, which, if desired, can be easily fixed with your own hands.
- Systematic flow of water into the toilet bowl;
- Water constantly flows into the flush tank.
A systematic stream of water that flows into the toilet indicates damage to the bulb in the system. The pear stops sealing the drain hole in the initial stage. To solve this problem, you can attach some kind of weight, thus weighing the pear down and returning it to its normal position. If the drain system fittings are equipped with a membrane, then in this case only replacement of this spare part is necessary.
Installation of drain fittings
If water constantly enters the tank, it means the float is deformed. If the float is skewed, it is quite easy to correct it. There is a more severe version of such a breakdown - depressurization of the float; to check it, you need to remove it and lower it into a container of water; if it sinks, it means it is unsuitable for further use and needs to be replaced.
How to install new fittings
Included with the new fittings are instructions for use. First of all, let's get acquainted with the instructions.
- 1. We install a valve that regulates filling using gaskets and adapters. There are plumbing models in which the inlet and filler mechanisms are installed simultaneously.
- 2. The fittings can be inserted into the tank before installing the toilet; we place the gasket on the upper surface of the drainage system and place the device in the tank, fastening it with nuts.
- 3. Rubber gaskets are used for internal fasteners, and plastic gaskets for external fasteners. The internal gaskets can be lubricated with silicone sealant for sealing. We replace old gaskets after disassembling the device.
- 4.If possible, the gasket connecting the tank and toilet bowl is also lubricated with sealant.
- 5. The fittings must be located at a distance of at least half a centimeter from the walls of the drain container.
- 6. Having completed the installation, the tank is attached to the toilet bowl.
- 7. Close the tank with a lid by screwing on the drain button.
- 8.Connect the water and perform a test drain.
Malfunctions in the operation of the drain tank
The main malfunctions of the drain tank are associated with violations in the installation of shut-off valves or wear of its elements. If it is necessary to replace valves or dismantle the tank, it is necessary to close the access to water. If there is a tap at the outlet of the water pipe, simply close it. Otherwise, you need to close the riser.
- One of the simplest problems with the tank is incorrect adjustment of the float. This leads to insufficient or excessive water supply. In older models, the problem is solved by changing the position of the wire that holds the float. It needs to be bent a little, raising the float if there is not enough water coming in or lowering it if there is too much water. New toilets are adjustable using a screw.
- Irregularities in the water supply dosage may be due to contamination of the water supply holes. In this case, you need to remove the cap from the float, turn it, pull out the membrane, and wash the ducts. It is advisable to replace the membrane to ensure high-quality operation of the mechanism.
- If the connection of the drain mechanism fails, water flows continuously into the tank, but it does not fill. To fix the problem, you need to tighten the bolts securing the base of the reinforcement.
- If water flows into the toilet continuously, the valve may be dry or clogged. The drain system must be disassembled to gain access to the drain hole. The valve and hole should be thoroughly cleaned and everything should be put back in place. If this does not help, you will have to replace the worn membrane.
- A leak under the tank occurs when the rubber ring located between it and the toilet wears out. In this case, you need to replace it with a new one with exact dimensions.
The designs of shut-off valves for toilets are not complicated. Knowing the features of their design makes it possible to choose the right model of plumbing equipment and carry out installation and repairs yourself. This will save money and eliminate the need to call specialists.
Toilet valve: types of valves and features of their installation. Installation and adjustment of the intake valve
The purpose of the toilet inlet valve is to regulate the flow of water into the toilet tank. The valve ensures silent and fast filling: about 7 liters in 20-45 seconds.
Equipped with a filter with a cell size of about 200 microns. If clogged, it can be cleaned and washed with water without removing it from the tank. The float in such a device can be open, or it can be located inside a protective housing.
Reinstalling the float valve is quite simple. In models with a bottom connection, the valve must be installed before installing the tank.
A rubber gasket is placed on the device tube, turning its conical side towards the hole in the tank. Then the valve is inserted into the hole for the water supply, a plastic washer is put on (if included in the kit) and secured with a nut. The nut is first tightened by hand and then tightened with a wrench.
It is very important to ensure a tight seal by installing the rubber gaskets correctly. In models with a side connection, protection against leaks is not so important; there the water supply is located above the filling level of the tank.
You also need to pay attention to the fact that the float in the tank does not touch anything, otherwise it will not be able to freely rise or fall with the water level.
It is also important to install the float so that the water level is 15 cm below the edge of the tank. Some models provide for adjusting the filling level of the tank. With it you can set the tank to be filled completely or halfway
A flexible hose is connected to the water riser through a tap using FUM tape. A shut-off valve must be installed. If repair work is necessary, it will allow you to shut off the water.
Restoring the float valve is as follows:
If a leak is detected in the area of the shut-off valve, troubleshooting work is carried out in the following sequence:
If tightening the sealing nut of the shut-off valve clockwise does not bring results, we will disassemble it. To do this, remove the sealing nut
Plumbing tricks for convenience and comfort
Wanting to achieve greater comfort, people invent new devices that can improve their lives, eliminating the slightest moments that can cause irritation. For example, many people are annoyed by a falling toilet lid. That is, not even the fact of falling, but the sound that is made.
In this regard, a toilet lid microlift was invented not long ago. This mechanism has recently become increasingly popular and is gaining new fans. It allows you to eliminate the problem described above - the sound of a falling toilet lid. The microlift is not only silent, but also allows the lid to lower smoothly, without sudden movements. There is no need to control this process, which is also very convenient.
Thus, we examined the mechanism of operation of such an important piece of plumbing as the toilet. We learned how water is drained and plunged a little into the world of modern plumbing with its new products
What types can there be?
Before deciding how to choose fittings for a toilet, let’s try to understand what should be understood by the word “fittings”. This word should be understood as all the constituent elements that are aimed at ensuring the operation of plumbing, which includes, among other things, the toilet.
According to the functions performed, the following types can be distinguished:
- fittings that block the flow of water after the tank is filled;
- fittings that provide drainage of liquid.
Each type constitutes separate mechanisms, which, nevertheless, are closely related to each other. The latter circumstance leads to the fact that if one of them breaks down, the second one stops working too.
Types of drainage system
In addition to the internal configuration, the shut-off valves of the flush tank differ significantly in the material of manufacture, which affects the quality and service life of the toilet itself.
Material options for the production of toilet fittings:
- Plastic: Due to the low cost and availability of the material, polymers have rapidly conquered the market in absolutely every industry. However, plastic is a fickle material; the quality and durability of the components, as well as the direct operation of the drainage system, depend on its composition. Previously, the quality of shut-off valves could be judged by the cost of the product itself, however, today there are too many new young manufacturers on the market offering high-quality products at low prices. And established well-known brands allow defects, which leads consumers to doubts. Therefore, today it is very difficult to distinguish reliable toilet fittings from fake ones. Unfortunately, this difference is revealed only during the operation of the toilet.
- Metal: a material that provides high strength and significant service life of shut-off valves. To produce drain systems, modern manufacturers use brass and bronze compounds, because they are truly resistant to mechanical damage and the effects of water. The fittings of the cistern, made of similar metals, do not corrode for several years, maintaining all functional qualities. Metal shut-off valves are typical only for expensive models produced in the appropriate style.
As practice shows, toilets with plastic fittings are in greatest demand, which is understandable. Affordable cost and the ability to repair at any time determine our choice.
The cistern fittings are the basis for the operation of the entire toilet. Water is supplied in two ways: side or bottom. Side water supply is characteristic of our domestic plumbing and is characterized by rather high noise. The lower water supply is much quieter than the upper mechanism.
Before you begin repairing a toilet, you need to familiarize yourself with its design.
Both with side and bottom water supply, the valve closes under the influence of a control rod connected to the float. A float is a kind of plastic container or a small foam element.
Regardless of the type of water supply, the float is carefully balanced during installation of the fittings. Such work is necessary for the efficient and reliable operation of the cistern, which directly depends on a certain water level in the system.
