Modern housing is almost impossible to imagine without a well-equipped toilet room (or a combined bathroom). The toilet has become a common plumbing fixture in every apartment, house and office. Its design seems complicated to most ordinary people, and repair work is entrusted in most cases to professional plumbers.
Meanwhile, if you have repeatedly resorted to their services, you have probably encountered the following situation: the master who came on call removes the lid from the toilet tank, “does magic” for a minute or two, then reports that the work is done . Without even opening your suitcase with tools and spare parts.
This indicates that most problems associated with the locking mechanism of the toilet tank are quite easy to fix . And there is no need to turn to the services of a plumber, wait for his visit and spend extra money on paying for his labor.
Fittings for the cistern: types, characteristics
Depending on the functions performed, fittings are divided into two types:
- I'll lock it. She is responsible for pouring water into the tank and locking it after filling.
- Drain. With its help, water is drained and the drain is blocked until the tank is filled.
Both of these types, despite their interconnectedness, work autonomously, but if one type of fittings fails, the result is the same - water leaks or uncontrolled leakage.
Features of shut-off valves
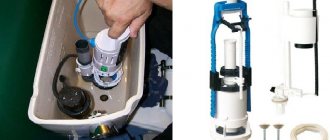
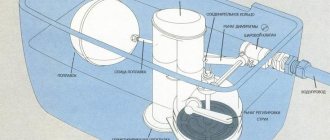
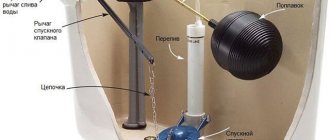
The shut-off valve set consists of:
- A drain mechanism, which in turn consists of a siphon with a lid and a gasket. The last part separates the drain pipe and the storage tank.
- Jet control lever. It is connected to the water pipe through a ball valve.
- A float that coordinates the filling of the tank. It is connected to the drainage device by a lever.
The shut-off valves operate according to the following scheme:
- water is supplied to the tank;
- the float rises to the set level;
- the lever acts on the shut-off valve and blocks the flow of liquid from the water supply.
When draining, the float takes the lower position, and the lever opens the way for water to enter the container from the water supply. Based on the method of water entry, a distinction is made between side and bottom shut-off valves.
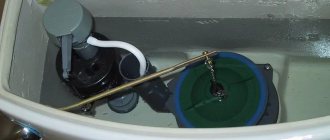
Side fitting for cistern
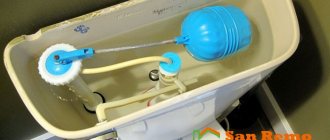
Tanks with side inlet are equipped with two openings, one of which is closed with a plug. In some toilet models, flushing is carried out using the side lever, in others - using the top button.
The operation of the side fittings is accompanied by quite a lot of noise, which is eliminated by using an extended inlet hose.
Lateral fitting components
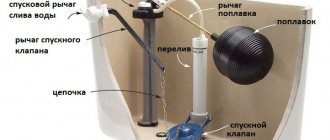
The drain design consists of the following elements:
- intake valve;
- trigger device;
- lever with float;
- filling container;
- lever controlling the trigger.
The fill container may be missing.
Then the float moves along the guide. The advantage of fittings with side connections is the simplicity of the design. It is easy to repair, there is no need to heavily seal the connection point of the inlet hose, and its cost is relatively low.
The drain mechanism works as follows:
- When the button is activated, a pull occurs. Under its influence, the drain valve opens.
- The entrance to the drain mechanism is blocked and the drain is carried out.
- When the lowest water level is reached, the drain in the tank is closed by closing the release mechanism.
- The float hole opens.
- After returning the vertical valve to its place, the drain passage is blocked.
- The water level drops and the float lowers, clearing the way for filling the drain tank.
- When the maximum liquid level is reached and the float rises, the tap is closed, stopping the flow of water.
Fittings for toilet cistern with bottom connection
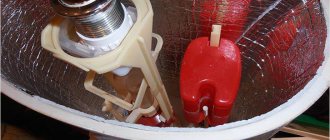
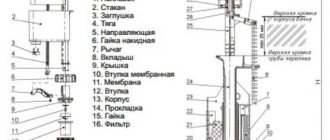
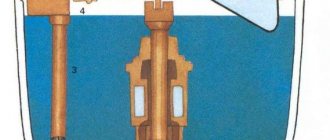
The lower fittings include the following elements:
- Float. Its role is to limit the water level in the tank.
- Guide. A float moves along it.
- Release device. It includes a glass into which, when flushing the toilet, a float and a rod connected at one end to the float and the other to an element for locking the liquid are lowered.
- Diaphragm valve.
Fittings for a toilet cistern with bottom water supply.
The advantages of this type of fittings include the absence of noise when filling the tank with water. The design of the lower fittings is extremely simple, therefore, it lasts a long time. Structurally, it is designed so that the inlet hose can be hidden.
The lower fittings work according to the following scheme:
- When water is drained from the tank, the float goes down along the guide.
- The thrust imparts a force that causes the valve to close. Water is not supplied to the storage tank.
A distinctive feature of this fittings is the direct dependence of the diaphragm valve on the quality of water entering the tank. Ideally, it should undergo pre-filtration, otherwise parts may become clogged. In this case, it becomes difficult to supply water to the tank.
The aesthetics of the design is an undoubted advantage of fittings for a toilet cistern with a bottom connection, but when repairing it you have to face some difficulties. They are associated with the inconvenient location of the fittings.
The shut-off elements fail due to the failure of the float seal, resulting in its flooding. Liquid constantly flows into the storage tank and flows through the overflow pipe into the toilet.
Leakage is possible in the connection area due to weak fixation of the nut or due to damage to the rubber gasket.
Types of float valves
Float valves for toilets are divided according to the type of locking mechanism into the following types:
- piston;
- membrane
In a piston device, a floating float, when rising, presses on a piston moving towards the flow of water until it rests against the saddle. Piston locking mechanisms are already outdated; they do not have any unique design features.
The disadvantages of such devices include noise during filling and the constant sound of falling drops due to the loss of tight pressure to the inlet over time.
The membrane locking mechanism is activated by the action of the pusher on the rubber or silicone membrane. Among the advantages of membrane devices are fast water collection, less noise, and constant flow intensity. Disadvantage: good constant water pressure is required.
Modern diaphragm valves
Most modern inlet valves for the flush tank are diaphragm devices. After draining, the membrane with the pusher moves away under the pressure of the incoming flow, allowing water to flow into the tank.
How to choose fittings for a toilet cistern
The main requirement for tank fittings is a long service life without repairs. When buying a toilet, you should look into the tank or ask the sales consultant to show the fittings separately.
Basic recommendations when buying a toilet
Experts advise adhering to the following rules:
- Do not choose complex mechanisms. They are more likely to malfunction and are not easy to repair. The design should be simple and extremely understandable.
- It is better to choose designs with fixation of the float and valve for dosing the liquid supply to the side wall. The lower supply is a weak point; leaks most often occur here.
- Choosing an exclusive fitting option is not a very good decision. A standard design is easier to repair; if necessary, it can simply be replaced.
- The quality of plastic parts is of great importance. The material must have sufficient strength, resistance to temperature fluctuations, and mechanical loads.
- You should pay attention to the brand. It happens that inexpensive models from an unknown manufacturer are defective.
Having chosen the compact version of the cistern, you should be prepared for the fact that difficulties may arise with replacing the fittings. Often imported membranes are not designed for water with aggressive impurities, which in real conditions leads to rapid wear.
Selection by design of drain fittings
Different models have different design of drain fittings. There are push-button options for complete drainage; some models are equipped with two drainage modes and a special function that allows you to interrupt the drainage of water.
A dual-mode button is an analogue of a key. In one of the positions it releases the liquid completely, in the other - only part. The interrupt function allows you to both block the drain and unblock it.
Reinforcement material
Most fittings are made of polymer materials. The properties of their constituent components determine the durability and quality of operation of the mechanism.
Metal reinforcement is the most durable and resistant to mechanical stress. Manufacturers use a one-piece version of such fittings exclusively in elite models. A separate system can be found in any toilet.
In modern models of flush cisterns, the durability of the fittings mainly depends on the service life of the rubber elements and on the influence of water of different hardness on them. Replacing these parts allows the valve to be used in the future.
Installation procedure
The specific instructions for attaching the tank to the toilet depend on what type of device you purchased.
The following types of drain containers are available on the modern plumbing equipment market:
- mounted separately from the toilet bowl,
- mounted on a bowl, for which the latter is equipped with a special shelf,
- built into the wall.
Let's consider any option in more detail.
Method 1. Mounted cistern
This method of placement is seen quite rarely and is even less used in private buildings. However, be aware of it.
The toilet tank is fastened as follows:
1. A special flush pipe, the diameter of which is 32 mm, is connected to the bottom of the drain tank. There is a special hole for this purpose.
2. Then marking is done. The tank is placed against the wall at such a height that the lower end of the pipe is opposite the inlet pipe of the toilet bowl located on the floor. After this, markings are applied to the surface of the wall using a marker or pencil.
3. The holes for the brackets are drilled. If the walls of the toilet are cement or tiled, you need to use a hammer drill with a special drill. This will make your work easier and speed up the process, and the resulting hole will be neater.
4. Select the correct tool diameter. It must exactly match the dimensions of the dowels or anchor bolts used.
5. Then the brackets are screwed to the wall, and a water storage tank is attached to them.
Method 2. Built-in tank
This refers to a structure installed on the shelf of the toilet bowl.
In this case, the flush cistern is attached to the toilet in the following sequence:
1. A rubber gasket is installed on the bowl. In most cases, it is already coated with a special adhesive that holds it in place. If this is not true, it is necessary to additionally use a special sealing sanitary gel.
Advice! Coat the gasket on both sides, since one is attached to the toilet shelf, and the other is adjacent to the flush tank. In addition, it is possible to additionally use a special rubber ring that seals the drain hole at the bottom of the container.
2. To secure the tank to the toilet bowl, special bolts with cone-shaped rubber gaskets are used. They are inserted into the holes provided for this purpose and screwed in well with nuts from below. Do not use too much force to tighten the nuts. This can lead to breakage of the tank or bowl, since ceramics do not withstand strong external influences well.
Upon completion of installation, the rubber parts provide the most airtight connection, which will not allow leaks after filling the container with water.
3. In order to prevent water from flowing out of other holes (for example, for the water supply pipe), it is necessary to use special rubber plugs. Before installation, it is also recommended to lubricate them with gel to obtain the tightest possible connection.
4. The next stage is the installation of drain fittings and connection of the water supply. During these operations, it is necessary to ensure that all gaskets, membranes and seals are in place.
It is recommended to wrap polymer tape on the external thread of the inlet pipe to protect against leaks.
5. The last stage is testing. It is necessary to unscrew the shut-off valve that cuts off the water supply to the tank and fill the container with water. To adjust the liquid level, a float mounted on a rocker arm or screw is used.
Advice! Plumbing gel takes some time to polymerize. Based on this, it is recommended to carry out testing 1-2 hours after the completion of the installation procedure.
Method 3. Hidden tank
A drainage container hidden in the wall is quite an expensive, but very aesthetic and popular option for arranging a toilet room. In addition to everything else, the hidden placement of the tank allows you to save space in the restroom and protect the structure from accidental damage.
On the outside, the built-in cistern differs from classic models:
- it is made from durable polymers and has fairly thick walls,
- the shape of the hidden tank is more extended upward and to the sides, so that it takes up less space in the wall,
- the shutter button is located not on the cover, but on the front surface of the device,
- For fastening, a special installation is used, which is included in the delivery set.
The work order is as follows:
- A steel frame is installed in a place pre-designated for installation, which will serve to secure both the flush cistern and the toilet itself. When installing it, it is necessary to perfectly maintain the horizontal and vertical, otherwise troubles will arise when you begin to attach additional fittings.
- A tank is installed on the frame and water is supplied to it. For this, it is better to use solid tubes, which provide great reliability. Since after tiling the hidden tank is finished, repairs will be problematic.
- As in previous cases, it is better to connect the supply pipe through a shut-off valve.
- Upon completion of the installation of the tank, the sewage system is installed, the steel frame is sheathed with pages of waterproof plasterboard, which is lined with the selected decorative material.
- The last stage is the installation of a button for the toilet, which controls the flush fittings. It is better to use a separate drain, which allows you to save water from the tap.
Installation and replacement of drain fittings
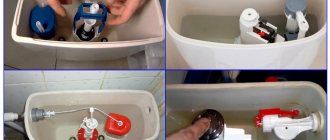
Before you begin installing or replacing fittings, you need to prepare the necessary tools: pipe and other wrenches, pliers. Additional materials required include sealing tape, gaskets of different diameters, and flexible pipes. If the tank has two holes, a decorative plug will be needed to cover the unused hole.
Part of the fittings is installed before installing the tank, and then another part. The first stage involves installing the base of the drain mechanism. Secure it with a plastic nut. Next, put a rubber sealing gasket on the nut and attach the tank itself.
The next step is the installation of the device responsible for the flow of water and connecting the hoses from the water supply.
During installation, be sure to adjust the float, levers, and valve. Adjust the float so that it provides the volume of water required for draining. The foam float is easily adjusted - it is moved along the bar. Plastic - by changing the angle between the slats.
You can see what the installation of fittings looks like in the following video:
Fastener selection
All fasteners and gaskets are usually included in the package.
If they are missing, fasteners are selected in compliance with the following rules:
- To fasten the tank to the toilet, use bolts with a smooth part at the top of the rod.
- Metal fasteners must be made of stainless steel, non-ferrous metals or have an anti-corrosion coating. Regular steel will quickly become rusty. The composition can be easily checked with a magnet.
- All fastener elements must be cast from the same metal of good quality, otherwise electrochemical corrosion will occur upon contact with water.
- High-quality plastic fasteners for the tank are not inferior in strength and reliability to metal ones.
- To fasten compact models, a cone-shaped gasket is used. This shape ensures that the gasket fits securely to the smooth top of the bolt shaft and provides a tight seal. As a last resort, you can use a regular gasket, but only complete with a bolt and a pressed washer.
- Silicone gaskets are better than rubber ones.
High-quality bolts with nuts, washers and gaskets allow you to secure the plumbing fixtures so that there are no leaks.
Repair of toilet fittings
It is not uncommon for a cistern to break down. In this case, it is not necessary to call a plumber; after studying the principle of operation of the fittings, you can fix the malfunctions yourself.
Basic faults
The most common possible defects are:
- high water consumption;
- leak;
- weak drain;
- production of gaskets.
Insufficient drainage may occur as a result of obstruction of the drainage channel.
A leak can be explained by the addition of water through an overflow or wear of the float. In case of overflow, the fittings are set to moderate water consumption. To do this, bend the lever or adjust the fastening screw. In the second case, the float is made heavier by adding metal hangers or replacing it with a new one.
Troubleshooting an inlet valve
In this unit, a violation of the quality of locking is most often observed. This happens due to the activation of an elastic cuff or rubber stopper. For repairs, the exhaust valve must be removed. Before this, turn off the tap and drain the water from the tank. Next, unscrew the drain button, remove the cover, unscrew the union nut, through which the valve is attached to the bushing.
The valve has a small rocker arm on the reverse side; it is connected to a float lever or rod. This is where the problem with any type of valve lies. To troubleshoot the problem, take the following steps:
- The drive lever is disengaged from this rocker arm.
- The rocker itself is removed. Typically, it is secured to the valve body with a pair of pins.
- Check the condition of the plug pressed into a plastic cup located on the opposite side of the rocker. It is taken out and turned to the water supply spout with the flat side. If this has already been done, the cork is cut, resulting in two even ends. The halves are folded and pressed back into the glass.
Diaphragm-type valves lose their tightness when the rubber disc is deformed, which may also be caused by insufficient float pressure on the valve. In this case, adjust the glass, placing it lower. There is another option - a foam cube is connected to the float from below. When these actions do not give the desired result, the membrane is changed.
Troubleshooting a button
Jamming, unsatisfactory movement, or complete disobedience to the influence may occur in this node. In older models, the button worked by acting on the rack. The latter transmitted movement to a gear on which a long lever was attached. At the end of the lever there is a chain, through which the membrane is lifted. The problem was resolved by tightening the chain more tightly. The teeth on the rack could also work together. To eliminate the malfunction, it was turned with its back side.
Modern drain valves are equipped with a lever mechanism, which is more reliable. The only possible thing is that it is not centered correctly. To avoid this, the threads on the drain valve body are positioned exactly along the central axis of the hole. If this condition is violated, the upper thrust plate of the microlift is shifted in the desired direction.
The cause of such a problem is failure of water to enter the tank, debris in the valve section in the narrowest place. In this case, the tank should be emptied, and the valve, together with the float and lever, should be unscrewed. Then, using a needle, clear the narrow passage through which the liquid enters the tank.
The remaining debris is washed by first opening the valve of the inlet pipe. If water flows freely, the valve is closed and all elements are installed in place.
If you need to replace any part of the fittings, it is better to take the unusable element to the store. In this case, you can purchase a part completely identical to the broken one.
What causes water to drain?
The functioning of the toilet cistern begins when you press the corresponding button. This button, or lever, is mainly located on the tank, however, in toilet designs where it is hidden, the buttons are taken out and attached to the surface of the wall in the room in a place convenient for you.
In the modern world, there are toilets on sale that have either a single-mode or a dual-mode push-button mechanism. In the first case, when you press the button, all the water that has accumulated in the tank will pour into the bowl. The dual-mode mechanism has the ability to save water. This happens due to the fact that we can press the second button. In this case, not all the water will pour out of the container into the bowl, but only a certain part of it.
In addition, modern manufacturers, trying to please every customer, have also created a two-mode drain system, but there is only one button. The amount of fluid released depends on the force with which you apply the lever.
Adjustment and configuration of drain fittings
The lower fittings are adjusted by rotating the adjusting screw. It sets the position of the float relative to the thrust. To fill the container as much as possible, turn the screw counterclockwise. If minimal filling is required, adjust clockwise.
By moving the float chamber along the rod, the liquid level in the tank is adjusted. When the lever has an increased size, the level can be increased and vice versa. To do this, simply unscrew the fixing screw, install it in the desired position and lock it.
The float can be moved along a toothed plastic rod. The water level in models with a metal rod can be changed by bending the rod in the desired direction.
Having mastered the principle of constructing a drain tank, you can deal with all the problems on your own. Even if the breakdown is repaired by a plumber, you can evaluate and accept his work. When deciding which fittings to choose, you should remember that top-connected mechanisms are cheaper, simpler, and bottom connections can also be reliable if all installation rules are followed.
How does a device that moves along a vertical guide work?
Water from the bottom supply to the tank is drained according to the following principle:
- 1. During flushing of water, the float mechanism moves along a guide.
- 2. The draft, acting on the valve, opens it.
- 3. The liquid is poured into the container.
- 4. The float device rises to the limit set by the draft, the diaphragm valve shuts off the liquid supply.
Water leaking from the tank into the toilet bowl indicates a broken fitting.
Attention! If the fittings have been in operation for several years, they become covered with a coating of lime and rust, which complicates the adjustment process. Special products to combat limescale will help solve the problem. You need to add a little product directly into the tank and rinse it off after a couple of hours.
Selecting the internal structure of the tank
Using a ruler, we determine the cross-sectional size of the pipe intended to fill the water. A diameter of 1.5 cm corresponds to a 3/8-inch liner; if the cross-section is two centimeters, then the liner is 1⁄2-inch. For convenience, it is better to choose the model of fittings that was used. We take out the fittings and buy the appropriate ones in the store.
A set of tools that will be needed for adjustment and repair:
- Roulette or ruler.
- Adjustable wrench marked 1.
- Several wrenches.
- New fittings.
