Floor-standing toilets have been out of competition for a long time, but everything is changing. Owners of modern apartments are increasingly choosing hanging models. This pleasure is not cheap, but this is practically the only drawback of this solution. But among the advantages of the design are its excellent design and ease of maintenance.
It is important that the installation of a wall-hung toilet is carried out in accordance with all the rules. We will tell you how and in what sequence the work is carried out, what devices will be needed to attach the bowl. Taking into account our recommendations, you can do everything yourself or supervise the actions of plumbers.
Required tools for installing an installed tank:
- This is, of course, a hammer drill with a 10-diameter drill.
- Bulgarian - any.
- A 13mm wrench or much better if you have a 13mm ratchet.
- Hammer.
- Crosshead screwdriver.
- Knife - any knife will do.
- Roulette.
- Marker or pencil.
- Level - preferably with magnets.
- And the most important thing is accuracy and attentiveness.
- Press jaws for metal-plastic or soldering iron for polypropylene.
- Gas and adjustable wrench and flax.
- A container of good silicone and a gun to squeeze it out.
Flush button
In a suspended system, the flush button, for obvious reasons, is mounted separately from the cistern, on a false wall that hides the installation. The consumer sees only a decorative panel with one or two keys. By design, the button can be:
- ordinary
, with a single key, when pressed, all the water in the tank is drained; - economical with a bipartite key
: by pressing one half, you drain all the water from the tank, when you press the other, only half of the water; - economical with the “start-stop” function
: the first press opens the drain, the second closes it, i.e. you regulate the amount of water drained yourself.
The key is connected to the drainage system using a pneumatic drive, a special lever or a cable.
GROHE Sail flush plate, chrome
Methods for installing a wall-hung toilet.
At the moment, two methods have been developed for attaching a wall-hung toilet: on an installation or on a concrete base. The owner of a plumbing fixture has the right to choose between these options, guided by only two criteria: if he wants an almost one hundred percent guarantee of fastening that will not come apart even under serious mechanical stress, then he needs to pay attention to installation. If the main goal is to install the toilet faster and without particularly significant material costs, then mounting on a concrete base is most suitable. Let us now pay attention to the aspects of each of these methods.
Installation of a wall-hung toilet on an installation.
The main feature of this method of attaching a wall-hung toilet is that the device is attached to the wall using a special frame pre-installed into it, which plays the role of an installation. In order to correctly carry out fastening using this method without the help of professionals, it is necessary to strictly follow the installation plan, which is divided into several stages:
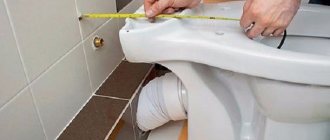
— Installation of the toilet frame. This structural component of the device is attached to the floor and main wall using dowels inserted into specially made holes. Next, at the attachment point, the sewerage and water supply pipes are removed. The installation itself must be level. Requirement for it: complete parallel contact with the wall to which it is attached. At this stage, you need to determine the height of the toilet above the floor. This figure is forty centimeters, but changes at the request of the homeowners;
— Supplying water to the tank. At the request of the device owner, the eyeliner can be supplied either elastic or rigid. Remember, while the water supply is being installed, the tank valve must be kept closed, otherwise a situation may arise with damage to the water supply;
— Connecting the toilet to the sewer system. This stage begins with the toilet outlet being inserted into the sewer outlet, and after this operation the resulting connection is secured with corrugation. To accomplish this, the bowl of the wall-hung toilet needs to be screwed onto the installation for a short time. After this, it must be removed again; the time for its installation will come at one of the subsequent stages;
— Covering the work area with plasterboard. The sheets are attached to the frame already at the moment when it is fixed to the wall. Often, the user is provided with instructions for covering with plasterboard by the manufacturer of the product, who includes an algorithm of actions included with the toilet itself. Plasterboard covering can be carried out in two ways: either by completely covering the entire area of the wall, or by covering only the area of the installation itself. See the video of covering the installation with plasterboard below.
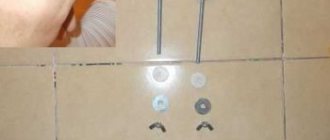
— Attaching the toilet bowl is the final stage, its essence: hanging this component of the device on a part of the steel frame using two small pins.
As you can see, there are no particular difficulties in independently installing a wall-hung toilet on an installation; you just need to pay great attention to the installation of the frame itself, since the reliability of the entire final result of the installation depends on its successful and verified fastening.
Installation of a wall-hung toilet on a concrete base.
This method differs from the previous one in that the toilet is mounted not on a frame built into the wall, but on a concrete base created by yourself. The standard list of parts required when installing a toilet in this way includes boards, nuts, screws and washers, two rods with threads no thinner than two centimeters and a length ranging from half a meter to eighty centimeters, a plastic pipe no shorter than ten centimeters, a drain coupling and silicone sealant. In the future, the algorithm for attaching a wall-hung toilet without installation looks like this:
— two rods are mounted into the main wall. In the future, they will be enough to withstand a load of four hundred to five hundred kilograms, which is enough to firmly seat the toilet;
— the height of the toilet is set, after which you can trim and install the flush coupling;
- on the boards that will be used as formwork, places for holes for fasteners are calculated, after which you can begin installing them;
— the depth of the rods is calculated (usually it should not exceed fifteen centimeters), after which they are fixed in the wall using special glue for concrete;
- then the toilet bowl is tried on, and then you can start concreting, the result of which should be a solid block of concrete that maintains the openness of the coupling and has protruding pins;
The further process of installing a wall-hung toilet on a concrete base does not have any fundamental differences with the process of attaching a standard floor-mounted toilet. The drain is connected, the joints are sealed, the bowl is installed on rods, which are secured with nuts on top. The final touch is to install the cistern above the bowl.
What makes this method of installing a wall-hung toilet fundamentally different from the previous one is that there is no need to purchase and install an expensive steel frame. It is with the help of this method of installing a plumbing fixture that it will be possible to save a lot of financial resources.
Design Features
Before proceeding directly with installation, you should understand the design. Installing a wall-hung toilet will become much easier when you know its structure and operating principle. It will immediately become clear how to act correctly and what is necessary.
The main feature of the product is that only the bowl remains visible.
The basis of the entire structure is a durable metal frame. The visible part is directly attached to it. It is from this element that all installation work starts. The frame must be firmly attached to the wall and firmly placed on the floor. As a result, it should be able to support an adult without any problems. Based on this, we can say that it will not be possible to fix the frame to a weak wall.
The frame has an element that allows you to change the height of the bowl, which is secured using special pins. They are the main fasteners when installing a toilet installation.
A common option is to attach two installations at once - a toilet and a bidet.
The second element is a plastic drain tank. He is also hiding in the wall. It has a specific shape, because must fit in limited space. The tank is also installed in a metal frame and insulated with a special material that prevents the formation of condensation. There is a cutout on the front wall of the tank for mounting a drain button. Modern models, including floor-mounted ones, have a dosed water discharge - 3 or 6 liters.
The next element is the toilet bowl. The only part that is visible and in active use. It has a traditional shape, but some designer models have original configurations.
The delivery set contains all the necessary parts and accessories. The attached instructions can also show the entire installation sequence of the toilet installation.
Mounting without installation
How to attach a wall-hung toilet if, for some reason, it is impossible to use the installation system for the toilet?
It’s worth mentioning right away: it’s still advisable to purchase a hidden-mounted tank. However, there is a more compact alternative - a valve that creates a short circuit between the toilet and the cold water supply riser for a few seconds. Of course, such a flush system is very sensitive to cold water pressure.
What will be the fasteners for a wall-hung toilet in this case?
They will be two studs with M20 threads, nuts and washers. Our task is to securely fix them in a wall or other structure, ensuring a maximum load of 400 kilograms, standard for wall-hung toilets.
This simple set can replace an expensive frame installation.
There are several ways to do this.
1. The most universal of them is to assemble the formwork and pour a concrete stand into which studs will first be inserted at the required height. The width of the washers and nuts on the back side will prevent them from being pulled out of the concrete.
2. A wall made of brick or even aerated concrete can be passed through with a long drill of the appropriate diameter. Then, on the opposite side, the holes are drilled to fit the diameter of the washers. After the studs are inserted and the toilet is tightened, the holes are puttied flush with the wall.
3. Finally, in the case of a concrete wall, a pair of long (at least 120 mm) anchors can help out, for which the turner will have to order very specific mushroom-shaped nuts. The anchor is first tightened without the toilet installed, and only then, when it is already loose in the wall, is the fragile earthenware bowl attached.
A low concrete column with studs embedded in it became a strong mount for a wall-hung toilet.
Niche preparation
Installing a wall-hung toilet involves using a niche to place the frame.
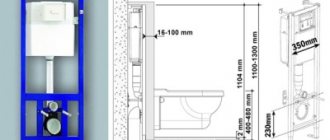
As already mentioned, a certain strength of the walls is required for fastening. The installation design can withstand a weight of up to 400 kg, part of the load from which is transferred to the wall. This issue must be approached with special care. In order to place the installation, you need to prepare a niche. It should be as follows:
- Height – 1 m;
- Width – 0.6 m;
- Depth - up to 0.2 m.
In some cases, creating such depth is problematic. In such cases, it is necessary to go deeper into the possible value, and hide the remaining elements with plasterboard panels.
By hiding the main part of the device, certain opportunities for decorating and improving the interior open up. It’s not worth just placing the installation near the wall and sheathing it with plasterboard, because... placing a toilet with a conventional layout will be cheaper and easier. In addition, it will take up less space.
Advantages and disadvantages of wall-hung toilets
Wall-hung toilets are gaining popularity due to their main advantages over floor-standing ones:
non-standard appearance allows you to create an exclusive interior
Thanks to its design features it saves space
Hidden installation of all communication pipes and hoses will give the bathroom a more aesthetic appearance
free access to the floor covering will facilitate cleaning work
Despite the large number of positive characteristics, the wall-hung toilet has some disadvantages:
higher price for the suspension system range
quite complex installation, requiring skills in this work
hidden communications create difficult access during maintenance
We install it ourselves
When installing a toilet installation with your own hands, a person can use previously acquired skills, instructions included with the design, and video clips from the Internet. There is enough information to get an idea of what the design should look like in the end, and how to achieve the desired result. But, if you have doubts about your strengths, it is better to seek the help of professionals. Using modern tools, they will quickly cope with this task and in the near future will provide a decent result of the work.
If you think there is not enough information, you can always supplement it and express your opinion in the form below “Your opinion”.
Recently, conventional floor-standing toilets are increasingly being replaced by wall-hung structures. They require placement in a smaller area and also have a more modern appearance. Therefore, the process of displacement of traditional models by them is quite natural. However, following modern trends has its negative sides - more complex installation, longer and more expensive. However, you can successfully get out of this situation if you learn how to install a wall-hung toilet with a do-it-yourself installation.
Review of manufacturers
Below is a table that contains the best manufacturers taking into account various criteria.
Rating of manufacturers based on several criteria
We hope this table will answer the question of which manufacturer is better. It should be taken into account that new models are entering the market, therefore, the objectivity and relevance of the sample may not be reliable.
Requirements for laying pipes
If an installed floor-standing toilet is being replaced, then there will be no problems with choosing a location, since the new one can be installed in the same place. However, when building new houses, it becomes necessary to find the optimal location for its installation.
Note!
In such cases, they focus on the location of the sewer pipes.
They must ensure a suitable slope of the drain so that blockages do not form, and the speed of removal of sewage from the toilet bowl is sufficient. The angle of inclination of sewer pipes is selected to be at least 450/m2 from the floor surface. Water pipes are laid horizontally inside or outside the walls.
Installation of a corner wall-hung toilet
This is interesting: How to attach a toilet to tiles: sequence of actions and working with tiles
How to choose?
We offer some tips to help when choosing equipment:
- We recommend purchasing products from well-known brands; the quality and reliability of such products are an order of magnitude higher than Chinese manufacturers. Considering the features listed above, cost savings can later turn into serious costs.
- Some models may have additional functions that increase comfort; an example is a microlift that ensures smooth lowering of the seat and lid. But it should be remembered that such additional piping significantly increases the cost of the equipment.
Example of a functional set to increase comfort - Pay attention to rimless models, their popularity rating has risen high in recent years.
A rimless toilet makes cleaning much easier - The circular flush system cleans thickets much more effectively than a horizontal flush.
Horizontal (A) and circular (B) drain - Pay attention to the mechanism of the drain fittings; they can be mechanical or pneumatic; the first is more reliable.
- Fittings that save water pay for themselves within a year or two. Now almost all well-known manufacturers install it on their products by default.
The two-button flush system has become almost standard for wall-hung toilets - Before purchasing, be sure to check the dimensions of the installation module; it may be larger or smaller than the required dimensions.
- Don’t rush to buy an additional bidet; some toilets support this function, so inquire about the availability of this model.
- Checking the availability of the appropriate certificate will help you avoid purchasing counterfeit products. Branded products (Roca, GaP, IFO, Laufen, etc.) must have technical documentation, which includes installation and connection instructions.
- Please check that the warranty card is filled out correctly.
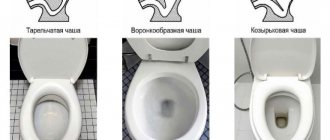
Bowl selection
When choosing a wall-hung model, you should give a significant role to the selection of the toilet bowl. The material from which the bowl is made is as follows:
- porcelain. The choice of material ensures that there are no problems with toilet hygiene;
- faience. It is difficult to distinguish it from porcelain, but its surface is more structural and is susceptible to plaque formation on the walls of the bowl. Earthenware toilets are easy to care for;
- stainless steel. The look is specific, but the advantage is strength and durability. Usually installed in public toilets;
- plastic. Such structures are susceptible to damage, so you should be careful when using them. This material is easy to care for;
- glass. A rather rare option, since its maintenance requires careful care, and the price of glass products is above average.
A popular option for wall-hung structures are ceramic toilets.