If you need to connect a toilet to a sewer system, the question arises: can this be done independently? You don’t need to be a plumber or have special skills for this, so after familiarizing yourself with the rules and features of installation, you can start working.
Later in the article we will talk about connecting a toilet to a sewer with corrugation and about installation without it. We will tell you what diameter of pipe should be used to connect the toilet to the sewer riser. We will also consider the details of installing a toilet with oblique and straight outlets.
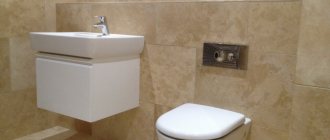
Installation of a wall-hung toilet
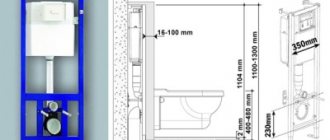
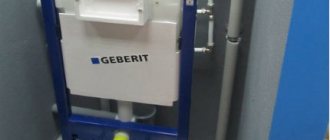
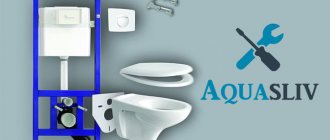
The wall-hung toilet is a rather complex structure. It has an installation that is a huge massive metal frame that is embedded deep into a wall or a specially prepared niche in advance. The design already has a built-in plastic barrel for flushing. Also on this frame there is a pipe for draining into the sewer.
Construction of a wall-hung toilet with an internal frame for communications Source sanriver.ru
The standard frame installation kit includes the following parts:
- a pin securing the frame to the wall;
- flush barrel;
- flush button;
- a drain pipe;
- a pin that directly secures the toilet bowl itself;
- drain outlet;
- fasteners for fixing to the floor.
Connecting cast iron sewerage with plastic pipes
In most apartment buildings of old construction, not only old-style toilets are installed, but also risers made of cast iron. The hole diameter of the cast iron riser is 123 mm, and that of a similar plastic pipe is 110 mm. If you need to install a new toilet, you will need to connect it with a plastic pipe to a cast iron riser, unless you plan to replace it. For such cases, there are special rubber cuffs that ensure a reliable connection.
Although a cast iron toilet drain pipe is a product with a long service life, it has a significant drawback - the occurrence of stagnation and blockages. In old apartment buildings, in order to improve the quality of functioning of the sewer system, it is planned to replace cast iron pipes with plastic ones. However, such replacements are carried out only in cases where cast iron sewer pipelines are in disrepair.
Gasket between the toilet and the built-in installation: why is it needed?
At the stage of attaching the toilet, a special damper gasket must be used. It is purchased for the appropriate design model, and sometimes can be included with the installation. Fasten it to a seat previously marked on tiles or granite tiles.
The lining performs several useful functions:
- makes the connection between the toilet and the wall more airtight;
- enhances sound insulation;
- prevents vibrations when using the toilet;
- maintains the integrity of the tile covering;
- It has no memory effect, so it doesn’t get pressed in.
The gasket itself consists of polyethylene foam. It can also protect the room from leaks if it is installed correctly.
Tight gasket under a wall-hung toilet Source vannarakovina.ru
Important! There are always special holes on the gasket between the toilet and the installation. They need to be aligned with the holes in the seat of the bowl itself and only then attached to the wall. In this matter you will have to get an assistant.
Pipe fittings: advantages and disadvantages
The device is selected depending on the location of the sewer riser and the outlet pipe, while calculating how to connect the toilet with minimal financial and time costs. Otherwise, you will have to redo the sewer system, adjusting it to the features of the toilet exhaust system.
Various devices for connecting the toilet to the sewerage system provide flexibility in performing installation work yourself
If the connection of the toilet with the sewer is carried out using drain pipes, then it is possible to achieve visual visibility of the unity of the installed product with connecting elements made of the same material (sanitary ware, ceramics, porcelain, etc.).
The difficulty of installation lies in the need to accurately match the parts with the location of the socket of the sewer pipe, since there is no possibility of adjusting the connecting element by cutting it.
Eccentric cuffs, produced from polymers, are a structure of two bends, the axes of which are shifted relative to each other.
The cuffs are sold in various lengths, so you can easily select a suitable part for connecting the purchased toilet to a sewerage system that has different parameters for the outlet and socket of the sewer pipe.
Corrugated pipes or corrugations have a plastic shape, thanks to which parts can stretch or shrink, as well as bend at any angle.
All these qualities facilitate installation work, during which the master only monitors the slope of the corrugation, which ensures normal maneuverability.
A cast iron or plastic sewer pipe is connected to the toilet using a rubber cuff, which is turned inside out during installation, ensuring a 100% tight connection.
To enhance the reliability of the connection, be sure to use a sealant. The result is a fairly reliable connection that will last for many years.
Self-connection of the toilet is carried out according to the diagram, and the master must have the necessary tools:
- set of wrenches or at least one adjustable wrench;
- several screwdrivers;
- metal saw used when dismantling an old toilet;
- tape measure, hammer, knife;
- sandpaper;
- sealant, a little tow, cement;
- hammer drill with a set of pobedit drills;
- dowels
How to choose the right place to install a wall-hung toilet
Assembling a wall-hung toilet installation always begins with choosing the installation location. It is rational in this matter to take into account the requirements of comfort and ergonomics. It is important that the distance to the walls is sufficient, and that the approach to it is free. You should also take into account the closest access to communications; the closer they are, the easier it is to complete the installation, since additional laying of pipes and risers will not be necessary.
Selected location for installation Source house-masterplus.ru
When do you need to replace the corrugation?
The service life of corrugated adapters, when installed correctly, can be measured in years, and the durability of products from well-known manufacturers is naturally higher. However, over time, high-quality corrugations need to be replaced.
Determining when it’s time to replace a pipe is usually not difficult. The most common damage to corrugations is a violation of their integrity and loss of elasticity of the seals. In both cases, depressurization of the connection will manifest itself in water leakage from behind the toilet, especially when flushing, and the appearance of a specific smell from the sewer.
The defective area is determined by visual inspection, in a hard-to-reach place - by touch. There are two ways to solve the problem in such cases - repair or replacement of the corrugation. The most reliable is the second one, let’s consider it in more detail.
Preparatory work
Since the process of installing a wall-hung toilet structure is quite complex, you will have to follow a strict sequence of actions, but first you should make preparations. To do this, assemble the entire kit for the frame structure. It includes:
- the frame itself plus a plastic barrel;
- inlet valve and fitting;
- fastening elements for the toilet bowl and frame.;
- control panel with built-in keys;
- flush elbow and drain pipe;
- pipe plugs;
- pad;
- toilet bowl and toilet seat with lid.
You will also need components to connect the flush tank to the pipeline: silicone sealant, flax fiber (tow), fum tape; pipe for connection to the water supply and connectors for it with the appropriate cross-section.
An assembled installation that fits into a niche for installing a wall-hung toilet Source remontnik.ru
You will also have to acquire a drill, a hammer drill, a tape measure and other equipment that may be useful in your work.
Connection of the pipe
Brief instructions for connecting the corrugated adapter are as follows:
- First of all, the rubber seal should be placed on the toilet outlet. To make it easier to put on, it should be moistened with water.
- Then the toilet is installed in place.
- The second end of the outlet is connected to the sewer socket.
Note! To seal all joints, they must be coated with silicone sealant.
If the connection is made with rigid connecting elements, then it is a little more difficult to perform, since it may be necessary to move the plumbing fixture to the required distance. If you need some complex non-standard solutions, and you do not have the proper experience, it is better to seek help from a professional plumber.
Marking
Let's assume that the bathroom is combined, then in the selected place, right in the center of the wall, draw a vertical line with a paint pencil. The rules will help ensure the level of the trait. When making such markings, take into account that the distance of the frame frame from adjacent walls must be at least 13.5 mm.
After this, select the place where the drain panel will be mounted in the future (at a height of 1 m from the floor finish, draw a layout diagram in accordance with the required parameters.
A horizontal line is made on the selected wall, which will be located strictly at the distance of the height of the structure. A horizontal line is drawn from here, and marks of the installation width are already made on it according to the lateral parameters of the frame structure.
From these points, vertical lines are lowered down to the floor, after which they are continued strictly perpendicular to the wall and parallel to each other for another 25 cm in length. On the resulting lines, markings are made of the places where the legs of the installation will stand. Here a gap of 3.5 cm is provided between the wall and the barrel.
Important! When performing the last marking, adjustments must be made in case the wall is blocked.
The resulting perpendicular lines on the floor are connected to each other at the extreme points. Be sure to check perpendicularity. If it is not achieved, the position of the lines is adjusted.
Installation of the installation and wall-hung toilet: step-by-step instructions
Once you have sorted out the markings and are convinced that all the lines are correct, you can begin installing the structure. We advise you to do everything in the strict sequence below so as not to miss anything.
- Frame assembly. This includes all parts that are supplied disassembled in the kit upon purchase. The outlet sewer pipe is also selected, and then a fitting installation is carried out.
- The next step is to install the upper stops. On the left rack of the frame, the height is adjusted to a mark of 1 m. The legs are immediately secured using the component bolts and at the same time the horizon is controlled.
- Now make markings on the wall for mounting the upper stops. At the same stage, they also make a diagram for fastening the lower legs of the structure to hold the wall-hung toilet.
- Using a hammer drill or impact drill, drill holes in the walls to install fasteners. The drill for this purpose is selected in accordance with the size of the bolt.
- Polymer dowels are driven into these holes, after which the installation itself is fastened directly. Then check the ideality of the level and, if necessary, correct the resulting error.
- Once the correct position is found, the structure is securely fixed with a lock nut. Next, install the fastener that will hold the sewer outlet pipe.
- Now install the sewer elbow and secure it with a clamp. Afterwards, fittings are installed that collect water into the flush barrel. Now everything is connected to the water supply and to the flush shut-off valves.
Hanging a toilet on an internal installation placed in the wall Source santehnika-progress.ru
Alternatives to exhaust corrugations
If we do not consider home-made devices made from improvised means such as reinforced hoses with adapters, then only hard plastic bends Ø 110 mm, the so-called “elbows,” provide worthy competition to corrugations. Moreover, fittings with solid walls have a number of important advantages over flexible pipes - they are stronger, due to smooth walls they are less likely to clog and are easier to clean from the outside. At the same time, rigid drain fittings are more cumbersome, and to replace them with an identical one, you need to dismantle the toilet.
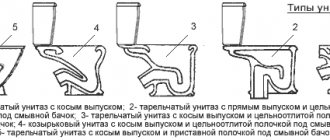
To expand the possibilities when placing a toilet in a toilet, solid plastic outlets are available in three types - for vertical, horizontal and oblique outlets.
Toilets in the toilets of private houses are equipped with a vertical outlet, and even then not often. The main inconvenience of such a system is that the sewer pipe must pass through the floor slab.
Direct connection is made using one elbow at 90° or two at 135°.
Horizontal outlets are also called straight - these are toilets whose drain pipes are directed back perpendicular to the wall. This connection simplifies the maintenance of the sanitary device and visually gives the structure stability, but is carried out with the obligatory use of a sealing collar.
To arrange a horizontal type drain, use a coupling and a 135° bend.
Oblique discharge means the direction of discharge at an angle of 30-45°. Today, such toilets are the most popular because, in addition to the individual installation location, they are also suitable for installation instead of a device with direct outlet.
This type of connection is made in the same way as a horizontal one - using 135° bends or a direct coupling.
Today, wall-hung toilets do not have models with an “oblique” outlet.
Video description
Installation of a wall-hung toilet.
Further actions are arranged as follows:
- The water is shut off and a flexible metallized hose is installed at the entry point, which will be responsible for collecting water.
- Afterwards, install a plastic plug on the inspection tank, which may be required during operation.
- As a result, studs are installed on which the wall-hung toilet is subsequently hung. Now, polymer linings are temporarily attached to them, as well as to the sewer pipe installed in the installation.
Please note that at this stage the electrical cable is also connected, but only for those cases if, in addition to the toilet, a bidet is also provided.
Features of using a corrugated adapter
The cuff or corrugation for the toilet is not used to connect to the sewer in all cases. The fact is that plastic pipelines are more reliable and can last much longer.
But in some cases it is impossible to do without a corrugated adapter. For example, if the toilet cannot be mounted directly opposite the sewer outlet or when the floor level has risen higher after renovation. This happens when the old floor covering is not dismantled, but new tile material is laid on top of it.
Sometimes the location of the toilet is changed due to the rearrangement of plumbing equipment, if it is necessary to install, for example, a shower stall. Corrugation is used when the type of outlet of the mounted device does not correspond to the existing sewage system.
People living in Soviet-built houses often face a similar problem. In them, old sewer networks are designed to connect to devices with an oblique outlet, while in modern toilets it is made straight.
Covering the structure and installing a wall-mounted toilet
After the assembly of the metal frame is completed, all communications are assembled and connected, this large structure is hidden behind a false wall or a special box.
Wall-hung toilet and bidet connected to one installation in the wall Source axop.su
It is often constructed from sheets of plasterboard or chipboard, which are screwed onto a pre-assembled frame made of metal profiles. Afterwards, holes for communications are cut in the sheathing sheets using a drill using an attachment in the form of a special crown, as well as holes for fastening studs. A window must be cut out to install a panel with flush buttons.
Important! After the work has been completed, the walls are covered with tiles or ceramic tiles, during which all parts are trimmed in accordance with all the holes on the plasterboard.
Installing a toilet bowl and flush panel
In this section we remember the gasket that needs to be installed. The instruction is based on the following algorithm:
- all components are found, rubber cuffs are installed on the sockets;
- plastic fittings are mounted on the faience pipes of the toilet;
- Next, markings are made where the plane of the rear wall of the toilet should go;
- after that, the fittings are removed from the toilet and inserted into the pipes of the assembled installation;
- a similar ring marking is made, here the distance on the inlet and outlet pipes is measured, as a result, the excess is cut off;
- at the end, the chamfer is removed and lubricant and rubber bands are applied on top;
- then take a polyethylene foam pad and, in accordance with the markings made on it by the manufacturer, put it on the studs and pipes coming out of the wall;
- the toilet bowl is inserted into the installation pipes pre-lubricated with sealant and at the same time put on the studs;
- Holding the toilet by the base, the final fixation is performed using nuts, which are also included in the kit.
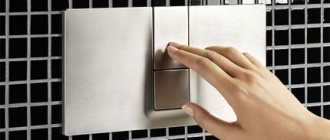
At the very end, a panel with small and large drain buttons is installed.
Nuances of choosing a corrugated product
Before choosing a corrugation for the toilet, you should clarify the parameters of the holes to which you plan to connect it. Experts advise buying this product together with plumbing fixtures.
Of the other dimensions of the toilet corrugation, the length of the pipe is important. Models of various purposes and types are available for sale. For example, if the bathroom is small and combined, an easy-to-install option would be a product with an outlet that allows you to simultaneously connect two objects to one sewer outlet. In some cases, it is more rational to use a rubber cuff for toilets.
You should not look for cheaper products, because regardless of what kind of corrugations there are for a toilet, even the most expensive option has an affordable price. If the connector costs a little more than other similar products, it will be of high quality.
Imported specimens have good indicators of durability and strength. The fact is that foreign manufacturers strengthen their products with reinforcing metal wire. These products are more rigid, better resist various mechanical influences and sag less.
To install a corrugated toilet drain, you may also need:
- a straight or eccentric coupling designed to connect to a sewer pipe of a device located very close;
- a plastic outlet or pipe with a cuff, used for installing plumbing fixtures, the position of which is shifted relative to the entrance to the drainage system;
- hard or soft corrugation, which allows you to bypass minor obstacles that prevent a direct connection of the device to the sewer.
When choosing an adapter, you must remember that problems arise not only when purchasing and using a product that is too stretched. Experts do not recommend using too short corrugation for the toilet. As a result of sharp bending or too much compression, the product will soon break.


