During construction, renovation, and simply replacing plumbing, the question of how to properly install a toilet in a private house becomes a priority. Incorrect actions may result in a malfunction of the sewer system. Emergency situations are inevitable if the installation of a toilet in a private house is carried out without complying with the standards. The information given in this article on how to properly install a toilet in a private home will help you avoid mistakes when solving the problem. Of course, a plumber will deal with the problem quickly and efficiently. But installing a toilet yourself in a private house will be more profitable.
Planning
Before installing a toilet in a private home, a number of preliminary steps are performed. And the first on this list is the floor plan. You cannot install a toilet in a private room without a plan. The diagram will require:
- precise measurements between location points;
- plumbing dimensions;
- type of equipment being installed.
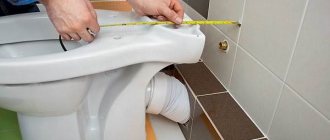
According to plumbing standards, the distance between the wall and the device should not be less than 20 - 25 cm. The free space between the plumbing fixtures and another object is 65 cm.
Best answers
Clara Bitchy:
Only with cement mortar, and let it sit. Gypsum is afraid of moisture - a solution with the addition of gypsum is good only in a dry place; moisture will crumble after a while. And to speed up the solution, you can add liquid glass, which will give it waterproofing properties, but it hardens so quickly that you may not have time to lay it :-)
about 100 Yanina:
no need to reinvent the wheel - make it with cement... although my husband put it just like that... didn't fill anything...
Grandfather Au:
yes, fill it with solution
Cat's smile:
Fill it with cement mortar - cement with sand (1:4), put a wooden board on top, and temporarily connect the toilet. , Leave it like that for a couple of days, then you’ll put it firmly in place.
Starr Grandfather:
3 parts cement + 1 part gypsum (alabaster) will set in 2 hours. The more gypsum, the faster. If 1:1 then it will set in 20-30 minutes Sand by itself! It will turn out something like this: 1 part cement: 2 parts sand: 1 part gypsum
Barabas:
Fill it with tile adhesive; it does not need to be diluted with sand, it will harden faster and will not crack.
Online magazine Tips for owners:
The faster the deader. This is the law. You can't think of anything other than a cement mixture. There are quick-hardening cements (dental fillings were made from these in the old days), but they are prohibitively expensive and rarely come across on wide sale.
The solution may be the following composition - mix dry cement with gypsum, 2 hours of cement - 1 hour of gypsum, add 2 parts of sand, for all this water, half of the total amount, even take a little less, add during the mixing process if it turns out too thick. Dissolve PVA in water, 10-15% of the volume of water. Pour the pre-mixed ingredients into the water, mix them thoroughly for about a minute. We wait a couple of minutes, mix again and fill the niche with the resulting solution using a spatula and smooth its surface.
It will set in about an hour. The toilet can be installed and connected to the sewer system in three hours, and it can be used (carefully!). But drill and install the fasteners the next day, or even better, at least let it sit for a day.
For reference, cement mixtures, as well as mixtures with other binders, do not dry out, they set (plastics polymerize).
Drying, a process that has practically nothing to do with setting, and sometimes has a negative effect. For example, if you decide to speed up the “drying” process with a stream of hot air, you will only get cracking. But the strength and speed of setting can be accelerated by steaming, i.e. by being in a humid, hot environment (but this is not for home use, this is how concrete products are made in factories)
As a rule, the setting speed can be accelerated only at the cost of strength or moisture resistance, as in our case... Therefore, filling with the above mixture may begin to deteriorate after just a few years.
Elena Anikina:
you can use rotband or alabaster, they harden faster than all the others
Chuck Kazemierczak:
Indeed, there is no need to rush. Carefully and slowly pour good cement. Place a board on top (through newspaper to prevent it from drying out). Place the toilet and attach it with corrugation. Tell everyone to sit down carefully. After a couple of days, when it hardens, calmly drill and fasten.
Stas Shabanov:
buy a bag of self-leveling floor. It will dry out in 3 hours.
Alexei:
you will also have to screw the toilet into your filled miracle with dowels or screws.
That’s why they put a board, a mortgage, into it, it’s easier to attach screws, ordinary ones, for wood.
They just hammered a hundred nails into the sides of the board, made a hedgehog out of it, and poured it with mortar, the mortar grabbed the nails, and the board didn’t jump out after drying.
In conditions of quick repairs, plumbers simply fitted a new board tightly, dipped it into molten bitumen, ran with it to the floor, and while it was still warm, pressed it into place.
Run:
Cement
Lyudmila Bogoslovskaya:
Regular cement takes a long time to dry. High-speed hydraulic seals are best for such things. For example, PCI Polyfix 5 minutes, which hardens within 5 minutes. And after this time, you can already veneer it on top and fill it with water
Choice
Solving the question of how to install a toilet in a private house is impossible without relying on parameters common to all models. The main selection criterion is the method of fastening and the type of drain. When replacing equipment, preference is given to a product with a similar type of drain and mounting method. The entire segment is divided into 6 types:
- For dachas - a bowl without a tank and fastenings, fixed with ordinary bolts. (A necessary accessory if a drainage pit is built in a private house).
- Compact floor-standing toilet - consists of two interchangeable elements. Fixed with special fasteners included in the kit.
- Monoblock floor – one-piece design. Disadvantage: if one element breaks, a complete replacement is required.
- Attached - with a tank recessed into the wall.
- Suspended - wall installation with complex installation of a holding frame frame and a flushing mechanism.
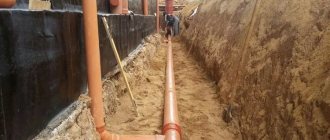
Connection to the sewer main
As already mentioned, toilets can be floor-mounted, wall-hung, or built-in. The last two types require an answer to the question of how to install a toilet installation with your own hands.
Installation - a ready-made drainage and water supply system, built into a niche for further installation of a toilet or bidet.
However, not every user is ready to split the partition in the wall and shell out money for wall-hung or built-in equipment. Therefore, traditional methods of connecting the toilet to the sewerage system and water supply are the most acceptable.
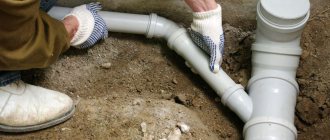
Speaking about attaching a thematic device to a waste pipe, it is necessary to emphasize the use of a budget corrugated cuff.
The cuff is installed by embedding one end of it inside the sewer pipe. The second end, accordingly, is connected to the toilet outlet. Next, the seams are sealed in 2 layers.
If the sewer inlet is a cast iron socket, then you will have to purchase an adapter 123x110 mm. First, the cuff is inserted into this adapter with a “petal”, then the latter cuts into the “cast iron”, and the joint is sealed.
The other end of the cuff is connected to the protrusion and rotated until the holes in the strapping are at the same level. This joint must also be sealed.
It wouldn’t hurt to do a test - pouring water into the toilet to check the quality of the sealing of the sewer outlet. If the cuff leaks, it should be resealed. If there are no leaks, the toilet is fixed to the floor.
In addition to the corrugated cuff, you can use a fan pipe. It promotes reliable connection of the outlet and is better combined with plumbing fixtures, which is very important when the question on the agenda is how to install a wall-hung toilet with your own hands or its flush-mounted equivalent.
On the other hand, fan pipes do not accept undercuts, which means that their sealed profile cannot be replaced as part of the installation.
Dismantling
The next stage is dismantling the old equipment.
Required Tools
Before starting the removal operation, check that you have the necessary tools. The minimum kit includes:
- hammer drill,
- drill,
- a set of keys (adjustable – a must!),
- fum tape,
- silicone sealant,
- roulette,
- building level.
Steps
Step 1. Turn off the water supply, drain the tank, drain the drain elbow.
Step 2: Remove the drain hose.
Step 3. Remove fasteners.
Step 4. Clean the joint.
Step 5. Remove the bowl and seal the hole with a lid or rag.
Cast iron sewer pipes were usually treated with a cement mixture. It will be easier to break the layer by drilling along its diameter.
Required Tools
Self-installation of the unit does not require a lot of time or money for preparation, however, it is important to purchase the necessary consumables:
- flexible corrugated cuff (or plastic drain pipe) for connection to the sewerage system
- bendable hose for connecting the tank and water pipe
Tools and accessories
Directly for installation and fastening you will need:
- Industrial hammer drill (another possible option is an impact drill)
- Drill (for making holes)
- Screwdriver Set
- Adjustable and open-end wrenches
- Spear drill bit for tile work
- Yardstick
- Construction level (preferably water level)
- Hammer and chisel
- Marker or pencil
- Metallized tape
- FUM tape
- Sealant (preferably silicone)
- Cement mortar
General recommendations
The sequence of work when installing equipment directly depends on the type of outlet direction. But there are mandatory points for all types, except for complex mortise models. The instructions look like this:
- Temporary installation of a toilet with corrugation to outline the location. (It is moved to the side while drilling).
- Drilling the required holes.
- Driving in dowels with the appropriate diameter.
- Securing the toilet (pre-install the toilet permanently) and connecting to the sewer. To do this, press the pipe with the seal tightly to the sewer pipe.
- Assembly and installation of the drain tank.
- Connecting the hose to the water point.
- Checking the operation of the flushing mechanism and the tightness of the joints.
Choosing a toilet
When choosing, you need to pay attention not only to the maintainability of the device, but also to:
- type (suspended or floor-standing),
- cistern design;
- type of bowl;
- the material from which it is made;
- release into the sewer system (discharge).
As for the material, modern plumbing fixtures are made from:
- Faience;
- Porcelain;
- Metal;
- Plastic;
- Stone;
- Glass.
It wouldn’t hurt to pay attention to the shape of the bowl, which can be:
- Disc-shaped;
- Funnel-shaped;
- Kozyrkova.
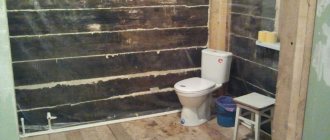
When installing a toilet on a wooden floor, the type of plumbing, its features, dimensions, and flushing characteristics matter. It will be a shame if the purchased hygienic device does not fit into the room in terms of dimensions or does not fit into the existing sewer system. It should not only be beautiful in appearance, but also meet all the requirements for it and the specifics of the bathroom.
Connecting elements
There are several connection methods.
Branch pipes and bends are indispensable when working with oblique bends. It is considered a practical and durable option.
The drain pipe is a guarantee of reliable operation of the water seal. Used to protect against the formation of air cushions in pipes. This point is relevant if there are a large number of water points. An analogue is a pipe with a check valve, manufactured as an integral mechanism.
The diameters of the pipe and drain outlet must be the same size.
Eccentrics - connecting cuffs with an offset axis - are successfully used. Plastic or corrugated eccentrics are a universal device for non-standard situations. Another advantage of such a coupling is the ability to be inserted directly into the sewer socket without an adapter.
The corrugation is suitable for difficult conditions. Where the discrepancy in the corners is more than 90 degrees, a corrugated cuff is indispensable.
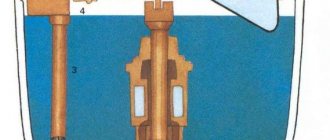
Installing the tank on a shelf
To fix the tank on the shelf, use 2 bolts and a sealing gasket made of rubber or foam material, which is placed on the hole in the drain mechanism of the tank. Washers and rubber seals in the form of a cone are put on the fastening bolts. They are installed in holes in the base of the tank.
The tank is placed in its proper place. All holes must be aligned. The fasteners are tightened at the bottom. There are plastic nuts for this. They have a special design that makes it possible to tighten everything by hand.
Please pay attention! You do not need to use wrenches to tighten these bolts. Hand tighten only. Otherwise you will get damaged.
Do-it-yourself installation of a wall-hung toilet
Finally, let’s look at the algorithm for installing and connecting a wall-hung toilet with a cistern hidden in the wall. Such models of plumbing allow rational use of free space in the room, but installation is quite labor-intensive and complicated. To install wall-hung toilets without a technician, you need to create a false wall behind which the structure with the cistern is hidden.
There are several stages for installing a wall-hung toilet:
- Preparatory work
- Stretching communications
- Installation of the cistern
- Installing the bowl
Preparatory stage
Installation of a wall-hung toilet begins with the preparatory tank. The hidden tank has its own thickness, which must be taken into account when designing and assembling a false wall. The button is attached to the body of the tank or placed a short distance from it - it depends on the model.
A power frame must be built into the wall, which is included in the delivery of wall-hung toilets. If it is missing, you will have to weld it from a metal corner. Some assemble it from an aluminum profile, but this option is not the most reliable. The included structure is called the installation. Pins are attached to it for hanging the bowl later.
Laying communications
When the frame for the built-in toilet is installed, you need to install sewerage and water supply to connect the equipment. The inlet neck of the sewer system must be located strictly at the level of the toilet outlet pipe attached to the wall. Do not forget to maintain a slope for the sewer pipe (1-3 cm per meter). Also, water pipes are connected to the toilet installation site. Most often, a PVC pipe is used for this, but some also choose metal-plastic.
Tank installation
When all communications are connected, it will be possible to install a hidden tank in the wall. There shouldn't be any difficulties with this. Connect it to the bowl drain pipe and plumbing system.
When the drain button is placed directly on the tank, you need to make sure that its surface extends beyond the plane of the wall cladding (most often it is ceramic tiles). The tank is securely fixed to the pins using nuts. The main thing, before sewing up a hidden tank with plasterboard or other material, is to make sure it is working by flushing the water several times.
Installing a hanging bowl
Once the tank is installed and connected, all that remains is to secure the bowl. This is done after the false wall has been assembled and tiled. The toilet is attached to the provided pins and clamped firmly. When installed correctly, the device can easily withstand even the heaviest people who will use it.
Installing a toilet requires not only free time, but also certain skills. Therefore, if you are not confident in your abilities, it is better to turn to specialists. Professional plumbers of the San-Remo company will carefully and in a short time install a regular or wall-hung toilet. For different types of floors, and if necessary, they will carry out all the necessary communications or repair old plumbing equipment.
What does poor ventilation in an apartment lead to?
Decades have passed since the current SNiPs were developed. Most apartments and houses today have plastic windows and metal entrances that are almost 100% sealed. This creates serious problems for the natural circulation of air in the home.
Ineffective ventilation causes gas to accumulate in the event of an emergency leak, which in turn creates an explosive situation.
In addition, the lack of normal air exchange leads to other negative consequences:
- The concentration of harmful substances increases, primarily carbon dioxide from breathing and carbon monoxide from cooking in the kitchen.
- A high concentration of water vapor leads to the formation of condensation on the windows, walls and ceilings of the apartment, which causes the development of mold, the appearance of a rotten smell and dampness in the house.
- A damp, moldy atmosphere is an ideal breeding ground for many pathogens.
Please note! Inadequate or no ventilation inevitably affects the health and daily well-being of residents, especially children and the elderly.
You can solve this problem in the warm season by opening the blinds and windows, but in winter this opportunity disappears, especially if there are children at home. The only favorable solution to the problem is to organize an air supply and exhaust system inside the apartment with your own hands.
What should a master expect: the main stages of construction
When thinking about building a bathroom in a wooden house, you should immediately decide that the plumbing must have access to the sewer or at least to a cesspool. Water must also be connected for the bathroom to function fully.
The arrangement of this zone in a wooden structure has its own characteristics and even some difficulties. But they are easy to overcome if you do everything according to the established sequence.
The construction of the bathroom should take place in the following order:
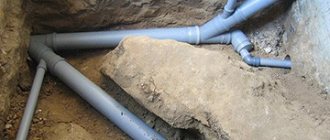
- Sewerage installation. This is an initial and very responsible activity. If problems arise with the sewerage system, construction may be delayed. In a house that does not have access to a sewer, cesspool or sewage treatment plant, it will be impossible to create a bathroom. The only solution in this case is to carry out sewerage or dig a hole yourself.
- Ventilation. Without it, it is also impossible to carry out hygiene procedures fully. This requirement is easier to fulfill; the main thing is to think about how to arrange everything correctly.
- Waterproofing installation and plumbing installation. This is also an important stage. If you ignore the installation of waterproofing, then over time the wood will deteriorate due to high humidity. It is also better to purchase high-quality plumbing fixtures. It will last much longer and you won’t have to injure the wooden base to carry out installation and dismantling.
- Selection of design and finishing work. In order not to become hostage to one image of a wooden house, you can use the services of an interior designer or come up with everything yourself, inspired by ideas from the Internet or an architecture and design magazine.
Work must be carried out strictly according to plan. You can’t do ventilation without understanding the sewage system, etc.
Also, before starting, you need to consider a few truths about wooden houses:
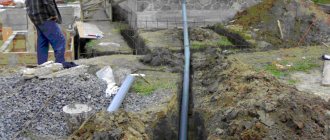
- Over time, the house shrinks. Therefore, it is better to purchase metal-plastic or plastic pipes so that in case of deformation they can withstand the pressure.
- To secure the pipeline, use special clips.
- A sliding frame is a special technology that will allow you to build a bathroom in a wooden house without complications.
Construction of a toilet for a summer house: drawing with dimensions for a “birdhouse” type structure
The design of the Birdhouse consists of wood, which can be covered with any other type of material. Construction of a single or gable roof is allowed. This type of closet is mounted as an above-ground building above the cesspool.
Typical design of a “Birdhouse” with dimensional parameters:
| Design element | Size, m |
| Rear wall (height) | 2 |
| Width | 1 |
| Front wall (height) | 2,3 |
| Base area | 1x1 |
When installing a wooden toilet structure, mandatory control of the placement of surfaces vertically and horizontally is necessary. For these purposes, it is recommended to use a building level.
Drawing of the Birdhouse toilet: 1 - frame, 2 - stand, 3 - door, 4 - handle, 5 - door crossbar, 6 - front wall, 7 - roof rafters, 8 - roof, 9 - ventilation riser, 10 - deflector, 11 — side wall, 12 — cesspool cover, 13 — brick supports, 14 — rear wall
Materials for the construction of the Birdhouse
To carry out the work, make sure you have:
- roofing felt - in the amount of 2 m?;
- concrete curb (2 pcs., length - 2 m) or sand-cement block (4 pcs.);
- door block (2000x900 mm);
- sand;
- linings (40 pcs., 87x3000 mm);
- edged boards (4 pcs., 50x100x6000 mm; 3 pcs., 32x90x6000 mm);
- profile sheet made of galvanized steel (2000x1520x0.4 mm);
- wooden beam (1 pc., 50x50x600);
- components for the door (latch, hinges, handles);
- fasteners (screws, nails);
- material for the finishing coating (varnish or coloring composition).
Toilet “Skvorechnik”, photo 1: preparation of materials and installation of the frame
In order to insulate the structure, you should purchase polystyrene foam. After construction is completed, the frame is sheathed from the inside. You can decorate the interior with beautiful materials (optional).
How to build a toilet in a country house with your own hands: step-by-step construction of a “Birdhouse”
Instructions for building the “Birdhouse” (step-by-step guide):
organization of a cesspool. The minimum size of the tank is 1x1x2 m. At the bottom there is a cushion of crushed stone or broken brick;
Toilet “Skvorechnik”, photo 2: installation of a technological hole in the floor
- construction of the foundation part. To do this, a concrete curb is installed so that the edges of the pit are located at a distance of no more than 0.2 m from it. The curb will act as a ceiling. The process of installing a curb involves digging in such a way that the concrete base rises above the soil level by no more than 0.1-0.15 m. If sand-cement blocks are used, they should be dug in the corners. The entire frame will be installed on them in the future;
- installation of roofing felt. The material is laid on top of the base in 3-4 layers as an insulator from moisture;
- construction of the above-ground part (wooden frame), its finishing. A wooden board or lining can be used as a cladding material for the frame. The flooring is made from thick boards. The minimum thickness for flooring is 4 cm. It is recommended to use wood species with increased strength characteristics. These species include larch, beech, oak, etc.
Toilet “Birdhouse”, photo 3: cladding of the external walls of the structure
Final work on the creation of the “Birdhouse”
The final work includes the following stages:
- creating a hole in the floor. The shape of the slot in this case can be arbitrary (round, diamond-shaped, oval, heart-shaped), the main thing is that its diameter is at least 30 cm;
- installation of door structure. For convenience, you can make a small slot in the door leaf in the form of a window so that sunlight can penetrate inside the frame. This window can be left free or glazed;
- roofing arrangement. The roof of the Birdhouse can be covered with various types of materials. Asbestos-cement sheets, roofing felt, and profile sheets made of steel are best suited for these purposes;
- applying the finishing layer. The surface of the product should be treated with varnish or paint. It is recommended to use oil dye.
Toilet “Skvorechnik”, photo 4: installation of a ventilation pipe and arrangement of the roof
When arranging toilets, do not forget about organizing ventilation. Even the simplest option will be enough. This system is designed to remove air from the waste pit to the outside. A pipe can be used as a material for making ventilation. The minimum diameter of the product is 10 cm.
To install the pipe in the podium part of the toilet, as well as in its roof, slots of the appropriate diameter are made. The pipe must rise above the roof by at least 0.2 m.
Toilet “Birdhouse”, photo 5: country toilet, built with your own hands
Organization of ventilation with access to the wall
The home ventilation system cannot be based on one principle. A holistic approach is essential. Constant air exchange can only be ensured with sufficient air supply. This is why natural methods of introducing clean air and forced ventilation in the wall are so important. In the first case, we are talking about ventilation of the house by opening the windows.
Natural exhaust
Natural air exhaust refers to a set of means for laying exhaust ducts without the use of outside air fans. Due to low efficiency and dependence on external weather conditions, these systems require good air supply. When equipping a house with a naturally functioning ventilation duct, it is necessary to consider its exit in each room of the building and equip these rooms with supply valves, which are installed on the wall opposite the exhaust opening.
Natural filtration ventilation is more beneficial for the human body, since the movement of masses does not cause unwanted drafts. The pump capacity ranges from 0.9 to 0.7 m3/h.
Force settings
Compared to natural exhaust, the hood with forced ventilation through the wall from the outside is equipped with an electric motor with an impeller that sucks exhaust air from the living space. Depending on the area of the room or the entire building, such blocks may have different capacities. A complete system is also equipped with supply fans that blow mass from the outside into the interior, which operate simultaneously with the exhaust fans.
The air speed in the house under these conditions is from 5.5 to 3 cubic meters per hour, which is similar to a light breeze. Therefore, such installations may cause discomfort in particularly sensitive people.
The ventilation unit can be installed in one room or in the entire house by installing multi-duct air ducts.
Combined ventilation device
The ventilation scheme with mixed filters is based on the principle of laying a network of branched air ducts for natural convection of air masses and equipping individual rooms with supply fittings. In addition, in places where water vapor and moisture accumulate the most, forced ventilation from the outside is organized through the wall in the form of above-wall devices.
This system is the most effective because it provides flexibility in cleaning. With good external draft, the use of electrical appliances can be avoided, thereby saving costs.
Which option is better
Arguments in favor of natural and combined ventilation:
- Acceptable financial costs for installation and operation.
- Minimum power consumption. Exhaust fans in combined systems operate intermittently and consume a total of 100-200 Wh. Heated air intakes will require more - about 500 W per room.
- Natural forced ventilation can provide adequate air exchange in a one- or two-story building, especially in a bungalow.
- There is no need to allocate space in the building to accommodate ventilation equipment and lay air ducts.
- Eliminates the need for unit maintenance and annual filter and duct cleaning.
Important note. Creating a completely mechanical general ventilation system requires a careful approach - calculations, design and qualified installation. This is impossible without designers with special training and qualified craftsmen.
One last point: if forced ventilation was not originally intended for the home, allocating space for air ducts will be difficult. You will need to get creative and place ventilation ducts under the floor or in wood ceilings to move through the rooms. In addition, part of the living space will be occupied by household appliances, as the expert talks about in the video:
Features of installing a toilet with an oblique (inclined) and vertical flush
The differences in installing a toilet with an oblique flush from the previous installation scheme are as follows:
- First of all, we place the connecting corrugation into the tee in the sewer not directly, but at an angle until the toilet is fixed with self-tapping screws. Otherwise, difficulties will arise when the plumbing fixtures are located close to the wall (that is, it will be difficult or impossible to insert and remove without dismantling the toilet itself).
- We place all the fittings inside the tank until it directly hangs on the toilet.
- Secure the drain assembly with a clamping nut (bottom outwards)
A toilet with a direct (that is, vertical) flush is installed on a special flange with a screw and clamps, which is included in the plumbing kit.
Rubber rings are used for tightness.
It should be noted that you can install a toilet on a wooden floor using a thick sheet of plywood (taffeta) to protect the wooden floor from rotting. Or just as decoration. However, according to many masters, you can do without it. It is enough to use a good antiseptic that protects against both rot and mold.
Install a toilet on a wooden floor: video
A properly installed toilet should not create puddles on the floor and spoil the floor covering. To achieve this, you need to correctly not only install it, but also connect it.
Luxury country toilet
I built an outdoor toilet for my wife and daughter. Well, I didn’t forget myself. I didn’t waste time on trifles. If you build, then build it right!
The user divided the construction of an outdoor toilet into stages:
- I dug a hole and lowered two barrels with a volume of 200 liters into it. The barrels were stacked on top of each other. There is no bottom or lid. I cut slits in the bottom barrel in a checkerboard pattern. Gravel 10-15 cm thick was poured from below.
- Marked out the foundation for the country toilet. Base size – 2500x1500 mm.
- The strip foundation was poured. I laid a beam with a cross section of 10x10 cm on the concrete. For waterproofing, I laid roofing felt.
- Installed the frame of an outdoor toilet made of timber. The height of the main posts is 2000 mm. A 5x5 cm block was used for the jib.
- For the rafters of the country toilet, the user took a 50x50 mm block. The pitch of the rafters is 400 mm. The lathing is a board 15x2 cm. The floor is covered with a board 3 cm thick.
- Mrreanimatolog insulated the country toilet with stone wool. The inside was lined with clapboard. Outside is a block house. I installed a washbasin, a sink and a “faience friend” like a country toilet.
The ventilation pipe goes behind the toilet. Then it passes under the floor and comes out directly above the barrel. A vent pipe is mounted on the wall. I made ventilation holes around the perimeter of the foundation from a pipe with a diameter of 5 cm. This provides additional ventilation. Therefore, there are no unpleasant odors in the toilet.
At the end of the work, the user completed a porch 700 mm long. Covered the roof with corrugated sheets. I cut in windows measuring 50x50 cm and installed a homemade door.
The operation of the country toilet proved the functionality of the design. Among the modifications, the user installed the toilet with silicone sealant. This eliminated leaks where the toilet was installed on the floor.
If the base is crooked
It happens that the floor in the toilet is not as level as is required today. Either the tiles were laid crookedly, or they themselves are not ideal, or maybe the floor is wooden and there are differences in the height of the boards. In general, you will have to mount the toilet on an uneven base. What's the best way to do this? Here's what can help secure a toilet on an uneven floor:
- Be sure to place the rubber under the base and take it a little thicker.
- Use plastic or rubber washers under the bolt heads.
- Replace the bolts with threaded rods. They have a metric thread, it is cut with a smaller pitch, which makes it possible to tighten it more smoothly. But when using a pin, you need to have the exact diameter of the hole.
Installing a toilet on an uneven floor
The operating procedure is as follows: first tighten the flat (or flatter) side. Then the opposite one is pulled up until it stops, but do not overtighten. A plastic or rubber wedge (or several) is installed in the gap and hammered in with a mallet. Wooden pieces are undesirable. After which, one by one, the fasteners are gradually pulled out on both sides. You need to tighten it gradually, slowly, checking the stability of the toilet. After the free play of the fasteners has been selected, the remaining wedges are cut off flush with the base. Everything is sealed with silicone sealant to match the color of the ceramic.