Home / Boilers
Back
Published: 06/04/2020
Reading time: 5 min
2
4991
The word “boiler” has become widely known; today it is almost difficult to find an apartment or house that does not have such a water heating device.
Installing a boiler in an apartment has become relevant not only in houses where there is no central heating supply, but also in those where there are hot water supply networks. An unpretentious, compact boiler has become a reliable source of hot water supply for millions of Russian citizens.
- 1 Norms and rules for installing a boiler in an apartment
- 2 Required tools and materials
- 3 Select the location for installing the water heater
- 4 Installation instructions for the boiler 4.1 Mounting to the wall
- 4.2 Connection to water supply
- 4.3 How to connect to power supply
Norms and rules for installing a boiler in an apartment
After the owner has made a decision and purchased an electric water heater, he must install it. Before installing a boiler in an apartment, you need to decide who will perform the installation work.
For this purpose, many owners invite specialists who have the necessary tools and experience, and are ready to install a water heating device efficiently and reliably in a couple of hours. The cost of installing a boiler will depend on the power and location.
Home craftsmen can easily handle this on their own. Before connecting the boiler, so that the installed equipment lasts a long time and does not become a source of dangerous situations, you will need to follow a number of rules:
- The wall for placing the device must be solid; installation of the water heater on partitions made of plasterboard or wood is prohibited.
- The location area is as close as possible to the intra-house distribution of utilities: water, sewerage and electricity.
- The electrical outlet for turning on the boiler must be located near the device and used only for it, with a direct connection without an extension cord.
- Free space is left in front of the water heater for maintenance and repair, and it is also placed as high as possible so that it does not obstruct the passage of people.
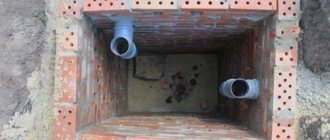
- For emergency drainage of water, the device must have access to a sewerage system.
- You will also need to first ground the boiler and install RCD protection on the power line.
- The boiler installation diagram must be carried out in accordance with the manufacturer's recommendations. To turn off the water heater for repair or maintenance, install shut-off valves and a safety relief valve, according to the standard sizes indicated in the documentation for the heater.
- If the boiler design does not provide a drainage line with a valve, it is installed on the cold water supply pipes at the lowest point in front of the storage tank.
Selection Basics
When choosing an autonomous source for heating water, these indicators should be taken into account:
- Tank volume (taking into account the number of people living in the apartment).
- Device power consumption.
- Internal coating of the tank (it is recommended to pay attention to magnesium or anode rods , which are protected from corrosion and scale).
- Dimensions and other features of the unit.
Find out more information about choosing a boiler for an apartment here.
Required tools and materials
Installing an electric water heater is not difficult, and it does not require expensive tools and equipment. Usually home craftsmen have everything at hand.
After the boiler is delivered to the installation address, it must be unpacked and inspected for compliance with the factory configuration, as well as to determine readiness for connection, specify the dimensions of the mounting strip and the boiler pipe for DHW.
List of basic tools and materials for installing and piping an electric storage electric water heater:
- household electric impact drill;
- set of concrete drills;
- professional building level bubble type;
- plumber's hammer;
- a set of locksmith's keys;
- hex keys, pliers and screwdriver;
- felt-tip pen for marking attachment points;
- anchor fastenings;
- tow or FUM tape;
- 2 standard hoses for connecting the boiler;
- 3 tees DN 15;
- 3 taps DN 15;
- PVS wire 3x2.5 for connecting the device to the electrical panel;
- RCD for operation in a single-phase network, according to the manufacturer’s recommendations, depending on the electrical power of the heating elements.
Electrical part of installation work
Connecting a boiler to electrical power may seem like a very simple task, since to start operating the device you just need to plug the device into a power outlet, and usually household storage water heaters are designed for a normal voltage of 220 V. But any person who is at least a little familiar with the operation electrical networks understands that a standard outlet may not be suitable for such powerful devices. To begin with, it is worth assessing the condition of the electrical wiring of a house or apartment, and then finding out what maximum load it is designed for.
Connecting several devices to one line at the same time (with high power) can be fatal for the entire system. For example, if you turn on a household electric stove/washing machine and a water heater at the same time, the wiring may cause a fire, burn out, etc. The most reliable and safest way would be to connect a separate cable from the electrical panel, and an important indicator of the situation will be the cross-section of the electrical cable. The minimum cross-section can be determined using special tables. In this case, it is worth taking into account the operating voltage, cable material, phases, whether the wiring will be hidden, etc. For water heaters, an aluminum or copper two-core cable with a voltage of 220 V, single-phase is usually used.
If the heater will be installed in a room with a high level of humidity (kitchen, bathroom), then it is worth using special moisture-proof sockets. Moreover, for two-phase boilers it is almost always necessary to install a residual current device, and the cable used must be protected from moisture, durable and elastic. Do not skimp on the cable, take it with reserve, the wire should never be stretched. Before connecting, do not forget to study the cable markings.
Choosing a place to install the water heater
It is recommended to install boilers as close to water risers as possible. This will help reduce the length of water pipes for piping, reduce installation costs and hydraulic losses in the network. Then the device will be able to provide good pressure of hot water.
Electric water heaters are installed on load-bearing walls made of brick or other durable stone. Despite the fact that the structure itself is not heavy, when filled with water, it acquires significant weight and is capable of collapsing a weak partition.
If all these rules are taken into account, then in a small apartment there are not many free spaces left for the correct installation of an electric boiler:
- In the toilet, above the toilet, near the risers, as high as possible, almost under the ceiling, so as not to injure people.
- In a combined bathroom with a bathtub, next to the plumbing and faucet.
- Small structures up to 30 liters can be installed under the kitchen sink.
- In the corridor under the ceiling, you can place a horizontal structure.
Useful tips
- The simplest option for installation is an electric boiler . This type of water heater may have 1 or 2 heating elements. It is better to choose a double one: since one of the heating elements may fail, then the second one will replace it. If desired, one can be disabled to save money.
- To increase boiler performance, it is recommended to connect recirculation .
- If you purchase a large-volume water heater (200 liters), then take into account that the water in it takes a long time to heat up (up to 6 hours) . And installation of the unit is possible only on the floor (installation on the wall is excluded).
- Each person consumes up to 20 liters of water per day . Based on this amount when determining the required tank volume of the device.
- In the case of using an electric heating element, grounding is done .
- It is reasonable to foresee the possibility of disconnecting the indirect boiler from the gas boiler and install special taps for this.
In general, installing a water heating system does not require much experience. The main thing is to take into account the type and method of connection to the power source. It is also necessary to carefully consider the project and take into account access to electrical lines, water supply, and drainage . And if you have to connect the unit to alternative power sources (or a gas water heater), then be sure to consult or entrust the complete connection of the water heater to a specialist.
What do you think of this article?
Boiler installation instructions
Step-by-step instructions are needed so that the home master takes into account the advice of experts when installing the boiler. This work is labor-intensive, and improper installation can ruin not only the newly purchased water heater, but also the appearance of the room. The work of installing an electric water heater is divided into several stages: fastening, piping with in-house networks and the first test run.
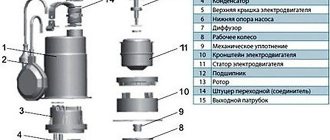
Wall mount
Installation is carried out using mounting hooks, which are fixed to the wall, onto which the boiler body is subsequently placed. Sometimes the structure is secured using a special mounting strip, which is supplied in the kit. It is mounted on the wall with anchor bolts, and only after that the electric boiler is fixed on it.
To properly secure the device, perform the following steps:
- Measure the dimensions of the housing, estimate the approximate installation location so that there are 4-5 cm gaps from the enclosing surfaces, and the removable cover could possibly be removed for repairs and maintenance. The distance from the ceiling must be sufficient to install the structure on the mounting plate.
- Using the template, mark and drill holes for hooks or anchors. The tiles are passed through with a ceramic drill bit and then a concrete drill bit and impact drill are used.
- Install dowels into the holes and screw in the hooks, or insert anchor bolts through the holes in the mounting plate and tighten them with a wrench.
- Hang the water heater on the fasteners.
- The construction level controls the absence of deviations from the horizontal and vertical. This is necessary so that during operation, no air pockets are created in the internal tank, otherwise the heating elements will quickly fail.
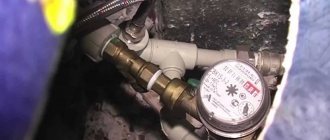
Connection to water supply
An electric water heater can be connected using either standard hoses or PVC pipes. The boiler connection diagram must correspond to the drawings specified in the factory documentation.
Piping the boiler with water supply
Before tying, you need to carefully check all the equipment and the availability of additional materials that were purchased for these purposes.
Algorithm for connecting an electric boiler to a water supply system:
- Screw a DN 15 tee onto the blue cold water pipe of the water heater.
- A relief valve is connected to the lower outlet of the tee with a diameter of ½ inch with an arrow directed towards the electric boiler, and a ball valve is connected to the side to drain the water heater during repair or maintenance.
- All connections are carefully sealed with FUM tape.
- Screw a ball valve onto the blue DHW pipe of the heater and connect it to the tee using a flexible hose or PVC pipes.
- Tighten the connecting nuts by hand, followed by wrenches.
- Place a hose on the relief valve and lead it into the sewer so that the water that will flow during thermal expansion goes down the drain.
How to connect to power supply
Modern electric heaters according to the Russian standard are supplied with a cable and an electrical plug. To reliably connect the boiler, simply plug the plug into a grounded outlet.
In other options, you will need to connect the line yourself. If the cable is not included with the device, buy a three-core PVS 3x2.5 cable and connect it directly from the electrical panel.
Work can be performed by persons who have a clearance group for working with electrical equipment. In order to protect the in-house electrical network from possible overvoltage in the boiler line, an automatic differential switch of 16 A is installed.
Then connect the wires to the boiler terminal block according to the diagram specified by the factory: phase wire - to L, zero - to N, and grounding - to PE or to the housing.
Connection diagram for an indirect heating boiler with recirculation
An indirect heating boiler makes it possible to obtain hot water by heating through a coil or heat exchanger in which the coolant circulates. Typically, such a system for producing hot water is used in cases where the owners have a gas or solid fuel heating boiler installed. Connecting an indirect heating boiler can be done according to one of the following schemes:
Using three way valve
It is best to install such a system when there is a significant consumption of hot water for household and hygienic needs. Here two circuits are created, one of which is intended for heating the room (main), and the second is for heating water in the boiler.
Installation diagram of a system with a three-way valve
The water heater thus has only 4 pipes: two for inlet and two for outlet. A three-way valve is mounted on the hot water line that goes from the boiler to the heating system, which allows the coolant to be used to heat water in the boiler. The convenience of the system is that when the water temperature inside the water heater drops to a threshold value, the temperature sensor transmits a signal to a three-way valve, which automatically switches to the mode of supplying hot water to the unit.
Using two circulation pumps
With this connection method, instead of a three-way valve, 2 recirculation pumps are used, each of which is used for its own circuit. The pumps are controlled using a temperature sensor of the indirect heating boiler. To prevent coolant flows from mixing, a check valve is installed.
Connection diagram via circulation pumps
Using a hydraulic boom
In a complex heating system, when the owners use the coolant not only in heating radiators, but also in water heated floor systems, a hydraulic arrow is used when connecting an indirect heating boiler. This is a special device, which is a compensation chamber in which the pressure difference is compensated and equalized. However, given the complexity of installing such a system, an experienced technician is invited to install it.
Safety regulations
Immediately after installing the boiler, it is recommended to install an RCD of the wet group of electrical wiring. This is a special device that can save your life in the event of an electric current breakdown through the heating element to the water and through the water to you or your family members.
Attention! The boiler may not come with a cord and plug , this is a normal situation! Such devices are powered directly to the network. This is indirectly done so that your boiler is connected by an electrician, who will simultaneously evaluate the throughput of your wiring and conclude whether it is even intended for such loads!