Wanting to provide a home or cottage with clean water for drinking and watering plants, many people think about building a well from concrete rings with their own hands, but if there is not enough experience in these matters, it is worth first familiarizing yourself with the construction technology and all possible nuances. In the world of centralized water supply, wells have not outlived their usefulness and continue to be popular, because they are a reliable insurance fund in case of interruptions in the supply of life-giving moisture, and sometimes their only source. Wells are a guarantee that there will always be fresh water in your house or dacha.
A well is the most important building in a dacha: it will provide you with water for irrigation, summer showers and cooking
Of course, only on condition that it is made in accordance with the technology and is maintained according to all the rules. From the point of view of technical aspects, there is nothing overly complicated in building a well, but the physical work will be very difficult.
Choosing between a well and a borehole
It's hard to answer the question which is better. In each individual case, many factors influence the decision.
To get a water source, you need to choose between a well and a borehole
- Water depth. Typically, the depth of the well does not exceed 15 m; if the aquifer is located below, then for economic and practical reasons you can think about a well.
- Self-construction. For a person without experience, the construction of a well will be clearer and easier to perform than the process of drilling a well.
- Obstacles. There is another important point - underground stones. If you come across one along the course of the drill, then it will be very difficult, and sometimes impossible, to get through it. In the case of a well and its large shaft diameter, the situation is simpler.
- Equipment. No special tool is required for digging wells.
- Service. The bottom of a well or well will silt over time, and it’s easy to guess which structure is easier to clean.
- Business interruptions. The well does not have these (subject to regular cleaning), but the supply of water from the well often depends on the operation of the pump, if it is electric.
Advice from experts on arrangement
The choice of a place to dig a well in a country house or a private country plot is made in compliance with a number of rules.
It is erected according to certain rules, and here are the main ones:
- The water source cannot be located closer than 8 meters from the outdoor toilet.
- If the sewage system at the dacha is designed as an absorbent cesspool (septic tank without a bottom), and the well is intended for drinking water, then the well shaft should be located at least 50 m from it.
- In the case of a sealed cesspool or if the water will be used exclusively for watering the garden, this distance can be reduced to 20 m.
- Also, the water source should not be located close to silos. The distance to them should also be at least 8 m.
Here it is worth considering that the greater the distance of your well shaft from all kinds of structures that pollute groundwater, the better.
This diagram shows that the well from the septic tank must be located at a distance of at least 20 m if the water is intended for household needs, and 50 meters if the water is intended for drinking
Tip No. 1 - time to carry out work
It is best to start work when the aquifer is at its lowest level. And it decreases significantly either during periods of prolonged drought, or after a month has passed after the first frosts hit.
Why during these periods? During these periods, water horizons are not recharged with water - in summer due to insignificant precipitation, and in late autumn and winter because the freezing upper layer does not allow water to penetrate into the earth.
Even though it’s freezing outside, you can go as deep into the aquifer as possible and comfortably. At this time, its recharge is minimal
You can dig a well at normal times, but in this case, at the last stage, you may not be able to penetrate well enough into the aquifer.
If you plan to make a filter, which is at least 60 cm, and have at least one ring of water in the well - 80 cm, then you will have to go deeper below the upper threshold of groundwater by about one and a half meters. And the easiest way to do this is in conditions where water does not remain constantly and at high speed.
But, if you rely entirely on a good pump that can pull slurry mixed with sand, then this is not a problem. In both cases, you will have to tinker in the slurry. And, of course, it is better if it is in warm weather.
Tip No. 2 - searching for groundwater
Many could see how some specialists, in search of water, walk around an area with two frames. Where they intersect, then, supposedly, the aquifer passes close to the surface.
To this we would like to note that any real hydrogeologist will tell you that:
- Water is everywhere and always, except, of course, when you live on the side of a mountain. If the terrain is more or less flat, then the groundwater belt lies, as a rule, at the same distance from the surface of the earth. If your site is hilly, in this case, it would be more acceptable to consider digging a mine in a low area. You can save money on 1-2, or even 3 rings, depending on what elevation changes your country landscape has.
- Searches using frameworks yield absolutely nothing. The effectiveness of this method has not been proven by scientists. Therefore, if you hire a home-grown specialist who practices this method, be aware that this specialist is most likely hanging noodles on your ears. Another thing is that you cannot prove this. As already mentioned, water is everywhere. And the fact that he made a mistake a couple of rings down or up, he will write off as the costs of the method, which he will warn you about in advance.
- The best way to find out at what distance the water lies is to either ask a neighbor on whose property there is already a well, or ask local geologists, drillers and meteorologists. They have engineering-geological maps, from which they will determine the depth of groundwater.
Well, when we have decided on a place, we go to get the rings and the necessary tools and equipment, if there is none at your summer cottage.
Some craftsmen search for water using such frames. But there is no scientific confirmation of their effectiveness, so it is better to entrust this operation to specialists
Tip #3 – choosing rings
It all depends on the diameter of your shaft. If you want to have a wide well, you can take wider rings. Of course, it takes longer to dig, but it is more convenient both to dig and to use. You can turn around properly, use a shovel with a longer handle, etc.
If you are satisfied with a narrow design, you can opt for rings of small diameter. In order to “get a feel for the situation,” you can climb into one of the rings right at the company and try to turn around in it. Whichever one will be more convenient to work in, take those.
The best option for a country well would be KS 10.9 tongue-and-groove, manufactured in accordance with GOST 8020-90. Of these, installing a shaft is a pleasure.
There are rings with a deeper lock, but they still have to be fastened together with staples to prevent shifts due to heaving
Tip #4 – what to do with quicksand?
Quicksand is a layer of silty clayey sand saturated with water. It resembles a dirty slurry in appearance; it is very difficult to obtain water from it: it is only possible as a result of long-term settling. And even then there will be too little of it, so extracting water from quicksand is pointless.
In general, the presence of quicksand in a section is an extremely rare geological situation. They are found only in glacial deposits, which are found, for example, in the Leningrad region. However, if you get caught, it would be advisable to go deeper below this layer. Only in this case will it be possible to ensure constant and rapid filling of the mine with water.
The process of overcoming quicksand is very labor-intensive. The legs are constantly being sucked in, and the accumulating water and slurry create additional difficulties in work. But if you want the well to be full, you will have to do this.
Three staples on different sides are enough to ensure that the rings are held tightly together. Quicksands of this design are not scary
Tip #5 – don’t delay the work
It is advisable to carry out work on arranging a well in the country as soon as possible. Delaying the work using the open method will lead to the collapse of the pit walls.
And if in a situation with the open method, the situation can be corrected by cleaning the hole and covering the crumbled edges with earth after installing the rings in the shaft, then in the second case it may be necessary to use a crane.
Upon completion of digging the well and backfilling the bottom filter, it is advisable to pump out the first water from it. Then it is mandatory to take a water sample for analysis in order to submit it for laboratory testing. Only after this will it be possible to decide whether it can be used for technical or drinking purposes.
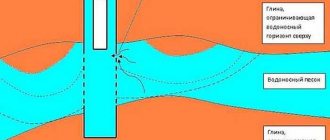
A little about accessible aquifers
Diagram: occurrence of aquifers
- Verkhovodka. It is located closest to the surface and is replenished due to precipitation, which is why its fullness is constantly changing, and during dry periods and in winter it can disappear completely. In addition, it is susceptible to pollution by wastewater treatment plants.
- Ground. They lie at a depth of 6-20 m and are located between two waterproof layers, but do not have excess pressure, so the water level in the well shaft remains practically unchanged. Only minor changes are observed at different times of the year.
- Artesian waters are located at a considerable depth, are strongly squeezed between two waterproof layers, which is why they are under pressure, and when the formation is pierced, they gush out to the surface. The quality of the water is beyond doubt, but the construction and maintenance of a well of a special design is usually not cost-effective.
Conclusions and useful video on the topic
Those who would be interested in listening to expert advice in a slightly expanded and different version can watch the following video:
Work on arranging a well shaft is not as complicated as it is labor-intensive. And it is not always necessary to dig the earth's surface, going tens of meters into it.
Much more often the aquifer occurs at a depth of 4 to 7 meters. Taking turns, it is quite possible for two strong guys to dig such a mine in two days. The main thing is desire and tools!
Tell us about how you dug and equipped a well on your summer cottage with your own hands. Share technological subtleties that site visitors can use. Leave comments, post photos and ask questions in the block below.
How to choose a place for a well and when to start digging
There is a whole arsenal of folk methods for finding water and determining the location for a well, most of them are not questioned, and dowsing is still popular to this day. Experts recommend, at a minimum, asking neighbors or independently measuring the depth of nearby structures. But only exploratory drilling can guarantee an accurate result. The well must be located on the site in a place where it is not at risk of contamination by domestic wastewater (for example, far from the country toilet).
Detection of aquifers using the folk method - dowsing
In addition, it should fit perfectly into the landscape design. It is not recommended to start construction work in the spring, since due to fluctuations in groundwater content, you can make a mistake with the depth. The optimal time is considered to be the end of winter, but not later than March. Work can also begin at the end of summer.
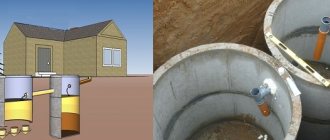
Installation
Installation of a manhole requires compliance with the requirements of SNiP. They say that the tray must be placed on a dense sand bed. Depending on the level of soil freezing, wall insulation may be needed. For these purposes, the pit is equipped with a clay or textile casing.
General requirements for the design and installation of wells:
They must be located at a distance of at least 30 meters from each other. This indicator depends on the diameter of the main pipeline. For example, a scheme with a pipe from 600 mm requires a minimum distance between branches of 100 meters
In addition, inspection structures should be located at each “important” section of the sewer system; If a plastic outlet is selected, it is recommended to use a cable type of pipeline. It differs from the classic one in having a corrugated surface equipped with numerous stiffening ribs; It is also important for the drainage system that the inspection structure is not washed away by groundwater.
Step-by-step installation instructions:
- The foundation pit is being prepared. A hole is dug, which is 50 centimeters larger than the size of the well. After this, its walls are compacted, and if necessary, formwork is built. You can later fill the protective casing over it;
- A cushion of sand and crushed stone in equal proportions is poured onto the bottom. It is better to take river sand for the inspection well - it is denser;
- Afterwards, the tray (a piece of pipe with a diameter of at least 600 mm) is immersed and the bottom is sealed. If you choose a plastic outlet, you can do this yourself. To install models made of cast iron and concrete, you will need to use the services of lifting equipment;
- The outlet of the pipe (sewer, drainage, drainage) is connected to the well pipes. The joints are sealed, thermally insulated and sealed. To ensure that pressure drops do not occur in the network during operation, it is necessary to separately consider the ventilation of the inspection compartment;
- The free space on the sides of the container is filled with sand and crushed stone. Compacts. After a few days, the procedure must be repeated;
- The last thing to install is the cover. Hatches for inspection wells are selected according to the diameter of the outlet and the necessary features. It will be possible to operate the sewerage system within 3 days after the installation of the inspection structure.
You can buy ready-made inspection wells at any plumbing supply store; their price depends on the brand and design features. For example, a model from Uponor (300 mm) in St. Petersburg will cost 60 euros, and in Krasnodar - 58.
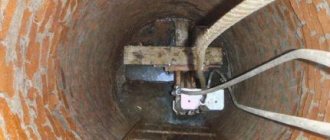
Construction of a shaft-type well
The design of the well is quite simple, but this should in no way affect the accuracy of the calculations, the quality of the work and the responsibility in its execution. Conventionally, wells can be divided into three main components:
- The water inlet - as the name implies, serves to filter and collect water.
- The trunk is the entire structure of the well in the thickness of the soil above the receiver.
- The head is the above-ground part, which is equipped with a lifting mechanism and a roof that protects the shaft from debris.
Scheme: well construction
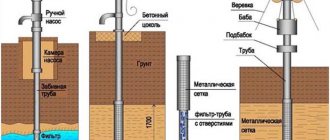
The nuances of lowering rings into a well without a tap
When starting work, you should take into account the large dimensions and considerable weight of concrete ring blocks.
It is almost impossible to cope with the installation alone. Features of the technology require the participation of at least two people. And for high-quality installation work, 3 workers will be required.
The distribution of responsibilities is as follows:
- the first helper on the surface is engaged in a winch, raising and smoothly lowering the reinforced concrete structure;
- the second, working below, is responsible for the formation of the column, installing and fastening the immersed rings, sealing the joints;
- the third is assigned the role of assistant.
Due to the massiveness of the concrete circles, lowering well blocks manually is accompanied by the risk of falling from a height, since the raised product initially hangs on a cable.
The instability of the tripod and insufficient reliability of the fastenings cause injuries. To prevent mechanical damage to the structure and injuries to operating personnel, it is recommended to choose a tower with an increased safety margin and a lifting mechanism with a metal cable.
Types of water intake, which one to choose?
The water intake of a conventional mine well is of three types:
- An incomplete water intake is the most common option and means that the shaft does not reach the lower impermeable layer, and water seeps through the bottom and wall.
- The full water intake reaches the waterproof layer and water seeps only through specially prepared walls of the shaft.
- A full water receiver with an expander is a structure that not only reaches the lower water-resistant layer, but also goes deep into it, forming a niche for accumulating water reserves. Its lower part is often made expanded.
Scheme: types of wells by type of water intake
Important! To think that the more water in the well, the better, is completely wrong. It is important to correctly calculate the balance between daily consumption and volume, otherwise stagnation with all the ensuing consequences is inevitable.
Material for mine wells
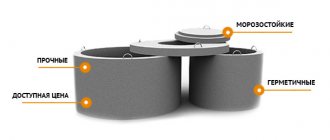
A well shaft can be made from many materials. Previously, it was stone or wood, later brick appeared, and recently the most popular is a well made of concrete rings. The disadvantage of stones is that they are inconvenient to work with; in addition, their cost leaves much to be desired, as is the case with natural wood.
Concrete rings for well construction
Brickwork is a rather labor-intensive process, and the material itself must be of high quality and have good water resistance. In the case of brickwork, it is very difficult to achieve good waterproofing that will not let water into the shaft. Concrete rings make it possible to simply and much faster build a well that will meet all the requirements for technical, sanitary and hygienic standards.
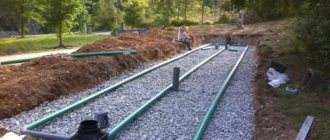
Laying water pipes and cables
It is necessary to dig a trench 40 cm wide. A water pipe with a diameter of 50 mm is laid in this trench. You can insulate the pipe with polystyrene foam.
Then concrete rings are placed in the hole. Heavy equipment is used to install them.
A hole is made in the rings for the pipe and cable. In order to lay the electrical cable, a hole is drilled with a hammer drill 20 cm above the hole for the water pipe. After the water pipe is laid, it is covered with a 20 cm thick layer of soil.
Then a three-core copper cable is laid in the hole, and the trench is completely covered with soil. The gaps between the rings must be filled with foam.
Safety Basics
Inexperienced homeowners often neglect basic rules and endanger not only themselves, but also their partners. To avoid ridiculous injuries, you need to follow at least some basic rules.
- A person in a mine must protect his head with a helmet. Anything can happen; a bucket falling down or a tool falling down is not uncommon.
- Ropes, ropes, ropes, rings - everything related to lifting is carefully checked before starting work.
- A person dripping in a shaft must be secured with a rope, and if the depth of the well is over 6 m, then with two: a working rope and a safety rope.
The construction of a well must be carried out by several people
- There are so-called gas pockets in the soil, and since the air exchange in the mine is not fast, as you descend, they periodically light a candle. Its flame should burn evenly, which indicates a sufficient amount of oxygen; if the fire goes out, the pit needs to be checked.
Advice! There are several ways to ventilate a mine. The easiest way to do this is with a thick blanket, which is lowered to the bottom several times and raised back on ropes. A fan lowered to the bottom of the shaft will also help speed up gas exchange.
How to make a “knife” with a filter
ani1883 and his son began digging the well and started with the construction of the knife.
ani1883FORUMHOUSE Member
Before digging a pit, the diameter of the future well is drawn. It should be taken into account that the diameter of the knife should be 10 cm larger than the diameter of the concrete ring for the well. Thus, the diameter of the pit is 10-15 cm larger than the diameter of the rings for the well.
First, we made approximate markings and removed the fertile layer down to the clay, leveled the bottom and drew the boundaries of the future knife. If the outer diameter is tied to the dimensions of the rings, then the inner diameter is tied to the length of the brick from which the filter will be assembled - for ani1883 the inner diameter is approximately 60 cm.
Next, along the inner diameter of the knife ring, the soil was carefully dug up and selected with a shovel, and then dug under the cone towards the larger diameter. Having selected the main volume of soil, we used a garden scoop to draw out the vertical wall and the “nose” of the knife.
The solution for the knife is self-mixing, the ratio of cement to sand is 1/4, with a minimum of water to wet the components. The solution was poured directly into the ground, the released water helped to remove the horizontal level of the solution. In total, it took three batches - three garden wheelbarrows of sand and three ten-liter buckets of cement.
A week later, when the concrete had set, a filter was laid - three rows of solid ceramic bricks. Before laying, “try on” dry, lay the masonry itself on a weak solution of cement and sand in a ratio of 1/7. The bricks of the first row are laid in a fan, the voids are filled with coarse sand, the second row is laid with the gaps of the first being covered, and the voids are also filled with sand, and the third is done similarly.
Technology and stages of constructing a well from concrete rings
It is unlikely that anyone is going to pour concrete rings on their own, because this is not only a complex and time-consuming process, but also meaningless. It is much easier to buy ready-made products in the required quantities, which can be easily calculated, knowing the depth of groundwater.
Advice! An incomplete well made of reinforced concrete rings is the most popular option, not only because of the ease of installation, but also due to the price-quality ratio.
Construction of a well with alternate installation of rings
The mine is always dug manually with a short-handled shovel; such a tool will be much easier to operate in a confined space. When a hole of the appropriate diameter is about half a meter deep, check the evenness of the bottom and install the first ring. It is important that it is exactly in the middle of the shaft and does not rest against one of the walls. After this, they continue to dig out the earth, but already inside the reinforced concrete product. As the soil is excavated, the ring will gradually deepen under its own weight and when the upper edge reaches the ground level, the next ring is installed on top of it and secured with staples.
Construction of a well using the method of alternate installation of rings
It happens that a hole is dug, but the ring does not go down. This means that it is located at an angle from the vertical axis. You can correct the position by placing a shield on top and throwing stones or bears of soil on the side that needs to be besieged. When the ring begins to sag, the excess is removed. They continue to go deeper. And so on until water begins to seep through the bottom of the shaft. They continue to dig for some time, pumping out the arriving water with a pump. Work is stopped when the mine reaches the first aquifer. Water will begin to flow very quickly. But they continue to pump it out so that it is possible to level the bottom and install a bottom filter, if necessary in a particular case.
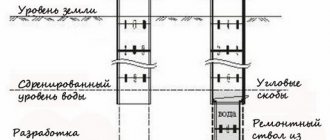
Installation of rings into a finished shaft
There is another construction method, when the rings are lowered one by one into a shaft completely dug to the aquifer. But this method is less popular and is not possible on all types of soil. It is also dangerous that at any moment, even before laying, the earth can collapse. Concrete rings are lowered into the pit by crane, placed end to end on top of each other and secured with steel brackets around the circumference of the connection.
Well construction method: installing concrete rings in the shaft
Internal waterproofing
All seams between the rings are sealed with mortar or a special ready-made compound. When lubricating them, do not forget about cracks and holes, which under the influence of moisture will quickly collapse and cause depressurization of the mine. It is strictly not recommended to use solutions that contain bitumen, as they can significantly spoil the taste of the water.
Processing the seams of a well made of concrete rings
External waterproofing of the well
Waterproofing the well from the outside will prevent water from entering the shaft. For this purpose, a so-called clay castle is made. Around the last rings, a trench is dug about 0.5 m wide and 1.5-2 m deep. Clay is poured into it and compacted tightly. As a result, it should lie slightly above the soil level closer to the well, and ensure that precipitation flows along the slope from the mine.
Scheme: external waterproofing of a well
The site is concreted. Over the next 2-3 weeks, the water must be pumped out several times. It can be used for household needs, but for drinking purposes it is better only after conclusion from the laboratory.
Design features
Due to the fact that reinforced concrete rings are used for different tasks, there are several types of products adapted for specific purposes. The diameter of wall rings, which are in demand when designing water pipelines, varies from 700 mm to 2000 mm with a height ranging from 690 – 890 mm and a wall thickness from 70 mm to 100 mm. Monolithic rings are used to strengthen the bottom, and sewer rings have a significant height, which is up to 900 mm with a diameter of up to 2000 mm. Structurally, the elements may have a solid bottom, perforation, or holes for liquid outflow.
According to the design of the connection, concrete rings are differentiated into two groups: straight and seam, distinguished by their connection to each other in the form of a lock. The latter are characterized by the presence of structural protrusions in the upper part of the product and grooves located below.
The weight of the rings, depending on the size and type, can vary from 200 to 1000 kilograms. Concrete products made using vibratory casting or vibrocompression technology are distinguished by high strength, reliability and, as a result, durability. The material used for the products is cement of a grade no lower than M200. Along with the main material, binder components are used. For the greatest efficiency and maximum strength, the products after disembarking from the molds must be steamed at temperatures from 70 to 90 ° C. Thanks to this technology, the rate of hydration of binder ingredients in the composition increases.
Depending on the purpose and design, concrete rings are presented in the following assortment:
- KSD – products with a bottom;
- KFK - elements focused on the construction of drainage systems and collectors;
- KO - supporting ring products used in the lower part of the structure of wells and foundations;
- KS – wall products;
- KVG - ring structures intended for the construction of wells when laying gas and water supply communications;
- KLK – elements of sewerage systems for storm communications.
According to the parameter of the degree of permeability of the concrete coating, products are divided into three categories with normal, reduced and especially low permeability, which is indicated in the marking of the rings in the form of the indices “H”, “P” and “O”, respectively.
When is a bottom filter needed, and what should it be like?
In order for the water in the well to remain clean and transparent, it is not necessary to install expensive purification systems; it is enough to resort to a time-tested method, namely the organization of a bottom filter. It is a layer of stones of different fractions that retain impurities, allowing only purified water to pass through. The method of arranging the filter depends on the type of soil at the bottom of the mine, the volume of groundwater and the rate of its flow.
Bottom filter device for a well
- Dense clay bottom. Such soil is not eroded by water and is supplied in its pure form, so the well does not need an additional filter. Moreover, it can cause harm by blocking the keys.
- The soft clay bottom can be eroded by active currents, causing the water to become a little cloudy. A layer of crushed stone about 20 cm high will help correct the situation.
- A sandy bottom, through which water seeps slowly, always needs a filter, which is laid in several layers. The first will be washed sand, the next layer will be filled with small pebbles, gravel or shungite up to 1 cm in size, and the last will be crushed stone or stones with a size of 5 cm or more. The height of each layer is 15-25 cm.
- A float at the bottom of the mine. Actually, this is the same sand, but washed away by water to an almost liquid state. In such wells, in addition to installing a bottom filter, it is often necessary to install a wooden or more modern metal shield with holes about 1 cm in diameter. It is lowered to the bottom, and a 15-20 cm layer of large stones and small pebbles is poured on top.
Well installation
Plastic tray well
One of the simplest processes is the technology of installing sewer wells. But this work must be done carefully and following all the necessary rules.
So:
- At the point where the pipes exit and enter, guided by the design, a corrugated pipe equipped with a bottom is installed.
- A cutter is used to make a hole corresponding to the diameter of the coupling for mounting the inlet pipe. The hole must be located at least half a meter from the bottom of the well for normal observation and control of the water level.
- If necessary, a check valve is mounted on the well inlet pipe.
- A trench is filled in above the lid at a level 25 cm above it, then leveled and thoroughly compacted.
The question often arises, what should be the distance between sewer wells?
This depends on the length of the highway itself, as well as on the presence of interchanges and turns in it. It is advisable to install inspection wells at key points. This will greatly simplify cleaning and repair of the pipeline if it becomes clogged.
As for the drainage well, as noted above, its depth must be at least two meters. The construction of a sewer well of this type is necessary for the discharge of water if there are no sewers, lakes or rivers nearby.
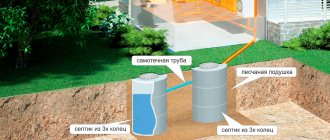
If you have a septic tank on your property, inspection wells are necessary. Their size can be small, and choose the distance between sewer wells based on the distance from the house to the septic tank.
If there are no turns along the drainage system, it is enough to install one or two small wells. They are installed simultaneously with the installation of an autonomous cleaning system.
In the case of a properly laid sewer pipe with the required slope for unimpeded flow of water, the well will be used extremely rarely, and only to control the drainage and clean the pipes.
If necessary, the drainage well can be used as a filter for the final purification of water that has passed through the septic tank. The water drained into the well will be filtered, passing through a layer of sand and gravel at the bottom, thus purifying itself. The finally purified water will be absorbed into the soil without polluting the environment or causing inconvenience to anyone.
The header is beautiful and functional
The final stage of the construction of any well will be the installation of the head - a beautiful and functional part. The head is based on a primitive lifting mechanism, but is also designed to protect the source from contamination. If beautifully executed, it can become an excellent decorative element on the site. Also, at the construction stage, it is advisable to think about organizing the water supply to the outdoor shower, if there is one on your site.
The well head is designed at the discretion of the site owner
To organize the head of the well, the upper ring of the well should protrude 60-80 cm above the surface. But in the first year after construction, it is not recommended to arrange the site, since the ground may still subside a little. A temporary lift with a good roof is being built. You can make a head or house for a well yourself or purchase a ready-made one. As a rule, they are sold disassembled, but assembling all the parts is not much more complicated than a children's construction set.