A drain pit without pumping is a structure consisting of several containers.
It involves treating wastewater using a mechanical method - the settling method.
That is, wastewater, entering the first container through the sewer pipe, is divided into water and mechanical impurities, which sink to the bottom, and the water is poured through the pipe into the next container.
If there is a third container, then the procedure is repeated again.
The last container does not have a bottom - instead there is a cushion made of drainage (crushed stone). Through it, clarified water enters the soil.
Drain pit made of several containers
It is important to understand that the degree of wastewater treatment does not reach high levels.
To make the drainage pit work more efficiently, it is recommended to add special biological preparations to the receiver. They will stimulate the processes of fermentation and decomposition of wastewater, and will help eliminate unpleasant odors.
Biological products for drainage pits
This is necessary to know before construction
Before making a cesspool from concrete rings or other materials, you should find out the positive and negative aspects of the design and its features. In general terms, this is a reservoir where sewage from the house goes. It may or may not have a bottom. In the second case, a sand and gravel bed is constructed and the wastewater is filtered through it into the soil.
Important! It is prohibited to create a cesspool with a filter bottom if the site has a high groundwater level (GWL), since there is a risk of toxic waste entering drinking water sources.
Positive traits:
- Affordable cost of arrangement.
- Durability. Subject to compliance with installation standards, the period of use is one hundred years.
- Easy to use.
Negative sides:
- Regularly call the vacuum cleaners if the pit is sealed.
- It is difficult to get rid of the smell in the area and keep it under control.
- It is necessary to create a convenient access to the cesspool; the hose of the vacuum trucks has a limited length.
- The risk of groundwater and soil contamination is such that it becomes unsuitable for growing vegetable and fruit crops.
Previously, when the cesspool was full, they simply filled it up and dug a new one. Now, due to the presence of a large number of biological and chemical substances, it becomes possible to regularly process sewage and reduce its volume. In liquid form, they seep into the soil. It is not necessary to clean solid sediments often - once every 2-3 years. A similar cesspool without pumping is also called eternal.
Construction of an independent sewer system
Diagram of a homemade brick septic tank.
To speed up the work, the option of installing a ready-made storage tank, for example a septic tank made from Eurocubes, is often chosen. However, a structure built with your own hands from brick will be cheaper.
A diagram of such a design:
- digging a hole in the ground;
- the walls and bottom are reinforced with bricks;
- a sewer pipe is installed on the side under the soil layer, it is located at a slight angle to speed up the movement of wastewater;
- the structure is closed with a lid and a hatch is provided for maintenance;
- in the upper part of the pit (in the side wall) there is a hole for connecting the ventilation duct.
A structure with a filter base is built according to the same scheme. However, in this case, a crushed stone cushion is formed at the bottom. There should not be a hard bottom that ensures tightness, as in the first case.
When choosing a finishing material to protect walls from wastewater, you need to take into account the properties and degree of strength of the products.
For example, it is not recommended to use silicate or porous bricks. Such material will absorb moisture, which will not only lead to its destruction, but will also cause the contaminated liquid to spread outside the storage tank.
The best option for a sewer structure is baked brick. It is durable and therefore can withstand the forces of soil heaving. In addition, baked clay brick is not a material with a porous structure. For this reason, it is better resistant to moisture.
If you plan to install drainage at the bottom of the pit, use a multi-layer structure: a layer of soil, sand, gravel or crushed stone. The recommended distance of the filter base from groundwater during the rainy season, when its level rises to its maximum, is 1 m. Sometimes holes are left in the walls of the well during laying, which will improve the filtration properties of the structure.
Digging a pit
Excavation of soil on the site is carried out in accordance with previously made calculations. Moreover, between the outer surface of the brick structure, which will be erected in the future, and the walls of the pit, a gap of up to 50 cm is left on each side.
If this is not done, the storage volume will decrease, since brick walls will have to be moved.
This measure allows for waterproofing on the outer sides of the structure. Even if baked brick is used, the structure is protected from prolonged contact with moisture. This helps to increase its service life.
Preparing the base of the container
The foundation of a sealed structure must be strong. For this reason, reinforcement is performed, and drainage is additionally arranged. If you skip one of the stages, the strength of the cesspool will decrease.
Instructions for making the base:
Installation diagram of a septic tank with a sand and gravel filter.
- A sand and gravel cushion is formed at the bottom of the pit. The total layer thickness is 200 mm. The sand is carefully compacted, which reduces the risk of subsidence of the base during the process of pouring and drying concrete. Gravel should also be compacted whenever possible (it consists of large fractions, so such material is more difficult to compact).
- The base is waterproofed. To do this, roll durable material, such as roofing felt, is placed at the bottom of the pit. It is laid with an overlap. Thanks to this, cement laitance will not get into the ground when filling the hole with mortar.
- A pre-prepared frame of steel rods with a diameter of 8-10 mm is laid on top of the roofing felt. It is recommended to use flexible strong wire for fastening. Welding will cause a deterioration in the properties of the material, resulting in a decrease in the strength of the structure. The cell dimensions of the reinforcing mesh are 100x150 mm.
Concrete bottom casting
To prepare the solution, use cement grade M300 and higher. Due to this, the strength of the structure increases. The prepared multilayer base is poured with a layer of concrete up to 150 mm thick. This is enough for the cesspool to withstand the impact of a large volume of wastewater.
Installation work can continue when the concrete has dried. If there is no time to wait 28 days, they move on to brickwork after 7-10 days.
During this time, the solution will set and harden enough to withstand a significant load without the risk of loss of properties.
Walling
In most cases, load-bearing structures are constructed using half-brick technology. For large pits, more reliable walls are erected: 1 or 1.5 bricks. To strengthen the structure, after completing the construction of the vertical partitions, the space between the storage tank and the walls of the pit is backfilled. A mixture of sand and cement is used.
There is no need to prepare the solution. It is enough to wait until sedimentary moisture begins to release, helping to strengthen the cesspool. The desired result is achieved when the cement-sand mixture is completely moistened. The result is a monolithic structure that will withstand the load exerted by wastewater even when the storage tank is full.
Application of waterproofing
Work to protect brick partitions from moisture is carried out as the masonry is completed. It will not be possible to protect the surfaces after construction is completed due to the small distance between the storage tank and the walls of the pit.
Coating and roll materials are used for waterproofing. Bitumen-based insulation is the most common. They use mastics and roofing felt.
It is recommended to cover the cesspool with coating-type materials. Roofing felt will not last long in direct contact with monolithic walls made of a moistened mixture of cement and sand. It is permissible to combine waterproofing materials, but this will lead to an increase in the cost of the structure. The sand and cement mixture used for backfill does not need protection. On the contrary, it is necessary to ensure access of moisture to this layer of material. Only under such conditions is it possible for the composition to harden.
Finishing the walls of the cesspool from the inside
Waterproofing a brick septic tank must be done using water-repellent materials.
It is recommended to use plaster compositions made from materials with suitable properties. Thus, preference should be given to mixtures with moisture-resistant properties.
But this waterproofing method is not reliable enough, given that the plaster layer will be affected by water in the existing storage tank around the clock.
For this reason, liquid glass is added to the mixture at the preparation stage. A potassium or sodium composition is suitable. This component improves the properties of the plaster.
However, all possible methods should be used to protect the internal walls due to the high humidity inside the drive. For this reason, the surfaces of the structure are additionally ironed with cement.
Covering the drain pit
From above, the pit and brick structure are closed in different ways:
- concrete slab with a hole for a sewer hatch;
- a wooden shield, to protect it from water, it is covered with roofing felt, the surfaces are pre-tarred.
A layer of thermal insulation material helps to reduce the outflow of heat from a structure in the winter season. It is recommended to use polystyrene foam for this purpose.
However, such measures do not always help prevent freezing. It is necessary to additionally use a layer of soil as a thermal insulation material. Soil is laid on top of a concrete slab or wooden panel. The layer thickness should be 150-500 mm.
Execution Variations
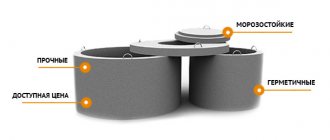
Since the construction of a cesspool from concrete rings is the most common solution, we will talk about its options in detail. The popularity of reinforced concrete rings is not accidental, but because, when properly installed, they have a long service life and are chemically resistant, which helps to successfully withstand the fermentation processes that certainly occur in the cesspool. You can build a pit on any soil, and the material itself is available.
Important! Often an alternative to rings is called pouring a monolithic structure, but these processes differ significantly in labor intensity, so such a comparison is impractical.
Pit without bottom
A similar cesspool with your own hands without pumping is created from rings that are mounted on a pre-prepared sand and gravel bed. They are popular in areas with seasonal or permanent residence. The effluent, when filtered, will go into the soil. To minimize the impact of toxic compounds, it is recommended to regularly use special cleaning products.
Since sewage in large quantities will be filtered into the ground, a cesspool without a bottom should be placed at a distance of 5-10 meters from the house and the foundation of any other structure; if this standard is not met, there is a risk of undermining and destruction of the foundation of the house. It is also required to be placed correctly in relation to the source of drinking water, the standards are as follows:
- Clay soils – from 20 m.
- Loams – from 30 m.
- Sandy soil – from 50 m.
Important! To erect such a structure, you must obtain permission, but if you build it without permission, there is a risk of earning a fine and the obligation to dismantle the cesspool.
Pit with bottom
A sealed cesspool made of concrete rings is suitable for areas where there is a risk of rising groundwater levels. They are recommended to be installed for country houses or for permanent residences, but with the number of permanent residents no more than 3-4 people. The key problem is that the wastewater is not filtered anywhere; it remains in the cesspool, which will have to be regularly emptied by vacuum cleaners. It is impossible to make an infinitely deep hole, since there are certain technical capabilities for pumping.
Another significant point is that for such a closed cesspool a ventilation pipe must be installed; gases escape through it, which are inevitably formed during the fermentation of wastewater and its processing by bacteria. Of course, it is necessary to arrange an entrance for special equipment, since sewer trucks will be frequent guests.
Features of arranging a cesspool with drainage capacity
Possible design options
A septic tank with several chambers is a separate topic for detailed consideration. And due to the fact that, first of all, most land owners are interested in the simplest and most affordable option for a cesspool, but one that does not require annual cleaning, this will be the focus of further attention.
To equip this version of the container, that is, essentially, strengthen its walls, different materials can be used - concrete, brick, reinforced concrete rings, metal barrels or even old car tires.
Construction of a cesspool reinforced with reinforced concrete rings
- Concrete rings are perhaps the most practical option. True, their acquisition, transportation and installation will require significant expenses. So, to unload them and sequentially install them in the pit, you will need special lifting equipment, the rental of which, firstly, is not cheap, and secondly, it cannot reach every site. The advantages of this approach are the strength of the created container, the smoothness of the internal surfaces on which dirt will not be heavily retained, as well as quick installation.
A cesspool whose walls are reinforced with bricks
- Brick. This material is also well suited for strengthening pit walls. The gaps left between the bricks will not allow waste water to linger inside the container; it will go into the ground not only through the bottom, but also through the walls. Brickwork can be done independently, since in this case it does not require special care and highly professional construction skills are not required. The disadvantage of this approach is the duration of construction, since the brick is small in size. In terms of the strength of the walls, such a pit is inferior to concrete. And in earthquake-prone areas it is better not to resort to this method.
Concrete walls of a cesspool
- Concrete walls. This is also a good option for strengthening walls - thanks to this construction technology, the treatment plant will last a long time. However, building such a structure is not an easy task, the work will take a lot of time and will require a lot of materials - cement, crushed stone, sand, reinforcement, boards and timber for formwork, as well as plastic pipes for arranging drainage holes. To make the solution, you will need to purchase or rent a concrete mixer, since a lot of concrete will be required.
Strengthening walls with cut tires
- Car tires. This is a reliable, durable and affordable material, since old, damaged, unnecessary products are used. In addition, laying tires will not take much time - they can be used to strengthen the walls of a cesspool in just a few hours. Stones (bricks) of equal height are placed between the tires, thanks to which gaps are formed, into which wastewater will also flow.
Metal barrels can also serve as the walls of a cesspool for some time.
- Metal barrels. Easy to install and affordable material. Barrels with cut off bottoms are installed in a pit one on top of the other; the walls can be perforated to drain wastewater into the ground. The disadvantage of this approach is the short service life compared to any other options listed above. Wastewater always has a very aggressive chemical composition, and the metal will be corroded quite quickly within 3÷ years. But even if the barrels rust through, they will still hold the walls up to a certain point, since by that time the soil will be saturated with moisture and compacted.
Another point that is common to any of the above options is the arrangement of a cesspool with or without drainage bedding.
Scheme of arrangement of a cesspool with drainage bedding
- The design of a pit without a sealed bottom, equipped with a crushed stone backfill, is more rational than simply reinforced walls.
In order to bring this option to life, the foundation pit for the pit should be expanded in its lower part by approximately 500÷700 mm. Then, a water-permeable but strong enough material must be secured to the bottom and walls; it will keep the bedding from sinking into the ground. Geotextiles are excellent for these purposes.
The bottom of the cavity formed by digging, covered with geotextile, is filled with large crushed stone to a height of 350÷400 mm. After this, the walls of the pit are installed to the height of the cavity, then the space between these outer walls and the ground is also filled with crushed stone. Since the water leaving the pit cannot be immediately absorbed into the soil, it passes through a crushed stone filter, thereby receiving additional purification. Thus, the bedding acts as a drainage pad into which the lower part of the pit walls will be recessed.
Cone-shaped cesspool
- A good option for a drainage pit is a cone shape. In this case, the lower part of the structure is expanded, and crushed stone is added under its walls, so subsidence is excluded. Drainage is also made along almost the entire height of the pit, which allows the pit to be used for a long time without pumping out its contents. The difficulty in installation work is that the pit for this version of the drainage pit must have a size that is almost three times larger than the planned dimensions of the cone. As a container, it is best to use a ready-made plastic cone-shaped well, which can be easily and quickly installed in a pit, but for this you will need to find it and deliver it to the site.
Drainage pit without external drainage bedding
- Another design option does not involve arranging a drainage bedding on the outside and perforating the walls of the pit, so water can only escape through its bottom, which is filled with crushed stone. In this case, the water from the pit will leave more slowly.
A two-chamber cesspool is the simplest septic tank
- And yet, it is better to immediately provide at least two chambers at the planning stage for the construction of treatment facilities, that is, turn a cesspool into a simple septic tank. The first chamber is made sealed. For example, from reinforced concrete rings, with a bottom cover or a glass ring installed at the bottom of the “column”. Or - self-construction of a sealed concrete container of any convenient shape. An overflow pipe is installed in the upper third of the first section, through which the settled water flows into the second chamber. The second section of the pit can be made of any of the materials listed above and have a single-chamber pit design, that is, with or without external drainage bedding.
It must be said that this particular option can be considered optimal both in terms of ease of creation and durability of use without pumping. And the SES will probably have far fewer questions about such a project.
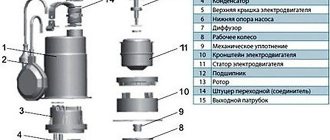
Design
A cesspool without a bottom or with a bottom has a similar design, the only difference is the presence of a concrete slab at the bottom. Sump elements (from bottom to top):
- Bottom plate (bottom) – for hermetically sealed structures.
- Reinforced concrete rings for a cesspool with a diameter of 1-2 m.
- Overlap (cover).
- Additional ring with a diameter of 0.7 m and a height from 30 to 90 cm.
- Luke. You can use iron or polymer sand.
- Pipe for ventilation.
Local sewerage system with wastewater treatment
In this case, ready-made septic tanks are used. They are installed in prepared pits. The main function of such structures is to collect and purify contaminated water.
Septic tanks can be one-, two- and three-chamber. Each of the compartments solves different problems.
The wastewater passing through them is first purified naturally (sediment sinks to the bottom), then goes through the stage of biological treatment, then ends up in a drainage well or filtration fields (equipped according to the principle of drainage). Here the water is purified to 90-97% and can be reused.
Determination of volume
In order to avoid problems with the operation of the pit, it is necessary to correctly calculate its volume. If it comes to the cesspool, where wastewater from the entire house is dumped, then you need to know the following data:
- Every day, 1 person on average produces from 150 to 200 liters of various types of sewage, provided that they use a bathtub, sink, toilet, or washing machine. In a month, a family of 4 people will “give out” more than 20 m3 of wastewater. This applies to calculations if the cesspool in a private house has a bottom, that is, sealed.
- Before making a cesspool without a bottom, so as not to pump it out, you should find out what type of soil is on the site. If the soil is sandy, it will filter quickly. This means that the volume may be slightly less. If clay or loam is discovered, the calculated volume will have to be increased by 10-15%, since such soils have low moisture permeability.
Important! It is imperative to make a reserve volume, since it is not always possible to clean a cesspool in a private house on time. This depends not only on the owners themselves, but also on the sewage disposal companies.
Note! That the maximum volume that a sewer truck (KAMAZ) can pump out is 10 m3, so there is no point in making the hole larger. 10 m3 is 4 rings with a diameter of 2 m + additional.
Design and types of drainage pits
A cesspool for a country house is considered a fairly simple method of eliminating sewage. In most cases, it is installed in dachas where there are no permanent residents, so there is no need to install complex septic tanks or connect to a centralized sewer system.
Installing a cesspool in a private house is not particularly difficult. This structure consists of the following components:
- dug pit;
- a special container that will contain waste liquids;
- pipeline;
- a system of fasteners and anchors to prevent the container from floating;
- filters for wastewater purification;
- sealants and other installation compounds.
The advantage for a private home of a self-made cesspool is financial savings and the ability to select the type of device, depending on the characteristics of the site (soil, proximity to the groundwater surface, etc.).
Which manufacturing method to choose also depends on the regularity of use, required service life and financial capabilities. To make the right choice, it is recommended to carefully study the options offered on the market and make a list of the features of your own sewer system.
If the wrong variety is chosen or there are errors in the arrangement of the cesspool, the owner of the site is highly likely to encounter some unpleasant moments. These include the release of sewage into the environment (deterioration of the ecological situation in the area), damage to property, the appearance of an unpleasant odor, etc.
Types of cesspools and septic tanks
Structures are classified according to the material used for their manufacture:
- car tires of various diameters;
- wood (this includes chipboard, plywood, boards, fiberboard, etc.);
- brick;
- concrete rings and slabs;
- plastic, metal-plastic, MDF, plastic.
The above materials are affordable and easy to find. It is worth noting that it is permissible to use not new products, but used high quality ones. Models are also divided according to the period of application:
- all seasonal;
- summer models.
Based on the principle of operation, structures are divided into sealed and filtration. In the first case, regular waste disposal will be required, because... wastewater is not treated, but simply accumulated.
In the second case, waste liquids are processed due to the proliferation of bacteria. The waste is not only cleaned, but also goes into the soil, which means there is no need for constant pumping. It will be necessary to call the sewage disposal equipment quite rarely and only to remove inorganic waste.
The main disadvantage of filtration cesspools is their low environmental friendliness. Poorly treated wastewater entering the ground can directly contribute to the pollution of nearby reservoirs, wells, etc. However, if such objects are located at a distance from the site, then the best solution would be to construct a filtration type structure.
The advantage of sealed pits is that there are no too strict requirements for choosing the location of the system. However, the main disadvantage is the need for regular pumping of wastewater. If about 5 people live in a house, then waste removal from the pit will need to be done every 1-2 weeks.
Pit development
When creating a cesspool from concrete rings with your own hands, it is important to dig the pit correctly. All excavation work should be carried out carefully and only after preliminary calculations. In order to install concrete rings without difficulty, you should make a hole in diameter slightly larger than the size of the rings.
There are specifics to the development of a pit, depending on what kind of cesspool is being created. For both one and the other, development can be carried out with a shovel or special equipment. The bottom should be leveled and compacted as much as possible.
The pit for a pit without a bottom needs to be deepened a little more, since it will be necessary to create a sand and gravel cushion.
As for the pit with a bottom, before installing the rings, you need to fill in a monolithic bottom or lay a reinforced concrete bottom of the required diameter.
Important! The joints between the bottom and the rings must be carefully sealed; for this purpose, coating or spraying compounds are used.
Drainage sewer complex
Distribution wells are being installed. Their height does not exceed 400 mm, the diameter varies from 400 to 700 mm depending on the type of material used to construct the walls. To protect the structure from water, the same techniques are used: coating insulation of external surfaces, plaster inside, as well as the ironing method.
The wells are covered with concrete slabs or wooden panels and thermal insulation is provided. It is recommended to equip them with bends. A concrete tray is created at the bottom of the wells; its height corresponds to the diameter of the pipes. Such wells are located away from the septic tank. Communications are diverted from them.
Pipes
A cesspool made of concrete rings without a bottom or with one needs to be properly connected to the house. External sewer pipes are responsible for this. Their laying is carried out in parallel with the development of the pit. At the same time, we must not forget these important points:
- Pipe slope. It should be such that the waste flows freely into the pit and not too quickly so that a water hammer does not occur. Details in the article “Calculation of sewer slope according to SNiP”.
- In case of laying close to the ground surface, it is necessary to carry out insulation.
- The pipes used must be designed for outdoor use, i.e. orange in color.
Do-it-yourself ordinary sewer pit
The simplest waste system is done like this:
- a pit is dug up to two meters deep, two meters wide and up to three meters long;
- earth walls are laid or fixed;
- a layer of crushed stone is poured down;
- A protective ceiling with a lid is installed on top.
The main advantages of a pit without a bottom:
- ease of use;
- low cost of design and operation;
- simple and quick DIY construction.
Disadvantages of a pit without a bottom:
- the groundwater level must be below the level of the sewage system;
- not suitable for draining large quantities of sewage water;
- environmentally unsafe;
- unscheduled filling due to rainwater is possible;
- has an unpleasant odor.
The procedure for constructing concrete rings
The choice: to use ready-made reinforced concrete products or to fill the walls yourself is yours, but a factory-made product of normal quality will last longer, and besides, installation can be done faster.
Important! With a cesspool made of concrete rings, one problem arises at the first stage, delivery, unloading and installation of structural elements in their rightful place. You can organize all this yourself, or you can find a company that, in addition to selling products, offers special conditions for the delivery and services of special equipment (truck crane or loader crane).
Important points when installing elements:
- Each subsequent ring is installed strictly according to the level; if adjustment is necessary, the element is dismantled, and only after the level has been removed is it installed again.
- All joints must be treated with special coating compounds. To facilitate the waterproofing process, choosing products with special recesses will help.
- If the rings do not have recesses, then they are fastened together using metal staples.
- In the last ring, a hole is made using a perforator to insert the pipe.
- The last stage is the installation of the floor slab and extensions.
Important! The larger the diameter of the concrete rings you use, the more profitable it is to use an extension, since it is cheaper, smaller and lighter than the rings.
The extension is a ring with a diameter of 70 cm. Since the external sewer pipes approach the cesspool at a depth of at least 1 meter (due to the slope and so as not to freeze in winter), the upper part of the pit does not work and there is no point in making it wide. Therefore, you can use an extension with a height of 90 cm.
Construction of a cesspool made of concrete rings
Choosing a place for the pit
The placement of waste collection facilities is determined by special rules and regulations. These recommendations make it possible to protect water supplies, the foundation of the house and green spaces from contamination in the event of an increase in the water level in the drainage pit. Sanitary rules determine the following distances:
- to the reservoir – 30 m:
- to the well with sandy soil - 50 m, with clay soil - 20 m;
- to trees – 3 m;
- at least 5 m to the foundation of the house;
- to the border of the neighboring plot - 2 m.
It is important to take into account the topography of the area; a low-lying area is not suitable for installing a drain tank. During rainfalls and snow melting, water will fill the hole. The depth of groundwater is also taken into account; it should be 1 meter lower from the bottom of the storage tank.
Cleaning
The construction of a cesspool is just the beginning of its operation, so it is important to know how to clean a cesspool; it is difficult to do this without pumping. If the pit has a filter bottom, then it is advisable to regularly use preparations for cesspools of a chemical or biological type. They will turn solid fecal matter into liquid, and it will pass through the filtration layer.
If the pit has a bottom, then the mentioned means will also be useful here, but they will only remove the characteristic odor and somewhat reduce the volume of waste water; this will practically not affect the regularity of pumping, since there is simply nowhere for the liquid to go.
Creating such a seemingly simple structure as a cesspool requires careful attention to all stages. Only its construction in accordance with all the rules will allow the pit to be used for decades without repairs or other difficulties. The only thing you have to do from time to time is to change the drainage layer in a hole without a bottom and pump out the wastewater in a hole with a bottom.
Preparatory work
Having decided on a location for the storage tank, excavation work begins. This is the first stage in the construction of any type of autonomous sewage system. The pit is dug according to calculations made on the optimal volume of the cesspool. The depth of the sump should not exceed 3 meters, this will allow pumping from the very bottom in case of siltation. The walls of the pit are leveled for subsequent installation of the selected material.
Advice. You can save on calling an excavator to dig a pit if you do it simultaneously with the construction of the foundation of the house.
Sealed waste pit
A sealed sewer system is a sealed container into which sewage water is pumped through pipes. As the container fills, sewage water must be pumped out with a special machine.
The main advantages of a sealed system:
- the installation location does not depend on the type of soil on the site;
- does not depend on the passage of groundwater;
- environmentally friendly, sewage water does not enter the environment.
Disadvantages of a sealed design:
- a smell appears if the storage tank is made in the shape of a well;
- monthly costs (you need to periodically call a sewer truck for pumping);
- relatively high construction cost.
Sewage pit from a barrel
This is an excellent option for arranging water drains with your own hands with natural cleaning of cesspool sewers with small amounts of waste (up to 1 cubic meter).
Barrel preparation:
- We use a 200 liter barrel, preferably from a material that does not corrode, we make holes in the wall in a checkerboard pattern for drainage using a drill or grinder. It is advisable to make holes at a distance of 15-25 centimeters;
- We tightly attach a pipe to the bottom of the barrel to connect the drain pipe. To ensure sealing, you can use silicone sealants. We treat the connection area of the pipe with mastic;
- We wrap the barrel in geotextile and secure it firmly with twine. This is necessary to ensure that the container is protected from soil and other foreign particles entering its structure while maintaining normal drainage.
Installation of a cesspool sewer system:
- we make a trench and lay sewer pipes, always with a slope;
- we prepare a pit with a depth and size slightly higher than the depth of the barrel;
- down the pit we fill gravel or crushed stone with a layer of 20 cm;
- We place a barrel on this pillow and connect the drain pipe;
- fill the resulting space between the walls of the pit and the container with gravel or crushed stone;
- We connect the sewer pipe to the installed pipe.
Now the sewer pit for your bathhouse is ready. You can also make a toilet drain pit with your own hands.