The last stage of connecting to the water supply is installing the washing machine inlet hose
Today we have to figure out how to connect a washing machine to the water supply. We will get acquainted with several solutions of varying complexity, differing in the ease of operation of the automatic machine and the fittings involved. In addition to water supply, methods of draining water from draining the machine into the sewer will be discussed. Let's get started!
Given
First, let's formulate the terms of reference as clearly as possible:
- Modern washing machines are connected only to cold water supply. The water is heated to the required temperature by its own heating element;
- The thread diameter of the inlet hose is DN 20. To connect it, you will need an external thread of the same size;
The photo shows the inlet hose. The size of the attached threads is 3/4 inch, or DN 20
- A hermetically sealed solenoid valve is responsible for drawing water from the water supply system. Accordingly, turning off the water with a separate tap is necessary (for example, in case of going on vacation - it will serve as additional insurance against flooding of neighbors), but the corresponding element of the shut-off valve will be used infrequently;
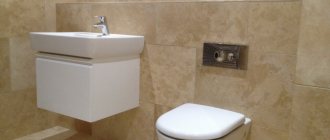
- The automatic machine is installed at a minimum distance from the water supply and sewage system. Its typical location is a bathroom (or a combined bathroom), a kitchen, or a storage room located near the bathroom.
Purpose of shut-off valves
The need to install a tap that shuts off the flow of water when connecting an automatic machine and disconnecting it from the cold water supply line during downtime is indicated in the operating instructions for the technical device. The manufacturer indicates two main purposes of this plumbing element:
- A flexible supply hose is not able to withstand constant pressure in the system; when the pressure increases or sudden pressure surges, the hose sheath can become deformed and leak.
- The check valve consists of a spring and a rubber disk, and is designed for temporary operation when the chamber with the drum is filled with water. Constant pressure stretches the spring, causing the shut-off membrane to not fit tightly. Also, under strong pressure, the rubber membrane may burst.
As a result, these factors lead to leaks and disruption of the functionality of expensive household appliances.
The absence of a tap in the water supply system to the washing machine is dangerous because breakthroughs usually occur at night, when the pressure in the circuit increases and all residents are sleeping. If this factor is not so important for the lower floors, then for owners of apartments on the upper floors, saving on shut-off valves can entail disproportionate expenses for repairing their own and neighbors’ homes.
The faucet connected to the water supply system must operate in an on-off mode, which does not require adjustment of the water flow. Therefore, they install inexpensive but reliable parts with a simple design and a large time interval for maintenance and repair of equipment with the replacement of worn out elements.
The shape of the product body is selected from the position of the most convenient location for access to the handle in the form of a long asymmetrical lever or butterfly.
Can you see everyone?
Here is a brief description of all the connection diagrams that we are going to introduce the reader to:
| Image | Description |
| The water tap is installed between the cams (eccentrics) and the corners or water sockets under the faucet in the bathroom. For hot water, a chrome extension is mounted, the same length as the faucet. The advantage of the scheme is the convenient and accessible location of the tap, the disadvantage is that the mixer extends 8-10 cm from the wall. |
| The tap is screwed into the thread on the rigid cold water supply in front of the flexible hose, which is responsible for connecting the on-board faucet or toilet flush cistern. The union nut of the flexible connection is connected to the external thread of the faucet. Advantages: the tap solves the problem of sealing a flexible connection with an uneven edge of a steel thread; The connection node is in most cases hidden from the view of the visitor to the room and does not spoil its design. Disadvantage: inconvenient access to the tap |
| The connection is made with clamps to a smooth steel pipe at any convenient water supply point in the apartment or even directly to the riser to the valve at the entrance to the apartment. Advantage: arbitrary location of the tap, not tied to a threaded connection. Disadvantage: violation of the integrity of the water supply system. After turning off the washing machine, the clamps will remain on the pipes. |
Tips for choosing
The location where the washing equipment is located is the main criterion when choosing a faucet. Corner parts are more suitable for small apartments. They allow you to reduce the space required for connection. If there is a need to connect several plumbing fixtures at the same time, it is better to purchase a three-way tap. A pass-through version of a ball valve would be appropriate if you already have an outlet for a washing machine.
The material from which products are made is not the least important. Brass components are more expensive than silumin ones, but they pay for their price due to their long service life and the ability to withstand significant loads. The next parameter worthy of attention is the diameter of the device. It must match the dimensions of the water pipes. You should also pay attention to the features of the carving. Size is important, as is its presence from the inside or outside. It also happens that carving is done independently by a home craftsman. When purchasing a crane, they also look at the angle of rotation. If, when closing the valve, it is directed towards the wall and touches it, it becomes difficult to use.
Method 1: connection in front of the mixer
What do you need to connect the washing machine in front of the faucet in the bathroom with your own hands?
Materials
This:
- Connection tap (three-way, with 1/2" male and female threads and one 3/4" male thread). It is better to prefer a ball valve (rotating 90 degrees) with a long flag: it is more reliable than a screw valve and does not require significant effort to open/close. It is advisable that the external thread of size 1/2 ends with a flange: it will simplify the sealing of the threaded connection;
An ideal three-way valve in every way
- Chrome plated thread extension (1/2 inch male and female threaded pipe) with a length equal to the length of the faucet;
Chrome 1/2" Thread Extension
- The sealing material for threads is thread sealant or plumbing flax impregnated (for example, silicone sealant).
Reference: linen impregnated with silicone or organic solvent paint does not rot during prolonged contact with water and does not fade at high operating temperatures. To avoid getting your hands dirty when winding flax, apply a little sealant to the thread, apply three or four turns of winding and lubricate its surface with a thin layer of silicone. When tightening the thread, the winding will be evenly saturated throughout the entire volume.
Sealing a threaded connection: first apply sealant to the threads, then wrap flax
Installation
Here are step-by-step instructions for connecting:
- Close the cold water and hot water valves at the entrance to the apartment;
- Open the taps to make sure the valves are working properly and the water is completely turned off;
- Unscrew the union nuts of the mixer with an open-end or adjustable wrench and remove it;
- Unscrew the eccentrics from the corners or sockets;
The first stage is dismantling the mixer
Hint: to unscrew the eccentric, insert a sponge of pliers or any other suitable object into it. The eccentrics are equipped with an internal cut that allows them to be screwed in and out without damaging the decorative coating on the outer surface.
- Wind up the external threads of the faucet and extension and screw them into the corners or water sockets;
- Rewind and screw the eccentrics into the internal threads of the faucet and extension;
- Reinstall the faucet;
Tip: when installing, it is better to replace the old gaskets under the mixer union nuts with new ones. Rubber loses its elasticity over time due to liming, and the joints may leak after assembly.
The best gaskets are silicone. They combine elasticity with a long service life
- Turn on the water and make sure there are no leaks;
- Connect the washing machine with a standard inlet hose to the tap and start washing.
How to choose a product?
When selecting shut-off valves for connecting household appliances to the water main, the editors of the website santehnikportal.ru recommend being guided by the following principles:
- To quickly control water flow, ball valves are best suited.
- Handles in the shape of a butterfly look more aesthetically pleasing. But for hard-to-reach places it is better to use a handle in the form of a lever.
- The best material for the production of locking parts is brass, which is resistant to corrosion. However, when installed in a polymer pipeline, an adapter from plastic to metal is required.
- You should pay attention to the position of the handle when the tap is open or closed. For example, it is more convenient for a tap with a long lever located close to the wall covering to close closely parallel to the wall, and open perpendicular to its plane, protruding outward. This will prevent involuntary rotation and unwanted opening of the channel.
- The sanitary fittings of the following Russian and European brands are of high quality and have proven themselves in the domestic market: Bosch, Bugatti, Elsen, Grohe, Itap, Valtec.
- The choice of housing design depends on the connection method - if it is installed in a gap or pipeline to which sinks, a faucet or its outlet, or a shower hose are connected, a triple design is used. When a water socket comes out of the wall, the best option is a corner housing; the straight pass-through version is not used too often and is connected to pipelines or water sockets located below the floor.
https://www.youtube.com/watch?v=KU9e0c3aReg&feature=youtu.be
There is another design type of a walk-through faucet, designed specifically for simultaneous connection to a faucet and a washing machine; during installation, the faucet and extension pipes are screwed between the water sockets and the mixing unit.
Method 2: connection before the flexible connection
This connection option is even simpler than the previous one. What does it need?
Materials
This:
- Faucet for washing machine . All requirements are the same as when installing it under a bathroom faucet, with the exception of the collar after the external thread: in this case it is not needed;
- Rewinding for threaded connections;
Easy to use and durable winding - Tangit Unilok thread
- Gasket for the union nut of the flexible hose or a new hose with the same length as the old one.
Reference: the trouble-free service life of flexible hoses in stainless steel braiding does not exceed 5 years. If the service life of the hoses is approaching five years, do not be lazy to replace them with new ones, without waiting for a break and flooding of the apartment.
The average service life of such eyeliner is 5 years. During this time, the rubber core loses its elasticity, so after dismantling and reinstallation the hose often leaks
Installation
Connecting the water supply to the washing machine is carried out in the following order:
- Turn off the cold water and make sure that it stops flowing to the site of the upcoming work;
- Unscrew the union nut of the flexible connection;
- Wind the thread underneath;
- Install a three-way valve;
- Replace the gasket under the union nut of the flexible hose or the entire hose;
- Connect the flexible connection and inlet hose of the washing machine;
- Turn on the water and check all pressure connections;
- Wash it.
Types of taps for washing machines
Cranes with various parameters are sold on the construction market; they can be divided into the following groups according to:
Material of manufacture . Plumbing fittings are often made of metals: brass, stainless steel, silumin; brass products are considered the most expensive and high-quality. The cheapest shut-off valves are made from silumin - an aluminum alloy; the products have low strength and light weight; unlike expensive metals, they have low ductility and crack under load.
You can find budget polymer shut-off valves on the market; plastic taps can be conveniently mounted into a polypropylene pipeline by soldering - this allows you to save on adapters from plastic to metal and in cost compared to using metal products.
The principle of operation of the locking mechanism . There are two main types of shut-off valves: screw and ball, in the first there is a gradual multi-turn shut-off of the flow due to the rotation of the screw shut-off valve, which is irrational for fittings whose sole purpose is to supply and shut off water flow. In a design with a ball, it is enough to turn the handle at a right angle to supply and turn off water - this is much faster and more practical, therefore, with rare exceptions, a two-way ball locking valve is installed in the water supply system for washing (dishwashing) appliances.
Polymer valves
Execution of the case . Depending on the location of the pipeline and ease of access, the following types of taps are installed in the water supply system:
- A straight or pass-through faucet for a washing machine has inlet and outlet pipes located on the same line and is mounted in a pipeline that has a separate outlet for connecting equipment.
- Tee tap . In this type of design, water flows inside the housing in a straight line, and there is a branch in the side wall for connection to the machine. The tee for connecting the washing machine to the water supply is used in water supply systems with previously connected plumbing equipment. Typically, a three-way valve is installed under sinks in the kitchen or bathroom, connecting the flexible line from the sink and washing machine to the inlet and outlet pipes, respectively, and the faucet body to the water pipe.
- Corner . Often the washing machine is connected to a water socket built into the wall, and it is much more convenient and rational for the inlet fitting of the flexible water supply to approach it at an angle of 90 degrees. To do this, screw a corner faucet for a washing machine of the appropriate diameter into it and connect a hose to it that runs down the wall.
Types of valve bodies: straight, tees, angled
Method 3: connecting to a direct section of water supply
The last scenario is inserting a tap into a straight section of water supply.
Materials
Required:
- Clamp with internal thread size 1/2 inch (DN 15);
Brass clamps for inserting into steel water pipes
- Ball valve with male-female threads;
Ball valve with external and internal threads
- Adapter from DN 15 thread to DN 20 thread.
Captain Obvious suggests: the adapter must have two external threads. One is screwed into the ball valve, and the union nut of the inlet hose is screwed onto the second.
Brass Pipe Thread Adapter
- Sealing material for threads.
Installation
- Turn off the cold water;
- We drill a hole with a diameter of 8-10 mm in the HVS liner;
- We clean the surface of the pipe around the hole from paint and rust;
- Install and tighten the clamp;
Tip: if the clamp does not include a rubber gasket, cut it from an old car inner tube.
- We sequentially install the ball valve and adapter, tightening the threaded connections;
- We connect the machine with the inlet hose;
- We check connections under pressure.
A special case
What to do if for some reason you cannot turn off the water (the valve on the supply line is faulty, the tap needs to be embedded in the riser, etc.)? This scenario differs from the scenario described above only in the sequence of actions and a specific tool.
- Mount a clamp on the pipe that has been cleaned of paint and rust and install a ball valve on it;
To clean the pipe, it is most convenient to use a drill with a wire brush.
- Open the faucet and drill the pipe directly through its valve;
- As soon as the wall of the supply or riser is drilled, remove the drill and turn off the tap. Further actions are no different from those described above.
Scheme of tapping into a water supply system under pressure
Important: in this case, you can drill the pipe only with a hand tool - a hand drill or a brace. A water-filled electric drill combined with a puddle on the floor will turn into a type of portable electric chair.
For work under pressure, use only hand tools
Replacing the inlet hose
If the water supply hose has visible damage and is leaking water, there is no need to repair it. These attempts will lead to nothing. You need to buy a new one and replace it. Before purchasing, be sure to check the length of the filler tube and the dimensions of the connection elements. It’s even better to take the old hose with you and the sales consultant will select an analogue. Before replacing, it is necessary to turn off the connection valve to reduce the pressure in the hose. To do this you need to wait for a few minutes. If this is not done, the forces applied to unscrewing can lead to damage to both the tap and the fitting. After dismantling the damaged element, a new one should be installed as described above.
Sewerage
Water drainage can be arranged:
- In a rented apartment - in the sink or bathtub. The plumbing fixture will be unsuitable for use for its intended purpose for no more than an hour and a half a day. As a bonus, you will receive a guaranteed absence of sewer blockages: hot water with powder perfectly washes away fat from the walls of sewer pipes, which is the main cause of blockages;
Not easy, but very simple: the drain is directed into the kitchen sink
- If you have a plastic prefabricated sewer comb installed in your apartment (intra-apartment sewerage distribution) - into the tee installed in its gap. Preferably - oblique, with a drain directed in the direction of movement of the drains. In this case, a volley discharge of water (for example, from a bathtub) and its simultaneous drainage by a washing machine will not lead to overflowing of the pipes;
Connecting the drain to the oblique tee
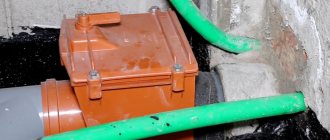
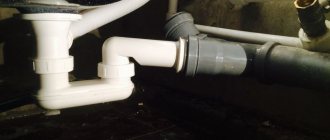
- Owners of cast iron sewers should take a closer look at siphons for sinks with an outlet for connecting the drain hose.
Connecting the drain to the siphon
The general rule is that the connection of the drain hose to the sewer must be sealed. Sealing is carried out with standard rubber cuffs or any available material (adhesive tape, polyethylene foam, etc.). Through leaky connections, fumes from sewer drains and risers will enter your apartment, and they will not smell like roses.
Sealing the connection between the drain and the sewer with a rubber cuff
Stage #3 – leveling the washing machine
In order for the automatic machine to serve with maximum efficiency, the installation and connection of the washing machine should be approached with the utmost care.
The floor base requires special attention, which must meet a number of criteria:
- strictly horizontal surface;
- durable structure;
- sustainability;
- protection from vibration and other influences inevitable during operation of the unit.
If the foundation does not meet these criteria, it is better to take measures to meet them.
In addition to levelness and reliability, the base for installing the washing machine must also have anti-vibration properties. If you are going to install it on a tiled or wooden floor, then it is better to carry out the whole process using devices that dampen vibration:
On fragile surfaces, it is advisable to make a cement-sand screed or strengthen the existing floors in the place where the washing device is supposed to be installed.
Adjustment of the position of the washing unit is achieved by changing the height of the support legs: to increase the distance from the floor they can be unscrewed, and to decrease they can be screwed in
After making sure that the base meets all the previously mentioned requirements, you can begin installation. The fully unpacked machine with the fasteners removed is placed in the selected location.
The horizontal installation is determined by the top panel, while the angle of deviation, which is checked by the top cover, should not exceed two degrees. Exceeding this indicator leads to a sharp increase in vibration, which has a very negative effect on the condition of the components and significantly reduces the service life of the machine.
Placing improvised materials under them that could slip out from under the supports during work is strictly prohibited. This may lead to an emergency situation. At the same time, it is allowed (and even recommended) to place a thin rubber mat on the sliding tiled surface.
As soon as the body of the machine is in a perfectly horizontal position, you should tighten the locknuts counterclockwise, fixing the optimal height of the support legs.
When leveling the machine, it is recommended to consider the following factors:
- The greatest degree of stability of the unit is achieved with the adjusting supports screwed in as much as possible, but this option is only permissible on a perfectly flat surface.
- When installing the machine on an inclined floor, it is advisable to use fixing parts to secure the supporting structures.
- To check whether the unit is installed correctly, you need to try to swing it diagonally. If the process is done correctly, there is no free play or its amplitude is the same for different diagonals.
Once you are sure that the unit is in the correct position, you can proceed to the next steps.
List of tools and materials
To connect the unit to the water supply, it is not enough to find a valve of a suitable configuration. Tools are also needed. Their list should include:
- Adjustable wrench. It is required for installation work, tightening nuts and connecting pipes.
- Calibrator. A necessary tool for working with plastic pipes. It makes it possible to adjust the screen when installing it on a pipe cut-in.
- Lerka. It can be replaced with any similar tool that allows you to cut threads.
- Screwdriver, file, drill. All this is necessary for work on arranging holes and other manipulations.
- Scissors for plastic. Instead, you can take a grinder, which is suitable for working with elements made of plastic and metal.
The washing machine must include a double hose. It will also have to be used during work. The length of the product should be slightly longer than necessary. This will make it possible to get a small margin during the rearrangement. When a hose has to be purchased specifically for these purposes, it is recommended to give preference to models with wire reinforcement. They will best withstand the pressure inside the pipes. A filter must be installed on the threaded part of the tap. It is designed for water purification. It is fixed to the outlet of the water pipe. This element is small in size and improves the quality of the liquid used. This reduces the risk of lime deposits forming. When water rich in minerals is used, several filters can be used simultaneously.
When planning to install plumbing parts, you cannot do without sealing rings and FUM tape. In addition, you will need winding and spare bolts. This set will allow you to secure the faucet tightly and, therefore, reliably. It is necessary to select a suitable connection option, taking into account the characteristics of the room and the area where plumbing fixtures are installed.
Conclusion
Connecting a washing machine to the water supply can be done in different ways, but in any case you need to use a special tap. With its help, it is possible to easily shut off the water after stopping the wash, which is definitely recommended by manufacturers, otherwise additional pressure is created on the valve of the device.
The valve can be installed independently in any suitable location. The video in this article will give you the opportunity to find additional information on the above topic.
Did you like the article? Subscribe to our Yandex.Zen channel
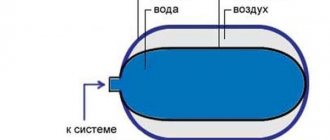
Why isn't a standard flow valve suitable?
Situations are not uncommon when users of washing machines have not encountered the supply of water to household appliances and do not understand why they cannot install a standard flow valve.
If you know what water hammer is, then such questions will not arise: water under high pressure literally breaks metal-plastic and even metal pipes. Is the washing device connected directly using a regular hose? There is a high probability that during a water hammer it will be torn into pieces.
A tee tap is most appropriate. It will not only withstand high pressure, but will also allow you to connect several different devices to the water at once. For example, a washing machine and a dishwasher.