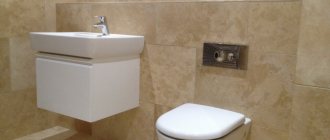
Conventional compact toilets are gradually replacing models with a cistern hidden in a wall or partition and a hanging bowl. This solution requires hidden installation of all bathroom communications, but the benefit is obvious - even a small room becomes visually more spacious and the interior more laconic.
This can be done by installing a toilet installation - a special supporting structure that combines the bowl and tank into a single whole. Installation of such models is more difficult than “compact” models, but detailed instructions for installing a wall-hung toilet and installation make it easier for even a non-professional to do the work themselves.
How the installation works
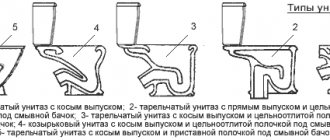
A common element in the design of all wall-hung toilets is a plastic tank with a flush button, which stands in a steel frame. The design also includes holes for fastening to enclosing surfaces, studs on which the bowl is mounted, and two elbows for flushing and draining. And depending on the method of installation and fastening, the following types of wall-hung toilet designs are distinguished:
- Block system. This is a suspended structure designed for attachment to a load-bearing wall (major apartment or interior partition). No support to the floor is provided. Can be mounted in a niche or attached to a surface. In the second case, it is necessary to fill the space from the floor to the block with bricks so that the bowl does not push through the lower part of the casing of the box or false wall.
- Frame system. Designed for installation near load-bearing and self-supporting walls made of building blocks or frame walls and internal partitions with thin sheet cladding. The load is taken by supports standing on the floor. Fastening to the wall secures the structure in a stable position.
- Corner system. A subtype of frame system for installing a toilet in the corner of a bathroom. The legs take the load. The rear part of the system provides for fixation to two adjacent walls located at an angle of 90°.
The dimensions of installations depend on the manufacturer and model.
For example, frame installations from the companies GEBERIT and [email protected] have a standard height of 112 cm and a width of 50 cm; for the GROHE brand, the dimensions are 113 cm and 53 cm, respectively. There are narrow and tall models from WISA (118×38 cm) and SANIT (118x45 cm). But you can find low designs - for example, the SANIT company produces a model with an installation height of 82 cm and a width of 53 cm.
A special feature of the frame installation is the ability to adjust the legs in height. It can be increased by 20 cm. And the size indicated in the diagram is given taking into account that the distance from the floor level to the axis of the drain elbow must be at least 22 cm.
The installation depth also does not have a fixed standard. It depends on the volume of the tank, the height and width of the frame and how the sewer pipe runs. With standard dimensions and a flush volume of 6/3 l, the minimum installation depth is in the range of 12-15 cm. If the tank has a function of increased flush volume (up to 9 l), then its installation depth can be greater - up to 20 cm. But the maximum the depth (distance from the wall to the edge of the frame) for most models does not exceed 23 cm.
Note. Leading manufacturers equip their installations with tanks with a factory flush setting of 6/3 liters and the ability to configure them for an economy mode of 4/3 liters. For some installation models, the volume of the tank allows you to configure operation in the flush/stop mode with a large volume of water - up to 9 liters.
The dimensions of block systems range from 45 cm to 110 cm in height, the width is usually about 50 cm (from 44 cm to 53 cm), and the depth ranges from 12 cm to 20 cm.
Note. There are block systems with a depth of 8-17 cm, which are classified as frameless installations. The GEBERIT company calls such models a concealed cistern. They can be installed in any walls and equipped with floor-standing toilets. The block consists of a tank with mounting plates, a front button and a flush elbow. But if the load-bearing capacity of the wall allows, the wall-hung toilet can be mounted separately from such a block installation.
Preparation for installation work
As always, we advise you to purchase everything you need to complete the job in advance and have it on hand.
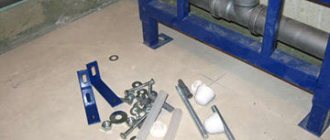
So, to install a wall-hung toilet with installation, you need to have:
- steel frame-module complete with a plastic tank (container);
- toilet bowl;
- flush key;
- steel studs for fastening work;
- set of connecting pipes.
Usually, the installation kit includes not only a plastic container, but also a flush key, pipes, adapters and fasteners. As a rule, the kit also includes special material to protect the entire structure, which will be located in the wall of the bathroom, from condensation. The same material reduces the noise level during the period of draining and filling the container with water.
When you buy plumbing fixtures in a store, be sure to check the package and purchase additional items that you need but are not included in the basic set. Please note that the bowl is usually purchased separately. The frame itself and all mounting elements are standardized, so choose the option that you like.
The double flush button not only looks advantageous, but is also a functional element: with its help you can select the flush intensity
Most buyers prefer a double flush button: it allows you to dose the water flow. To perform installation and finishing, you will need moisture-resistant drywall.
Don't forget about the tools. You will need:
- perforator;
- concrete drills;
- roulette;
- pencil for marking;
- spanner wrenches;
- building level;
- knife for working with drywall.
Prepare the work area: remove all unnecessary items. We can start.
How to determine the installation location of the system
To choose the right model of installation and toilet, you need to decide on the location.
If we are talking about replacing an old model of a floor-standing toilet with a wall-hung one, then this place has already been chosen taking into account the size of the bathroom and can be left for installing the wall-hung model. The design with a hanging bowl will not violate the ergonomic requirements for the size of passages, minimum dimensions on the sides and in front of the toilet.
When installing a toilet installation with your own hands in a new place (during reconstruction or remodeling of a bathroom), the following requirements must be taken into account:
- the toilet bowl should be located as close as possible to the sewer riser to ensure a normal slope angle of the sewer pipe, and the upper edge of the bowl (without a lid) would be above the floor level at a standard height of 40 cm;
- the minimum distance from the front edge of the bowl to the wall, door or other plumbing fixture should be 50 cm, optimal - 75 cm;
- the minimum distance from the center line of the toilet to the side walls, furniture or other plumbing fixtures is 38 cm, the optimal is 45 cm.
Note. The minimum and optimal distances are indicated taking into account the “average” size of a person, which provides comfortable conditions for 90% of plumbing users. For large people, these sizes are selected individually.
There are also recommendations for placing a special accessory - a toilet paper holder. It is advisable that it be located on the side wall, slightly in front - at a distance of 20-30 cm from the edge of the bowl and at a height of 60-70 cm from the floor level.
After choosing a location, depending on the nature of the wall, the possible method of fastening and hidden installation of communications, the type and specific model of installation is selected.
Installation nuances
Every business has its own secrets. There are also some nuances when installing the installation.
Block installation
With the advent of a block design with a wall-hung toilet, mounting it to the wall became a serious problem. At the same time, the method of installing pins on which the bowl is hung, proposed by plumbing manufacturers, is unlikely to be liked by the owners, since it steals some of the space and hardly fits into the design of the toilet.
Briefly about the method. The formwork is being assembled. Studs with a washer and a nut are installed on the back side. All this is poured with concrete, which is then tiled.
Plumbing experts have adopted other methods. More on the secrets below.
1. The solid wall is drilled through with a hammer drill with a long drill. Here's another little trick: the drill is cooled with oil very often, literally every 20-30 seconds. On the reverse side, a countersunk hole is drilled under the washer and nut (bolt head).
A long pin is installed if from inside the apartment or a bolt if from the outside of the wall. The potay is sealed with putty and lined. This method is ideal for private homes. In a high-rise building, it is unlikely that the neighbors will allow the decoration of their walls to be destroyed. Therefore, it is necessary to adopt the following method.
Scheme for attaching a tank with studs through the wall.
2. Anchors are driven into the concrete wall if it is monolithic, or special dowels are used if there are cavities. There is another secret here. Before installing the toilet with studs, you need to open the spacers. You can't just turn a hairpin - there's no head. For these purposes, plumbers use a mushroom nut, that is, not a through nut.
Dowel “petal” for concrete structures with cavities.
Tightened anchor pin.
Anchor pin.
They advise those who do the work themselves to do the same. It is impossible to find such a part for sale. Therefore, there is only one option left: look for a turner and order an unusual nut from him. However, being a professional in one business does not mean that a person is a pro in another.
Our grandfathers also knew how to screw in and unscrew studs using two nuts: you screw them onto the stud, and then use two keys to lock them tightly. The stud is screwed into the top nut, and unscrewed through the bottom nut.
Frame installation
When installing a frame installation, professionals advise:
- use a more modern panel with two buttons, which will save water;
- place the drain panel either between two tiles or in the center of one of them;
- set the upper edge of the toilet bowl to a height of 40-44 cm;
- the thickness of the protective screen or false wall should not be more than 7 cm;
- Carry out thorough quality control of work at each stage of installation.
Installation diagram for toilet
Each model has a diagram for installing a wall-hung toilet, which shows:
- general dimensions of the frame - width and height (without taking into account the adjustment of the legs);
- minimum distance from the floor level to the axis of the drain elbow;
- height of the flush key;
- the location and height of the water supply pipe to the tank;
- diameters of drain and water pipes;
- center-to-center distance of holes for mounting the bowl;
- frame attachment points.
Markings for installing the toilet installation are carried out based on this diagram.
Installation installation steps
There is one unique feature in the character of representatives of the “Russian world”: first they create difficulties for themselves, and then heroically overcome them. What does this have to do with installing a toilet installation? The most direct. In most cases, a plumbing product is first purchased, and then the question of where to install it is decided. And, as often happens, the wrong design was purchased. Therefore, we present the sequence of stages for installing a wall-hung toilet:
- the location of the installation is determined;
- a model is selected to suit the formed conditions;
- the wall and floor are marked for the purchased structure;
- the tank is hung;
- installation of the installation body is in progress;
- the drain pipe is connected to the sewer riser, and the tank to the water supply;
- performance is checked;
- the installation is covered with a false wall or protective box;
- work is being carried out to finish the false panel with tiles or decorative plaster;
- a panel with drain buttons is installed;
- the toilet is hung with simultaneous connection to the tank and sewerage system.
Note that professional plumbers sometimes swap the fastening of the frame and the installation of the tank. This is not important and does not affect the quality of work.
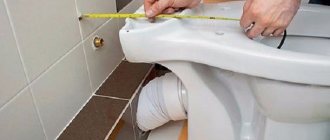
How to properly pre-mark
Before you begin installing the toilet with your own hands, you need to make preliminary markings on the wall and floor.
First, determine the vertical, which must coincide with the axis of the frame. There are three options:
- Separate bathroom without washbasin and bidet. In this case, the vertical runs through the center of the wall on or near which the installation is installed.
- Bathroom with toilet and bidet. Both installations are lined up. And the vertical axes for each frame should be positioned so that they fall in the center of the selected location, taking into account the ergonomics of the bathroom. Under standard conditions, both axes should “divide” the wall into three equal parts.
- Combined bathroom. The vertical line on the wall should pass through the geometric center of the selected location.
The next step is to mark the vertical center of the drain button. For a block system, this is the only reference point, and it is usually located at a height of 1 m above the finished floor level. Therefore, you need to take into account the thickness:
- leveling screed;
- heated floors with insulation and their own screed (if provided);
- finishing layer (tile adhesive plus tiles).
For a frame installation of standard height, this size (1 m) is specified in the diagram, but if it is short, then they are guided by the installation height of a particular model.
Further marking is carried out as follows:
- A horizontal line is struck level in the center of the key or the top of the frame and the installation width is marked on it.
- From these points, vertical lines are drawn down. They continue on the floor parallel to each other and perpendicular to the plane of the wall.
- Mark on each line a distance greater than the installation depth indicated in the passport. The actual size must also take into account the gap from the tank to the wall of 1.5 cm, the method of laying the sewer pipe and its maximum outer diameter at the joints. So, with an installation depth of 12 cm, the minimum distance from the wall to the front surface of the installation is 13.5 cm - if the pipe “goes” under the ceiling, 15.5 cm - if the sewer pipe runs along the wall. And this does not take into account irregularities.
- Connect the marks - this will be the line along which the places where the legs are attached to the floor are located.
- Check the perpendicularity of this line relative to the side wall. If necessary, adjust it, making sure that the shortest distance to the wall is no less than the actual depth.
Marking on the wall for a block installation is much simpler and consists only of marking the attachment points to the wall. In accordance with the diagram and focusing on the recommended height of the flush button, a parallel line is struck from the vertical axis on each side at a distance equal to half the installation width. And on these lines the points of attachment of the frame to the main wall are marked.
Suspended model on a concrete base
A steel frame is expensive. In principle, you can do without it by building a concrete pedestal with your own hands, which will serve as a reliable foundation for the wall-hung toilet. This option is considered the most economical.
The diagram of the model on a concrete base includes: 1 – two rods for fixing the toilet bowl, mounted into the wall; 2 – concrete base; 3 – pipe for draining into the sewer
With this installation method, the drain container can either be mounted into the wall, with the drain button located outside, or placed above the bowl of the plumbing fixture.
Pre-installation procedure
Let's consider the option that is considered the least expensive. Let's prepare everything you need for work:
- concrete M200 - approximately 40 liters;
- boards for making formwork;
- threaded rods (length 50-80 cm, thickness 2 cm) - 2 pieces;
- washers, nuts, screws for woodworking;
- plastic pipe (diameter 11 cm, length 8 cm);
- drain coupling;
- Styrofoam;
- silicone sealant.
I think it’s worth repeating that the wall we have to work with must be permanent.
Step-by-step installation process
We fix rods in the main wall, onto the outlets of which the toilet bowl will then be placed. Let us remind you that we must have a stable and reliable structure that can withstand a weight of 400 kg.
The next step is to install the drain coupling. At this stage, it is necessary to determine the height of the toilet in order to cut the coupling to the appropriate length.
Now we need to install the formwork. In order to mark fastening points on the formwork, you should determine the distance between the holes intended for fastening.
To calculate the length of the rods, you need to add up the thickness of the recess, which is approximately 15 cm, and the distance from the wall to the toilet bowl. To fix the rods in the wall, concrete adhesive is used - a chemical anchor.
This is what the structure looks like ready for the concreting process: the place where the drain will be connected to the toilet bowl is covered with foam plastic
When the formwork is installed and the installation of the pins is completed, the bowl should be installed in the place intended for it. Make sure that the mounting holes match the outlets, and the outlet hole matches the coupling drain.
In twenty-eight days, the monolithic concrete support will be completely ready for installation. Pay attention to the groove in the front of the monolith - there was foam here
The next step is concreting. This must be done by installing foam plastic in the place where the drain hole will be. Remember that the concrete will finally harden only after 28 days.
After this, you can remove the formwork and make sure that in front of us there is a monolithic concrete block with pins coming out of it and an open, fixed coupling. A toilet is mounted to the front of the block, and a tank is placed on the base itself.
This is exactly what a wall-hung toilet will look like after installing the bowl, and its tank will be installed on a concrete base
The procedure for installing a bowl to a concrete base is no different from installing a floor-standing toilet. You need to install the bowl on the pins, tighten the nuts, connect and seal the drain. Lastly, a drain tank is placed on the concrete base.
As you can see, this method of installing a hanging model is much cheaper and easier than working with the installation. But, to be honest, the result is not much different from a floor-standing toilet.
Materials and tools
Even when purchasing the installation, you need to check the completeness. In addition to the frame itself, the tank, the inlet valve and the flush elbow must be:
- drain elbow;
- key;
- fastenings and fastening elements;
- plugs for flush and drain pipes (to prevent debris from getting in during operation);
- gasket for mounting a wall-mounted toilet (sound insulation).
In the case when you are installing plumbing fixtures yourself for the first time, it would be good to find out if the seller has spare parts for installation (if something goes wrong). All leading manufacturers produce spare parts and repair kits for installations - pipes, elbows, inlet and flush valves, membranes, seals and transitions. In addition, there should be a variety of different types of fasteners and fasteners that can be purchased separately.
You also need to purchase a set of pipes for connecting the wall-mounted toilet to the installation, silicone sealant for the joints of sewer pipes and fum tape for installing a stop valve on a water pipe.
To install a wall-hung toilet with installation, you will need the following tools:
- level, tape measure, ruler, construction corner, pencil or marker;
- hammer drill and concrete drills;
- hammer;
- a set of wrenches (as well as an adjustable or gas wrench);
- screwdrivers;
- pliers.
If you immediately install a frame from a profile for subsequent sheathing with plasterboard, then you also need a tool for this work:
- metal scissors;
- drill;
- knife or hacksaw;
- screwdriver
Advantages and disadvantages of installed toilets
Today, many people have already appreciated the positive aspects of using built-in plumbing. The following advantages of such equipment can be highlighted:
- The compact size of the product saves space and visually expands the space;
- convenient access to all external parts for cleaning, so cleaning the bathroom will not take much time and will not be difficult;
- silent drainage of water due to the insulation of the tank with wall structures;
- frequently used separate drainage of water in streams of different strengths ensures its saving;
- installation of a toilet with installation is a reliable and durable design that can withstand increased operating loads;
- wall-hung toilets do not interfere with the deployment of heated floor systems, as well as the laying of tile coverings.
Some installations take up very little space.
The disadvantages of installed plumbing include:
- lack of access to communications, since they are covered with a decorative wall;
- despite the fact that the design is reliable and rarely fails, in order to eliminate emergency situations associated with the tank, additional costs will be required both for dismantling the decorative screen and for expensive components;
- despite saving space when assembled, a wall-hung toilet with an installation, the frame dimensions of which are slightly wider than conventional floor-mounted plumbing fixtures, sometimes at the installation stage needs to expand the space for attaching the supporting frame;
- installation of toilets in the classic design does not require special strength from the surrounding walls, but the block structure can only be secured to a strong support.
Removing the wall is a necessary inconvenience when repairing a toilet with installation.
Features of installation and toilets installation
As mentioned above, there are three options for “installation and toilet” combinations.
Wall-hung toilet with block design
The easiest way to install the system yourself is to install the frame on the surface of the main wall and lay a quarter-brick partition below the structure to provide a reliable support for the wall-mounted toilet. The butt size of a single brick is 12.5 cm plus 1 cm of a vertical joint made of masonry mortar, and the resulting 13.5 cm is just right for most models whose installation depth lies within these limits.
Another option is to purchase a block installation, which includes two special floor supports to “support” the wall-mounted toilet bowl. These supports are placed on the sanitary ware fastening pins, and they do not allow the bowl to “fall” back. Such models include Geberit Kombifix (110.340.00.5). If such accessories are not included in the kit, they can be purchased separately, for example Geberit Kombifix stops (457.888.26.1) or Alcaplast mounting kit (M90).
Do-it-yourself installation of a block installation proceeds according to the following algorithm:
- At the marked fastening points on the wall, holes are made with a puncher, to which the frame is screwed with dowels.
- Drive in dowels or anchors and screw the frame to them.
- Insert the tank into the frame, connect it to the water pipe (the water supply tube may be included in the delivery package) and to the flush elbow.
- Screw in the mounting studs to secure the bowl.
- Connect the drain elbow to the sewer through an adapter pipe (from the kit or purchased additionally).
Wall-hung toilet with frame installation
This is the most common type of hidden installation design - it is suitable for installation near any wall or partition, regardless of its load-bearing capacity.
Connecting a plumbing fixture
At the final stage of installing a toilet with installation, the most important operations are its reliable connections to the water supply and sewer networks.
The tank can be fed from the side or from above; however, in any location, it is not recommended to use flexible hoses to connect the tank to the water supply because of their short service life. Moreover, if they fail, replacing the connections will require dismantling the false wall (if there is no hatch for access to communications). For these reasons, it is advisable to use pipes made of polymer materials or stainless bellows connectors.
To connect the tank to the water supply, it is advisable to use pipes made of polymer materials.
Next you need to prepare the pipe fasteners. The 90º toilet outlet outlet is inserted into the sewer pipe and rigidly attached to the installation frame using a plastic fastener clamp.
1. The outlet for connecting the toilet outlet is inserted into the sewer. 2. Next, the outlet is attached to the installation frame using a plastic clamp with a latch.
The studs are screwed into the frame and locked to connect the wall-mounted toilet bowl. Some models provide for fastening studs to the installation frame and, additionally, to the main wall.
Studs for fastening a wall-hung toilet.
Interim control is carried out. The internal structure is covered with a false panel. Panels are often made from plasterboard sheets, then decorated with tiles or plaster.
Gypsum board is the most convenient material for installing false walls.
Drywall is convenient because it is easy to make holes in it to connect the installation with the toilet bowl itself, as well as flush buttons.
Important! If you decide to trim the false wall with tiles, then you can hang the wall-hung toilet bowl only after the tile adhesive has completely hardened (7 days).
To connect the toilet to the communications, the connecting pipes are shortened to the required size.
To connect the toilet with communication systems (to the sewerage cistern), special pipes are used. The length of the pipes comes with a reserve. Subsequently, the pipes are shortened to the required size, taking into account the thickness of the decorative panel.
To protect against damage to the coating of the wall and toilet, a shock-absorbing gasket is installed between them. And protective PVC tubes are put on the studs.
The toilet is tightly attached to the supporting structure. To prevent damage to the surface of the toilet when tightening the nuts, the kit includes washers made of durable plastic.
Next, install the tank flush button. When installing it, you should carefully read the instructions - the design of buttons from different manufacturers can differ quite significantly.
You can get acquainted with the principle of operation of the flush tank button by watching the video:
After connecting the toilet bowl with the cistern and the sewer outlet, the entire structure is tested for strength, correct assembly of individual elements, reliability of fastenings and tightness.
Attaching a floor-standing toilet to the installation
Correct installation of a floor-standing toilet on an installation is only possible if the tiles on the floor have already been laid or there is an exact level of the finished surface. In this case, markings are made on the wall by selecting the center of the flush hole in the toilet as the reference point rather than the flush key. And the installation takes place in the following order:
- Select a location for installing plumbing fixtures.
- They mark a vertical axis on the wall. Mark on it the point of connection of the floor-standing toilet to the flush elbow of the cistern.
- The dimensions of the block installation and attachment points are noted relative to this point.
- The tank is secured (in a niche, on the wall, in a frame partition).
- Connect to a water pipe.
- Install the flush elbow.
- They make a sewer line (along the wall, in a grooved channel, inside a frame partition.
- The system and toilet are temporarily connected. Check the operation and tightness of the system.
- Close the flush and drain pipes with plugs, and the studs with tubes.
- The installation is covered with plasterboard (with holes for flushing and draining). Or they seal the niche and grooves with mortar.
- The wall is being finished.
- Connect and secure the floor-mounted toilet.
Types of installation systems
The modern market for construction and related equipment offers two types of installation systems. Both options are convenient and practical, and the choice depends on which walls the structure will be attached to and which parts of it will bear the main operational load.
Block installation is the simplest, budget option, however, its installation requires certain conditions. The structure can only be used on a main wall, having previously prepared a niche in it to accommodate the tank and connections to the sewerage system with water supply.
The second option involves lining the system with bricks, masking it with plasterboard or other sheet materials, followed by decorative cladding. These actions are carried out only after all installation activities are completed.
Strong anchors are required for fastening. They bear the main operational load. The main advantages of the model include a reasonable price and the ability to use the installation not only in conjunction with wall-hung toilets, but also with stationary floor-standing toilets.
A block installation can be “recessed” into a niche made in the main wall, and in this way save useful space in the bathroom
The frame installation belongs to a more complex type of construction, but makes it possible to fix the toilet on thin hollow partitions or plasterboard walls. It is considered a very reliable system and has all the characteristics to hold both the plumbing module and itself.
Placed on the floor or foundation. Allows several mounting options: with special elements to four points on the wall, to two points on the floor and two on the wall, or only to the base of the floor using stable paws. The main load falls on the lower part of the base.
The main advantage of the frame installation is the adjustable legs. They can be set to any desired and comfortable height. The design is suitable for installation in rooms of non-standard shape, easily fits into the most unexpected design and can even be located in a corner without hiding the useful space of the bathroom.
Frame installation allows you to place the toilet in any place most convenient for you and does not require a permanent wall for installation
The dimensions of block systems are always standard. Their width is 50 centimeters, their depth ranges from 10 to 15 cm, and their height does not exceed 1 meter. Frame installations have a base width from 50 to 60 cm, a depth from 15 to 30 cm, and a height (due to adjustable legs) from 80 cm to 1.4 meters.
For wooden houses or non-permanent buildings, experts recommend purchasing the widest and lowest systems possible. This makes it possible to reduce the load on the walls and ensures the normal functioning of the module for a long time.
Image gallery
Photo from
Shortened installation options
Wall-hung toilet near the window opening
Lateral location of the flush button
Top location of the flush button
The article, which we recommend you read, describes in detail the pros and cons of using installations and wall-hung toilets, as well as the features of choosing the best option.
Comparison of block and frame structures
Like any other technical structures, block and frame installations have their own advantages and disadvantages.
Among the main advantages are such parameters as:
- the ability to hide unaesthetic connecting elements and communication pipes from view;
- saving free space and efficient use of useful space in the sanitary unit (most important for small bathrooms and rooms with a complex, non-standard layout);
- impeccable sound insulation, thanks to which even in the smallest apartment you cannot hear the sounds of the tank draining and filling;
- increasing the level of hygiene and ensuring easy cleaning under the toilet itself and in the area around it;
- high-quality fastening fittings, allowing you to position the plumbing module at the most convenient and personally comfortable height.
The disadvantages include the rather high cost of the entire structure, some difficulties in installation and the mandatory dismantling of the external interior decoration in the event of a malfunction or breakdown. However, these points are much less significant and do not become a stumbling block when purchasing an installation.
The following gallery will introduce you to the specifics of fastening installations using metal guides:
Image gallery
Photo from
Block installation options
Step 1: Installing the support post into the horizontal element
Step 2: Attaching Mounting Parts to the Rack
Step 3: Using the Quick Release Lock
What is included with the system?
Before you properly install the toilet with the installation, you need to understand the set of parts. The installation system consists of several separate components. The base is a durable steel frame.
Retractable brackets allow you to adjust the height of the structure and provide the ability to mount the device on the floor or on a special foundation.
The kit also includes the necessary fastening fragments, sound insulation elements, an adapter for the flush elbow and a hidden tank.
The main operating device is the flush button, presented in the form of a plastic panel. In addition to its main function, it plays the role of an inspection hatch. A single button is responsible for standard water drainage, a double button allows you to regulate the water supply and makes it possible to spend it more economically.
A panel with drain buttons can not only perform its direct function, but also serve as an effective element of the overall interior design
The most advanced control panels have several additional useful features:
- double flush option - economical and ordinary;
- stop flush - when a second press stops the flow of water.
Some well-known brands also produce more modern contactless control consoles. They are equipped with sensitive infrared sensors that respond to movement and obstacles. Such a system is completely independent and practically does not require human participation in management.
How to choose the right installation?
Purchasing a support frame for a toilet is a responsible and serious matter. You need to approach the choice of installation carefully and rationally. After all, if something breaks or malfunctions during operation, you will have to do a lot of work to detect problems and even dismantle part of the external decoration.
Therefore, it is best to purchase a high-quality system with a mandatory warranty from the manufacturer.
Grohe installations are considered one of the most reliable, last a long time and are easily repaired in case of breakdown. The company carries out warranty repairs and always provides its customers with the necessary components.
Self-respecting brands usually give a 10-year service life for their products, not only for the structure itself, but also for all components, oil seals, sealing gaskets, connecting pipes and the tank.
In reputable branded stores, related parts are available even after the company has discontinued the model. In addition, large brands maintain authorized service centers, where qualified employees will always answer customer questions and carry out warranty repairs in the shortest possible time.
Installation procedure for a wall-hung toilet
The hanging bowl is installed after the installation for the toilet has been installed and the finishing work has been completed. And depending on the type of installation, installation method and wall materials, there are the following options for preparation for finishing:
- install a block or frame system and cover the entire surface from floor to ceiling with a double layer of plasterboard;
- install a frame or block system and make a box from plasterboard;
- install a frame system in a frame wall;
- install a frame or block system in a niche and cover it with plasterboard or cover it with a layer of plaster.
After the installation and communications are “hidden” under the rough surface of the walls and floor, finishing is carried out with selected materials (tiles or decorative plaster). Then they begin to install the wall-hung toilet.
Note. It is believed that the maximum benefit from the hidden installation of the tank and communications is achieved if the installation for the toilet is installed in a niche.
Selecting a location and order of installation steps
When choosing the best location for the toilet, pay attention to a number of features of the room. Firstly, on its geometric parameters. Naturally, installation should be carried out where the plumbing fixture will interfere less. A good solution is a corner installation; it allows you to economically use limited space, and also helps to implement unusual design solutions.
There are corner installations on sale, but, in principle, a regular frame installation can be installed in the corner of the room.
Secondly, the proximity of communications, especially sewer lines, is important. Lengthening engineering routes will require the allocation of additional space for them. In addition, you will have to take into account the installation slope of the sewer (1.5-3 cm per 1 m), which, in the case of significant removal of plumbing, will increase the height of its attachment. These factors should be paid attention to, which will also facilitate further operations to organize drainage and water supply points for other bathroom equipment.
The order of performing work on assembling a toilet installation with your own hands is based on following step-by-step instructions, which define the following main stages:
- determining the location of a plumbing fixture with a frame or block system;
- installation and fastening of all structural elements;
- supply and connection of communications;
- checking all systems.
Niche for installation
A niche is made in the wall for installation if the installation depth of the frame, materials and wall thickness allow such work to be performed. And in addition to the niche in the wall, they also cut channels for water and sewer pipes, which, like the installation, must be installed secretly.
Important. This method is not suitable for load-bearing walls made of bricks (for walls made of reinforced concrete, it is technically impossible to make a niche with your own hands). And if the arch of a niche can be reinforced with an insert made of a metal profile (standard practice for an opening), then this option is not suitable for hidden pipe laying - cutting horizontal channels in a load-bearing wall is prohibited at the regulatory level.
And without horizontal grooves, it is extremely difficult to make hidden wiring - only if the pipes approach the niche from below, and before it are laid in a screed or between the joists of a wooden floor.
For a niche in the wall, there is only one option provided by the manufacturer - for a block installation with an attached toilet.
In addition to this option, they also use a bathroom niche in which the water supply and sewer risers pass. In this case, a frame made of a metal profile is installed in a niche, and a frame installation for a wall-mounted toilet is attached to it.
Installation covering
After completing the installation, the transition from plumbing work to general construction work takes place. All elements of the system, as well as engineering communications, are hidden behind a false wall, protective screen or in a box. The priority option is a gypsum plasterboard partition from floor to ceiling. To install it, a guide metal profile is attached to the walls and screed.
Stiffening ribs from the CD (ceiling) profile are screwed to it with metal self-tapping screws. In this way, a sheathing is formed for fastening the sheet material. Holes are drilled in the drywall for toilet pipes and studs, and a window is cut out for a panel with buttons, after which the installation is sheathed with plasterboard.
To help self-taught people, we recommend that you look at the work “How to sheathe an installation in a toilet,” which describes in detail how to install the sheathing and correctly attach the gypsum board to it.
Installation of a frame with a tank in a niche
The complexity of this method is that the installation of the frame in the niche is “non-standard”. The installation instructions from GEBERIT and GROHE do not cover this option, and the kit does not include fasteners for this.
Installation of the frame in a niche proceeds according to the following algorithm:
- Mark the line for installing the legs on the floor, taking into account the installation depth, the location of the water and sewer risers. The markings must be perpendicular to the walls of the niche or in the plane of the adjacent surface.
- The verticals on the walls of the niches are set off from this line.
- Mount reinforced guides of the UA50 profile on the floor, side walls of the niche and ceiling.
- Install the frame into the profile and fasten it to the floor, having previously drilled holes for the dowels.
- Set the height of the legs and the horizontal level of the frame.
- Fasteners (studs or other type of fastening) are made to a specific size to rigidly fix the installation to the “far” wall of the niche. Drill holes for these fasteners and attach the frame.
- Cut a section of the UA profile to the width of the niche. Attach it to the side profiles and frame.
- Install flush and drain fittings for a wall-hung toilet. Install studs to secure the bowl. Connect the tank to the water supply and the drain elbow to the sewer. Temporarily hang the toilet and connect it to the installation. Check the system for leaks and operability.
- Remove the tank, close the flush and drain holes with plugs, and close the toilet studs with protective tubes. Attach plasterboard cut to size to the profiles in two layers.
Installation instructions
In the instructions on how to install a toilet installation, there are no clear recommendations on what work is performed initially: connect the tank to the water supply network, and then secure the frame, or vice versa, start installation from the frame. In practice, they often start with the tank.
Connecting the installation to the water supply
The technology for connecting the tank to the plumbing system has its own sequence:
- the cold water riser is closed;
- We find in one of the packages an adapter for the tank wall, also known as a faucet. For different manufacturers, the shape of the tap and the method of closing may be different;
- since you can’t put a water pipe directly onto the tap, we find an additional fitting (there is a different model for each type of pipe);
- to better seal the connection, we wrap flax fiber or fum tape around the tap;
- twist the fitting with the tap;
- we attach a metal-plastic (in our case) or polypropylene pipe to the fitting;
Important: Do not use a flexible hose.
- install the tap in the wall of the tank;
- turn off the tap inside the tank;
- connect the metal-plastic pipe to the water supply;
- we find a flexible hose inside the tank or among the parts of the kit, remove the protective covers from it and screw it to the tap;
- take the hose out. Take a bucket and place it under the hose. Alternately open the tap on the riser, and then in the tank;
- We conduct a test drain of water to check for leaks;
- close both taps, connect the second end of the hose to the drainage unit;
- put a plug.
Frame installation
Considering that the frame can move vertically using its legs, first of all you need to set its height, and only then attach it to the wall.
At what height to install
In Russia and the CIS countries, regulatory documents (GOST, SP, SNiP) do not regulate the installation height of a toilet from the floor, since there is no standard for installing a floor-standing toilet. It can neither be raised nor lowered, and the size of the bowl is regulated by GOST 30493.
At the same time, many years of experience in operating floor-standing toilets has shown that the most convenient, and even common, height is 40 cm (in Europe it is customary to install it at a height of 43 cm). The standard developed by practice is suitable for people with different physical abilities, heights and builds. When the edge of the bowl is raised by 4 cm, the person is still in the comfort zone. At a height of 46 cm, discomfort sets in (45 cm is the borderline value between the two zones) - 90% of toilet visitors’ feet do not reach the floor.
It is not always possible to maintain the specified parameters when installing a wall-hung toilet, since in many cases the desire of the apartment owner runs into objective circumstances:
- the height of the receiving hole of the sewer pipe turned out to be too high due to a miscalculation by the builders - they simply played it safe or incorrectly calculated the thickness of the floor covering cake;
- out of necessity, the toilet was moved away from the sewer riser, as a result of which it had to be raised 3 cm for every meter of connecting pipe.
- They laid a warm floor without a screed, as a result of which the floor level dropped, but the sewer pipe remained in the same position.
If it is not possible to hang the toilet within 40-44 cm, then a podium is arranged. After all, it is easier and more convenient for a toilet visitor to climb onto a small elevation than to sit on a toilet seat without support under his feet.
An alternative to this solution would be to rebuild the riser, which is much more expensive (the cost of replacement usually scares the owners). Everything is much simpler when you need to raise the bowl to 40 cm. For this, manufacturers have provided two methods:
- drilled 4 vertical holes in the installation frame for toilet studs;
- We installed retractable legs in the frame, which have a height reserve of up to 20 cm (for most models 17-18 cm).
Therefore, you can adjust the height of a wall-hung toilet either by installing pins in the desired hole, or by raising/lowering the legs (a 13mm wrench will help, or even better, a socket head with a “ratchet”).
To simplify the process of adjusting the height of the toilet using the legs, there is a 1 m mark on the installation frame. If set, the height of the top of the bowl from the floor surface will be 42 cm. Therefore, if there is a need to raise or lower the toilet, this mark must be adjusted: increase by a couple centimeters or reduce.
If the installation frame is installed on the base of the floor (floor), then it is necessary to take into account the thickness of the waterproofing, cement screed, tile adhesive and tiles (5-8 cm).
Frame mounting technology
The height-adjusted frame is placed with its feet on the floor at the points marked during the marking process. Further actions do not cause difficulties:
- Mark the places where the legs are attached on the floor with a marker or pencil;
- install the upper stops;
- mark the mounting points on the wall;
- move the frame to the side and drill holes in the wall and floor;
- hammer the dowels into the drilled holes;
- we fasten the frame at all points, but do not fix it rigidly;
- We check the vertical and horizontal installation. If necessary, we make adjustments - for this purpose, play is left in the fastenings. First we check the vertical;
- then horizontal, correcting deviations with the legs;
- All fastening points are clamped and secured with a locknut.
Connection to sewerage
At the final stage of installation, the installation is connected to the sewer system. For this purpose, the kit includes two elbows: one with a right angle (90o), for connecting to the riser at the back of the installation, and one at an angle of 120o, when the outlet passes along the wall.
The connection is carried out according to the following algorithm:
- The hemisphere of the mounting clamp is attached to the frame. The fastening can be both upper and lower - during the work you need to focus on the drilled holes;
- an elbow is inserted into the hemisphere and secured with a latch;
- measure the distance from the elbow to the riser hole and cut off the adapter pipe with an angle grinder (an angle grinder is not a technology, but the most convenient tool);
- we remove the chamfer from it, remove the burrs with a file;
- Lubricate all connections with silicone and assemble.
After connecting the sewer system, the toilet studs are screwed into the frame. It is very important to prevent skewing: they must be parallel to each other and perpendicular to the wall. The method of mounting on the wall is clearly visible in the photo below.
Functionality check
After connecting the tank to the water supply and the drain pipe to the sewer riser, the functionality of the system is checked. After all, the next stage is covering the installation with plasterboard, which will block access to many structural elements. For this:
- open the tap inside the tank;
- remove the plugs from the pipes (red in the photo, yellow or blue from other manufacturers);
- pipes with cuffs are attached to the toilet;
- The toilet bowl is put on the pins and moved towards the installation. The goal is for the dressed pipes to mate with similar pipes mounted on the frame. It will not be possible to push it all the way, since the fittings on the toilet have a decent amount of length (later they will have to be shortened);
- manually activate the flush valve rod.
Attention: many craftsmen place wooden blocks between the installation and the bowl and secure the toilet with nuts, which makes the structure rigid.
The test of the functionality of the wall-hung toilet is completed by eliminating the identified faults (if any) and returning the structure to its original state: the tap is closed and the water is drained from the tank, the bowl is removed from the studs, and the plugs are put in place.
Sewage supply
Supplying water to the toilet installation does not cause any difficulties. And for any connection of the tank (from the side or from above), you can always lay a half-inch rigid or flexible pipe. With connection to the sewerage system the situation is more complicated. The diagram for the installation shows two types of connections:
- the knee goes down at a right angle;
- the knee is rotated 45° in the plane of the frame.
In most cases, the connection of the installation to the sewer system is based on these options.
The first option, for example, is used for direct connection to the drain, when the frame stands in the same niche as it. The second option is used when laying a drain pipe to the riser along the wall.
But there are cases when both options are not suitable due to limited space and the unique geometry of the bathroom - the large diameter of rigid pipes and fixed elbow angles prevent this from being done correctly. And to solve the problem of how to turn the sewer elbow away from the installation and provide the required slope angle, corrugated adapters are used. For example, corrugation D 90/110 MM FLEXI from ALCAPLAST. But in this case, it is necessary to check the slope of the corrugation.
Connecting communications
To connect to the water supply, the installation kit includes an inlet valve with an external outlet for a ½-inch pipe and an angle shut-off valve inside the installation.
For toilet installations with a bidet function, an additional tube is provided for the intimate hygiene fitting. And to ensure a comfortable temperature, such models are also connected to the electrical network to heat the water that is used for washing. And for this purpose, fastenings are provided for mounting the protective tube of the electrical wiring.
How to check the system for functionality
After connecting to communications, before sewing up the installation, it is necessary to check the operation and the system for leaks. To do this, pre-install the toilet with the following installation:
- adapters with cuffs and sealing rings are inserted into the flush and drain holes of the installation;
- “put” the toilet on the studs and move it as close as possible to the installation so that the adapters fit more tightly into the toilet (it won’t be possible to push it in tightly - the pipes are too long);
- open the shut-off valve on the inlet valve;
- when the tank is full, drain the water (for pneumatics, you need to connect the button and flush valve with tubes, for mechanics, activate the flush valve rod by hand).
After checking and eliminating possible malfunctions, the toilet bowl, adapters and button are removed.
Final stage
After completion of the work, the entire structure is again checked for leaks. To do this, simply fill the tank with water until it is completely filled. Then the water is poured into the toilet, observing whether there is a leak and what the pressure is.
The most likely possible problems and how to fix them.
- If leaks are found on the toilet bowl, the cause may be improper installation of the sealing gaskets. They are easy to adjust or change. You should turn off the water, unscrew the fasteners connecting the toilet to the supporting structure, and check the gaskets.
- If the toilet is loose, tighten the bolts securing it to the installation. Care must be taken not to damage the threads or crush the ceramics.
- If there is a weak discharge of water into the sewer, then you should make sure that the slopes of the pipes are sufficient, as well as the smoothness of their turns.
How to install a wall-hung toilet to an installation
Even when choosing a location and marking, it is ensured that the height of the wall-hung toilet from the floor without a lid is 40 cm. But if after laying the tiles it turns out that it will hang 2 cm higher or lower, this is acceptable.
The wall-hung toilet is mounted on studs after adjusting the size of the adapter pipes for connecting the toilet drain and flush to the installation:
- Remove the protective plugs and tubes.
- Insert the adapters into the elbows and mark the level “0” on them - the plane of the surface of the installation cladding.
- Then insert the adapters with the other side into the toilet (put a sealing cuff on the flush bowl). About the toilet.
- The adapters are shortened by the difference between the two marks.
Place a gasket on the studs (it serves to protect the finish and dampen structural noise during flush operation) and begin installing the wall-hung toilet on the installation:
- Rubber bushings are inserted into the holes for mounting the wall-hung toilet.
- Insert adapter pipes into the drain and flush holes of the bowl.
- Place the wall-mounted toilet on the studs so that the transition pipes fit exactly into their holes on the installation, and the bowl fits tightly to the wall.
- Place elastic washers and steel washers on the studs and tighten the nuts.
- Before finally tightening the fasteners, you can slightly adjust the horizontal level relative to the height of the toilet from the floor.
Design and operating diagram of the installation
Self-installation of a toilet on an installation will become easier if you understand its design and operating principles. Let's look at the elements of a frame bathroom in more detail.
Support steel frame
The metal frame is the main load-bearing element of the installation, which bears not only the weight of the equipment, but also the weight of the person sitting on the bowl.
The frame is fixed simultaneously to the load-bearing wall and the floor, but there are also designs with a double frame for installation in the partitions of large bathrooms.
The double frame is installed in the partition of large bathrooms and is attached only to the floor with four legs using special fasteners (+)
At the bottom, the frame is equipped with retractable legs for adjusting the installation height. The standard height of the upper edge of the toilet seat from the floor is 40-48 cm, it depends on the height of the owners of the apartment. Steel pins are screwed into the frame at the front, onto which the bowl is subsequently hung.
Plastic cistern
Each manufacturer has its own shape of the plastic tank, because it is necessary to ensure good water capacity within the narrow confines of the metal frame. The surface of the plastic is covered with a heat insulator to prevent the formation of condensation.
Choose a cistern with a special coating that prevents condensation from forming. If there is moisture in a closed installation space, metal elements can quickly rot
On the front surface of the tank there is a small area where manufacturers try to accommodate all the equipment: a pipe for connecting a water hose and a device for mounting a release button. It is this limited installation rectangle that will be accessed for repairs after the final installation of the equipment.
Drain dosing has already become a standard, so each flush tank has regulation of the volume of water discharged.
Types of toilet bowls
The bowl is the most beautiful element of the installation, on which designers work more than engineers. The traditional oval seat shape remains the best-selling, but rectangular, round and shaped bowls are also in demand.
When determining the required height of the toilet bowl, take into account the height of children. A decrease in level by 2-3 centimeters will help teach a child to go to the toilet independently 1-2 years earlier
Small components of the installation (fasteners, fittings, drain button, etc.) vary depending on the manufacturer, so it is better to familiarize yourself with the features of their installation in the installation instructions.
Installation of the flush button
According to the principle of operation, there are two types of toilet flush button: mechanical and pneumatic.
Even at the installation assembly stage, a flush valve is installed. Each company has its own design, but the principle of operation is common:
- a mechanical button activates the flush using a pull rod, separate for each key - economy mode and full flush;
- For a pneumatic flush, there are two tubes from the valve to the button—one for each mode.
Installation of the flush button begins with its connection to the flush valve. For a mechanical drive, the rods (pins) must be “adjusted” in length and each connected to its own key, while for a pneumatic drive, the tubes must be connected.
Then the button is “snapped” into the socket.
Common Difficulties
The main problems arise due to the limited size of most bathrooms. This is especially true for strictly residential buildings, when in addition to the small “dimensions” there is added poor geometry of the room - the absence of right angles and parallels in the enclosing surfaces. In this case, even the slope of the wall is checked before installation. And leveling the walls further reduces the room for “maneuver” when installing the installation under the toilet.
The correct choice of type and model of installation, as well as the accuracy of markings, frame location and adherence to the installation diagram will help you avoid mistakes and alterations.
And the main condition is careful handling of mechanisms and sanitaryware. Even “tightening” the fastenings of the intake and exhaust valves or the hinged bowl can lead to a violation of the tightness of the connections or damage to the device itself.
What is important to know. It is necessary to buy installations and plumbing from reputable brands. It is better to do this with dealers or trading companies that have appropriate agreements with service centers and provide a guarantee for the purchased product. In addition, if necessary, you can buy additional accessories or a repair kit for the selected installation model from such sellers.
Myths about hanging plumbing
Although primitive flushing blocks were used back in Soviet times, people are still afraid to install modern block plumbing structures in their apartments. Below are some misconceptions about installations and wall-hung toilets.
Myth No. 1 . A wall-hung toilet may fall under the weight of a person.
Installations are usually secured with 12 mm thick bolts. The frame structure itself and the support rods are designed for a weight of 400-450 kg. The only reason for a toilet to fall can be the collapse of the wall to which it is attached.
Myth No. 2 . It is necessary to dismantle the decorative box if the cistern breaks down.
The drain button frame is secured with latches and can be easily removed. Underneath there is a hole for connecting a water hose with a compact tap. Within this “installation” window on the front wall of the tank there is also a float mechanism, which can be unscrewed from the tank by hand and repaired without dismantling the box.
Myth No. 3 . A wall-hung toilet takes up minimal space.
Block and frame installations require an additional 20-25 cm of bathroom space. Therefore, these structures take up even more space than a floor-mounted toilet. The only option for reducing space is to place the installation in a wall niche.
Myth No. 4 . There are no spare parts for block installations.
The sizes of components are standardized by most manufacturers, because repairable models have priority when purchasing. In plumbing stores, picking up a broken part will not be difficult. In addition, you can repair the installation yourself.