To connect a water heater, you need to prepare the necessary tools and materials, determine the connection diagram, select a location for installation, secure the boiler, then connect to the water supply and electrical networks.
Living in a house without hot water cannot be called comfortable. Water is needed literally every minute for a variety of purposes. Therefore, the connection of a storage or instantaneous water heater is planned in advance and is carried out as planned even at the stage of finishing work. In an existing house, the connection is usually combined with repairs to the premises. Before you begin this work, you need to decide what type of water heater will be optimal for installation in your home.
The need to connect a water heater may be caused by the following reasons - lack of centralized hot water supply, remoteness of the heating point, dilapidation of boiler equipment or heating mains, in which the water entering the apartment may be lower than the expected temperature. In each specific case, a certain type of water heater will be required.
For a family of more than three people, a flow-through heater is sufficient. But only if the house is not the object of periodic visits.
And with a larger family, as well as with the possibility of guests arriving, it is necessary to organize the possibility of using hot water for several water points at the same time.
This becomes available only when connecting a storage water heater with a capacity of at least 100 liters, and the connection diagram itself will depend on its type and design.
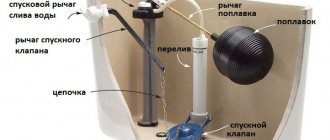
To install the water heater, you need to hang the boiler in the desired position on reliable fasteners. A safety valve and a tee with a ball valve are installed on the cold water inlet pipe to drain water from the boiler. Shut-off valves are installed at the inlet and outlet of the water heater. To check the tightness, you need to fill the boiler, for which we open the hot water tap on the mixer and on the water supply.
Consider the types of water heaters
Water heaters for apartments and private houses are distinguished by the type of energy carrier - these are electric and gas appliances. Electrical equipment can be storage and flow-through, while gas models operate only as flow-through devices. Heaters come in vertical and horizontal shapes, floor and wall-mounted. To correctly connect heating equipment with a tank of the required volume, it is recommended to use the following table.
Before choosing one or another model of water heating equipment, you need to have an idea of how different types of devices work.
Indirect heating devices
Indirect heating heaters operate from coolant from the heating network, which passes through the tank along a spiral heating element. It is made in most cases from copper, which has high thermal conductivity.
The coolant at this moment has its maximum temperature, since it enters this circuit directly from the boiler. The water temperature in such a water heater in most cases does not exceed 80 degrees. During intensive use of hot water, it can be reduced at the time of pumping to replenish the level in the boiler.
The peculiarity of the operating conditions is that the heating process is not carried out in a continuous mode. This means that water is not heated when there is no heating season. But it is possible to isolate the boiler circuit in a private house into a separate network and heat it at this time at the minimum operating mode of the boiler.
In addition, in any heating system, it is desirable to install a backup heating unit using an alternative fuel. Usually this is a lower power boiler.
It can be switched to a water heater via a separate circuit. At the same time, the plumbing and heating system becomes somewhat more complicated, but not so much that connecting the water heater with your own hands becomes impossible.
Indirect heating is used as a backup hot water supply system during the heating season.
Storage water heaters
The name suggests that a storage boiler has a container in which a certain volume of hot water is accumulated, necessary to meet the needs of everyone living in an apartment or house.
A thermostat is installed in the tank, which controls the heating elements, maintaining a constant temperature of the working volume of water (about 700 C.). For example, for a family of 5 people it is enough to install a storage water heater with a 50-liter tank. There are models with a volume of 150 liters.
The advantage is that the drives have a large performance reserve. Large tanks are capable of supplying hot water simultaneously for washbasins, showers and bathtubs, as well as for kitchen sinks for the entire duration of connection.
The only drawback of such units is that after the working volume of hot water is completely consumed, you have to wait for full filling and heating for an hour to an hour and a half.
Flow-through
The devices are equipped with small containers. The heating element of the flow-through heater is turned on at the moment the tap is opened. Rapid heating occurs due to the flow of liquid through a hot spiral. Unlike storage devices, flow-through models, due to the short-term effect of heating elements, cannot heat water to high temperatures.
The valve on the tap regulates the replenishment of the water level in the tank as it is consumed from a centralized water supply or a reserve tank on a personal plot.
Despite this, instantaneous heaters prove their effectiveness as backup power during seasonal and emergency shutdowns of hot water supply. They are in great demand among summer residents, who install them in shower stalls.
The disadvantage of a flow-through heater can be considered its low performance. For example, a bathtub can only be filled with warm, but not hot water, with high energy consumption.
Gas
Geysers are instantaneous water heaters. They began to be installed en masse in the USSR in the early 60s of the last century, when the country began construction of multi-storey gasified residential buildings. Heating in such devices is carried out as follows - water from the water supply enters a spiral water conduit around a copper box-shaped screen, inside which the gas burns in burners (grid-irons).
In the initial position, the gas wick is constantly burning. When you turn the tap, the water coming from the water supply opens the valve, and the gas begins to flow into the grate, where it ignites from the wick. For different models, the water temperature is controlled manually or automatically. But for everyone, when the water supply suddenly turns off, the automatic shuts off the gas supply.
The advantage of geysers can be considered high performance and efficiency. Their ability to quickly provide hot water is highly valued by consumers. Geysers can operate efficiently and safely only in conditions of centralized water and gas supply.
Installation diagrams and solutions
You can connect a heating device to the centralized supply in one of two ways: through a security group or directly.
A security group consists of a collection of the following elements:
- shut-off valve;
- Check Valve;
- safety valve;
- expansion vessel.
Option number 1 . The presence of a safety group is traditionally used in indirect heating boiler installations, as well as when the pressure of the centralized system is higher than the limit parameter of the boiler operating pressure.
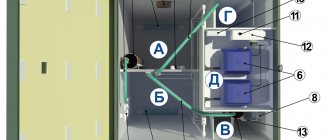
Classic scheme of indirect heating equipment. Two safety groups are used: 1 – boiler safety group; 2 – expansion vessel; 3 – boiler tank safety group; 6 – heating circulation pump; 7 – boiler circulation pump (+)
Option number 2 . Direct connection is usually applicable to small-capacity equipment with a flow-through operating principle. Direct connection is also allowed in conditions of lower and stable pressures of the centralized water supply. In any case, the installation diagram involves the installation of shut-off valves.
In order to be able to maintain and repair water heating equipment, it is equipped with shut-off valves at the inlet and outlet of the system (+)
Installing a storage water heater - step-by-step instructions
Installing a storage type boiler can be more difficult in a wall-mounted version, as opposed to floor-mounted units. Otherwise, the connection diagram is the same for both types of devices.
The owner of the home can connect the storage water heater with his own hands if he has experience in handling tools, electrical equipment and plumbing. First, you need to prepare the necessary tools and materials, determine the connection diagram to the water heater communications and select the installation location of the unit, and then proceed directly to the installation and connection of the boiler.
What tools and materials will we need?
We will need the following tools:
- perforator;
- level or laser level;
- tape measure, marker, ruler;
- 2 brackets with anchor bolts;
- PVS wire 3 x 2.5;
- socket with 3 sockets;
- automatic fuse 16 A;
- 2 flexible hoses;
- water pipe 1/5 inch;
- couplings, fittings;
- welding machine (in case of using polypropylene pipes);
- 2 shut-off valves;
- drainage and water tap;
- hacksaw for metal;
- FUM tape;
- cement + sand;
- putty.
Keep in mind that you may need additional tools, such as an angle saw or a circular saw.
Connection diagram for storage water heater
It is simpler for a vertical device than for a horizontal one. The complexity of the connection diagram for the latter is that the horizontal storage heater is placed under the ceiling and all communications have to be pulled upward to the device.
Choosing a location for installation
The choice of location for a storage water heater depends on its type. Floor-standing devices have significant dimensions and require a lot of room space. Moreover, there must be enough space around the unit for maintenance and repair.
The location should be as close as possible to the points of hot water consumption, which will reduce heat losses when passing through the pipes.
They try to choose a place to connect the boiler closer to the water supply and water taps, that is, they choose the “golden mean”. Small-volume wall heaters can be hung on any wall, but if the tank is larger than 80 liters, it can only be hung on load-bearing vertical fences made of concrete or brick.
For vertical floor-standing boilers, be sure to choose a location with a solid floor base. Sometimes the area of the floor under the water heater is made of monolithic concrete or covered with ceramic tiles.
Unlike large-sized housing, in most apartments of a standard type, especially in older buildings, it is quite difficult to choose a place for a storage water heater. Practice shows that owners of small apartments most often determine the position of the boiler in places such as:
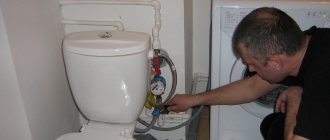
- above the toilet cistern, which saves space, especially in combined bathrooms;
- in the same bathrooms, horizontal hot water storage tanks are attached to the wall above the bathtub;
- a unit with a volume of 10–15 liters is placed under the kitchen sink in a floor cabinet;
- a horizontal water heater is placed under the ceiling in a corridor or other room, which requires additional installation of water pipes.
DIY water heater installation
We make fastening
Floor-standing boilers do not require additional fastenings. The units rest on supports in the form of metal legs with rubber pads; there are adjusting screws at the bottom of the device. If necessary, plates from any sufficiently strong sheet material are used.
The supplier must include brackets
in the delivery package for
a horizontal boiler The places for their fastening are marked with a marker on the wall. We install the unit in the chosen location. Carefully align it to the horizon using a building level. The two points must be on the same horizontal line, which is checked with a level or laser level. Using a hammer drill, two holes are drilled in concrete or brickwork. Dowels are driven into them, threaded into the mounting holes of the brackets.
The boiler is suspended from supports. The homeowner does not need to come up with anything on his own; in the accompanying documentation, the manufacturer indicates how to mark the mounting locations on the wall.
Connect to the water supply
To make it clearer to a larger circle of consumers how to install a storage water heater, it is proposed to consider the general scheme for connecting to the water supply in conditions where there are cold and hot water risers and pipe connections to the mixer.
A storage water heater is installed on the floor or hung on the wall, and cold and hot water pipes are connected to it. At the cold water supply inlet to the electric heater, a ball valve and a safety valve are installed, which protects the device from emptying the tank, deformation and damage when pressure or temperature increases. The valve is an integral part of the equipment delivery set.
Tees are cut into the hot and cold water pipelines to connect flexible hoses or plastic or steel pipes from the water heater. All threaded connections are made with FUM tape wound. The inputs to the heater are marked in two colors: red – hot water output, blue – cold water intake from the water supply network.
Connect to the electrical network
Household boilers are designed to operate on a 220 volt network. All storage water heaters are equipped with 3 horn connectors - 2 of them are for power supply, and the third contact is ground. The corresponding socket is attached to the wall at a height of at least 500 mm from the floor.
Since the storage water heater is equipped with heating elements that have significant power, separate wiring is installed for them to connect to the electrical network. The wire cross-section is selected depending on the power; the connection is made through a separate machine for 9-16 amperes. When laying a line, you may need a tool for cutting a channel in the walls, an electrical installation tool, or a drill for drilling holes in the walls. To do this, a hole is punched in a concrete or brick wall from the outlet to the meter using a hammer drill. An electrical wire is placed in it.
In the control room, a 16 A fuse is mounted on a DIN rail, which is connected to the electric meter. They also punch a groove to the grounding bus. If there is a grounding terminal in the panel board, pull a three-core wire from the socket. Channels with wires are sealed with cement mortar and putty.
How to install a water heater on drywall in 20 minutes after a bathroom renovation
First start
Before the first start-up of new equipment, all connections are visually checked. Then open the cold water tap and fill the tank. Turn on the heating. After a specified time, open the nearest water tap and determine the degree of water heating.
At the same time, the dryness of all threaded connections is monitored by touch. If a leak is detected, the system is turned off and the defect at the connections is eliminated. Then you should restart the boiler again and finally make sure that the equipment is working correctly.
Choosing a boiler - how many liters will be needed
We decided to touch on this topic, since the normal supply of hot water to the house (abbreviated as DHW) depends on the volume of the water heater. Buying a tank with a large supply of water is also pointless:
- the heating time to a comfortable temperature increases;
- the price of equipment increases;
- The installation of a storage water heater becomes more complicated due to the large weight of the device + a decent volume of water.
Advice. If you only need a heater for washing dishes, it is better to buy a low-power electric flow-through model, which is placed under the kitchen sink or instead of a faucet. How to choose the right electric water heater for your dacha, read in a separate publication.
The capacity of the storage tank is selected according to the consumption of mixed (warm) water per 1 resident per day - 20 liters for hygienic needs, another 12 liters for household needs. How many liters of boiler is needed in total:
- for economical consumption, a family of 2 people needs 50 liters, for comfortable consumption – 80 liters;
- 3 people – 80...100 l;
- 4 family members – 100…120 liters;
- 5 or more residents who actively use hot water - 120...150 l.
Installation of instantaneous water heater
Flow devices can be of different designs and power, but they are all united by ease of installation; they are somewhat simpler than storage units. The water in them is heated when passing through a small enclosed space in which the heating element is located. Obviously, the heating process occurs in a very short time, which requires powerful heating elements.
An instantaneous water heater is usually a small-sized equipment connected by a flexible hose to a tee, which is cut into a cold water pipe. It is connected to the nearest 220 V outlet.
A feature of instantaneous water heaters is that they can only be used for one point, but there are designs that allow you to power several objects at the same time, but they are quite expensive and have significant electricity consumption. Placed in any convenient place: on the wall above the sink, bathtub, kitchen sink or under it, on the ceiling in the shower stall.
Of course, you can install instantaneous water heaters at several points. But even in this case, they can only be used one at a time, otherwise the electrical network may not be able to withstand significant overloads. We can conclude that such a device is applicable only for a small family consisting of two or three people.
A test run of the instantaneous water heater is carried out to identify leaks at the connection point to the water supply.
ATMOR Basic Connection and operation / Instantaneous water heater / If hot water is turned off
The easiest way to connect to a water supply is provided for a flow-through heater in the form of a tap.
There are many designs of such devices and they have their own individual characteristics. Therefore, when purchasing a heater, you must carefully read the installation rules and follow them scrupulously.
Wall-mounted and other wall-hung options for instantaneous water heaters can be connected to the water supply using a standard flexible tube.
Instantaneous water heater: connection and use
Installation of a water heater. Instantaneous water heater, installation and installation, Electrolux, Electrolux.
Connecting an instantaneous water heater to the electrical network
There is an opinion among consumers that connecting a water heater to the power supply involves plugging the plug into an outlet. However, it must be taken into account that it is in this device that there is direct contact between water and electricity . What can give rise to circumstances leading to electric shock to a person.
There are several circumstances that you should pay attention to:
- selection of the cross-section of the electrical cable, which is determined by the power consumption of the water heater;
- selection of a circuit breaker for the water heater power supply network;
- selection of socket, if used.
- grounding
When connecting a heater with a power of 3.5 kW or more, a three-core wire with a cross-section of 3 mm2 should be used.
Connection via a socket provides installation of an IP44 class product. These are waterproof devices designed specifically for installation in rooms with high humidity.
The machine for connection should be selected based on the power consumed by the device. You can be guided by the following considerations:
- for devices with a power of up to 2 kW, you can use a 9-amp machine;
- for devices consuming up to 3.5 kW, a 16 A automatic machine is suitable;
- for more powerful units, a device up to 25 A should be used.
If the boiler power is more than 3.5 kW, it must be connected not through an outlet, but only directly.
All about water heaters. Selecting a water heater, operating principle, installation, startup.
Choosing a location and attaching the boiler to the wall
The process begins with finding a suitable location to place it.
Boiler mounting
When selecting the required site for placing equipment, several special points should be taken into account:
- The installation must be placed in such a way that it is located close to the power and water supply points. This is justified by the fact that according to the wiring, the water will flow directly into the tank and be heated there. If there is a need to install a boiler on the wall, you need to take care in advance about the placement of electrical supplies in the project.
- When installing a boiler, it is better to use a plumbing box. It will allow you to hide the unit and save free space.
- If the installation will be carried out in the kitchen, then you need to calculate the amount of free space. Please note that separate water heating devices are produced for kitchens, which are distinguished by their compactness.
- It is not recommended to install the device in the bathroom directly above the container. This will not only lead to discomfort in use, but also if you are in constant dampness, the equipment will quickly fail.
- Before placing the boiler, you need to check how strong the wall is. The ideal option would be a surface made of brick or concrete blocks.
The usefulness of the equipment’s operation will depend on the correct choice of wall. Please note that the boiler weighs a lot, and when filled with liquid, the weight will increase several times, and the wall must support all this. It is impossible to mount the boiler on a wooden wall, of course, unless it is provided with reliable insulation from heat.
Connecting a geyser
Home craftsmen should be aware that all work related to the installation of gas equipment can only be performed by gas service workers (Gorgaz) who have a special permit. Information on this topic cannot be instructions for installing a geyser with your own hands.
Even if the owner shows independence and installs the gas water heater correctly himself, he cannot avoid troubles from the gas service, including the imposition of penalties.
In the 60s of the last century, the USSR carried out mass construction of five-story panel buildings, the so-called “Khrushchev buildings”. As a rule, these houses were gasified, and a gas water heater was installed in each apartment. Over time, gas water heaters became outdated and they began to be replaced with new modern gas water heaters.
Installing new equipment in the place where the old column was is quite simple. The gas and water pipes practically do not change their position, with the exception of some adjustments to their connections to the pipes of the new water heater. Tools you may need are a hammer drill to install new brackets, wrenches and pipe wrenches.
The new column is hung on brackets. Using couplings, bends and gaskets, a gas pipe and water supply are connected to the boiler pipes. A flexible hose is used to connect the hot water outlet pipe to the water tap. The exhaust pipe is connected to the outlet of the column.
After all connections have been made, perform a test run. During the first switch-on, check the draft in the hood and the absence of water and gas leaks. If violations are detected, the device is turned off and the violations are eliminated.
Features of the electrical circuit
In order to accurately install a water heater in your dacha, you must also have an idea of how to connect it to the electrical network. To do this, you must first take into account the following requirements:
- Due to its fairly high power, the boiler must be connected to the network via a separate branch.
- To ensure complete safety, the unit housing must be grounded. Therefore, the power supply must be supplied with a three-wire cable through a 3-pole socket with a connected ground wire.
How to work with different types of pipelines
Not so long ago, the question of what to make a water supply from practically did not exist. There have always been metal pipes of various types for this purpose.
And for faster, high-quality installation, additional parts were used - fittings to connect various pipeline elements into a single workable system. They have always been divided into threaded and welded.
Installation of metal pipeline systems
Metal water supply networks can be made of two main materials - steel or copper. Cases of installation from other types can be considered exotic.
The main connection method for steel pipes is threaded and welded. To eliminate the use of thread-cutting tools, in some cases welded threaded ends are used. The main assembly, including for pipelines of complex configurations, is carried out using fittings.
This type of connection in pipelines, such as flange, is practically not used for heating and hot water supply systems in country houses and apartments.
If it is necessary to make bends, it must be taken into account that its minimum radius for steel pipes is 2.5 times the pipe diameter. For bending at home, you can use manual mechanical or hydraulic pipe benders.
Copper pipes are installed in the same way as steel pipes. The difference lies in the connection method. Copper parts are mounted by soldering.
In this case, the ends of the pipes are often flared to ensure a reliable connection. This technological operation is possible due to the high ductility of the metal.
Connection using threaded fittings is also used. In this case, flaring of the ends is also used, but it is done at an angle of about 45 degrees.
The advantage of copper water pipes is:
- Resistance to hydraulic shocks;
- No lime deposits on the inner surface of the pipe walls.
- Durability – service life is up to 50 years.
The disadvantages include the high cost of materials.
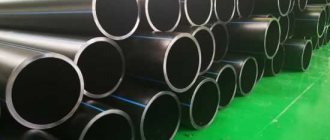
Installation of polypropylene pipelines
Polypropylene, as an alternative material for installing water supply and heating systems, appeared several decades ago and immediately became a popular substitute for metal pipes. This became possible due to ease of installation, low weight, simplifying delivery, and long service life.
A special feature of the manufacturing material is its resistance to bending, so installation is carried out strictly along straight lines. Fittings made of the same material are used for connections.
Threaded fittings have also been developed and are used, the main application of which is to use them at the transition points from a metal pipeline to a polypropylene one, for example, when installing pipeline elements with metal casings. These can be taps, plugs, monitoring and control devices, and so on.
When using polypropylene as the main material in heating networks and hot water supply systems, it should be taken into account that the maximum temperature it can withstand without consequences is no more than 90 degrees.
This is quite enough to heat any room. When polypropylene pipes are used in extreme conditions in heating and hot water supply, their durability is about 20 years; in low-temperature water supply systems it can reach 50 years.
The connection of polypropylene pipeline elements is made by soldering. A special soldering iron is used for this.
For pipes of various diameters, the heating time in the soldering iron is from 5 to 10 seconds. It is necessary to hold the joint motionless when connecting for 15-20 seconds.
Soldering installation is carried out on a workbench, while individual network links are assembled and installed into the system “by hand”. This is less convenient and you need to use the services of an assistant.
This installation procedure excludes the installation of closed heating networks - if leaks occur, the wall will have to be destroyed.
Installation of metal-plastic systems
The use of an aluminum layer in the wall of a water pipe for both cold and hot water is caused by the need to protect the metal parts of the system from oxidation.
Oxygen from the air is able to penetrate plastic in atomic form and dissolve in water. At the same time, it acquires aggressive properties and actively oxidizes the metal, promoting failure.
To protect against this, aluminum foil is used, which is applied to the workpiece along the adhesive layer. The material is applied in a spiral, the joint is welded with a laser.
A second adhesive layer and an outer layer of plastic are applied on top of the foil. This creates an obstacle to the penetration of aggressive substances, and the method is called oxygen protection.
The installation of metal-plastic pipes differs from that described above only in the need to strip the metal layer before soldering. A special device is used for this.
The physical properties of metal-plastic pipes allow the use of bends during the installation process. This allows you to create seamless sections of water supply, in which connections are made only at the exit from the channel, hidden in the wall or floor.
This method is widely used when installing heated floors and hidden plumbing. For this reason, metal-plastic pipes are produced in coils up to 600 meters long.
Video description
Video on how to properly install electrical protection for a boiler:
- The cross-section of the cable conductors must correspond to the power of the boiler heating element.
- Low-power water heaters can be connected via a waterproof socket connected to the panel with a separate cable.
- Medium and high power models must be connected via an RCD. In the event of a breakdown on the housing, the device will automatically turn off the current supply to the unit.
Helpful information! Floor-standing boilers have a larger capacity, and therefore more power. Therefore, safety requirements when connecting them to the electrical network are more stringent. So, the cable connection for them must come from a specially mounted separate electrical panel.
Application of check valve
This mechanism belongs to the safe operation system.
Its use on a pressure device is necessary. When heated, the water in the boiler noticeably increases its volume, resulting in an increase in pressure in the vessel. The extreme manifestation of this process is its rupture. As a result, the room is filled with steam and hot water, which can cause significant harm to people.
When critical values are reached, the valve installed on the boiler opens the spring damper to discharge water, which is discharged through the fitting. To dispose of it, a hose is installed on the fitting and connected to the nearest discharge into the sewerage water supply. It must be securely fastened, since the discharge can be carried out with great pressure. After releasing excess water, the spring valve closes.
The valve also has a lever for releasing water, which can be used manually.
Security
To connect powerful models of storage-type water heaters to the electrical network, craftsmen use a reinforced cable with three cores, which is laid directly from the distribution board. Installation of a double circuit breaker or RCD and grounding are required.
Connection to the electrical network Source otopleniesam.ru
Crimping
This term refers to a control test that confirms the performance of equipment and plumbing. When it is carried out in an apartment or private house, a special device is used, with which water is pumped into the system and the pressure is manually increased. This is done in the following order:
- The pressure tester is connected to a water supply line filled with water. The pressure rises to 4-5 atmospheres.
- The system is inspected to identify leaks and eliminated as soon as they are identified.
- A further increase in pressure to 10-12 atmospheres is carried out after their elimination.
- In this state, the heater and pipelines to it are left for a day.
How to connect a boiler in your apartment yourself
The water heater is considered ready for operation if the maximum achieved pressure in the water supply does not change during the day.
Preparation
Carrying out the correct preparatory measures is the key to successful installation of a water heater in an apartment. First, it is advisable to read the instructions supplied with the device by the manufacturer, paying special attention to the issue of safety precautions during installation and operation of the device.
An equally important point will be the competent choice of location for mounting water heating equipment.
In this case, strict adherence to several aspects is mandatory:
- availability of the installed water heater for preventive measures and maintenance under operating conditions;
- the type of wall and its ability to withstand the weight of the installed water heater filled with water;
- the condition of the electrical wiring and, if necessary, correction of all identified deficiencies;
- compliance of the electrical wiring with the characteristics of the water heating device and the requirements set by the manufacturer for the operation of the device.
It is equally important to carry out a high-quality diagnosis of the condition of the entire water supply system, including the correct functioning of risers and pipes. Particular attention is paid to the quality of the water that will flow into the water heating equipment, and to determine the need to install a filter.
At the preparation stage, special importance is attached to the correct choice of location for mounting the water heater, since only in this case will the ease of installation, maintenance and operation of the equipment be guaranteed.
Frequent connection errors
All components of the water heater must be correctly connected. These include tees, relief valves and ball valves. Despite the detailed step-by-step instructions that can be found on the Internet, when connecting boilers, home craftsmen manage to make the following mistakes:
- Instead of a safety device, an ordinary valve is installed. In this case, the pressure on the unit does not decrease, which leads to premature wear of the equipment;
- the lack of thermal insulation on the hot water pipe leads to the fact that the water quickly loses its high temperature and takes a long time to heat up in the tank;
- Unjustified extension of communications when installing the unit can cause a drop in boiler performance.
If all the requirements for installing and connecting the water heater are met at a high quality level, then the device itself will last for many years.
Conclusion
Summarizing all of the above, we can say that with proper connection and compliance with operating rules, the boiler will serve for a long time. It is important to note that if you are not completely confident in your abilities, it is better to turn to specialists for help. If you are confident in yourself and are going to connect the boiler yourself, then carefully monitor what you are doing and keep common mistakes in mind so as not to accidentally make them. To avoid mistakes at a very early stage, try to take all measurements with maximum accuracy.