A fan of the “Loft” design style - a very unique way of decorating a home - rejoices like a child at every valve or pipe that sticks out in the most visible place.
Other citizens do not share these delights and try their best to hide the engineering communications.
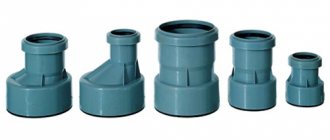
Let's see how and from what you can make a box for pipes in the toilet and bathroom.
How to hide pipes in a toilet - ways
How to close (hide) pipes in the toilet? There are two ways to remove pipes, as they say, out of sight.
Laying in wall or floor construction
Using this method, we not only hide the pipes, but also get maximum free space.
Before bricking up communications, they should be covered with thermal insulation made of foamed polyethylene, which will allow the pipe material to expand freely when the temperature changes.
Laying pipes in this way is possible only at the stage of major repairs.
When laying inside the floor, the pipes are placed in a screed; when laying inside the wall, a channel (groove) will need to be punched in the wall using a hammer drill. In the latter case, the installation process will not only be labor-intensive, but also extremely dirty and dusty.
There are a number of limitations with this method:
- You can only embed the pipe itself into the wall or floor - you won’t be able to hide the meter, fittings or filter in this way. If the embedded pipe consists of several sections, they can only be connected by welding - sealing threaded and other detachable connections (for example, using push fittings for metal-plastic pipes) is not allowed.
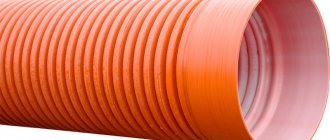
- The maximum diameter for pipes with this hidden installation option is 50 mm. Accordingly, the sewer pipe coming from the toilet (usually 110 mm in diameter) cannot be hidden in this way.
- Punching grooves in load-bearing walls is prohibited.
It should also be taken into account that risers with this installation method remain visible.
Pipes in the bathroom often spoil the overall appearance of the room, so many people try to disguise them. How to hide pipes in the bathroom - we will describe several methods of disguise.
We will discuss the procedure for performing pressure testing of the pipeline here. Safety measures when performing work.
The enamel in the bathroom wears out over the years, and in order to avoid purchasing a new bathroom, it is better to restore it. In this topic https://aquacomm.ru/cancliz/mnogokvartirnyie-doma/santehnika/kak-vosstanovit-emal-v-vannoj.html we will consider the main technologies for coating restoration: enameling, stacrylic, acrylic liner.
Camouflage through enclosing structures
In this case, it will not be possible to save space, but the following advantages are available:
- pipes and building structures are not affected (major repairs are not required);
- you can hide not only the pipes themselves (including risers), but also all pipeline elements, including meters;
- there are no restrictions regarding pipe diameters or types of connections;
- it is possible to provide quick access both to the entire pipeline and to its individual sections or elements, for example, valves.
You can choose one of two options:
- Build a compact box along the pipes, leaving the dimensions of the room unchanged.
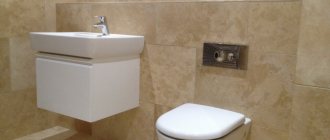
- Install a partition across the entire width and height of the room, so that all communications are behind it. At the same time, the room is somewhat reduced in volume, but it acquires a perfectly neat appearance: only smooth walls, without conspicuous boxes and “steps” (a box lying on the floor). Behind such a partition you can also hide the installation for a wall-hung toilet along with the flush cistern.
Installation must be done so that the pipes do not touch the walls of the box or partition, otherwise they will be wetted by condensation.
A convenient alternative to a stationary partition are roller shutters. They not only hide the pipes, but are also an interior decoration in themselves, as they look very stylish. But the most important advantage is the ability to access communications literally with one movement.
You can also resort to a compromise option - install the partition not up to the ceiling, but at a height of, say, 1.2 m. In this case, the enclosed space is also sewn up on top. Above the shortened partition you can place several shelves for storing tools, household chemicals, etc.
If you need to disguise the riser, you can only sew up the corner in which it is located. To do this, you can use just one plane, installing it diagonally.
Covering the structure with plasterboard
After assembling the frame, they move on to its sheathing.
- Measurements are taken from each plane of the frame, transferred to drywall and strips are cut out. The edges of the cut strips must be cleaned with sandpaper or treated with a roughing plane.
- Self-tapping screws and a screwdriver are used to attach plasterboard sheets to the frame. The distance between the fasteners is no more than 25 cm. The screws should be screwed in at right angles.
- To inspect the pipes in the toilet, a door is installed in the partition.
Implementation
To build a camouflage structure, you will need sheet materials, of which there is no shortage today. Let's look at the most accessible and common:
- Box made of PVC or MDF panels : in general, MDF is not designed for use in rooms with high humidity, but if the bathroom is separate, it can be used in the toilet - here the humidity remains within normal limits. Also, for a separate toilet, such a “water-resistant” material as laminate would be quite suitable. PVC panels are produced in sheets with a length of 260 to 600 cm and a width of 10 to 50 cm. The dimensions of the sheets must be chosen so that the amount of waste is minimal. The thickness is 5 – 10 mm and determines the strength of the product.
- Drywall box : this material usually serves as the basis for finishes such as wallpaper or ceramic tiles. Unlike the option described above, the gypsum plasterboard box is non-removable, so it should be equipped with hatches for access to valves and other pipeline elements. Working with drywall is considered more difficult than working with plastic or MDF panels. The material used in the bathroom must be moisture resistant.
- Plywood or OSB box : for a separate toilet, these materials are also quite suitable. Like drywall, they will need to be covered with something, but they are quite affordable.
- Box-cabinet : this design is ideal for masking risers and other vertical pipelines.
Compared to a regular box, it has two important advantages: it provides full access to the pipes and, being equipped with shelves, can be used to store a variety of small items.
Creating shelves
If the bathroom is small and the distance between the two pipes is small, then you can simply sew up the entire back wall. If the distance is large or there is only one pipe, then you will get a kind of niche that can be filled with something. The best solution would be a box in the toilet made of plasterboard with shelves. The shelves themselves will be installed between two newly formed walls.
After finishing, the shelves will look like an integral part of the structure
You need to make shelves after two boxes are ready, and a niche is created between them. On the left and right boxes inside the niche you will need to make markings for attaching the shelves. Then the lines are extended and markings are made on the back wall.
The guide is cut so that it can be bent into a rectangle of the given dimensions. All cut places are then fastened with self-tapping screws when the profile is bent into a geometric shape. Then this quadrangle is inserted into the niche and screwed to the boxes. This is very convenient, because the toilet has a small area for work. In fact, this rectangle is a shelf, so you need to very carefully calculate all dimensions . If this is very difficult, then you can simply cut the profile and attach it one at a time, and not all at once.
It is not very convenient to attach a pre-assembled shelf to the back wall of the toilet
The rear profile is attached to the wall of the toilet, but the front guide remains loose. The mini-frame is covered with plasterboard from the bottom, top and front. The result is a solid shelf that can support the weight of various toiletries. All shelves are made in the same way.
If you still have questions (how to make a horizontal box, is it possible to lay tiles, etc.), then the answers to them can be gleaned from this video material.
Materials
You should also prepare the materials from which the frame will be assembled.
For a box made of plastic or wood (MDF, OSB, plywood), you will need wooden blocks, and for installing drywall, a special metal profile is produced.
It consists of elements of 2 types - guides and rack profiles (marked with the designations UD and CD). The guide profile is designed for fastening to building structures.
To design corners and joints, you need to purchase corners and other profiles.
Fastening of frame elements and sheet materials is carried out using dowels and self-tapping screws.
Features of assembling a plasterboard box in the bathroom
Any home craftsman who is at least a little familiar with construction tools can assemble a plasterboard box in the bathroom and toilet with his own hands.
The action plan will be like this:
- first of all, remove the old covering from the walls;
- level the walls if necessary; if the curvature is slight, this can be done by gluing drywall to tile adhesive;
- replace plumbing;
- install installation;
- make markings;
- assemble a box from profiles;
- cut and screw drywall;
- perform finishing.
There is not as much work as it might seem at first glance, and you can do it yourself in one day.
Sequencing
Let's take a closer look at how each type of box is assembled:
MDF and plastic
So, we make a box for plastic pipes in the toilet. Having decided on the dimensions of the box, they assemble the frame from the bars. If MDF panels are used, they should be screwed to the frame with self-tapping screws. To design external and internal corners, corner strips are used that will hide the fasteners.
To install PVC panels on the frame, you first need to secure (you can use a construction stapler) a special profile - corner and end strips. The PVC sheet must be inserted into the resulting grooves.
Pipes hidden behind the box
Plastic panels should be cut in such a way that each edge of the box consists of one fragment - this design will be stronger.
In the upper edge of the box, in an arbitrary place, you should make a hole and install a ventilation grille in it.
A small hole should also be drilled at the very bottom of the side edge. Thanks to it, a leak, if one occurs, will be immediately detected.
Drywall
Installation of the frame for the plasterboard box begins with screwing the guide profiles to the wall and floor.
Then transverse ribs made from a rack profile are inserted into them. Both profiles are fastened together with special fasteners - the so-called “crabs”.
You can also use a special tool – a notch – to fasten the frame elements together.
If the edge of the box is not solid, but is assembled from several fragments of plasterboard, the transverse ribs must be located at the place of their joints. Then the joints will need to be taped with paper tape.
Let us remind you that the plasterboard box is non-removable, so hatches must be secured to the frame opposite the valves and meters.
Special varieties are produced, on the doors of which it is convenient to stick tiles - this is in case the box is intended to be finished with this particular material. To prevent hatches from opening spontaneously, they can be equipped with magnets for cabinet doors and sideboards.
Drywall sheets are screwed to the frame with self-tapping screws, the heads of which should be recessed into the material by approximately 1 mm. Don’t forget to cut a ventilation hole on top, after which the walls of the box can be puttied and covered with finishing material - wallpaper or tiles.
Plywood and OSB
The frame, as in the first option, is assembled from wooden blocks, to which the sheet material is screwed with self-tapping screws. Since both plywood and OSB will have to be covered with facing material, this type of box can also be considered non-removable - it is necessary to install hatches.
Closet
The cabinet box is assembled from chipboard or OSB and differs from a regular box only in the presence of doors. You can make them yourself, but it is better to purchase ready-made ones at a furniture store. The ventilation hole, as in the box, is made from the top, but if the cabinet consists of several sections, it is better to arrange individual ventilation for each of them by drilling holes in the doors.
Marking
It is performed directly on the ceiling, floor and walls of the toilet.
Accurate markings are the key to a strong and durable structure
It is done this way:
- there is the most protruding point on the communications, from which they retreat 3-5 cm and mark a line with a pencil;
- then take a laser level and draw a straight line between the ceiling and floor, passing along this mark. If you don’t have a level at hand, you can use a plumb line with a dye thread;
- the same actions are performed on the opposite wall;
- markings around the installation are made with a distance of 5 cm from the frame;
- then the horizontal surfaces are marked, for this we need a corner;
- we place a corner to the wall at the intersection with the floor and draw a line perpendicular to the vertical mark at an angle of 90 degrees;
- We perform the same actions on the other side;
- on the ceiling we do the same;
- draw a parallel line above the installation, level with a deviation of 4 cm.
The marking can be considered completed. We begin to install the metal frame.
Markings applied to walls, floors and ceilings
Price issue
Here are the approximate prices for the main materials for the box:
- sheet of drywall: about 70 rub. per sq. m;
- PVC panels: RUB 120/sq. m;
- metal profile for installation of gypsum boards: guide (3 m) – 52 rubles, rack-mount (3 m) – 68 rubles;
- putty: about 50 rubles/kg (per 1 sq. m of gypsum board surface usually requires 1.3 kg).
Materials for a plasterboard partition with dimensions of 1.5x2.5 m will cost 1,300 rubles.
If you hire a master, you will have to pay an additional 416 rubles. (125 rubles per sq. m).
The task of re-arranging pipes in the bathroom is quite troublesome, but such work can be done independently. Laying out pipes in the bathroom with your own hands - a detailed description of the stages of work.
We will look at which filter for water purification is better to choose in this material.
Frame installation
The sequence of work will be as follows:
- Guide profiles are installed along the contour marked on the ceiling and floor.
- Vertical posts are attached to the walls.
- At the junction of elements on the ceiling and floor, a protruding edge of the box is installed.
- The rigidity of the frame is achieved by installing transverse profiles between the vertical elements. The distance between them should not exceed 30 cm. These crossbars will serve as a place for attaching drywall sheets.
- An inspection window is installed on the plane that will be directed towards the entrance.
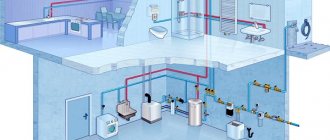
Types of utility wiring
Before designing the wiring, you should become familiar with what types of such structures exist. There are only three of them. Moreover, one, with pass-through sockets, is practically not used. Therefore, we will not consider it.
Type #1. Serial type wiring
To implement this, taps are made from the cold and hot water supply risers leading to the first consumer. Pipes are laid from it to the second and further. Each water collection point is equipped with a tee, to one of the outlets of which the consumer is connected.
Overall this is a very simple scheme. It can only be used where the number of water consumers is small.
This is due to the fact that if several water collection points are activated simultaneously, the pressure in them will weaken and may be insufficient for the correct operation of the equipment. This is the main disadvantage of series wiring.
However, for apartments with one bathroom and a small amount of plumbing used, this may be the best option. A significant drawback of the system is the inability to turn off one of the plumbing fixtures for replacement or repair.
Serial wiring is extremely simple to implement, but not very convenient to use. However, for small bathrooms this solution may be quite acceptable.
There are many more advantages to sequential wiring. First of all, it is simplicity in design and installation. There will be no complex schemes here, everything is done very simply.
In addition, such wiring is considered the most economical option. The consumption of pipes and other elements will be significantly lower than in other systems, and installation costs are also minimal.
Even a novice plumber can handle the design and subsequent installation of sequential, otherwise tee, wiring
Type #2. Collector type of wiring
The collector type scheme involves connecting each of the consumers to the main line. For this, a special element is used, which is called a collector - a device that distributes water flows.
In a more complex version, and this is best, each collector outlet is equipped with a shut-off valve. Collector-type wiring can be considered the most convenient option to use. There are several reasons for this.
Firstly, the absence of pressure drops in the system. All consumers receive equally good water pressure, even if all water points operate simultaneously.
If the pressure in the system of an apartment or private house is too low for some reason, you can temporarily limit the water supply to one of the consumers, for example, to the toilet, thereby increasing the pressure for others.
The collector type of wiring is more convenient to use than the serial type. In this case, a separate line goes to each consumer, which guarantees no problems with pressure. However, such a system turns out to be more complex in design and installation.
Secondly, the ability to disconnect plumbing fixtures from the water supply if they need replacement or repair.
Thirdly, reliability. In fact, a single pipe goes to each consumer, without any connections or other elements. A leak can only appear in the collector area or near the device itself. Here it will be very easy to find. For this reason, pipes with manifold wiring can be safely installed using a hidden method.
Fourthly, ease of use. If there is a problem with a plumbing fixture and a leak appears, for example, at a faucet, you do not need to crawl under the sink. It is enough to close the shut-off valve on the manifold leading to the faulty device and wait for the specialists to arrive.
Even a woman or child unfamiliar with plumbing can do this. At the same time, all other equipment will work properly.
Professionals recommend using manifolds with shut-off valves for installation in water supply systems. With their help, if necessary, you can easily stop the water supply to a branch or plumbing fixture in need of repair.
However, collector wiring also has some disadvantages. First of all, it will cost the owner more than a sequential circuit. This is due to the fact that it will be necessary to lay a branch to each consumer. This will take a lot more material.
In addition, the installation of manifolds and shut-off valves will be required if the distributors are not equipped with them. And the circuit itself will be much more complicated than a sequential one.
Conclusion
As for other box options, you can safely proceed by analogy, there are no special secrets there. In addition, you can watch the video in this article, which contains a lot of information regarding apartment renovation. And it’s time for me to start laying the tiles, which I, of course, will talk about a little later.
Did you like the article? Subscribe to our Yandex.Zen channel
August 1, 2021
Design, Bathroom and toilet design
If you want to express gratitude, add a clarification or objection, or ask the author something, add a comment or say thank you!
Roller shutters
If the bathroom is small, then additional structures for hiding pipes and a riser in the toilet will take up useful space. Roller shutters do not require much space and open compactly, so it is worth considering this camouflage option. They are blinds that rise and fall using a shaft and a special design. They are made from:
- wood;
- aluminum;
- plastic.
Plastic roller shutters are considered the most profitable option. They are inexpensive, waterproof, and have a neat and attractive appearance. Roller shutters are mounted on top of the cabinet wall or built inside an opening with pipes.
When inserting, the roller shutter box can be left outside or hidden inside. The second method is preferable, because the box located inside the cabinet will not clutter up the appearance of the bathroom.
Finishing the box
Putty and finishing, which are carried out in a certain sequence, will help give the pipe box in the toilet a finished look:
- The first step is to process the joints of the mounted structure. To do this, they are first primed and then sealed with starting or special putty using reinforcing tape - paper or sickle tape.
- After the joints have dried, a layer of primer is applied to the plane of the box.
- The edges of the box are decorated with a plastic or metal corner, which is glued to a thin layer of putty, and then covered with a putty mixture. After drying, the corners are carefully sanded.
- The entire surface of the structure is covered with putty in several layers, each time you need to wait for the material to dry completely.
- The dried surface is rubbed and polished.
To finish the box, tiles, wallpaper, and water-based paint can be used. The main thing is that the style of finishing the box is in harmony with the rest of the renovation in the toilet.